
Link to product (MT4): https://www.mql5.com/en/market/product/44395
Link to product (MT5): https://www.mql5.com/en/market/product/80538
Explanation video: https://www.youtube.com/watch?v=PvdGyoVmOp4
Contents
A. Main Settings
B. RSI Filter
C. ADX Filter
D. Price Action Filter
E. Order Management
F. Dynamic Take Profit
G. Recovery Mode
H. Miscellaneous
A. Main Settings
| =========Main Settings========= | Default value |
| [A1] RSI - Period | 14 |
| [A2] Sell Peak - Above this RSI level | 75 |
| [A3] Buy Peak - Below this RSI level | 25 |
| [A4] Sell Entry - Above this RSI level | 65 |
| [A5] Buy Entry - Below this RSI level | 35 |
| [A6] Buffer bars between peak RSI and entry | 100 |
| [A7] Active bars for peak RSI | 1000 |
| [A8] Min price diff between peak RSI and entry | 50 |
| [A9] Max price diff between peak RSI and entry | 5000 |
| [A10] Pause after closed trade | 100 |
| [A11] Check that entry is highest or lowest close | FALSE |
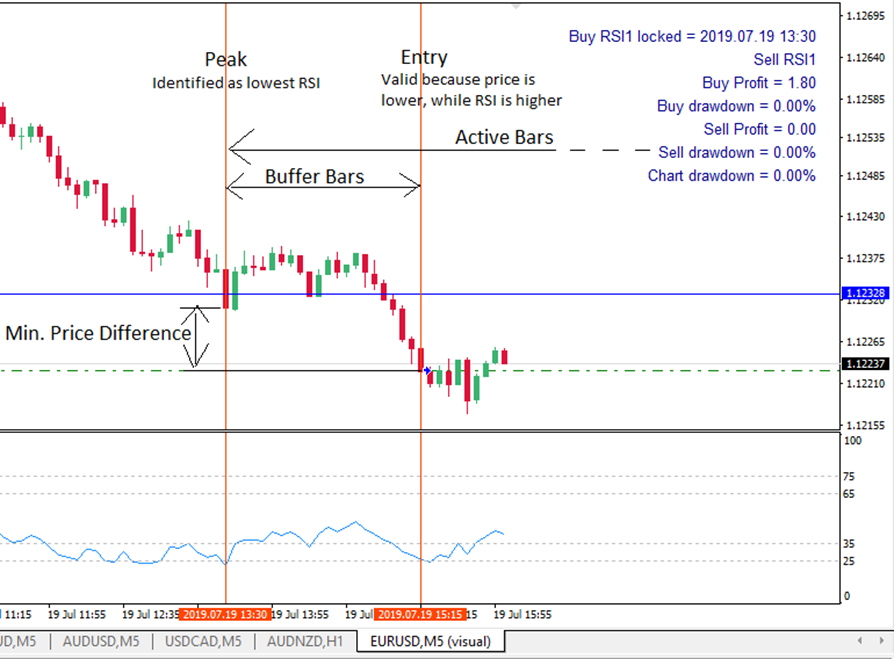
The variables in this section define what qualifies as a divergence.
[A1] RSI - Period -> Period used for RSI
[A2] Sell Peak - Above this RSI level -> Minimum RSI value, that needs to be exceeded, for the EA to start looking for entries. When the EA finds a bar that closed with an RSI value above this level, it will remember it as reference and monitor to see if a divergence appears. When a valid bar is found, a message is displayed on the chart: “Sell RSI1 locked = date & time”.
[A3] Buy Peak - Below this RSI level -> Same as variable [A2], but for buys
[A4] Sell Entry - Above this RSI level -> Variables A2 & A3 are used to define the peak, while variables A4 & A5 are used to define the entry bar. This is the minimum RSI value, that needs to be exceeded, for the EA to actually enter the trade. By comparing the price and RSI at Peak (see variable A2 & A3 above) and price and RSI at entry, it will determine if it is a divergence or not.
[A5] Buy Entry - Below this RSI level -> Same as variable [A2], but for buys.
[A6] Buffer bars between peak RSI and entry -> The EA will wait this number of bars before it considers to enter a trade. This variable was placed because sometimes the EA finds a peak, but shortly after a lower/higher RSI appears. With buffer bars, it waits to make sure this situation is avoided.
[A7] Active bars for peak RSI -> A valid peak is valid for this number of bars.
[A8] Min price diff between peak RSI and entry -> The lower low/higher high must be at least this many points away from peak RSI.
[A10] Pause after closed trade -> Wait this number of bars before it can trade again. Filter applies only to the type of trade closed (for example, if a buy closed, it will wait 20 bars before a new buy can be opened).
[A11] Check that entry is highest or lowest close -> If turned ON, it will check that the entry bar (last bar) is the lowest or highest close between peak and now.
Example trade:
B. RSI Filter
| =========RSI Filter========= | Default value |
| [B1] Counter Signal Strategy | Off |
| [B2] Counter Signal - Period | 14 |
| [B3] Counter Signal - Top level | 85 |
| [B4] Counter Signal - Bottom level | 15 |
| [B5] Reset peak at strong RSI | FALSE |
[B1] Counter Signal Strategy -> Options: Off / Cancel at counter signal / Confirm with counter signal
- Off: This turns off the counter signal strategy. Therefor, this variable and the next 3 variables (B2, B3 & B4) will be ignored if set to OFF
- Cancel at counter signal: When the price is going down, the EA would look for a divergence to enter a buy. If between the RSI peak and the possible entry, the RSI goes above the value at [B3], the RSI peak is canceled
- Confirm with counter signal: As an example, a RSI peak for a buy is valid only if it then goes above [B3]
Example for “confirm with counter signal”:
This sell was made possible because RSI went below [B4] (=15), between peak and entry. If the strategy was set to “cancel with counter signal”, the EA would have ignored this divergence.
[B2] Counter Signal - Period
[B3] Counter Signal - Top level
[B4] Counter Signal - Bottom level
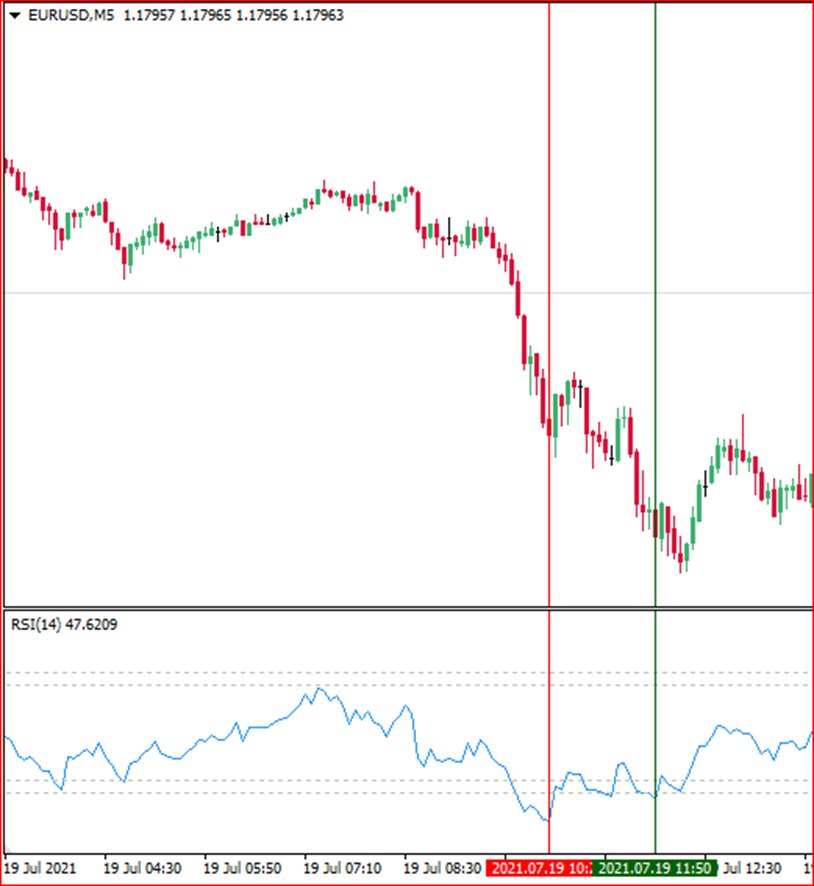
[B5] Reset peak at strong RSI -> The peak used as reference will not necessarily be the extreme RSI value, but the lowest/highest close where RSI is still oversold/overbought. It is easier to explain with an example
For a buy: When Reset = OFF, peak is the lowest RSI in the past number of bars (define by the variable [A7] Active Bars). When Reset = ON, peak is the bar with the lowest price close, that has RSI < variable "[A3] Buy Peak" (With Reset ON, the peak will be set to the green line, because that is the lowest bar with RSI < 25)
This idea is useful in cases of strong trend because the lowest RSI is maybe at the beginning, but price just keeps going down and down
C. ADX Filter
| =========ADX Filter========= | Default value |
| [C1] ADX Filter | On |
| [C2] ADX - Timeframe | Current |
| [C3] ADX - Period | 14 |
| [C4] ADX - Min ADX at peak | 25 |
| [C5] ADX - Max ADX at peak | 50 |
| [C6] ADX - Lower ADX at entry vs peak (<peak*factor) | 0.75 |
| [C7] ADX - Lower opposing DI at entry vs peak | Off |
| [C8] ADX - Higher compatible DI at entry vs peak | Off |
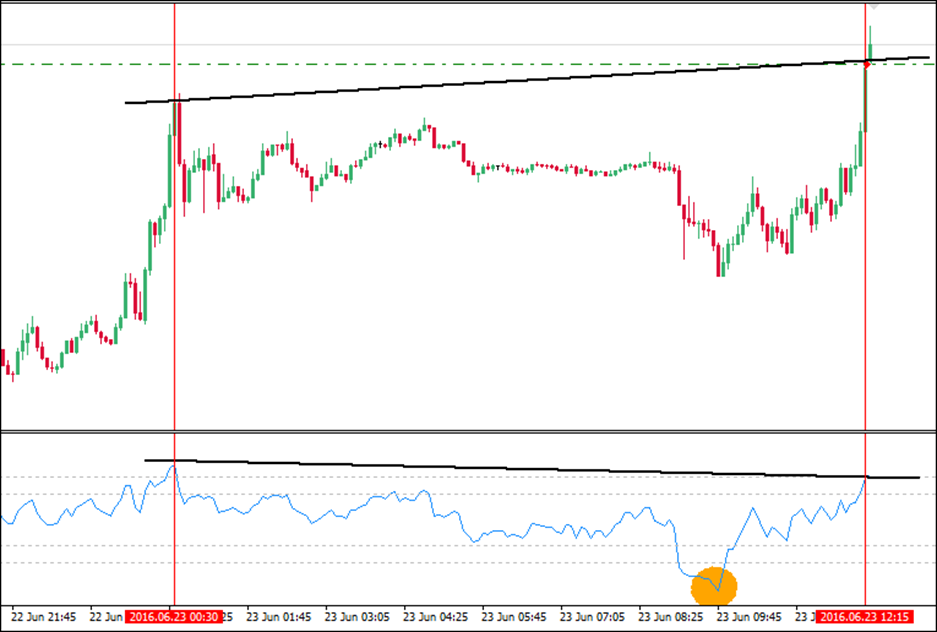
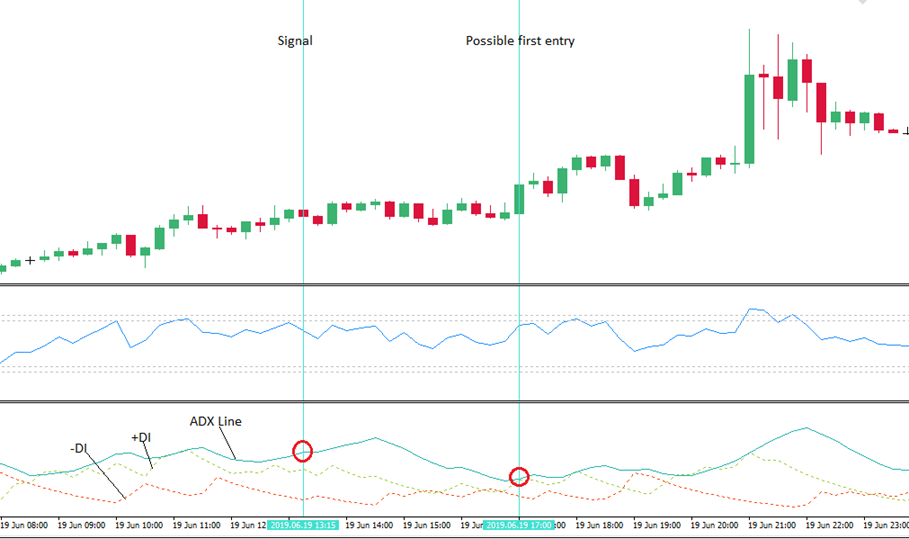
The ADX Trend Filter is designed to help ignore non trends or very strong trends. When turned on, for all the 7 variables (C2 - C8), the EA uses [C2] ADX - Timeframe and [C3] ADX - Period set here. If you are trading on a smaller timeframe than ADX-Timeframe, it will check the last closed bar for ADX values.
[C4] ADX - Min ADX at peak and [C5] ADX - Max ADX at peak -> If the EA identifies an overbought/oversold RSI value, it should also check the ADX value and allow the peak to remain only if ADX is between Min and Max.
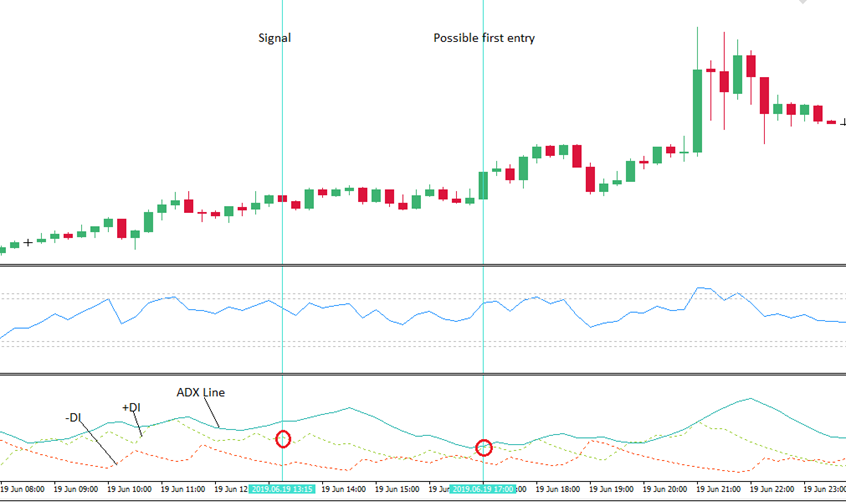
[C6] ADX - Lower ADX at entry vs peak (<peak*factor) -> Checks if the ADX at time of first trade is lower than the ADX at RSI peak. If ADX is now lower than at signal time, a trade can be opened. If not, no trade. Performed calculation: ADX@peak * [C6] < ADX@entry. By default, the factor is 0.75, so the ADX at entry should be at least 25% smaller. Screenshot (red circle):
[C7] ADX - Lower opposing DI at entry vs peak -> Checks before opening a trade if the opposing DI is lower than what it was at the peak time. A lower opposite DI signals that the bulls/bears are losing power. For example, for a buy, -DI should be lower at trade entry than it was at RSI1 signal. For a sell, +DI should be lower. Screenshot (red circle) - it was looking for sells, +DI was lower, which is good:
[C8] ADX - Higher compatible DI at entry vs peak -> Checks before opening a trade if the compatible DI is higher at trade entry versus what it was at signal time. A higher DI would signal that the bulls/bears are stepping in. For example, for a buy, +DI is higher now than what it was at the time of the signal. Screenshot - it was looking for sells, -DI is higher:

D. Price Action Filter
| =========Price Action Filter========= | |
| [D1] PA Filter | Off |
| [D2] Peak - Number of travel bars | 16 |
| [D3] Peak - Min travel pts | 0 |
| [D4] Peak - Max travel pts | 1000 |
| [D5] Peak - Number of trend bars | 500 |
| [D6] Peak - Top percent for sells | 20 |
| [D7] Peak - Bottom percent for buys | 20 |
| [D8] Entry - Number Of travel bars | 8 |
| [D9] Entry - Less travel entry vs at peak (<peak*factor) | 2 |
| [D10] Min bounce pts | 0 |
[D1] PA Filter -> General On\Off switch for the whole set of variables.
[D2] Peak - Number of travel bars
[D3] Peak - Min travel pts
[D4] Peak - Max travel pts
These 3 parameters relate to the RSI peak and checks the following: how many points were travelled in the last X bars for the RSI to reach an oversold/overbought peak. The reason: sometimes RSI reaches oversold and it just travelled 100 points in the last 6 hours. Here is a visual example, where number of travel bars = 100, Min travel = 300, Max travel = 4000:

What EA checks: In the last 100 bars, is the difference between lowest and highest close larger than 300 points, but smaller than 4000 points?
[D5] Peak - Number of trend bars
[D6] Peak - Top percent for sells
[D7] Peak - Bottom percent for buys
These 3 parameters check if you are buying low and selling high. Using the default settings above (500, 20, 20) , here is an example: It remembers the lowest and highest close in the last 500 bars and opens buy only if the peak RSI is in the bottom 20% of this range (so only if the oversold happened at a low place).
[D8] Entry - Number of travel bars -> Number of bars to be analyzed
[D9] Entry - Less travel entry vs at peak (<peak*factor) -> Compares the the number of points traveled now, versus before peak. So, for example, using the default settings (8, 2), it compares the last 8 bars before entry and the last 8 bars before the peak. The price traveled before entry should be less then Travel before peak * [D9].
[D10] Min bounce pts -> The EA can consider an entry only when this condition is fulfiled. Logic for buy:
- After peak is found
- It finds lowest close after RSI1 locked bar
- It finds highest high, after lowest close bar
- Calculate highest minus lowest. If this is above Min Bounce, this condition can be set to true. The condition will be reset when a new peak is found.
Below, the orange lines are the bounces. At least one of them must be larger than Min Bounce

E. Order Management
| =========Order Management========= | Default value |
| [E1] AutoLot | TRUE |
| [E2] AutoLot size | 1000 |
| [E3] Initial lot size | 0.02 |
| [E4] Lot size multiplier | 1 |
| [E5] MaxLot | 1 |
| [E6] Grid type | At fixed distance |
| [E7] Min order distance pts | 750 |
| [E8] Order distance multiplier | 1.2 |
| [E9] Max orders | 6 |
| [E10] TP type | 0 |
| [E11] Fixed TP points | 150 |
| [E12] Virtual SL type | 3 |
| [E13] Fixed SL at | -200 |
| [E14] Activate trailing SL at | 100 |
| [E15] Trail SL by pts | 50 |
[E1] AutoLot
[E2] AutoLot size
[E3] Initial lot size
If AutoLot is set TRUE, the EA will calculate lot size like this: Balance / AutoLot Size * Initial Lot Size.
In other words, considering the settings above, for every 1000 USD in the balance, the EA will allocate 0.02 lot size. A 5.000 USD account will have 0.10 lot positions. A 7.000 USD account will have 0.14 lot size etc.
If AutoLot is set to FALSE, the EA will always use Initial Lot Size as the lot size.
[E4] Lot size multiplier -> Since the EA can be used as a grid robot, you can decide to increase lot size with each new order for the same basket (Basket = the situation where price goes in the opposite direction where you want it and new orders are opened to have a better average entry price). I don’t use this function because I found it’s not very efficient and also dangerous, but you can use it at your own risk.
[E5] MaxLot -> Although AutoLot and the multiplier can increase lot size, this will be the maximum allowed lot size.
[E6] Grid type
- At Bar Close: checks only after the bar closed if it should open a new order for the basket.
- At Fixed Distance: opens new order for the basket when it reaches the distance of Min Distance Points
[E7] Min order distance pts -> The minimum distance between two orders. This is used for the grid function.
[E8] Order distance multiplier -> Allows you to increase the distance between orders. For example, using the default settings above, the second order opens at minimum 100 points distance, then 120, then 144 etc. The idea behind this was that so not all orders are clustered too close together if the entry was bad.
[E9] Max orders -> Total number of orders in a basket.
[E10] TP type
- Fixed virtual TP: Take Profit is at a certain number of points from the average entry.
- Fixed real TP: Same as the virtual TP, but the TP is added to each trade. The advantage is that now even if you close the EA, the TP will still be stored in the trade
- At bar close > virtual TP: TP is checked after the last bar closes. This technique will give you more profit, but it is a little risky in case there is only a spike to your TP level and then price moves away.
- Dynamic - at DTP-RSI1: Take Profit is determined by “Dynamic Take Profit”. There is a section below for Dynamic Take Profit. What this does is that it closes the position when RSI reaches DTP-RSI1 Level. The idea was, that if it entered on an RSI divergence, it could also exit based on RSI. With this option, it would close a buy when the RSI is greater than what you set at DTP - RSI 1 Up Level. And it would close a sell when it is below DTP - RSI 1 Down Level
[E11] Fixed TP Points -> If Virtual TP Type is “Fixed virtual TP” or “Fixed real TP”, this would be the take profit level, in points.
[E12] Virtual SL Type
- Fixed SL: The SL is set when the trade is opened. SL is calculated from first trade. Also see variable [E13]
- Trailing SL: SL is activated after trade is already in profit with [E14] points and will follow the price. If you have a buy, for example, the SL will move up, if the price goes up and you are more in profit. The trailing SL only moves in the direction of more profit.
- Fixed at first, trailing after: Unlike the trailing SL which is activated only after you are already in profit, this type of SL is set from trade open. After a certain number of points, it turns into a trailing SL
- None: No SL
[E13] Fixed SL at -> Number of points from first trade entry, where the SL is placed. Put the SL as a negative number. So, if you want a stop loss when you are 200 points in loss, set this variable to -200.
[E14] Activate trailing SL at -> In case you have a trailing SL, it will be activated after you are already this number of points in profit. Since we are talking about profit, set it as a positive number. So, if you want a trailing stop loss when you are 150 points in profit, set this variable to 150.
[E15] Trail SL By Pts -> In case the SL is trailing, trail by this many points.
F. Dynamic Take Profit
| =========Dynamic Take Profit========= | Default value |
| [F1] DTP - Timeframe | 5 |
| [F2] DTP - RSI period | 7 |
| [F3] DTP - RSI 1 top level | 75 |
| [F4] DTP - RSI 1 bottom level | 25 |
| [F5] Allow DTP close | 0 |
The Dynamic Take Profit is a way to exit the trades based on the RSI value of the last bar closed. The settings below will become activated only if you select [E10] TP type = Dynamic - at DTP-RSI1.
[F1] DTP - Timeframe -> Timeframe to be used when using the dynamic take profit.
[F2] DTP - RSI period -> Time period for the dynamic take profit.
[F3] DTP - RSI 1 top level -> RSI level at which it will close buy trades.
[F4] DTP - RSI 1 bottom level -> RSI level at which it will close sell trades.
[F5] Allow DTP close
- Immediately: with this option, the trades will be closed as soon as the conditions are met (RSI of the last bar was above [F3] for buys, or below [F4] for sells)
- Only when in profit: with this option, the trades will only be closed if they are also in profit.
G. Recovery Mode
| =========Recovery Mode========= | Default value |
| [G1] Drawdown percent to start recovery | 7 |
| [G2] Drawdown percent for next recovery cycle | 99 |
| [G3] Close percent to exit lock | 50 |
| [G4] Min recovery order distance | 1500 |
[G1] Drawdown percent to start recovery -> The EA is fitted with a recovery logic. In case the trades on this chart, opened by the EA are at this level of drawdown (%), it will open a counter trade in the equal amount. For example, if you have 3 buys, each of 0.20 lots in drawdown, it will open a 0.60 lot sell to stop the drawdown. Recovery only checks and manages EA trades, based on magic number (ignore manual trades or other EAs).
[G2] Drawdown percent for next recovery cycle -> The locked trades will be unlocked at some point (see variable [G3]). However, if the price still moves against your trades and you have more drawdown, you can select when they should be locked again. For example, if this variable is set at 99, it means there will be only 1 recovery cycle. If this variable will be set at 20, the first recovery cycle is at 7%, but the second is at 27% drawdown, the third is at 47% etc.
[G3] Close percent to exit lock -> Trades are unlocked when the profit from one side of the trades can close [G3] percent of the other trades. For example, you have 3 buys of 0.20 lot locked with 1 sell of 0.60 lot: if the sell is in profit and can close 0.30 lot of the buys, it will do so. After the trades are unlocked, they receive the old TP line. New trades in the basked are opened at a distance of [G4], instead of [E7].
[G4] Min recovery order distance -> Distance between the trades, after the first recovery cycle is closed. The reason for this is to allow more control on how the EA should open trades in the basked in case the price is going against you.
H. Miscellaneous
| =========Miscellaneous========= | Default value |
| [H1] Trade comment | RSI Divergence Trader PRO 1.65 |
| [H2] Max spread | 50 |
| [H3] Max pairs | 2 |
| [H4] Start hour | 1 |
| [H5] End hour | 23 |
| [H6] Magic number | 1001 |
| [H7] Text color | Blue |
| [H8] Show closed trades on chart | TRUE |
| [H9] Show on-screen buttons | TRUE |
| [H10] USA compliance (no sells & buys at the same time) | FALSE |
| [H11] No trade - notifications only | FALSE |
| [H12] Place order (pts from entry bar / 0=Off) | 100 |
[H1] Trade comment -> Trade comment to be added to trades opened by this EA.
[H2] Max spread -> The spread (difference between buy and sell price, offered by your broker) must be below this number. This is to avoid opening trades when spread is too high, to minimize risk. Variable is checked only before opening the first trade in the basket.
[H3] Max pairs -> Maximum number of pairs traded at the same time. This is to avoid too much exposure. It will check what other trades are opened on your account.
[H4] Start hour -> With this variable you can define a certain time when trading is allowed or not. This can help you in case you want to monitor your trades or in case you want to avoid trading right after midnight, when there can be gaps in the price.
[H5] End hour -> Same as variable [H4], trades will open before this hour.
[H6] Magic number -> Number assigned to each trade. The EA knows which trade to monitor based on this number, so make sure you don’t use the same magic number as other EAs you might have on your account. You can set magic number to 0 in case you want to use the EA to manage your manual trades.
[H7] Text color -> Text color used on the on-screen text.
[H8] Show closed trades on chart -> The EA automatically adds your closed trades on the chart, so you can review them if you wish.
[H9] Show on-screen buttons -> On screen buttons to close all the trades at once. It will close only trades based on the magic number.
[H10] USA compliance (no sells & buys at the same time) -> For USA customers, turn this on in case your broker does not allow to have sells and buys on the same pair, at the same time. This effectively disables the recovery feature.
[H11] No trade - notifications only -> Use this in case you only want to receive a notification on your phone when a divergence is found. The EA will send an alert to MetaTrader, which forwards it to your phone. Also check Tools -> Options -> Notifications to make sure that notifications are activated and sent correctly.
[H12] Place order (pts from entry bar / 0=Off) -> With this option, the EA will not open trades directly when all conditions are met, but instead it will place an order [H12] points away from the last bar when conditions were met. So, for example, if it finds a buy divergence and you set [H12] at 100, it will actually open the buy only when price closes 100 points up from the divergence bar. This makes the EA safer because you are not jumping into a buy too fast, you are waiting for price to confirm that it changed direction. The pending order is valid for the same amount as [A7] bars from RSI peak.


")