
MQL5으로 거래용 능동 제어판 만들기
들어가며
효율성은 직업 사회에서는 매우 중요한데, 이는 속도와 정확성이 특히나 중시되는 트레이더 일에서 부각됩니다. 업무용 터미널을 준비하면서 분석 내용을 구현하고 하루빨리 시장에 진입하기 위해 각자 자신의 업무 공간을 최대한 편안하게 만듭니다. 그러나 이 문제의 현실은 개발자들이 항상 모든 사람들을 만족시킬 수는 없고 특정한 기능들을 자신이 원하는대로 맞추는 것은 불가능하다는 것이다.
예를 들어, 매매자의 경우, "New Order" 키를 누를때의 시간이 초단위로 중요하며, 모든 패러미터의 후속 설정이 시간적으로 중요할 수 있습니다.
그러면 어떻게 솔루션을 찾는가? MetaTrader 5는 "Button", "Edit" 그리고 "Label" 같은 환상적인 요소를 제공하기에 해법은 요소의 커스텀화에 달려있습니다. 해봅시다.
2. 판 옵션
먼저 판에 어떤 타입의 기능이 중요한지 판별하겠습니다. 패널을 이용하여 거래하는 것에 방점을 찍을 것이며, 다음과 같은 기능도 포함됩니다:
- 포지션 오픈
- 보류 주문 배치
- 포지션/주문 변경
- 포지션 청산
- 보류 주문 삭제
또한 색 구성표 패널, 글꼴 크기 및 저장 설정을 사용자 지정할 수 있는 기능을 추가해도 문제 없습니다. 미래 패널의 모든 요소에 대해 좀 더 자세히 설명하겠습니다. 각 패널 기능에 대한 객체 이름, 개체 유형 및 용도에 대한 설명을 명시합니다. 각 객체의 이름은 "ActP"로 시작합니다. 이는 해당 객체가 패널에 속해 있음을 나타내는 일종의 키가 됩니다.
2.1. 오픈 포지션
아래에서는 포지션 오픈에 필요한 모든 패러미터에 대하여 소개할 것이며, 버튼을 클릭하는걸로 이를 구현해볼 것입니다. 상자에 체크 표시를 하면 활성화되는 보조 라인은 손절 및 이익 실현 수준을 설정하는 데 도움이 됩니다. 실행 타입 선택은 옵션 버튼을 사용하여 처리됩니다.
| 이름 | 타입 | 설명 |
|---|---|---|
| ActP_buy_button1 | 버튼 | 매수 거래용 버튼 |
| ActP_sell_button1 | 버튼 | 매도 거래용 버튼 |
| ActP_DealLines_check1 | 플래그 | 보조 라인의 플래그 설정/초기화 |
| ActP_Exe_radio1 | 옵션 버튼 | 거래 타입을 선택하기 위한 옵션 버튼 그룹 |
| ActP_SL_edit1 | 입력 필드 | 손절 입력용 필드 |
| ActP_TP_edit1 | 입력 필드 | 이익 실현 입력용 필드 |
| ActP_Lots_edit1 | 입력 필드 | 수량 입력용 필드 |
| ActP_dev_edit1 | 입력 필드 | 오픈 중에 허용 가능한 편차를 입력하는 필드 |
| ActP_mag_edit1 | 입력 필드 | 숫자 입력용 필드 |
| ActP_comm_edit1 | 입력 필드 | 코멘트 입력용 필드 |
1번 테이블 "거래 오픈" 패널 요소 목록
2.2 보류 주문 주문하기
아래에서는 보류 중인 주문을 주문하는 데 필요한 모든 패러미터에 대해 안내하고, 키를 눌러 배치할 것입니다. 플래그를 체크하여 활성화되는 지원 라인은 손절, 이익 실현, 역지정 수준 및 만료 시간을 설정하도록 도와줍니다. 실행 타입 및 만료 시간 타입 선택은 옵션 버튼 그룹의 도움을 받아 수행됩니다.
| 이름 | 타입 | 설명 |
|---|---|---|
| ActP_buy_button2 | 버튼 | 매수 주문용 버튼 |
| ActP_sell_button2 | 버튼 | 매도 주문용 버튼 |
| ActP_DealLines_check2 | 플래그 | 보조라인 설정/초기화용 플래그 |
| ActP_lim_check2 | 플래그 | 주문 손절 설정/초기화용 플래그 |
| ActP_Exe_radio2 | 옵션 버튼 | 주문 실행 타입 선택용 옵션 버튼 그룹 |
| ActP_exp_radio2 | 옵션 버튼 | 주문 만료 타입 선택용 옵션 버튼 그룹 |
| ActP_SL_edit2 | 입력 필드 | 손절 입력용 필드 |
| ActP_TP_edit2 | 입력 필드 | 이익 실현 입력용 필드 |
| ActP_Lots_edit2 | 입력 필드 | 수량 입력용 필드 |
| ActP_limpr_edit2 | 입력 필드 | 역지정 주문 단가 설정용 필드 |
| ActP_mag_edit2 | 입력 필드 | 매직넘버 입력용 필드 |
| ActP_comm_edit2 | 입력 필드 | 코멘트용 필드 |
| ActP_exp_edit2 | 입력 필드 | 만료 시간 입력용 필드 |
| ActP_Pr_edit2 | 입력 필드 | 주문 실행 단가 입력용 필드 |
2번 테이블 "보류 주문 실행하기" 패널 요소 목록
2.3. 거래 변경 / 청산
이하에서는 거래의 변경 및 청산에 필요한 모든 패러미터를 소개합니다. 상자에 체크 표시를 하면 활성화되는 보조 라인은 손절 및 이익 실현 수준을 설정하는 데 도움이 됩니다. 드롭다운 목록에서 거래 선택 항목이 생성됩니다.
| 이름 | 타입 | 설명 |
|---|---|---|
| ActP_ord_button5 | 드롭다운 목록 | 거래용 선택 목록 |
| ActP_mod_button4 | 버튼 | 거래 변경 버튼 |
| ActP_del_button4 | 버튼 | 거래 청산 버튼 |
| ActP_DealLines_check4 | 플래그 | 보조 라인 설정/초기화 플래그 |
| ActP_SL_edit4 | 입력 필드 | 손절 입력용 필드 |
| ActP_TP_edit4 | 입력 필드 | 이익 실현 입력용 필드 |
| ActP_Lots_edit4 | 입력 필드 | 수량 입력용 필드 |
| ActP_dev_edit4 | 입력 필드 | 허용가능 편차 입력용 필드 |
| ActP_mag_edit4 | 입력 필드 | 매직 넘버 표시 필드 (읽기 전용) |
| ActP_Pr_edit4 | 입력 필드 | 시작가 표시 필드 (읽기 전용) |
3번 테이블 "거래 변경 / 청산" 패널 요소 목록
2.4. 주문 변경 / 제거
아래에서는 보류 중인 주문을 변경하거나 제거하는 데 필요한 모든 패러미터를 소개합니다. 박스에 체크하면 활성화되는 지원 라인은 매도, 매수, 역지정 레벨 및 만료 시간을 설정하도록 돕습니다. 옵션 버튼 그룹에서 만료시간의 타입을 선택할 수 있게 되고. 드롭다운 목록에서 주문 선택이 생성됩니다.
| 이름 | 타입 | 설명 |
|---|---|---|
| ActP_ord_button5 | 드롭다운 목록 | 주문 선택용 리스트 |
| ActP_mod_button3 | 버튼 | 주문 변경 버튼 |
| ActP_del_button3 | 버튼 | 주문 제거 버튼 |
| ActP_DealLines_check3 | 플래그 | 보조 라인 설정/초기화 플래그 |
| ActP_exp_radio3 | 옵션 버튼 | 주문 만료 타입 선택용 옵션 버튼 |
| ActP_SL_edit3 | 입력 필드 | 손절 입력용 필드 |
| ActP_TP_edit3 | 입력 필드 | 매수 입력용 필드 |
| ActP_Lots_edit3 | 입력 필드 | 볼륨 표시용 필드 (읽기 전용) |
| ActP_limpr_edit3 | 입력 필드 | 역지정 주문가 입력 필드 |
| ActP_mag_edit3 | 입력 필드 | 매직 넘버 표시용 필드 (읽기 전용) |
| ActP_comm_edit3 | 입력 필드 | 코멘트용 필드 |
| ActP_exp_edit3 | 입력 필드 | 만료 시간 입력용 필드 |
| ActP_Pr_edit3 | 입력 필드 | 주문 실행가 입력용 필드 |
| ActP_ticket_edit3 | 입력 필드 | 주문 티켓 표시용 필드 (읽기 전용) |
4번 테이블. "주문 변경 / 제거" 패널 요소 목록
2.5 세팅
아래 드롭다운 목록에서 단추, 레이블 및 텍스트 색상을 선택하고 여러 글꼴 크기를 설정하겠습니다.
| 이름 | 타입 | 설명 |
|---|---|---|
| ActP_col1_button6 | 드롭다운 목록 | 버튼 색상 선택용 리스트 |
| ActP_col2_button6 | 드롭다운 목록 | 태그용 색상 선택 리스트 |
| ActP_col3_button6 | 드롭다운 목록 | 문자열 색상 선택용 리스트 |
| ActP_font_edit6 | 입력 필드 | 문자열 크기 설정용 필드 |
5번 테이블 "설정" 패널 요소 목록
패널을 사용하지 않을 경우 패널을 최소화할 수 있는 버튼도 추가됩니다. "지원 라인"과 같은 기구가 있는 것을 보셨을 수도 있습니다. 저것들은 뭐고 어떤 때에 쓸까요? 라인을 사용할 때 마우스를 사용하여 해당 라인을 원하는 가격/시간으로 끌기만 하면 손절, 이익 실현, 보류 중인 주문의 목표 가격, 역지정 주문(수평 라인)의 가격 및 보류 주문의 만료 시간(수직 라인)을 설정할 수 있습니다.
무엇보다 시각적 설치는 텍스트 설치(가격/시간을 해당 필드에 수동으로 입력하는 것)보다 더 편리합니다. 또한 이 선은 선택한 주문의 패러미터를 "강조 표시"하는 역할을 합니다. 주문이 많을 수 있기 때문에 보통 가격을 표시하는 표준 단말기 음영선이 매우 혼란스러워질 수 습니다.
3. 인터페이스 생성의 보편적 어프로치
지금까지 우리의 목표인 일종의 그래픽 어시스턴트를 만드는 것에 대해 알아보았습니다. 이 목적을 달성하기 위해서는 우리는 유저 친화적 인터페이스가 필요합니다. 첫째, 모든 제어 요소(아마 아주 많을)는 소프트웨어를 사용하여 생성되어야 하므로 물체의 위치와 크기를 미리 계산해야 한다는 점을 잊지 말아야 합니다.
자, 우리가 길고 지루하고 힘든 시간을 보냈다고 상상해보세요. 물체의 좌표를 만들고, 그것들이 서로 겹쳐지지 않도록 하고, 선명하게 보이도록 말이죠. 그리고 새로운 물체를 추가할 필요가 있고, 우리의 모든 계획은 지금 다시 세워져야 합니다!
신속한 애플리케이션 개발 환경(Rapid Application Development environment, Delphi, C + + Builder 등)에 익숙한 사용자는 복잡한 사용자 인터페이스라고해도 얼마나 빨리 생성될 수 있는지 알고 있습니다.
이를 MQL5를 통해 구현해보도록 하지요. 첫째, 마우스를 사용하여 가장 적절한 방법으로 제어 대상을 찾고 크기를 조정합니다. 그런 다음 차트에 있는 모든 객체의 속성을 읽고 파일에 기록하는 간단한 스크립트를 작성하고, 필요한 경우 해당 속성을 쉽게 검색하고 모든 차트에서 해당 객체를 완전히 재구성할 수 있습니다.
스크립트 내 코드는 이것 처럼 보일 겁니다:
//+------------------------------------------------------------------+
//|                                  Component properties writer.mq5 |
//|                        Copyright 2010, MetaQuotes Software Corp. |
//|                                              http://www.mql5.com |
//+------------------------------------------------------------------+
#property copyright "Copyright 2010, MetaQuotes Software Corp."
#property link      "http://www.mql5.com"
#property version   "1.00"
#property script_show_inputs

input int interfaceID=1; //input parameter - the identifier of the stored interface
//+------------------------------------------------------------------+
//| Script program start function                                    |
//+------------------------------------------------------------------+
void OnStart()
  {
//---
   //Open file for writing
   int handle=FileOpen("Active_Panel_scheme_"+IntegerToString(interfaceID)+".bin", FILE_WRITE|FILE_BIN);
   if(handle!=INVALID_HANDLE)
     {
      //We will go all the objects on the chart
      for(int i=0;i<ObjectsTotal(0);i++)
        {
         string name=ObjectName(0,i);
         //And write their properties in the file
         FileWriteString(handle,name,100);
         FileWriteInteger(handle,ObjectGetInteger(0,name,OBJPROP_TYPE));

         FileWriteInteger(handle,ObjectGetInteger(0,name,OBJPROP_XDISTANCE));
         FileWriteInteger(handle,ObjectGetInteger(0,name,OBJPROP_YDISTANCE));
         FileWriteInteger(handle,ObjectGetInteger(0,name,OBJPROP_XSIZE));
         FileWriteInteger(handle,ObjectGetInteger(0,name,OBJPROP_YSIZE));
         FileWriteInteger(handle,ObjectGetInteger(0,name,OBJPROP_COLOR));
         FileWriteInteger(handle,ObjectGetInteger(0,name,OBJPROP_STYLE));
         FileWriteInteger(handle,ObjectGetInteger(0,name,OBJPROP_WIDTH));
         FileWriteInteger(handle,ObjectGetInteger(0,name,OBJPROP_BACK));
         FileWriteInteger(handle,ObjectGetInteger(0,name,OBJPROP_SELECTED));
         FileWriteInteger(handle,ObjectGetInteger(0,name,OBJPROP_SELECTABLE));
         FileWriteInteger(handle,ObjectGetInteger(0,name,OBJPROP_READONLY));
         FileWriteInteger(handle,ObjectGetInteger(0,name,OBJPROP_FONTSIZE));
         FileWriteInteger(handle,ObjectGetInteger(0,name,OBJPROP_STATE));
         FileWriteInteger(handle,ObjectGetInteger(0,name,OBJPROP_BGCOLOR));

         FileWriteString(handle,ObjectGetString(0,name,OBJPROP_TEXT),100);
         FileWriteString(handle,ObjectGetString(0,name,OBJPROP_FONT),100);
         FileWriteString(handle,ObjectGetString(0,name,OBJPROP_BMPFILE,0),100);
         FileWriteString(handle,ObjectGetString(0,name,OBJPROP_BMPFILE,1),100);

         FileWriteDouble(handle,ObjectGetDouble(0,name,OBJPROP_PRICE));
        }
      //Close file
      FileClose(handle);
      Alert("Done!");
     }
  }
//+------------------------------------------------------------------+
보시다시피 이 코드는 매우 간단합니다. 모든 차트 객체의 일부 속성을 바이너리 파일에 쓰는 것 뿐입니다. 가장 중요한 것은 파일을 읽는 동안 기록된 속성의 순서 순서를 잊지 않는 것입니다.
스크립트를 완성했으니 이제 인터페이스를 만들어봅시다.
먼저 메인메뉴를 탭 종류별로 정리해보도록 하겠습니다. 어째서 탭이 필요한가? 그것은 객체가 좀 많아서 화면에 다 끼워맞출 경우 문제가 생길 수 있기 때문입니다. 객체는 그에 따라 그룹화되므로(위의 표 참조), 각 그룹을 별도의 탭에 배치하는 것이 더 쉽습니다.
그러므로, 지금부터 주 메뉴를 만들 것입니다. 터미널 메뉴 Insert -> Objects -> Button을 사용하여 차트 상단에 5개의 버튼을 생성합니다.
![]()
1번 그림. 패널 탭
객체를 선택한 다음 마우스로 끌어서 "Ctrl" 키를 누른 상태에서 객체를 쉽게 복제할 수 있다는 점을 잊지 마십시오. 이렇게 함으로서 오리지널을 이동시키지않고 복사본을 만들 수 있습니다.
객체 이름은 모두 "ActP"로 시작해야 한다는 점을 잊지 말고 각별히 주의해야 합니다. 또한 문자열 이름에 "main"을 추가합니다. 이는 객체가 기본 메뉴 모음에 속함을 나타냅니다.
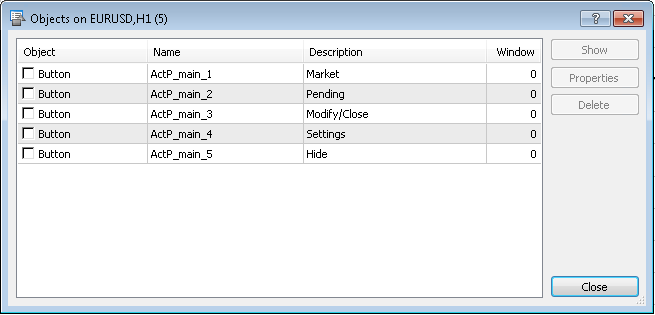
2번 그림. 객체 리스트 (패널 탭)
Similarly, let's 마찬가지로 탭 내용을 새 차트에 적용하겠습니다. 각 탭의 내용물은 다른 차트에 넣어야 합니다!
"Market" 탭:

3번 그림. "Market" 탭의 요소들

4번 그림. "Pending" 탭의 요소들
Settings 탭:
![]()
5번 그림. "세팅" 탭의 요소
마지막 탭 "Modify/Close"가 다르므로 보류 중인 주문을 수정/삭제하고 거래 거래를 수정/종료합니다. ttrade와 명령 작업을 두 개의 하위 탭으로 나누는 것이 합리적일 것입니다. 먼저 드롭다운 목록을 활성화하는 버튼을 생성해 보겠습니다. 드롭다운 목록에서 작업할 주문 또는 거래를 선택합니다.
![]()
Figure 6. "Modify/Close" 탭의 요소들
Afterwards we create sub-tabs. To work with trades:

7번 그림. 포지션 관리 요소
기타 관리 요소:

8번 그림. 주문 작업을 위한 하위 탭
바로 그거예요, 인터페이스가 생성됩니다.
각 차트에 스크립트를 적용하여 각 탭을 별도의 파일에 저장합니다. 입력 패러미터 "interfaceID"는 각 탭에 따라 다르게 설정되어야 합니다:
- 0 - 홈
- 1 - 시장
- 2 - 보류
- 3 - 매매 / 주문 선택 리스트 활성화 버튼
- 4 - 설정
- 6 - 매매 작업용 하위 탭
- 7 - 주문 작업용 하위 탭
5번 탭은 메인 메뉴의 "Minimize window" 버튼과 연계되기때문에 연결되는 객체가 없으므로 생략합니다.
이러한 모든 조작 후 터미널 -> MQL5 -> 의 디렉토리에 다음 파일이 나타납니다.
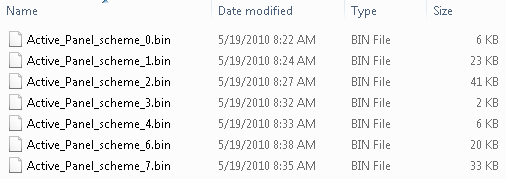
Figure 9. 패널 스키마 파일 목록
4. 인터페이스 요소 다운받기
이제 인터페이스 요소가 파일에 저장되고 작업을 시작할 준비가 되었습니다. 우선, 패널이 위치할 위치를 결정합시다. 메인 차트에서 직접 찾으면 가격표가 막혀 매우 불편합니다. 따라서 패널을 기본 차트의 하위 창에 배치하는 것이 가장 합리적입니다. 인디케이터로 이 판을 만들 수 있습니다.
만들어봅시다:
#property copyright "Copyright 2010, MetaQuotes Software Corp."
#property link      "http://www.mql5.com"
#property version   "1.00"
#property indicator_separate_window //place the indicator in a separate window

int OnInit()
  {
//--- indicator buffers mapping
   //Set the short name of the indicator
   IndicatorSetString(INDICATOR_SHORTNAME, "AP");
//---
   return(0);
  }

int OnCalculate(const int rates_total,
                const int prev_calculated,
                const datetime& time[],
                const double& open[],
                const double& high[],
                const double& low[],
                const double& close[],
                const long& tick_volume[],
                const long& volume[],
                const int& spread[])
  {
//---
//--- return value of prev_calculated for next call
   return(rates_total);
  }
이 인디케이터의 주요 기능은 다양한 계산 대신 하위 창을 생성하는 것이기 때문에 코드가 매우 간단합니다. 한 가지 방법은 인디케이터의 하위 창을 찾을 수 있는 "short" 이름을 설치하는 것입니다. 차트를 컴파일하여 인디케이터에 적용하면 창이 나타납니다.
이젠 Expert Advisor 패널에 집중해봅시다. 새 Expert Advisor를 생성할 것입니다.
OnInit () 함수는 이하의 오퍼레이터를 담고 있습니다:
double Bid,Ask;         //variables for current prices
datetime time_current;  //time of last tick
int wnd=-1;             //index of the window with an indicator
bool last_loaded=false; //flag indicating whether it's a first initialization or not
//+------------------------------------------------------------------+
//| Expert initialization function                                   |
//+------------------------------------------------------------------+
int OnInit()
  {
//---
   //Start the timer at intervals of 1 second
   EventSetTimer(1);
   //Get the latest prices
   get_prices();
   //Define the window with an indicator
   wnd=ChartWindowFind(0,"AP");
   //If the first initialization - create interface
   if(!last_loaded) create_interface();
//---
   return(0);
  }
ChartWindowFind, 인디케이터 창의 위치를 찾는 것을 통해 시장의 현재 매매가를 받아와서 변수로 저장하는 타이머(왜 이렇게하는가는 아래에서 설명합니다)를 기동시킵니다. Flag last_loaded - Expert Advisor가 초기화되었는지 여부를 나타냅니다. 이 정보는 초기화 중에 인터페이스가 다시 로드되지 않도록 하기 위해 필요합니다.
create_interface () 함수는 이렇게 보입니다:
//+------------------------------------------------------------------+
//| Function of the interface creation                               |
//+------------------------------------------------------------------+
void create_interface()
  {
   //if reset settings is selected
   if(Reset_Expert_Settings)
     {
     //Reset
      GlobalVariableDel("ActP_buttons_color");
      GlobalVariableDel("ActP_label_color");
      GlobalVariableDel("ActP_text_color");
      GlobalVariableDel("ActP_font_size");
     }

   //Create the main menu interface
   ApplyScheme(0);
   //Create the interface tab "Market"
   ApplyScheme(1);
   //Set all objects as unmarked
   Objects_Selectable("ActP",false);
   //redraw the chart
   ChartRedraw();
  }
우선 입력 패러미터 "reset settings"를 체크하는 것입니다, 만약 설치되었다면 세팅을 담당하는 글로벌 변수를 제거합니다. 이 작업이 패널에 미치는 영향은 아래에 설명되어 있습니다. ApplyScheme () 함수는 파일에서 인터페이스를 만듭니다.
//+------------------------------------------------------------------+
//| The function for the interface loading                           |
//| ID - ID of the saved interface                                   |
//+------------------------------------------------------------------+
bool ApplyScheme(int ID)
  {
   string fname="Active_Panel_scheme_custom_"+IntegerToString(ID)+".bin";
   //download the standard scheme if there isn't saved scheme
   if(!FileIsExist(fname)) fname="Active_Panel_scheme_"+IntegerToString(ID)+".bin";
   //open file for reading
   int handle=FileOpen(fname,FILE_READ|FILE_BIN);
   //file opened
   if(handle!=INVALID_HANDLE)
     {
      //Loading all objects
      while(!FileIsEnding(handle))
        {
         string obj_name=FileReadString(handle,100);
         int _wnd=wnd;
         //the auxiliary lines are in the main window
         if(StringFind(obj_name,"line")>=0) _wnd=0;
         ENUM_OBJECT obj_type=FileReadInteger(handle);
         //creating object
         ObjectCreate(0, obj_name, obj_type, _wnd, 0, 0);
         //and apply the properties
         ObjectSetInteger(0,obj_name,OBJPROP_XDISTANCE,FileReadInteger(handle));
         ObjectSetInteger(0,obj_name,OBJPROP_YDISTANCE,FileReadInteger(handle));
         ObjectSetInteger(0,obj_name,OBJPROP_XSIZE,FileReadInteger(handle));
         ObjectSetInteger(0,obj_name,OBJPROP_YSIZE,FileReadInteger(handle));
         ObjectSetInteger(0,obj_name,OBJPROP_COLOR,FileReadInteger(handle));
         ObjectSetInteger(0,obj_name,OBJPROP_STYLE,FileReadInteger(handle));
         ObjectSetInteger(0,obj_name,OBJPROP_WIDTH,FileReadInteger(handle));
         ObjectSetInteger(0,obj_name,OBJPROP_BACK,FileReadInteger(handle));
         ObjectSetInteger(0,obj_name,OBJPROP_SELECTED,FileReadInteger(handle));
         ObjectSetInteger(0,obj_name,OBJPROP_SELECTABLE,FileReadInteger(handle));
         ObjectSetInteger(0,obj_name,OBJPROP_READONLY,FileReadInteger(handle));
         ObjectSetInteger(0,obj_name,OBJPROP_FONTSIZE,FileReadInteger(handle));
         ObjectSetInteger(0,obj_name,OBJPROP_STATE,FileReadInteger(handle));
         ObjectSetInteger(0,obj_name,OBJPROP_BGCOLOR,FileReadInteger(handle));

         ObjectSetString(0,obj_name,OBJPROP_TEXT,FileReadString(handle,100));
         ObjectSetString(0,obj_name,OBJPROP_FONT,FileReadString(handle,100));
         ObjectSetString(0,obj_name,OBJPROP_BMPFILE,0,FileReadString(handle,100));
         ObjectSetString(0,obj_name,OBJPROP_BMPFILE,1,FileReadString(handle,100));

         ObjectSetDouble(0,obj_name,OBJPROP_PRICE,FileReadDouble(handle));

         //Set color for the objects
         if(GlobalVariableCheck("ActP_buttons_color") && obj_type==OBJ_BUTTON)
            ObjectSetInteger(0,obj_name,OBJPROP_BGCOLOR,GlobalVariableGet("ActP_buttons_color"));
         if(GlobalVariableCheck("ActP_label_color") && obj_type==OBJ_LABEL)
            ObjectSetInteger(0,obj_name,OBJPROP_COLOR,GlobalVariableGet("ActP_label_color"));
         if(GlobalVariableCheck("ActP_text_color") && (obj_type==OBJ_EDIT || obj_type==OBJ_BUTTON))
            ObjectSetInteger(0,obj_name,OBJPROP_COLOR,GlobalVariableGet("ActP_text_color"));
         if(GlobalVariableCheck("ActP_font_size") && (obj_type==OBJ_EDIT || obj_type==OBJ_LABEL))
            ObjectSetInteger(0,obj_name,OBJPROP_FONTSIZE,GlobalVariableGet("ActP_font_size"));
         //Set global variable font size
         if(obj_name=="ActP_font_edit6" && GlobalVariableCheck("ActP_font_size"))
            ObjectSetString(0,obj_name,OBJPROP_TEXT,IntegerToString(GlobalVariableGet("ActP_font_size")));
        }
      //Close file
      FileClose(handle);
      return(true);
     }
   return(false);
  }
이 또한 복잡할 것이 없습니다. 이 기능은 미리 저장된 인터페이스 체계를 사용하여 원하는 파일을 열고 이전에 식별한 창(인디케이터 창)에 파일을 생성합니다. 또한 터미널의 글로벌 변수에서 객체의 색상과 폰트 크기를 선택합니다.
Objects_Selectable() 함수를 사용하면 버튼 애니메이션을 켜고 실수로 필요한 개체를 삭제하지 않도록 보조 라인을 제외한 모든 개체가 표시 해제됩니다.
//+------------------------------------------------------------------+
//| Function of setting objects as unselectable                      |
//+------------------------------------------------------------------+
void  Objects_Selectable(string IDstr,bool flag)
  {
   //Check all the objects
   for(int i=ObjectsTotal(0);i>=0;i--)
     {
      string n=ObjectName(0,i);
      //If the object belongs to the panel
      if(StringFind(n,IDstr)>=0)
        {
         //Lines remain untouched
         if(!flag)
            if(StringFind(n,"line")>-1) continue;
         //Set everything unselectable except the lines
         ObjectSetInteger(0,n,OBJPROP_SELECTABLE,flag);
        }
     }
  }
이제 OnTick() 함수를 들여다 봅시다. 이 함수가 시중의 최신 매매가를 얻어줄 것입니다.
//+------------------------------------------------------------------+
//| Expert tick function                                             |
//+------------------------------------------------------------------+
void OnTick()
  {
   //Get the latest prices
   get_prices();
  }
get_prices() 함수가 이하의 폰을 가집니다:
//+------------------------------------------------------------------+
//| Function obtain information on tick                              |
//+------------------------------------------------------------------+
void get_prices()
  {
   MqlTick tick;
   //if the tick was
   if(SymbolInfoTick(Symbol(),tick))
     {
      //obtain information
      Bid=tick.bid;
      Ask=tick.ask;
      time_current=tick.time;
     }
  }
OnDeinit () 에 대해서도 잊으면 안됩니다:
//+------------------------------------------------------------------+
//| Expert deinitialization function                                 |
//+------------------------------------------------------------------+
void OnDeinit(const int reason)
  {
//---
   //if the deinitialisation reason isn't the timeframe or symbol change
   if(reason!=REASON_CHARTCHANGE)
     {
      //reset initialization flag
      last_loaded=false;
      //Delete all panel objects
      ObjectsDeleteAll_my("ActP");
      //Delete files with the saved state of the tabs
      FileDelete("Active_Panel_scheme_custom_1.bin");
      FileDelete("Active_Panel_scheme_custom_2.bin");
      FileDelete("Active_Panel_scheme_custom_3.bin");
      FileDelete("Active_Panel_scheme_custom_4.bin");
      FileDelete("Active_Panel_scheme_custom_5.bin");
     }
   //otherwise set a flag
   else last_loaded=true;
   //stop the timer
   EventKillTimer();
  }
먼저 시간 및/또는 기호의 변경으로 인해 초기화 해제된 경우 패널 항목을 삭제하지 않습니다. 다른 경우에선 ObjectsDeleteAll_my() 함수를 통해 모든 아이템을 제거합니다.
//+------------------------------------------------------------------+
//| The function deletes all panel objects                           |
//| IDstr - object identifier                                        |
//+------------------------------------------------------------------+
void  ObjectsDeleteAll_my(string IDstr)
  {
   //check all the objects
   for(int i=ObjectsTotal(0);i>=0;i--)
     {
      string n=ObjectName(0,i);
      //if the name contains the identifier - remove the object
      if(StringFind(n,IDstr)>=0) ObjectDelete(0,n);
     }
  }
컴파일 및 Expert Advisor 기동 후에, 이하의 결과를 얻을 수 있습니다:

10번 그림. Expert Advisor 작업 예시
그러나 이러한 객체들이 조작에 반응하도록 할 수 있을 때까지는 거의 의미가 없습니다.
5. 이벤트 관리
인터페이스가 생성되었으니 이제 제대로 작동해야 합니다. 객체에 대한 모든 작업은 특정 이벤트를 생성합니다. OnChartEvent 함수OnChartEvent(const int id, const long& lparam, const double& dparam, const string& sparam) 은 ChartEvent의 처리 메카니즘입니다 . 우리가 관심을 가질만한 이벤트는 다음과 같습니다:
- CHARTEVENT_CLICK - 차트 위 클릭
- CHARTEVENT_OBJECT_ENDEDIT - 입력 필드 수정 완료함
- CHARTEVENT_OBJECT_CLICK - 그래픽 객체 클릭
이 경우 id 함수의 패러미터는 이벤트의 ID를 나타내며, sparam은 이 이벤트를 생성하는 객체의 이름을 나타냅니다. 다른 모든 패러미터는 우리에게 중요하지 않습니다.
먼저 주 메뉴 버튼을 클릭하여 살펴보겠습니다.
5.1. 메인 메뉴 이벤트 관리
메인 메뉴는 5개의 버튼으로 구성되어 있습니다. 둘 중 하나를 클릭하면 누름 모드로 전환되어 오른쪽 인터페이스로 이동하여 해당 탭을 업로드합니다. 그런 다음 다른 모든 메뉴 버튼이 눌리지 않은 모드로 전환됩니다.
//+------------------------------------------------------------------+
//| Event handlers                                                   |
//+------------------------------------------------------------------+
void OnChartEvent(const int id, const long &lparam, const double &dparam, const string &sparam)
{
...
   //Event - click on a graphic object
   if(id==CHARTEVENT_OBJECT_CLICK)
   {
   ...
       //main menu button click
      if(sparam=="ActP_main_1") {Main_controls_click(1); ChartRedraw(); return;}
       //Here we execute the corresponding operators
      if(sparam=="ActP_main_2") {Main_controls_click(2); ChartRedraw(); return;}
      if(sparam=="ActP_main_3") {Main_controls_click(3); ChartRedraw(); return;}
      if(sparam=="ActP_main_4") {Main_controls_click(4); ChartRedraw(); return;}
      if(sparam=="ActP_main_5") {Main_controls_click(5); ChartRedraw(); return;}
   ...
   }
...
}
메뉴 버튼을 클릭한다면 Main_controls_click() 함수가 작동되었을 것입니다. ChartRedraw() 를 통해 차트를 다시 그리고 함수를 완성합시다. 한 번에 하나의 객체만 클릭할 수 있으니 추가 구현 시 CPU 시간 낭비가 발생하므로 일단 실행을 완료해야 합니다.
//+------------------------------------------------------------------+
//| Tab processor                                                    |
//| ID - index of clicked tab                                        |
//+------------------------------------------------------------------+
void Main_controls_click(int ID)
  {
   int loaded=ID;
   //we will go all tabs
   for(int i=1;i<6;i++)
     {
      //for all except the selected set inactive
      if(i!=ID)
        {
         //also remember the last active tab
         if(ObjectGetInteger(0,"ActP_main_"+IntegerToString(i),OBJPROP_STATE)==1) loaded=i;
         ObjectSetInteger(0,"ActP_main_"+IntegerToString(i),OBJPROP_STATE,0);
        }
     }
//if(loaded==ID) return;
   //set an active state for the selected
   ObjectSetInteger(0,"ActP_main_"+IntegerToString(ID),OBJPROP_STATE,1);
   //delete the drop-down lists
   DeleteLists("ActP_orders_list_");
   DeleteLists("ActP_color_list_");
   //and set the list buttons to the unpressed state
   ObjectSetInteger(0,"ActP_ord_button5",OBJPROP_STATE,0);
   ObjectSetInteger(0,"ActP_col1_button6",OBJPROP_STATE,0);
   ObjectSetInteger(0,"ActP_col2_button6",OBJPROP_STATE,0);
   ObjectSetInteger(0,"ActP_col3_button6",OBJPROP_STATE,0);
   //save state of the last active tab
   SaveScheme(loaded);
   //remove old tab
   DeleteScheme("ActP");
   //and load a new
   ApplyScheme(ID);
   //Set all objects as unselected
   Objects_Selectable("ActP",false);
  }
앞에서 Objects_Selectable() 함수와 ApplyScheme() 함수를 다루어보았습니다. 이후에 DeleteLists() 함수를 살펴볼 것입니다.
SaveScheme() 함수는 인터페이스 파일을 저장하여 재차 로딩했을 때에 모든 속성을 유지하도록 할 것입니다:
//+------------------------------------------------------------------+
//| Interface saving function                                        |
//+------------------------------------------------------------------+
void SaveScheme(int interfaceID)
  {
   //open file for writing
   int handle=FileOpen("Active_Panel_scheme_custom_"+IntegerToString(interfaceID)+".bin",FILE_WRITE|FILE_BIN);
   //if file opened
   if(handle!=INVALID_HANDLE)
     {
      //go all the chart objects
      for(int i=0;i<ObjectsTotal(0);i++)
        {
         string name=ObjectName(0,i);
         //if the object belongs to the panel
         if(StringFind(name,"ActP")<0) continue;
         //and it isn't a tab
         if(StringFind(name,"main")>=0) continue;
         //write the object properties to a file
         FileWriteString(handle,name,100);
         FileWriteInteger(handle,ObjectGetInteger(0,name,OBJPROP_TYPE));

         FileWriteInteger(handle,ObjectGetInteger(0,name,OBJPROP_XDISTANCE));
         FileWriteInteger(handle,ObjectGetInteger(0,name,OBJPROP_YDISTANCE));
         FileWriteInteger(handle,ObjectGetInteger(0,name,OBJPROP_XSIZE));
         FileWriteInteger(handle,ObjectGetInteger(0,name,OBJPROP_YSIZE));
         FileWriteInteger(handle,ObjectGetInteger(0,name,OBJPROP_COLOR));
         FileWriteInteger(handle,ObjectGetInteger(0,name,OBJPROP_STYLE));
         FileWriteInteger(handle,ObjectGetInteger(0,name,OBJPROP_WIDTH));
         FileWriteInteger(handle,ObjectGetInteger(0,name,OBJPROP_BACK));
         FileWriteInteger(handle,ObjectGetInteger(0,name,OBJPROP_SELECTED));
         FileWriteInteger(handle,ObjectGetInteger(0,name,OBJPROP_SELECTABLE));
         FileWriteInteger(handle,ObjectGetInteger(0,name,OBJPROP_READONLY));
         FileWriteInteger(handle,ObjectGetInteger(0,name,OBJPROP_FONTSIZE));
         FileWriteInteger(handle,ObjectGetInteger(0,name,OBJPROP_STATE));
         FileWriteInteger(handle,ObjectGetInteger(0,name,OBJPROP_BGCOLOR));

         FileWriteString(handle,ObjectGetString(0,name,OBJPROP_TEXT),100);
         FileWriteString(handle,ObjectGetString(0,name,OBJPROP_FONT),100);
         FileWriteString(handle,ObjectGetString(0,name,OBJPROP_BMPFILE,0),100);
         FileWriteString(handle,ObjectGetString(0,name,OBJPROP_BMPFILE,1),100);

         FileWriteDouble(handle,ObjectGetDouble(0,name,OBJPROP_PRICE));
        }
      //Close file
      FileClose(handle);
     }
  }
DeleteScheme() 함수는 탭 객체들을 삭제합니다.
//+------------------------------------------------------------------+
//| Function to delete all the panel objects, except tabs            |
//+------------------------------------------------------------------+
void  DeleteScheme(string IDstr)
  {
   //we will go through all the objects
   for(int i=ObjectsTotal(0);i>=0;i--)
     {
      string n=ObjectName(0,i);
      //remove everything but the tab
      if(StringFind(n,IDstr)>=0 && StringFind(n,"main")<0) ObjectDelete(0,n);
     }
  }
따라서 Main_controls_click() 함수를 사용하는 것으로 우선 저장 후 옛 탭을 제거하고, 새로운 것을 로딩할 것입니다.
Expert Advisor를 컴파일하면 결과를 볼 수 있게 됩니다.
이제 기본 메뉴 버튼을 클릭하고 새 탭을 로드하여 원래 탭 상태로 유지하겠습니다.

11번 그림. "Pending" 탭의 항목들

12번 그림. "Modify/Close" 탭의 요소들

13번 그림. "세팅" 탭의 요소
이제 메인 메뉴가 제 기능을 다하기 때문에 이것으로 메인 메뉴의 조작을 마칠 수 있습니다.
5.2. "Flag" 구성요소 이벤트 관리하기
보조 라인 및 역지정 주문 설정은 "Flag" 구성요소를 사용하여 설정하지만 MT5의 그래픽 객체 목록에는 없습니다. 그러니 만들어봅시다 "그래픽 레이블" 객체가 있으며, 이것은 실질적으로는 "켜짐" 상태 및 "꺼짐" 두 상태가 있는 이미지입니다. 상태는 객체를 클릭하는 것에 따라 바뀝니다. 각 상태에는 다른 이미지를 설정할 수 있습니다. 각 상태에 대응할 이미지를 선택하십시오:
- 활성화됨

- 비활성화됨

객체의 속성에 그림을 설정해 보겠습니다:
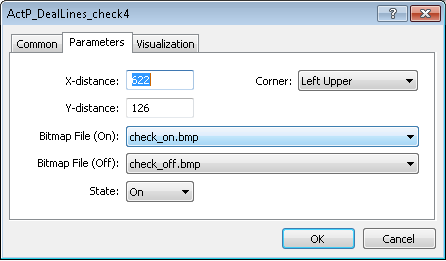
13번 그림 "flag" 요소의 속성 설정하기
목록에서 그림을 사용하려면 해당 그림이 "터미널 폴더-> MQL5-> Images" 폴더에 있고 확장자가 ".Bmp"여야 합니다.
객체를 클릭할 때 발생하는 처리 이벤트로 돌아가 보겠습니다. 거래 개시 시점에 보조 라인을 배치하는 역할을 하는 플래그의 예를 사용하겠습니다.
      //click on the flag of the setting of auxiliary lines during transaction opening
      if(sparam=="ActP_DealLines_check1")
      {
         //Check the flag state
         bool selected=ObjectGetInteger(0,sparam,OBJPROP_STATE);
         //If the flag is set
         if(selected)
         {
            //Retrieve the value of the stop loss and take profit from the input fields
            string SL_txt=ObjectGetString(0, "ActP_SL_edit1", OBJPROP_TEXT);
            string TP_txt=ObjectGetString(0, "ActP_TP_edit1", OBJPROP_TEXT);
            double val_SL, val_TP;

            //If the Stop field is not empty
            //save the value
            if(SL_txt!="")
               val_SL=StringToDouble(SL_txt);

            //if empty
            else
            {
               //Take the max. and min. prices of chart
               double pr_max=ChartGetDouble(0, CHART_PRICE_MAX);
               double pr_min=ChartGetDouble(0, CHART_PRICE_MIN);
               //Set the stop at the 1/3 of the chart price range
               val_SL=pr_min+(pr_max-pr_min)*0.33;
            }

            //Similarly processes the Take
            if(TP_txt!="")
               val_TP=StringToDouble(TP_txt);
            else
            {
               double pr_max=ChartGetDouble(0, CHART_PRICE_MAX);
               double pr_min=ChartGetDouble(0, CHART_PRICE_MIN);
               val_TP=pr_max-(pr_max-pr_min)*0.33;
            }
            //Move the line to new positions
            ObjectSetDouble(0, "ActP_SL_line1", OBJPROP_PRICE, val_SL);
            ObjectSetDouble(0, "ActP_TP_line1", OBJPROP_PRICE, val_TP);
         }
          //If the flag is unset
         else
         {
             //remove the lines
            ObjectSetDouble(0, "ActP_SL_line1", OBJPROP_PRICE, 0);
            ObjectSetDouble(0, "ActP_TP_line1", OBJPROP_PRICE, 0);
         }
          //redraw the chart
         ChartRedraw();
          //and finish the function
         return;
      }
대기 중인 주문 탭의 마감/수정 시 보조 라인의 처리 및 설치를 담당하는 플래그에도 동일한 메소드가 사용됩니다. 따라서 본 문서에서는 거기까지 깊게는 들어가지 않도록 하겠습니다. 미리 연습해보고싶은 분은 Expert Advisor 코드를 활용하시면 됩니다.
"Pending" 탭의 역지정 주문 플래그 세팅은 다음과같은 핸들러가 있습니다:
void OnChartEvent(const int id, const long &lparam, const double &dparam, const string &sparam)
{
...

   //Event - click on a graphic object
   if(id==CHARTEVENT_OBJECT_CLICK)
   {
   ...
      //Click on the orders stoplimit check box
      if(sparam=="ActP_limit_check2")
      {
         //Check the flag state
         bool selected=ObjectGetInteger(0,sparam,OBJPROP_STATE);
         if(selected) //if flag is set
         {
            //set the new color for the price edit
            ObjectSetInteger(0, "ActP_limpr_edit2", OBJPROP_BGCOLOR, White);
            //enable it for the edit
            ObjectSetInteger(0, "ActP_limpr_edit2", OBJPROP_READONLY, false);
            //установим в поле значение текущей цены
            //Set the current price as the field value
            ObjectSetString(0, "ActP_limpr_edit2", OBJPROP_TEXT, DoubleToString(Bid, _Digits));
            //if the auxiliary lines are allowed
            //move them
            if(ObjectGetInteger(0, "ActP_DealLines_check2", OBJPROP_STATE)==1)
               ObjectSetDouble(0, "ActP_lim_line2", OBJPROP_PRICE, Bid);
         }
          //if flag is unset
         else
         {
            //set the field unavailable for editing
            ObjectSetInteger(0, "ActP_limpr_edit2", OBJPROP_BGCOLOR, LavenderBlush);
            //set the field color
            ObjectSetInteger(0, "ActP_limpr_edit2", OBJPROP_READONLY, true);
            //and "empty" text
            ObjectSetString(0, "ActP_limpr_edit2", OBJPROP_TEXT, "");
            //if the auxiliary lines are allowed
            //move them to the zero point
            if(ObjectGetInteger(0, "ActP_DealLines_check2", OBJPROP_STATE)==1)
               ObjectSetDouble(0, "ActP_lim_line2", OBJPROP_PRICE, 0);
         }
      }
   ...
   }
...
}
플래그 관련은 끝났습니다. 우리가 만든 "옵션 버튼 그룹" 객체를 고려해봅시다.
5.3. "옵션 버튼 그룹" 구성 요소 이벤트 관리
이 구성 요소를 사용하여 거래 유형과 주문 만료 유형을 선택합니다. 플래그를 사용하는 경우처럼 그래픽 태그를 사용할 것입니다. 하지만 이번에는 새로운 그림과 함께 사용할 수 있습니다.
- 활성화됨

- 비활성화됨

그러나 여기서 클릭하는 옵션 버튼을 제외한 모든 옵션 버튼을 비활성 상태로 재설정해야 하기 때문에 문제가 복잡합니다. 주문 처리 타입의 예시를 생각해보세요:
void OnChartEvent(const int id, const long &lparam, const double &dparam, const string &sparam)
{
...
   //event - click on a graphic object
   if(id==CHARTEVENT_OBJECT_CLICK)
   {
   ...
      //click on radion button 1 - order execution type
      if(sparam=="ActP_Exe1_radio2")
      {
         //check the radio button state
         bool selected=ObjectGetInteger(0,sparam,OBJPROP_STATE);
         //set the appropriate state
         ObjectSetInteger(0,sparam,OBJPROP_STATE, 1);
         //if it selected
         if(selected)
         {
            //reset the other radio buttons
            ObjectSetInteger(0, "ActP_Exe2_radio2", OBJPROP_STATE, false);
            ObjectSetInteger(0, "ActP_Exe3_radio2", OBJPROP_STATE, false);
            //redraw the chart
            ChartRedraw();
            //finish the execution of function
            return;
         }
         //redraw the chart
         ChartRedraw();
         //finish the execution of function
         return;
      }

       //Similarly for the radio button 2
      if(sparam=="ActP_Exe2_radio2")
      {
         bool selected=ObjectGetInteger(0,sparam,OBJPROP_STATE);
         ObjectSetInteger(0,sparam,OBJPROP_STATE, 1);
         if(selected)
         {
            ObjectSetInteger(0, "ActP_Exe1_radio2", OBJPROP_STATE, false);
            ObjectSetInteger(0, "ActP_Exe3_radio2", OBJPROP_STATE, false);
            ChartRedraw();
            return;
         }
         ChartRedraw();
         return;
      }

       //Similarly for the radio button 3
      if(sparam=="ActP_Exe3_radio2")
      {
         bool selected=ObjectGetInteger(0,sparam,OBJPROP_STATE);
         ObjectSetInteger(0,sparam,OBJPROP_STATE, 1);
         if(selected)
         {
            ObjectSetInteger(0, "ActP_Exe1_radio2", OBJPROP_STATE, false);
            ObjectSetInteger(0, "ActP_Exe2_radio2", OBJPROP_STATE, false);
            ChartRedraw();
            return;
         }
         ChartRedraw();
         return;
      }
   ...
   }
...
}
주문 만료 유형 옵션 버튼은 세 번째 단계를 클릭할 때 추가 단계를 수행해야 한다는 사실에서만 다릅니다. 주문 만료의 시작 시간에 날짜를 새로 설정해야 합니다.
void OnChartEvent(const int id, const long &lparam, const double &dparam, const string &sparam)
{
...
   //Event - click on a graphic object
   if(id==CHARTEVENT_OBJECT_CLICK)
   {
   ...
       //Click on the 3rd radio button - order expiration date
      if(sparam=="ActP_exp3_radio2")
      {
         //checking it state
         bool selected=ObjectGetInteger(0,sparam,OBJPROP_STATE);
         ObjectSetInteger(0,sparam,OBJPROP_STATE, 1);
         //if it selected
         if(selected)
         {
            //reset the remained radio buttons
            ObjectSetInteger(0, "ActP_exp1_radio2", OBJPROP_STATE, false);
            ObjectSetInteger(0, "ActP_exp2_radio2", OBJPROP_STATE, false);
            //set the new date to the date edit field
            ObjectSetInteger(0, "ActP_exp_edit2", OBJPROP_BGCOLOR, White);
            ObjectSetInteger(0, "ActP_exp_edit2", OBJPROP_READONLY, false);
            ObjectSetString(0, "ActP_exp_edit2", OBJPROP_TEXT, TimeToString(time_current));
            //if auxiliary lines are allowed
            //set the new time line
            if(ObjectGetInteger(0, "ActP_DealLines_check2", OBJPROP_STATE)==1)
               ObjectSetInteger(0, "ActP_exp_line2", OBJPROP_TIME, time_current);
            ChartRedraw();
            return;
         }

          //if it isn't selected
         else
         {
            //set the edit field as not available for editing
            ObjectSetInteger(0, "ActP_exp_edit2", OBJPROP_BGCOLOR, LavenderBlush);
            ObjectSetInteger(0, "ActP_exp_edit2", OBJPROP_READONLY, true);
            //remove the auxiliary line
            if(ObjectGetInteger(0, "ActP_DealLines_check2", OBJPROP_STATE)==1)
               ObjectSetInteger(0, "ActP_exp_line2", OBJPROP_TIME, 0);
         }
         ChartRedraw();
         return;
   ...
   }
...
}
옵션 버튼을 다루는 것은 이걸로 끝입니다.
5.4. 드롭다운 리스트 이벤트 생성 및 관리
드롭다운 목록을 사용하여 수정/마감/제거 및 색상 선택 패널을 선택할 수 있습니다. 매매 / 주문 리스트로 시작해봅시다.
"Modification / closure" 탭에 가장 먼저 나타나는 것은 "Select order -->" 버튼이며, 이 버튼은 목록을 활성화하는 버튼입니다. 이 아이콘을 클릭하면 드롭다운 목록이 펼쳐지고, 선택한 후에는 드롭다운 목록이 다시 펼쳐집니다. 이 버튼의 CHARTEVENT_OBJECT_CLICK 핸들러를 살펴봅시다:
void OnChartEvent(const int id, const long &lparam, const double &dparam, const string &sparam)
{
...
   //event - click on a graphic object
   if(id==CHARTEVENT_OBJECT_CLICK)
   {
   ...
      //click on the drop-down list activate button (order select)

      if(sparam=="ActP_ord_button5")
      {
         //check status
         bool selected=ObjectGetInteger(0,sparam,OBJPROP_STATE);
         //the list is activated
         if(selected)// the list is selected
         {
            //delete interface
            DeleteScheme("ActP", true);
            //arrays for serving the information about the orders
            string info[100];
            //array for the tickets
            int tickets[100];
            //initialize it
            ArrayInitialize(tickets, -1);
            //get orders info
            get_ord_info(info, tickets);
            //create the list
            create_list(info, tickets);
         }
          //the list isn't active
         else
         {
            //delete it
            DeleteLists("ActP_orders_list_");
         }
          //redraw the chart
         ChartRedraw();
          //finish the function
         return;
      }
   ...
   }
...
}
우리의 주 목표는 거래/주문 건이 시장에 나와 있는지 확인하고, 만약 있다면, 거래/주문 건에서 정보를 추출하여 목록에 표시하는 것입니다. get_ord_info() 함수가 이 임무를 수행합니다:
//+------------------------------------------------------------------+
//| The function for obtaining the information about orders          |
//+------------------------------------------------------------------+
void get_ord_info(string &info[],int &tickets[])
  {
   //initialize the counter
   int cnt=0;
   string inf;
   //if there is an open position
   if(PositionSelect(Symbol()))
     {
     //combine all order infomation in a single line
      double vol=PositionGetDouble(POSITION_VOLUME);
      int typ=PositionGetInteger(POSITION_TYPE);
      if(typ==POSITION_TYPE_BUY) inf+="BUY ";
      if(typ==POSITION_TYPE_SELL) inf+="SELL ";
      inf+=DoubleToString(vol, MathCeil(MathAbs(MathLog(vol)/MathLog(10))))+" lots";
      inf+=" at "+DoubleToString(PositionGetDouble(POSITION_PRICE_OPEN), Digits());
      //write the results
      info[cnt]=inf;
      tickets[cnt]=0;
      //increment the counter
      cnt++;
     }

   //all orders
   for(int i=0;i<OrdersTotal();i++)
     {
      //get ticket
      int ticket=OrderGetTicket(i);
      //if order symbol is equal to chart symbol
      if(OrderGetString(ORDER_SYMBOL)==Symbol())
        {
         //combine all order infomation in a single line
         inf="#"+IntegerToString(ticket)+" ";
         int typ=OrderGetInteger(ORDER_TYPE);
         double vol=OrderGetDouble(ORDER_VOLUME_CURRENT);
         if(typ==ORDER_TYPE_BUY_LIMIT) inf+="BUY LIMIT ";
         if(typ==ORDER_TYPE_SELL_LIMIT) inf+="SELL LIMIT ";
         if(typ==ORDER_TYPE_BUY_STOP) inf+="BUY STOP ";
         if(typ==ORDER_TYPE_SELL_STOP) inf+="SELL STOP ";
         if(typ==ORDER_TYPE_BUY_STOP_LIMIT) inf+="BUY STOP LIMIT ";
         if(typ==ORDER_TYPE_SELL_STOP_LIMIT) inf+="SELL STOP LIMIT ";
         inf+=DoubleToString(vol, MathCeil(MathAbs(MathLog(vol)/MathLog(10))))+" lots";
         inf+=" at "+DoubleToString(OrderGetDouble(ORDER_PRICE_OPEN), Digits());
         //write the results
         info[cnt]=inf;
         tickets[cnt]=ticket;
         //increment the counter
         cnt++;
        }
     }
  }
블록 정보와 티켓 및 거래가 결합됩니다.
추가적으로, create_list() 함수는 이 정보를 기반으로 목록을 만듭니다:
//+------------------------------------------------------------------+
//| The function creates list of positions                           |
//| info - array for the positions                                   |
//| tickets - array for the tickets                                  |
//+------------------------------------------------------------------+
void create_list(string &info[],int &tickets[])
  {
   //get the coordinates of the list activation button
   int x=ObjectGetInteger(0,"ActP_ord_button5",OBJPROP_XDISTANCE);
   int y=ObjectGetInteger(0, "ActP_ord_button5", OBJPROP_YDISTANCE)+ObjectGetInteger(0, "ActP_ord_button5", OBJPROP_YSIZE);
   //get colors
   color col=ObjectGetInteger(0,"ActP_ord_button5",OBJPROP_COLOR);
   color bgcol=ObjectGetInteger(0,"ActP_ord_button5",OBJPROP_BGCOLOR);
   //get window height
   int wnd_height=ChartGetInteger(0,CHART_HEIGHT_IN_PIXELS,wnd);
   int y_cnt=0;
   //proceed arrays
   for(int i=0;i<100;i++)
     {
      //break if end reached
      if(tickets[i]==-1) break;
      //calculate the list item coordinates
      int y_pos=y+y_cnt*20;
      //if the windiow limits are reachedl, start a new column
      if(y_pos+20>wnd_height) {x+=300; y_cnt=0;}
      y_pos=y+y_cnt*20;
      y_cnt++;
      string name="ActP_orders_list_"+IntegerToString(i)+" $"+IntegerToString(tickets[i]);
      //create element
      create_button(name,info[i],x,y_pos,300,20);
      //and set its properties
      ObjectSetInteger(0,name,OBJPROP_COLOR,col);
      ObjectSetInteger(0,name,OBJPROP_SELECTABLE,0);
      ObjectSetInteger(0,name,OBJPROP_STATE,0);
      ObjectSetInteger(0,name,OBJPROP_FONTSIZE,8);
      ObjectSetInteger(0,name,OBJPROP_BGCOLOR,bgcol);
     }
  }
마지막으로, DeleteLists () 함수들은 목록에서 요소를 제거합니다:
//+------------------------------------------------------------------+
//| The function for the list deletion                               |
//+------------------------------------------------------------------+
void  DeleteLists(string IDstr)
  {
   //proceed all objects
   for(int i=ObjectsTotal(0);i>=0;i--)
     {
      string n=ObjectName(0,i);
      //delete lists
      if(StringFind(n,IDstr)>=0 && StringFind(n,"main")<0) ObjectDelete(0,n);
     }
  }
이제 활성화 버튼을 클릭하면 목록이 생성됩니다. 목록의 모든 요소를 클릭할 때마다 몇 가지 특정 작업이 수행되어야 하므로 제대로 작동해야 합니다. 구체적으로: 주문 작업을 위한 인터페이스를 로드하고 주문/거래에 대한 정보로 이 인터페이스를 채웁니다.
void OnChartEvent(const int id, const long &lparam, const double &dparam, const string &sparam)
{
...
   // Event - click on a graphic object
   if(id==CHARTEVENT_OBJECT_CLICK)
   {
   ...
       //Click not on an item of order selection list
      if(StringFind(sparam, "ActP_orders_list_")<0)
      {
          //Remove it
         DeleteLists("ActP_orders_list_");
          //Set the activation button to "unpressed"
         ObjectSetInteger(0, "ActP_ord_button5", OBJPROP_STATE, 0);
          //redraw chart
         ChartRedraw();
      }
       //Click on the order selection list item
      else
      {
          //Set a new name for the activation button
         ObjectSetString(0, "ActP_ord_button5", OBJPROP_TEXT, ObjectGetString(0, sparam, OBJPROP_TEXT));
          //Set the activation button to "unpressed"
         ObjectSetInteger(0, "ActP_ord_button5", OBJPROP_STATE, 0);
          //get ticket from the list item description
         int ticket=StringToInteger(StringSubstr(sparam, StringFind(sparam, "$")+1));
          //Load the interface
         SetScheme(ticket);
          //and delete the list
         DeleteLists("ActP_orders_list_");
          //chart redraw
         ChartRedraw();
      }
   ...
   }
...
}
여기서부터 조금 복잡해집니다. 목록의 크기와 개체의 이름을 미리 알 수 없으므로 목록의 요소 이름을 검색하여 목록에서 정보를 검색해야 합니다. SetScheme() 함수는 매매나 보류 주문용으로 적절한 인터페이스를 세팅할 것입니다:
//+------------------------------------------------------------------+
//| The function sets the interface depending on type:               |
//| position or pending order                                        |
//| t - ticket                                                       |
//+------------------------------------------------------------------+
void SetScheme(int t)
  {
   //if position
   if(t==0)
     {
      //check for its presence
      if(PositionSelect(Symbol()))
        {
         //delete old scheme
         DeleteScheme("ActP",true);
         //and apply new
         ApplyScheme(6);
         //set position parameters
         SetPositionParams();
         //the objects are unavailable for the selection
         Objects_Selectable("ActP",false);
        }
     }
   //if order
   if(t>0)
     {
      //check for its presence
      if(OrderSelect(t))
        {
         //delete old scheme
         DeleteScheme("ActP",true);
         //and apply new
         ApplyScheme(7);
         //set order parameters
         SetOrderParams(t);
         //the objects are unavailable for the selection
         Objects_Selectable("ActP",false);
        }
     }
  }
SetPositionParams() 및 SetOrderParams() 함수는 로딩된 인터페이스의 필수 속성을 설치합니다:
//+------------------------------------------------------------------+
//| Set position parameters for the objects                          |
//+------------------------------------------------------------------+
void SetPositionParams()
  {
   //if position is exists
   if(PositionSelect(Symbol()))
     {
      //get its parameters
      double pr=PositionGetDouble(POSITION_PRICE_OPEN);
      double lots=PositionGetDouble(POSITION_VOLUME);
      double sl=PositionGetDouble(POSITION_SL);
      double tp=PositionGetDouble(POSITION_TP);
      double mag=PositionGetInteger(POSITION_MAGIC);
      //and set new values to the objects
      ObjectSetString(0,"ActP_Pr_edit4",OBJPROP_TEXT,str_del_zero(DoubleToString(pr)));
      ObjectSetString(0,"ActP_lots_edit4",OBJPROP_TEXT,str_del_zero(DoubleToString(lots)));
      ObjectSetString(0,"ActP_SL_edit4",OBJPROP_TEXT,str_del_zero(DoubleToString(sl)));
      ObjectSetString(0,"ActP_TP_edit4",OBJPROP_TEXT,str_del_zero(DoubleToString(tp)));
      if(mag!=0) ObjectSetString(0,"ActP_mag_edit4",OBJPROP_TEXT,IntegerToString(mag));
      //redraw chart
      ChartRedraw();
     }
   //if there isn't position, show message
   else MessageBox("There isn't open position for "+Symbol());
  }
//+------------------------------------------------------------------+
//| Set pending order parameters for the objects                     |
//| ticket - order ticket                                            |
//+------------------------------------------------------------------+
void SetOrderParams(int ticket)
  {
   //if order exists
   if(OrderSelect(ticket) && OrderGetString(ORDER_SYMBOL)==Symbol())
     {
      //get its parameters
      double pr=OrderGetDouble(ORDER_PRICE_OPEN);
      double lots=OrderGetDouble(ORDER_VOLUME_CURRENT);
      double sl=OrderGetDouble(ORDER_SL);
      double tp=OrderGetDouble(ORDER_TP);
      double mag=OrderGetInteger(ORDER_MAGIC);
      double lim=OrderGetDouble(ORDER_PRICE_STOPLIMIT);
      datetime expir=OrderGetInteger(ORDER_TIME_EXPIRATION);
      ENUM_ORDER_TYPE type=OrderGetInteger(ORDER_TYPE);
      ENUM_ORDER_TYPE_TIME expir_type=OrderGetInteger(ORDER_TYPE_TIME);

      //of order type is stoplimit, modify the interface
      if(type==ORDER_TYPE_BUY_STOP_LIMIT || type==ORDER_TYPE_SELL_STOP_LIMIT)
        {
         //set new value to the order price edit
         ObjectSetString(0,"ActP_limpr_edit3",OBJPROP_TEXT,DoubleToString(lim,_Digits));
         ObjectSetInteger(0,"ActP_limpr_edit3",OBJPROP_BGCOLOR,White);
         //set order price available for edit
         ObjectSetInteger(0,"ActP_limpr_edit3",OBJPROP_READONLY,false);
        }
      //if order type isn't stoplimit, modify the interface
      else
        {
         ObjectSetString(0,"ActP_limpr_edit3",OBJPROP_TEXT,"");
         ObjectSetInteger(0,"ActP_limpr_edit3",OBJPROP_BGCOLOR,LavenderBlush);
         ObjectSetInteger(0,"ActP_limpr_edit3",OBJPROP_READONLY,true);
        }

      //check expiration type
      //and set interface elements
      switch(expir_type)
        {
         case ORDER_TIME_GTC:
           {
            ObjectSetInteger(0,"ActP_exp1_radio3",OBJPROP_STATE,1);
            ObjectSetInteger(0,"ActP_exp2_radio3",OBJPROP_STATE,0);
            ObjectSetInteger(0,"ActP_exp3_radio3",OBJPROP_STATE,0);
            break;
           }
         case ORDER_TIME_DAY:
           {
            ObjectSetInteger(0,"ActP_exp1_radio3",OBJPROP_STATE,0);
            ObjectSetInteger(0,"ActP_exp2_radio3",OBJPROP_STATE,1);
            ObjectSetInteger(0,"ActP_exp3_radio3",OBJPROP_STATE,0);
            break;
           }
         case ORDER_TIME_SPECIFIED:
           {
            ObjectSetInteger(0,"ActP_exp1_radio3",OBJPROP_STATE,0);
            ObjectSetInteger(0,"ActP_exp2_radio3",OBJPROP_STATE,0);
            ObjectSetInteger(0,"ActP_exp3_radio3",OBJPROP_STATE,1);
            //in addition, set new value to the edit
            ObjectSetString(0,"ActP_exp_edit3",OBJPROP_TEXT,TimeToString(expir));
            break;
           }
        }
      //set new values for the objects
      ObjectSetString(0,"ActP_Pr_edit3",OBJPROP_TEXT,str_del_zero(DoubleToString(pr)));
      ObjectSetString(0,"ActP_lots_edit3",OBJPROP_TEXT,str_del_zero(DoubleToString(lots)));
      ObjectSetString(0,"ActP_SL_edit3",OBJPROP_TEXT,str_del_zero(DoubleToString(sl)));
      ObjectSetString(0,"ActP_TP_edit3",OBJPROP_TEXT,str_del_zero(DoubleToString(tp)));
      ObjectSetString(0,"ActP_ticket_edit3",OBJPROP_TEXT,IntegerToString(ticket));
      if(mag!=0) ObjectSetString(0,"ActP_mag_edit3",OBJPROP_TEXT,IntegerToString(mag));
      ChartRedraw();
     }
   //if there isn't such order, show message
   else MessageBox("There isn't an order with ticket "+IntegerToString(ticket)+" for "+Symbol());
  }
마지막으로 CHARTEVENT_CLICK를 사용하여 차트를 클릭했을때 목록을 지우게 합니다:
void OnChartEvent(const int id, const long &lparam, const double &dparam, const string &sparam)
{
...
   //Event - is click on the chart
   if(id==CHARTEVENT_CLICK)
   {
       //delete all lists
      DeleteLists("ActP_orders_list_");
      DeleteLists("ActP_color_list_");
       //Set the activate buttons to the unpressed state
      ObjectSetInteger(0, "ActP_ord_button5", OBJPROP_STATE, 0);
      ObjectSetInteger(0, "ActP_col1_button6", OBJPROP_STATE, 0);
      ObjectSetInteger(0, "ActP_col2_button6", OBJPROP_STATE, 0);
      ObjectSetInteger(0, "ActP_col3_button6", OBJPROP_STATE, 0);
      ChartRedraw();
      return;
   }
...
}
이러한 일련의 과정을 통해 통해 멋진 드롭다운 목록을 생성하게 됩니다:

14번 그림. An example of the drop-down list panel "Modify/Close"
이제 설정 탭에서 색상 선택 목록을 생성해야 합니다.
활성화 버튼의 핸들러를 고려합니다:
void OnChartEvent(const int id, const long &lparam, const double &dparam, const string &sparam)
{
...
   //Event - click on the chart
   if(id==CHARTEVENT_OBJECT_CLICK)
   {
   ...
       //Click on the button to activate the colors drop-down list
      if(sparam=="ActP_col1_button6")
      {
          //check state
         bool selected=ObjectGetInteger(0,sparam,OBJPROP_STATE);
          //the list is active
         if(selected)//the list is active
         {
             //creat list
            create_color_list(100, "ActP_col1_button6", 1);
             //Set the position of the remaining buttons to "unpressed"
            ObjectSetInteger(0, "ActP_col2_button6", OBJPROP_STATE, 0);
            ObjectSetInteger(0, "ActP_col3_button6", OBJPROP_STATE, 0);
             //delete other lists
            DeleteLists("ActP_color_list_2");
            DeleteLists("ActP_color_list_3");
         }
          //the list isn't selected
         else
         {
             //delete it
            DeleteLists("ActP_color_list_");
         }
          //redraw chart
         ChartRedraw();
          //finish the execution of function
         return;
      }
   ...
   }
...
}
여기서는 주문 선택 목록과 동일한 방법을 따릅니다.
목록 생성 함수는 좀 다릅니다:
//+------------------------------------------------------------------+
//| Function for creating the colors list                            |
//| y_max - maximal list widthа                                      |
//| ID - list ID                                                     |
//| num - interface number                                           |
//+------------------------------------------------------------------+
void create_color_list(int y_max,string ID,int num)
  {
  //Get the coordinates of the list activation button
   int x=ObjectGetInteger(0,ID,OBJPROP_XDISTANCE);
   int y=ObjectGetInteger(0, ID, OBJPROP_YDISTANCE)+ObjectGetInteger(0, ID, OBJPROP_YSIZE);
   //get color
   color col=ObjectGetInteger(0,ID,OBJPROP_COLOR);
   //and window width
   int wnd_height=ChartGetInteger(0,CHART_HEIGHT_IN_PIXELS,wnd);
   y_max+=y;
   int y_cnt=0;
   //We will go through the colors array
   for(int i=0;i<132;i++)
     {
      color bgcol=colors[i];
      //calculate list item coordinates
      int y_pos=y+y_cnt*20;
      //if we reached the boundaries of the window, start new column
      if(y_pos+20>wnd_height || y_pos+20>y_max) {x+=20; y_cnt=0;}
      y_pos=y+y_cnt*20;
      y_cnt++;
      //create new element
      string name="ActP_color_list_"+IntegerToString(num)+ID+IntegerToString(i);
      create_button(name,"",x,y_pos,20,20);
      //and set its properties
      ObjectSetInteger(0,name,OBJPROP_COLOR,col);
      ObjectSetInteger(0,name,OBJPROP_SELECTABLE,0);
      ObjectSetInteger(0,name,OBJPROP_STATE,0);
      ObjectSetInteger(0,name,OBJPROP_BGCOLOR,bgcol);
     }
  }
목록 요소에 대한 클릭 프로세스에 대해 자세히 살펴보겠습니다.
void OnChartEvent(const int id, const long &lparam, const double &dparam, const string &sparam)
{
...
   //Event - click on chart
   if(id==CHARTEVENT_OBJECT_CLICK)
   {
   ...
       //click isn't on the color list button
      if(StringFind(sparam, "ActP_color_list_1")<0)
      {
          //delete list
         DeleteLists("ActP_color_list_1");
          //set color list activation button to "unpressed"
         ObjectSetInteger(0, "ActP_col1_button6", OBJPROP_STATE, 0);
          //redraw chart
         ChartRedraw();
      }
       //click on the color list
      else
      {
          //get color from the list
         color col=ObjectGetInteger(0, sparam, OBJPROP_BGCOLOR);
          //set it for all the buttons
         SetButtonsColor(col);
          //set button to unpressed
         ObjectSetInteger(0, "ActP_col1_button6", OBJPROP_STATE, 0);
          //delete list
         DeleteLists("ActP_color_list_1");
          //redraw chart
         ChartRedraw();
      }
   ...
   }
...
}
SetButtonsColor() 함수는 버튼의 색을 설정합니다:
//+------------------------------------------------------------------+
//| The function sets color for all buttons                          |
//| col - color                                                      |
//+------------------------------------------------------------------+
void SetButtonsColor(color col)
  {
   //We will go through all the objects
   for(int i=ObjectsTotal(0);i>=0;i--)
     {
      string n=ObjectName(0,i);
      //If the object belongs to the panel and its has a button type
      //set color
      if(StringFind(n,"ActP")>=0 && ObjectGetInteger(0,n,OBJPROP_TYPE)==OBJ_BUTTON)
         ObjectSetInteger(0,n,OBJPROP_BGCOLOR,col);
     }
   //set global variable
   GlobalVariableSet("ActP_buttons_color",col);
  }
이 아래의 결과를 보십시오:

15번 그림. 버튼 색상 설정하기
색상 선택 목록과 텍스트 레이블은 유사합니다. 그 결과 몇 번의 클릭만으로 패널을 화려하게 연출할 수 있습니다:

16번 그림. 패널, 버튼, 텍스트의 변경된 색상
이걸로 목록도 마무리지었습니다. 이젠 입력 필드를 살펴보도록하죠.
5.5. 입력 필드 이벤트 관리하기
입력 필드는 CHARTEVENT_OBJECT_ENDIT 이벤트를 생성하며, 이 이벤트는 필드의 텍스트 편집이 완료될 때 발생합니다. 이 이벤트를 처리해야 하는 유일한 이유는 엔트리 필드의 가격과 관련된 가격 보조 라인을 설정하기 때문입니다.
정지선의 예를 살펴보겠습니다:
void OnChartEvent(const int id, const long &lparam, const double &dparam, const string &sparam)
{
...
   //End edit event
   if(id==CHARTEVENT_OBJECT_ENDEDIT)//end edit event
   {
   ...
      //if edit field is SL field
      if(sparam=="ActP_SL_edit1")
      {
        //and auxiliary lines are enabled
         if(ObjectGetInteger(0,"ActP_DealLines_check1",OBJPROP_STATE)==1)
         {
            //get text from the field
            double sl_val=StringToDouble(ObjectGetString(0, "ActP_SL_edit1", OBJPROP_TEXT));
            //move lines at new position
            ObjectSetDouble(0, "ActP_SL_line1", OBJPROP_PRICE, sl_val);
         }
         //redraw chart
         ChartRedraw();
         //it ins't necessary to proceed the other objects, because the event from the one
         return;
      }
   ...
   }
...
}
다른 입력 필드도 비슷하게 처리됩니다.
5.6 타이머 이벤트 처리
타이머는 보조 라인을 모니터링하는 데 사용됩니다. 이렇게 하면 선이 연결된 가격 값이 자동으로 입력 필드로 이동합니다. 타이머의 매 틱 마다 OnTimer() 함수가 실행됩니다.
활성된 "Market" 탭에서 손절 및 이익 실현 선을 배치하는 케이스를 생각해보세요.
void OnTimer()// Timer handler
{
   //panel 1 is active
   if(ObjectGetInteger(0, "ActP_main_1", OBJPROP_STATE)==1)
   {
      //if auxiliary lines are allowed
      if(ObjectGetInteger(0,"ActP_DealLines_check1",OBJPROP_STATE)==1)
      {
         //set new values to the edit fields
         double sl_pr=NormalizeDouble(ObjectGetDouble(0, "ActP_SL_line1", OBJPROP_PRICE), _Digits);
         //stop loss
         ObjectSetString(0, "ActP_SL_edit1", OBJPROP_TEXT, DoubleToString(sl_pr, _Digits));
         //take profit
         double tp_pr=NormalizeDouble(ObjectGetDouble(0, "ActP_TP_line1", OBJPROP_PRICE), _Digits);
         ObjectSetString(0, "ActP_TP_edit1", OBJPROP_TEXT, DoubleToString(tp_pr, _Digits));
      }
   }
   ...
   //redraw chart
   ChartRedraw();
}
//+------------------------------------------------------------------+
다른 선 추적도 비슷하게 구현됩니다.
6. 주문 처리
이 시점에서 모든 필수 입력 필드, 확인란, 라인 및 옵션 버튼을 채웠습니다. 지금은 보유한 모든 데이터를 기반으로 거래를 시도해 볼 때입니다.
6.1. 주문 개방
"From the market" 탭에는"Buy" 및 "Sell" 버튼이 있습니다. 모든 필드가 올바르게 채워진 경우 버튼 중 하나를 클릭하면 거래가 실행됩니다.
이 버튼들의 핸들러를 한 번 보도록 합시다:
void OnChartEvent(const int id, const long &lparam, const double &dparam, const string &sparam)
{
...
   //Event - click on the object on the chart
   if(id==CHARTEVENT_OBJECT_CLICK)
   {
   ...
       //click on the Buy button
      if(sparam=="ActP_buy_button1")
      {
          //check its state
         bool selected=ObjectGetInteger(0,sparam,OBJPROP_STATE);
          //if it "pressed"
         if(selected)
         {
             //try to perform a deal
            deal(ORDER_TYPE_BUY);
             //and set the button to the unpressed state
            ObjectSetInteger(0, sparam, OBJPROP_STATE, 0);
         }

          //redraw chart
         ChartRedraw();
          //and finish the function execution
         return;
      }
      //******************************************
       //the similar for the sell button
      if(sparam=="ActP_sell_button1")
      {
         bool selected=ObjectGetInteger(0,sparam,OBJPROP_STATE);
         if(selected)
         {
            deal(ORDER_TYPE_SELL);
            ObjectSetInteger(0, sparam, OBJPROP_STATE, 0);
         }
         ChartRedraw();
         return;
      }
   ...
   }
...
}
보시다시피 deal() 함수는 작동중입니다.
//+------------------------------------------------------------------+
//| Deal function                                                    |
//+------------------------------------------------------------------+
int deal(ENUM_ORDER_TYPE typ)
  {
   //get the data from the objects
   double SL=StringToDouble(ObjectGetString(0,"ActP_SL_edit1",OBJPROP_TEXT));
   double TP=StringToDouble(ObjectGetString(0, "ActP_TP_edit1", OBJPROP_TEXT));
   double lots=StringToDouble(ObjectGetString(0,"ActP_Lots_edit1",OBJPROP_TEXT));
   int mag=StringToInteger(ObjectGetString(0, "ActP_Magic_edit1", OBJPROP_TEXT));
   int dev=StringToInteger(ObjectGetString(0, "ActP_Dev_edit1", OBJPROP_TEXT));
   string comm=ObjectGetString(0,"ActP_Comm_edit1",OBJPROP_TEXT);
   ENUM_ORDER_TYPE_FILLING filling=ORDER_FILLING_FOK;
   if(ObjectGetInteger(0,"ActP_Exe2_radio1",OBJPROP_STATE)==1) filling=ORDER_FILLING_IOC;
   //prepare request
   MqlTradeRequest req;
   MqlTradeResult res;
   req.action=TRADE_ACTION_DEAL;
   req.symbol=Symbol();
   req.volume=lots;
   req.price=Ask;
   req.sl=NormalizeDouble(SL, Digits());
   req.tp=NormalizeDouble(TP, Digits());
   req.deviation=dev;
   req.type=typ;
   req.type_filling=filling;
   req.magic=mag;
   req.comment=comm;
   //send order
   OrderSend(req,res);
   //show message with the result
   MessageBox(RetcodeDescription(res.retcode),"Message");
   //return retcode
   return(res.retcode);
  }
이상할게 하나도 없죠 먼저 객체에서 필요한 정보를 읽고 매매 요청을 생성합니다.
작업을 확인해봅시다:
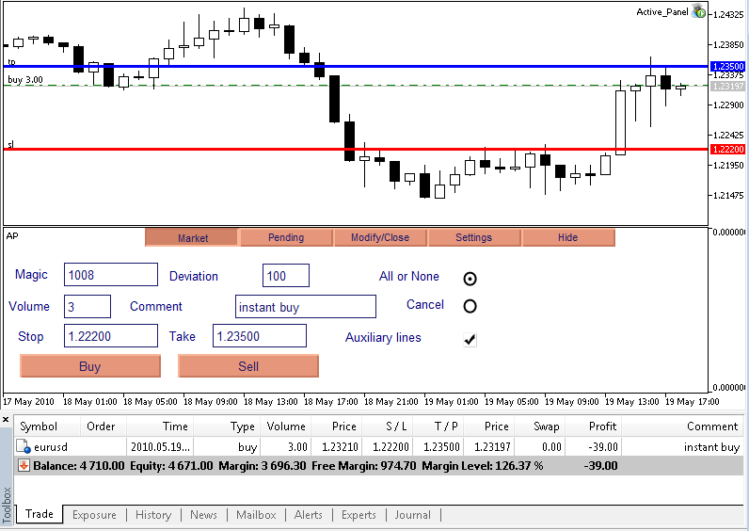
17번 그림. 거래 작업 - 매수 주문 실행 결과
보시다시피 매수 주문이 성공적으로 처리되었습니다.
6.2. 보류중인 주문 설정
"Pending" 탭의 "Buy" 및 "Sell" 버튼은 보류 중인 주문을 처리하는 역할을 합니다.
핸들러를 한 번 봅시다:
void OnChartEvent(const int id, const long &lparam, const double &dparam, const string &sparam)
{
...
   //Event - click on the chart object
   if(id==CHARTEVENT_OBJECT_CLICK)
   {
   ...
       //click on the pending order set button
      if(sparam=="ActP_buy_button2")
      {
         //check the button state
         bool selected=ObjectGetInteger(0,sparam,OBJPROP_STATE);
         //if it pressed
         if(selected)
         {
            ENUM_ORDER_TYPE typ;
            //get the pending order from the edit
            double pr=NormalizeDouble(StringToDouble(ObjectGetString(0, "ActP_Pr_edit2", OBJPROP_TEXT)), Digits());
            //if it isn't stoplimit order
            if(ObjectGetInteger(0, "ActP_limit_check2", OBJPROP_STATE)==0)
            {
               //if the order price is below the current price, set limit order
               if(Ask>pr) typ=ORDER_TYPE_BUY_LIMIT;
               //overwise - stop order
               else typ=ORDER_TYPE_BUY_STOP;
            }
              //if stoplimit order is specified
            else
            {
               //set operation type
               typ=ORDER_TYPE_BUY_STOP_LIMIT;
            }
              //try to place order
            order(typ);
              //set button to the unpressed state
            ObjectSetInteger(0, sparam, OBJPROP_STATE, 0);
         }
          //redraw chart
         ChartRedraw();
          //and finish the execution of function
         return;
      }
      //******************************************

       //similar for the sell pending order
      if(sparam=="ActP_sell_button2")
      {
         bool selected=ObjectGetInteger(0,sparam,OBJPROP_STATE);
         if(selected)
         {
            ENUM_ORDER_TYPE typ;
            double pr=NormalizeDouble(StringToDouble(ObjectGetString(0, "ActP_Pr_edit2", OBJPROP_TEXT)), Digits());
            if(ObjectGetInteger(0, "ActP_limit_check2", OBJPROP_STATE)==0)
            {
               if(Bid<pr) typ=ORDER_TYPE_SELL_LIMIT;
               else typ=ORDER_TYPE_SELL_STOP;
            }
            else
            {
               typ=ORDER_TYPE_SELL_STOP_LIMIT;
            }
            order(typ);
            ObjectSetInteger(0, sparam, OBJPROP_STATE, 0);
         }
         ChartRedraw();
         return;
      }
   ...
   }
...
}
여기서는 현재 시장 가격과 설정된 가격을 비교하여 그를 기반으로 미래에 주문할 타입을 결정합니다. 그 후 order() 함수가 주문을 결정합니다.
//+------------------------------------------------------------------+
//| The function places an order                                     |
//+------------------------------------------------------------------+
int order(ENUM_ORDER_TYPE typ)
  {
   //get the order details from the objects
   double pr=StringToDouble(ObjectGetString(0,"ActP_Pr_edit2",OBJPROP_TEXT));
   double stoplim=StringToDouble(ObjectGetString(0,"ActP_limpr_edit2",OBJPROP_TEXT));
   double SL=StringToDouble(ObjectGetString(0, "ActP_SL_edit2", OBJPROP_TEXT));
   double TP=StringToDouble(ObjectGetString(0, "ActP_TP_edit2", OBJPROP_TEXT));
   double lots=StringToDouble(ObjectGetString(0,"ActP_Lots_edit2",OBJPROP_TEXT));
   datetime expir=StringToTime(ObjectGetString(0,"ActP_exp_edit2",OBJPROP_TEXT));
   int mag=StringToInteger(ObjectGetString(0,"ActP_Magic_edit2",OBJPROP_TEXT));
   string comm=ObjectGetString(0,"ActP_Comm_edit2",OBJPROP_TEXT);
   ENUM_ORDER_TYPE_FILLING filling=ORDER_FILLING_FOK;
   if(ObjectGetInteger(0, "ActP_Exe2_radio2", OBJPROP_STATE)==1) filling=ORDER_FILLING_IOC;
   if(ObjectGetInteger(0, "ActP_Exe3_radio2", OBJPROP_STATE)==1) filling=ORDER_FILLING_RETURN;
   ENUM_ORDER_TYPE_TIME expir_type=ORDER_TIME_GTC;
   if(ObjectGetInteger(0, "ActP_exp2_radio2", OBJPROP_STATE)==1) expir_type=ORDER_TIME_DAY;
   if(ObjectGetInteger(0, "ActP_exp3_radio2", OBJPROP_STATE)==1) expir_type=ORDER_TIME_SPECIFIED;

   //prepare request
   MqlTradeRequest req;
   MqlTradeResult res;
   req.action=TRADE_ACTION_PENDING;
   req.symbol=Symbol();
   req.volume=lots;
   req.price=NormalizeDouble(pr,Digits());
   req.stoplimit=NormalizeDouble(stoplim,Digits());
   req.sl=NormalizeDouble(SL, Digits());
   req.tp=NormalizeDouble(TP, Digits());
   req.type=typ;
   req.type_filling=filling;
   req.type_time=expir_type;
   req.expiration=expir;
   req.comment=comm;
   req.magic=mag;
   //place order
   OrderSend(req,res);
   //show message with the result
   MessageBox(RetcodeDescription(res.retcode),"Message");
   //return retcode
   return(res.retcode);
  }
작업을 확인해봅시다:
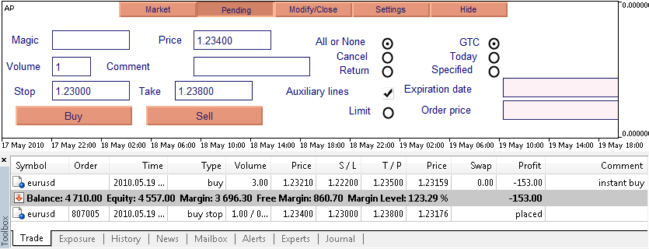
18번 그림. 거래 작업 - 보류 주문을 처리한 결과
역지정 매수가 성공적으로 준비되었습니다.
6.3. 포지션 변경
"Modify/Close" 탭의 Edit 버튼은 선택한 포지션을 수정합니다.
void OnChartEvent(const int id, const long &lparam, const double &dparam, const string &sparam)
{
...
   //Event - click on the graphic object on the chart
   if(id==CHARTEVENT_OBJECT_CLICK)
   {
   ...
       //click on the modify position button
      if(sparam=="ActP_mod_button4")
      {
          //check the button state
         bool selected=ObjectGetInteger(0,sparam,OBJPROP_STATE);
          //if it pressed
         if(selected)//if pressed
         {
            //modify position
            modify_pos();
            //delete the elements of the scheme
            DeleteScheme("ActP" ,true);
            //and reset it (update the interface)
            SetScheme(0);
            //set the button to the unpressed state
            ObjectSetInteger(0, sparam, OBJPROP_STATE, 0);
         }
          //redraw chart
         ChartRedraw();
          //finish the execution of function
         return;
      }
   ...
   }
...
}
Modify_pos() 함수가 직접적으로 수정을 담당하고 있습니다:
//+------------------------------------------------------------------+
//| The function modifies the position parameters                    |
//+------------------------------------------------------------------+
int modify_pos()
  {
   if(!PositionSelect(Symbol())) MessageBox("There isn't open position for symbol "+Symbol(),"Message");
   //get the details from the edit objects
   double SL=StringToDouble(ObjectGetString(0,"ActP_SL_edit4",OBJPROP_TEXT));
   double TP=StringToDouble(ObjectGetString(0, "ActP_TP_edit4", OBJPROP_TEXT));
   int dev=StringToInteger(ObjectGetString(0,"ActP_dev_edit4",OBJPROP_TEXT));
   //prepare request
   MqlTradeRequest req;
   MqlTradeResult res;
   req.action=TRADE_ACTION_SLTP;
   req.symbol=Symbol();
   req.sl=NormalizeDouble(SL, _Digits);
   req.tp=NormalizeDouble(TP, _Digits);
   req.deviation=dev;
   //send request
   OrderSend(req,res);
   //show message with the result
   MessageBox(RetcodeDescription(res.retcode),"Message");
   //return retcode
   return(res.retcode);
  }
결과:
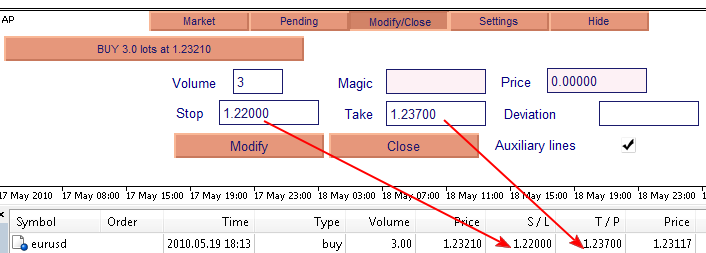
19번 그림. 주문 운영 - 주문 속성을 수정한 결과(TP 및 SL 설정)
손절 및 이익실현 레벨이 성공적으로 변경되었습니다.
6.4. 포지션 청산
"Modify/Close" 탭의 Close 버튼은 선택한 포지션을 청산합니다(어쩌면 부분적으로).
void OnChartEvent(const int id, const long &lparam, const double &dparam, const string &sparam)
{
...
   //Event - click on the chart object
   if(id==CHARTEVENT_OBJECT_CLICK)
   {
   ...
      //click on the close button
      if(sparam=="ActP_del_button4")
      {
         //check the button state
         bool selected=ObjectGetInteger(0,sparam,OBJPROP_STATE);
          //if pressed
         if(selected)
         {
            //try to close position
            int retcode=close_pos();
            //if successful
            if(retcode==10009)
            {
               //delete scheme elements
               DeleteScheme("ActP" ,true);
               //set the new text for the list activisation
               ObjectSetString(0, "ActP_ord_button5", OBJPROP_TEXT, "Select order -->");
            }
            //set button state to unpressed
            ObjectSetInteger(0, sparam, OBJPROP_STATE, 0);
         }
          //redraw chart
         ChartRedraw();
          //finish the execution of function
         return;
      }
   ...
   }
...
}
close_pos() 함수가 청산을 처리합니다:
//+------------------------------------------------------------------+
//| Closes the position                                              |
//+------------------------------------------------------------------+
int close_pos()
  {
   if(!PositionSelect(Symbol())) MessageBox("There isn't open position for symbol "+Symbol(),"Message");
   //get the position details from the objects
   double lots=StringToDouble(ObjectGetString(0,"ActP_lots_edit4",OBJPROP_TEXT));
   if(lots>PositionGetDouble(POSITION_VOLUME)) lots=PositionGetDouble(POSITION_VOLUME);
   int dev=StringToInteger(ObjectGetString(0, "ActP_dev_edit4", OBJPROP_TEXT));
   int mag=StringToInteger(ObjectGetString(0, "ActP_mag_edit4", OBJPROP_TEXT));

   //prepare request
   MqlTradeRequest req;
   MqlTradeResult res;

   //the opposite deal is dependent on position type
   if(PositionGetInteger(POSITION_TYPE)==POSITION_TYPE_BUY)
     {
      req.price=Bid;
      req.type=ORDER_TYPE_SELL;
     }
   else
     {
      req.price=Ask;
      req.type=ORDER_TYPE_BUY;
     }

   req.action=TRADE_ACTION_DEAL;
   req.symbol=Symbol();
   req.volume=lots;
   req.sl=0;
   req.tp=0;
   req.deviation=dev;
   req.type_filling=ORDER_FILLING_FOK;
   req.magic=mag;
   //send request
   OrderSend(req,res);
   //show message with the result
   MessageBox(RetcodeDescription(res.retcode),"Message");
   //return retcode
   return(res.retcode);
  }
결과 - 선택한 트랜잭션 3개의 1.5 랏를 닫았습니다.
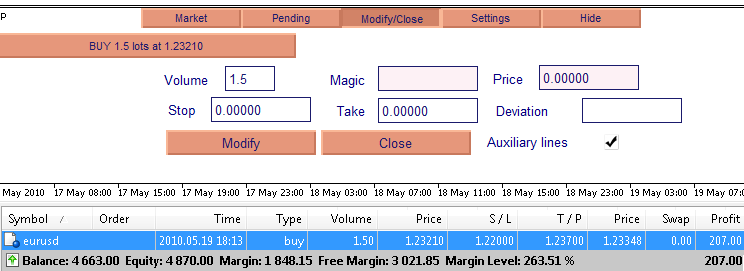
20번 그림. 주문 - 부분 포지션 청산
6.5. 보류중인 주문 변경
"Modification/Closure" 탭의 Edit 버튼은 선택한 주문을 수정합니다:
void OnChartEvent(const int id, const long &lparam, const double &dparam, const string &sparam)
{
...
   //Event - click on the chart graphic object
   if(id==CHARTEVENT_OBJECT_CLICK)
   {
   ...
      //click on the order modify button
      if(sparam=="ActP_mod_button3")
      {
         bool selected=ObjectGetInteger(0,sparam,OBJPROP_STATE);
         if(selected)
         {
            //get the order ticket from the edit
            string button_name=ObjectGetString(0, "ActP_ord_button5", OBJPROP_TEXT);
            long ticket=StringToInteger(StringSubstr(button_name, 1, StringFind(button_name, " ")-1));
            //modifying an order
            modify_order(ticket);
            //update interface
            DeleteScheme("ActP" ,true);
            SetScheme(ticket);
            //set button to unpressed state
            ObjectSetInteger(0, sparam, OBJPROP_STATE, 0);
         }
          //redraw chart
         ChartRedraw();
          //and finish the execution of function
         return;
      }
   ...
   }
...
}
Modify_order () 함수가 변경을 담당합니다:
//+------------------------------------------------------------------+
//| The function modifies an order                                   |
//| ticket - order ticket                                            |
//+------------------------------------------------------------------+
int modify_order(int ticket)
  {
   //get the order details from the corresponding chart objects
   double pr=StringToDouble(ObjectGetString(0,"ActP_Pr_edit3",OBJPROP_TEXT));
   double stoplim=StringToDouble(ObjectGetString(0,"ActP_limpr_edit3",OBJPROP_TEXT));
   double SL=StringToDouble(ObjectGetString(0, "ActP_SL_edit3", OBJPROP_TEXT));
   double TP=StringToDouble(ObjectGetString(0, "ActP_TP_edit3", OBJPROP_TEXT));
   double lots=StringToDouble(ObjectGetString(0,"ActP_Lots_edit3",OBJPROP_TEXT));
   datetime expir=StringToTime(ObjectGetString(0,"ActP_exp_edit3",OBJPROP_TEXT));
   ENUM_ORDER_TYPE_TIME expir_type=ORDER_TIME_GTC;
   if(ObjectGetInteger(0, "ActP_exp2_radio3", OBJPROP_STATE)==1) expir_type=ORDER_TIME_DAY;
   if(ObjectGetInteger(0, "ActP_exp3_radio3", OBJPROP_STATE)==1) expir_type=ORDER_TIME_SPECIFIED;

   //prepare request to modify
   MqlTradeRequest req;
   MqlTradeResult res;
   req.action=TRADE_ACTION_MODIFY;
   req.order=ticket;
   req.volume=lots;
   req.price=NormalizeDouble(pr,Digits());
   req.stoplimit=NormalizeDouble(stoplim,Digits());
   req.sl=NormalizeDouble(SL, Digits());
   req.tp=NormalizeDouble(TP, Digits());
   req.type_time=expir_type;
   req.expiration=expir;
   //send request
   OrderSend(req,res);
   //show message with the result
   MessageBox(RetcodeDescription(res.retcode),"Message");
   //return retcode
   return(res.retcode);
  }
결과를 봅시다. 주문이 성공적으로 수정되었습니다:
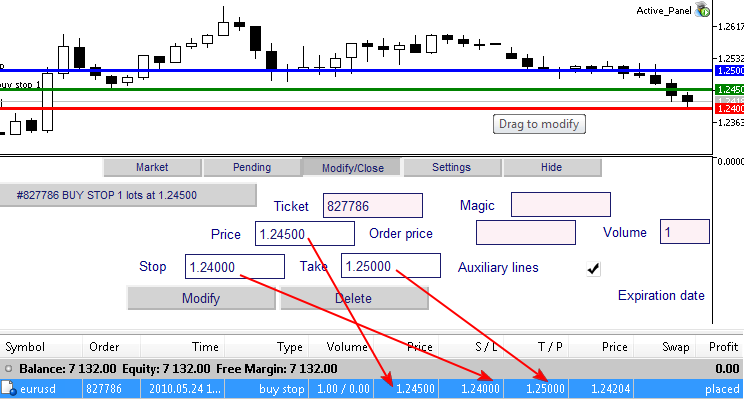
21번 그림. 보류중인 주문 변경
6.6. 보류중인 주문 삭제하기
"Modification/Closure" 탭의 Delete 버튼은 선택한 주문을 삭제합니다:
void OnChartEvent(const int id, const long &lparam, const double &dparam, const string &sparam)
{
...
   //Event - click on the graphic object on the chart
   if(id==CHARTEVENT_OBJECT_CLICK)
   {
   ...
       //click on the order delete button
      if(sparam=="ActP_del_button3")
      {
         //check the button state
         bool selected=ObjectGetInteger(0,sparam,OBJPROP_STATE);
          //if pressed
         if(selected)
         {
            //get the ticket from the list
            string button_name=ObjectGetString(0, "ActP_ord_button5", OBJPROP_TEXT);
            long ticket=StringToInteger(StringSubstr(button_name, 1, StringFind(button_name, " ")-1));
            //try to delete order
            int retcode=del_order(ticket);
            //if successful
            if(retcode==10009)
            {
               //delete all objects of the scheme
               DeleteScheme("ActP" ,true);
               //set new text for the list activation button
               ObjectSetString(0, "ActP_ord_button5", OBJPROP_TEXT, "Select an order -->");
            }
             //set button state to unpressed
            ObjectSetInteger(0, sparam, OBJPROP_STATE, 0);
         }
          //redraw chart
         ChartRedraw();
          //and finish the execution of function
         return;
      }
   ...
   }
...
}
del_order() 함수가 주문의 삭제를 처리합니다:
//+------------------------------------------------------------------+
//| The function for pending order deletion                          |
//| ticket - order ticket                                            |
//+------------------------------------------------------------------+
int del_order(int ticket)
  {
   //prepare request for deletion
   MqlTradeRequest req;
   MqlTradeResult res;
   req.action=TRADE_ACTION_REMOVE;
   req.order=ticket;
   //send request
   OrderSend(req,res);
   //show message with the result
   MessageBox(RetcodeDescription(res.retcode),"Message");
   //return retcode
   return(res.retcode);
  }
결과를 봅시다 - 주문이 삭제되었습니다.

22번 그림. 주문 - 보류 주문 삭제
마치며
마지막으로 제어판의 모든 기능이 테스트되었으며 성공적으로 작동하고 있습니다.
이 기사를 읽고 얻은 지식이 시장에서 일하기 위한 대체 불가능한 보조 역할을 하는 능동적인 제어판의 개발에 도움이 되기를 바랍니다.
제어판 제작을 시작하려면 터미널 폴더에 아카이브를 압축해제하고, AP 인디케이터를 차트에 적용한 후 그 다음에 Active Panel Expert Advisor를 실행하십시오.
MetaQuotes 소프트웨어 사를 통해 러시아어가 번역됨.
원본 기고글: https://www.mql5.com/ru/articles/62
 MQL5에서 ICQ 와 Expert Advisor 사이의 연결
 문자 알림과 트레이드 리포트 생성 및 발간
 MQL5으로 "스네이크" 게임 만들기
 다양한 대륙과 시간대에 맞춘 거래 전략의 예시