
Developing an MQL5 RL agent with RestAPI integration (Part 3): Creating automatic moves and test scripts in MQL5

Introduction
In this article, which is the third in a series, we will delve into the practical application of REST APIs in systems. We have seen the development of MQL5 functions and their integration with the Python tic-tac-toe game via FastAPI. In this new article, we can make significant progress. We will focus on implementing automatic tic-tac-toe moves to increase the level of difficulty and interactivity of the game. We will also pay special attention to the development of test scripts in MQL5 to ensure the reliability and efficiency of our integrated system.
Understanding the complexity of this project, it seems necessary to provide clear instructions for installation and execution. I regret not including this information in previous parts and thank you for your understanding. Therefore, I'm presenting a step-by-step guide, including recommendations for Windows users who may encounter scripting restrictions.
Installation and Implementation Guide
Prerequisites:
- Python 3.6 or higher.
- MetaTrader 5 installed on your computer.
- On Windows, make sure scripting is allowed. If necessary, run Set-ExecutionPolicy RemoteSigned in PowerShell as administrator to allow the script to run.
Installation and implementation steps:
- Download and unpack the project. After downloading the article project, unpack the files into the desired folder.
- Copy it to the Experts folder. Move the extracted folder to the Experts folder in your MetaTrader terminal.
- Open the folder in the terminal.
- On Windows you can do this by searching for Command Prompt or PowerShell in the Start menu by opening the program and using the cd folder_path command to navigate to the corresponding project folder.
- On MacOS or Linux, open Terminal and run the cd folder_path command.
- Create a virtual environment. Open the project folder in the terminal and run python -m venv env to create a virtual environment.
- Activate the virtual environment. On Windows, run the env\Scripts\activate command. On MacOS or Linux, run the source env/bin/activate command.
- Install dependencies. After enabling the virtual environment, run pip install -r requirements.txt.
Project implementation:
- To run the tic-tac-toe game API, open the terminal in the project folder and run python AppTicTacToe.py.
- To execute in MetaTrader, open MetaEditor, go to the menu Tools > Options > Compilers. Paste the path to the 'scripts' folder of the virtual environment into the 'External compile location', click the compile button and/or drag the script onto the chart.
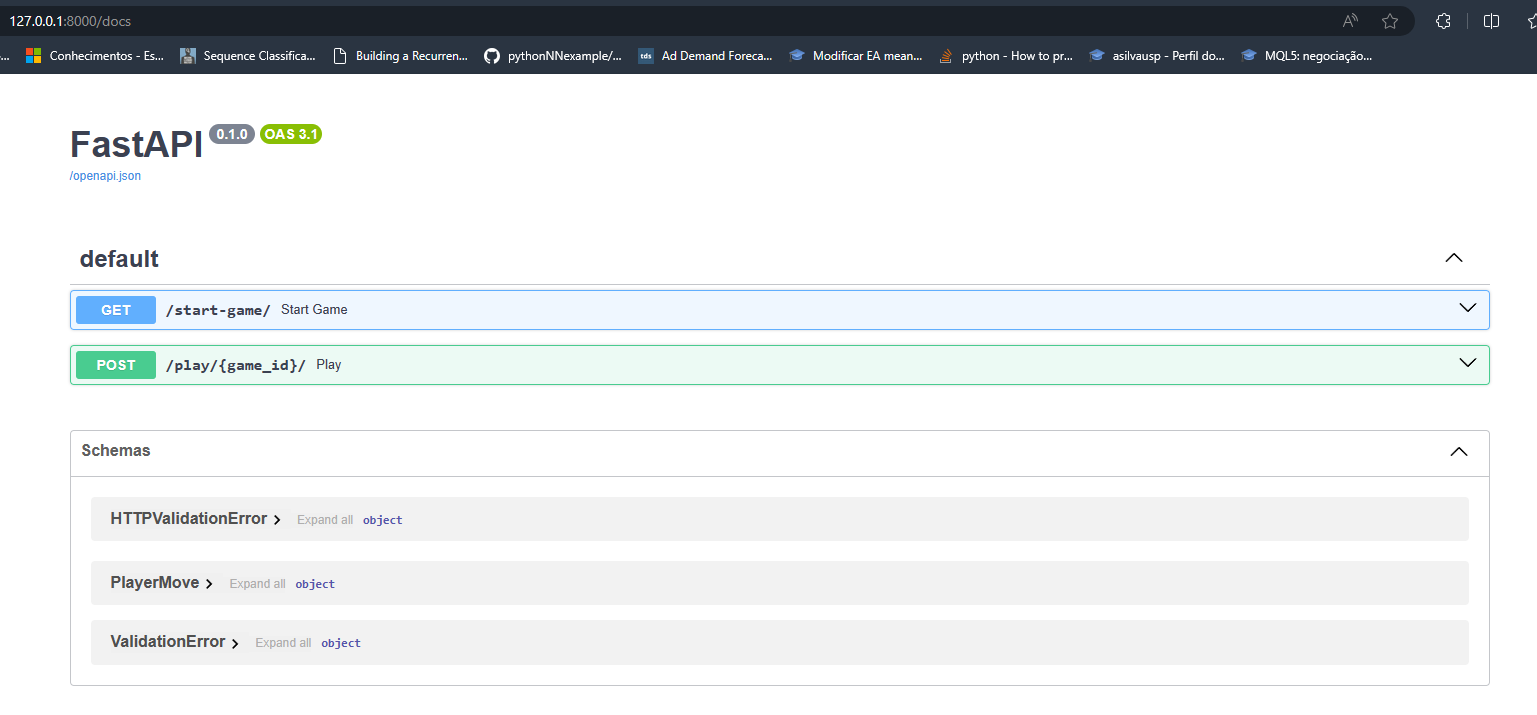
- Access Swagger UI. Go to localhost:8000/docs in the browser to interact with the API through the Swagger UI.
There are two main goals of our current work. First, to improve the tic-tac-toe game in Python so that it performs moves autonomously using intelligent decision-making algorithms. Second, the development and implementation of unit tests in MQL5, which check and ensure the reliability of interaction between the MQL5 code and the REST API.
This article consists of 3 parts:
- Developing automatic moves in the tic-tac-toe game, which describes the process of modifying the game to add the logic of automatic moves, including the programming methods used and the difficulties encountered.
- Creating test scripts in the MQL5 language, where we will see the process of developing unit tests in MQL5 with an emphasis on ways to test the interaction between MQL5 and the REST API.
- Practical and integration tests, during which we will see the integration of implemented improvements, including tests and evaluation of results.
Thus, developing an agent in MQL5 that interacts with the tic-tac-toe game becomes the next logical step. This agent can imitate a real user, performing moves and responding to actions in the game, thereby creating a testing environment that is close to reality. This strategy allows us to not only test the functionality of the game and the API, but also study (and improve) the decision-making algorithms in automated games, providing a more complex and engaging gaming experience.
The combination of automatic tic-tac-toe play and unit testing in MQL5 creates a robust development cycle where every improvement in the game is tested and refined through rigorous testing. A continuous development and testing process ensures the creation of a reliable and efficient integrated system that can provide not only an improved gaming experience, but also valuable insights for future integrations and developments on systems in need of integration.
Developing Automatic Moves
This section will focus on understanding the structure and logic of existing game code. Since the game does not have a graphical interface, and complex decision-making algorithms will not be used to implement automatic moves, our goal will be to simplify and optimize this process.
The first step is to analyze how the game handles manual moves, looking at the logic that drives the moves and how it determines the state: win, lose or draw. Understanding this process will be necessary to integrate automatic move functionality without breaking existing game mechanics.
In the future, automatic moves will be implemented in a simpler way. Instead of a complex algorithm, we can choose a more direct approach, such as randomly selecting a free position on the playing field for automatic play. Despite its simplicity, this approach should be enough to imitate an opponent and make the game dynamic.
Let's look closely at the old game code and try to understand how it works. This is necessary to be able to plan how to add automatic moves without complicating the game. Our goal is to make everything user friendly while sticking to the simple style that is already in the game.
Game initialization:
def __init__(self):
    self.board = [[' ' for _ in range(3)] for _ in range(3)]
    self.player_turn = True
Here the game is initialized with an empty board (self.board), while variable self.player_turn indicates the player's turn. The minimalist design provides an ideal starting point for integrating automated game logic without complicating the existing code.
Display of the board:
def print_board(self):
    for row in self.board:
        print("|".join(row))
        print("-" * 5)
The print_board method handles the display of the game board. The way the game state is presented is critical to maintaining usability and understanding of the game, especially after the introduction of automatic moves.
Checking the winner:
 def check_winner(self):
     for i in range(3):
         if self.board[i][0] == self.board[i][1] == self.board[i][2] != ' ':
             return self.board[i][0]
         if self.board[0][i] == self.board[1][i] == self.board[2][i] != ' ':
             return self.board[0][i]
     if self.board[0][0] == self.board[1][1] == self.board[2][2] != ' ':
         return self.board[0][0]
     if self.board[0][2] == self.board[1][1] == self.board[2][0] != ' ':
         return self.board[0][2]
     return None
This method is necessary to determine the winner after each game. Its logic will be needed when checking for game completion, both for manual and automatic games.
Executing moves:
 def make_move(self, row, col):
     if self.board[row][col] == ' ':
         if self.player_turn:
             self.board[row][col] = 'X'
         else:
             self.board[row][col] = 'O'
         self.player_turn = not self.player_turn
     else:
         print("Invalid move. Try again.")
The make_move method is responsible for player moves. Implementation of automatic moves will require modification of this method to switch between manual and automatic moves.
Executing automatic moves:
Implementing automatic moves in tic-tac-toe is a new challenge and fun. Let's try to implement it using a new method called machine_move. First it will try to find a way to win or prevent the other player from winning. If there is no such opportunity, it will choose an empty position on the game board at random.
def machine_move(self):
    for i in range(3):
        for j in range(3):
            if self.board[i][j] == ' ':
                # First try to find a winning move for 'O'
                self.board[i][j] = 'O'
                if self.check_winner() == 'O':
                    return (i, j)  # Return position for win
                self.board[i][j] = ' '

                # Then try to block a winning move for 'X'
                self.board[i][j] = 'X'
                if self.check_winner() == 'X':
                    self.board[i][j] = 'O'  # Block the win of the player
                    return (i, j)
                self.board[i][j] = ' '

    # If there are no winning moves, randomly choose a free position
    available_moves = self.available_moves()
    if available_moves:
        move = random.choice(available_moves)
        self.board[move["row"]][move["col"]] = 'O'
        return (move["row"], move["col"])
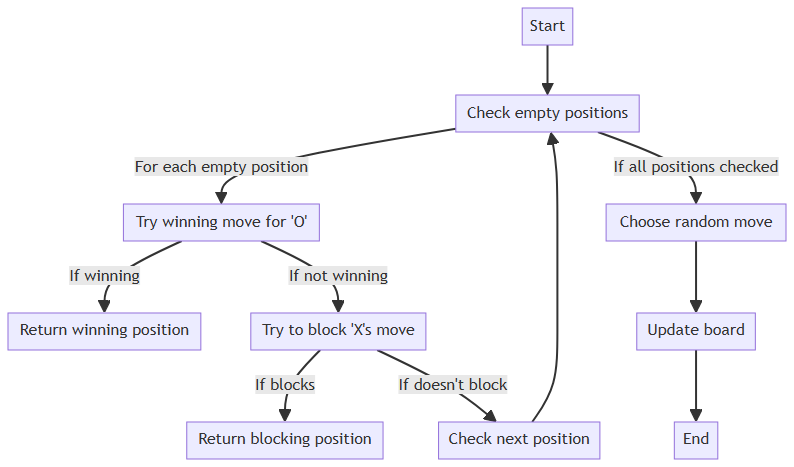
We will also have a method available_moves. This method is very important because it allows you to view the game board and show all the empty positions. This way we guarantee that the computer will only make moves in empty cells.
def available_moves(self):
    moves = []
    for i in range(3):
        for j in range(3):
            if self.board[i][j] == ' ':
                moves.append({"row": i, "col": j})
    return moves
Thanks to these changes, the tic-tac-toe becomes more interesting. It remains simple, but now has an added element of surprise and strategy thanks to automatic moves. And this makes the game even more exciting.
Integrating automatic moves into a Python tic-tac-toe game adds complexity and interactivity, paving the way for future advanced implementations such as the implementation of an MQL5 agent. The idea is that at the end of this stage of development, the game will not only become more complex for the player but will also be ready for more complex interactions with other external agents.
Although the logic of automatic moves is initially simple, it lays a solid foundation for the game. With the ability to perform autonomous moves and dynamically respond to the game context, the system becomes suitable for simulating a realistic opponent. This is necessary to test the effectiveness and stability of the game in various scenarios, especially in preparation for the future implementation of the MQL5 agent.
When planning to implement this agent, tic-tac-toe with automatic moves will already be equipped to simulate a real-life gaming environment. The agent will be able to interact with the game, making moves and reacting to automatic actions, with a script that approximates a game between two human players. Such interaction will allow us to evaluate not only the functionality of the game and the API, but also the effectiveness of the decision-making algorithms used, which will open the way for improvements and amendments.
Additionally, the presence of an MQL5 agent will provide a more advanced and realistic testing environment. This will allow us to simulate different game scenarios, test the system's response in different conditions and ensure the stability and reliability of the game.
Below is the complete game code:
class TicTacToe:

    def __init__(self):
        self.board = [[' ' for _ in range(3)] for _ in range(3)]
        self.player_turn = True

    def print_board(self):
        for row in self.board:
            print("|".join(row))
            print("-" * 5)
        print(f"Player {self.player_turn}'s turn")

    def check_winner(self):
        for i in range(3):
            if self.board[i][0] == self.board[i][1] == self.board[i][2] != ' ':
                return self.board[i][0]
            if self.board[0][i] == self.board[1][i] == self.board[2][i] != ' ':
                return self.board[0][i]
        if self.board[0][0] == self.board[1][1] == self.board[2][2] != ' ':
            return self.board[0][0]
        if self.board[0][2] == self.board[1][1] == self.board[2][0] != ' ':
            return self.board[0][2]
        return None

    def machine_move(self):
        for i in range(3):
            for j in range(3):
                if self.board[i][j] == ' ':
                    self.board[i][j] = 'O'
                    if self.check_winner() == 'O':
                        return (i, j)
                    self.board[i][j] = ' '
                    self.board[i][j] = 'X'
                    if self.check_winner() == 'X':
                        self.board[i][j] = 'O'
                        return (i, j)
                    self.board[i][j] = ' '

        for i in range(3):
            for j in range(3):
                if self.board[i][j] == ' ':
                    self.board[i][j] = 'O'
                    return (i, j)


    def available_moves(self):
        moves = []
        for i in range(3):
            for j in range(3):
                if self.board[i][j] == ' ':
                    moves.append({"row": i, "col": j})
        return moves
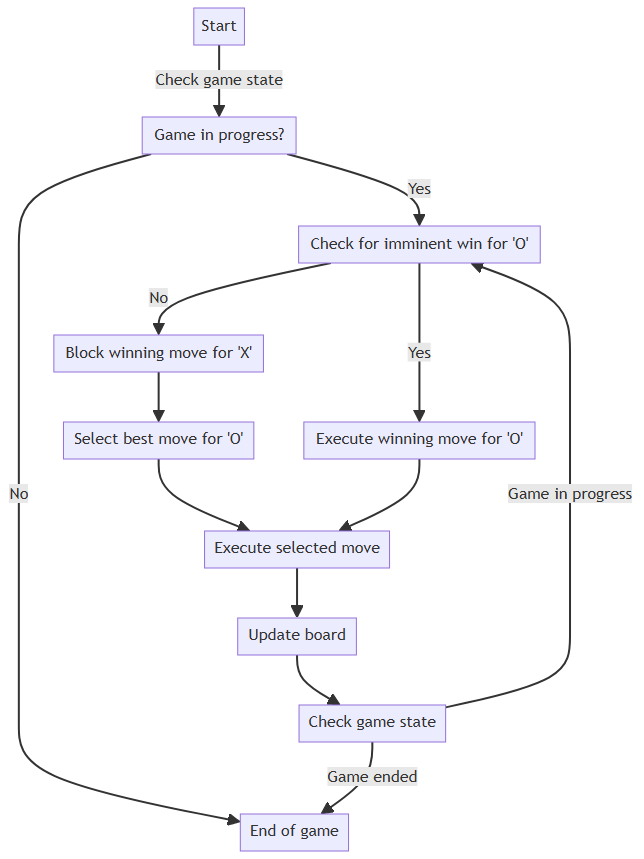
Now that we have implemented automatic moves in the tic-tac-toe game in Python, we need to integrate this functionality with our FastAPI. This step is necessary to ensure efficient and seamless interaction between the game and the backend, which paves the way for future integrations, such as the implementation of an MQL5 agent.
In order for the API to support automatic moves, we need to make some important changes to the code. Let's now go through the steps required for this integration in detail.
-
Improved turn management: The API should correctly determine whose turn it is to play, the player or the machine. After each player's move, the API must check whether it is the turn of the machine and, if so, activate the automatic turn logic.
-
Integration with machine_move logic: The machine_move function in the tic-tac-toe game code is necessary for automatic moves. Therefore, after each player move, the API must call this method to determine the machine's reaction.
-
Consistent update of game state information: After each turn, be it player or machine, the API must be updated to accurately reflect the state of the game board. This ensures that the player always receives up-to-date and correct information about the progress of the game.
-
Game result handling: The API should be able to determine the end of the game (whether it's a win or a draw) and report it accordingly. It is very important that the API provides clear information about the winner of the game or declares a draw if winning is not possible.
-
Clear and meaningful responses: The API must provide all the necessary data in response, such as the current state of the playing field, the moves made by the machine, and the result of the game, if any. All this ensures a smooth and informative user experience.
Example of Implementation in API
To accommodate these changes, we will change the play function in the API:
@app.post("/play/{game_id}/")
def play(game_id: int, move: PlayerMove):
    game = games.get(game_id)
    if not game:
        raise HTTPException(status_code=404, detail="Game not found")

    board = game.board
    if board[move.row][move.col] == ' ':
        board[move.row][move.col] = 'X'
    else:
        raise HTTPException(status_code=400, detail="Invalid move")

    player_move = {"row": move.row, "col": move.col, "symbol": 'X'}

    winner = game.check_winner()
    machine_move_result = None

    if not winner:
        game.player_turn = not game.player_turn
        if not game.player_turn:
            move_result = game.machine_move()
            if move_result:
                row, col = move_result
                machine_move_result = {"row": row, "col": col, "symbol": 'O'}
                winner = game.check_winner()
            game.player_turn = not game.player_turn

    return {
        "board": board,
        "player_move": player_move,
        "machine_move": machine_move_result,
        "winner": winner,
        "available_moves": game.available_moves()
    }
We implement the functionality of automatic moves in the tic-tac-toe game in Python and adapt FastAPI to support this functionality in order to create a full-fledged interactive gaming system. Now that the API is configured to handle automatic moves, players can interact with the game in a more dynamic way. When a player makes a move, the API checks to see if it is the machine's turn to play and, if so, activates the automatic move logic. This creates a continuous interactive gameplay experience where a human competes against an artificial intelligence to win.
In addition, the API provides detailed information about the current state of the game, including the updated board, the moves made by the machine, and the result of the game, whether one of the players wins or draws. This makes the player's experience more engaging and informative.
Creating Test Scripts in MQL5
In the previous article, we learned how to create and manage HTTP requests in MQL5. Now we'll apply this knowledge to develop robust unit tests. We design each test function to simulate real-life interaction scenarios between MQL5 code and the REST API, ensuring that all aspects of the interaction are tested and verified.
The tests cover everything from initializing the game to performing correct and incorrect moves, as well as checking win conditions. This will also create a solid foundation for future expansions and integrations.
At the end of this topic, the reader will have a clear understanding of how unit tests are structured and implemented in MQL5 and how important they are for system development.
Test Structure
Test code in MQL5 is organized in three main files:
- Tests.mqh contains test functions.
- Request.mqh handles HTTP requests.
- Tests.mq5 is the main script that runs the tests.
Tests.mqh
- Assert(): This function is used to check if a certain condition is true. It is very important to confirm the expected test results.
Code and explanation:
void Assert(bool condition, const string message) {
  if(!condition) {
    Print("Test error: ", message);
  }
}
If the condition passed to Assert is false, it prints an error message. This helps you quickly identify testing failures.
- TestGameInitialisation(): Checks the initialization of the new game and ensures that the API responds correctly.
void TestGameInitialization() {
  string url = "http://localhost:8000/start-game/";
  string response;
  int result = Request("GET", response, url);
  Assert(result == 200, "Game initialization failed");
  Assert(StringLen(response) > 0, "game_id missing in game initialization response");
}This function makes a GET request to start a game and checks if the response code is 200 (OK) and if
game_id is returned in the response.
This function makes a GET request to start a game and checks if the response code is 200 (OK) and if the game_id is returned in the response.
-
TestPlayerMove(): Tests the functionality of the player making the correct move.
// Test function to check player's move
void TestPlayerMove()
  {
   string url = "http://localhost:8000/start-game/";
   string response;
   int result = -1;
   int game_id = -1;

   Request("GET", response, url);

   js.Deserialize(response);
   game_id = js["game_id"].ToStr();

// Make a valid player move
   url = StringFormat("http://localhost:8000/play/%d/", game_id);
   string payload = "{\"row\": 0, \"col\": 0}";
   result = Request("POST", response, url, payload);

// Check if the HTTP response code is 200 (OK)
   Assert(result == 200, "Player move failed");

// Check if the response contains information about the player's move
// (you can adjust this based on the actual response structure)
   Assert(StringFind(response, "player_move") != -1, "Player move response incomplete");
  }
Once the game starts, this function makes a valid move and checks if the API processes the move correctly, returning code 200 and move information in the response body.
- TestInvalidPlayerMove(): Checks the API response for invalid movement.
Code and explanation:
// Test function to check an invalid player move
void TestInvalidPlayerMove()
  {
   string url = "http://localhost:8000/start-game/";
   string response;
   int result = -1;
   int game_id = -1;

   Request("GET", response, url);

   js.Deserialize(response);
   game_id = js["game_id"].ToStr();

// Make an invalid player move (e.g., on an occupied position)
   url = StringFormat("http://localhost:8000/play/%d/", game_id);
   string payload = "{\"row\": 0, \"col\": 0}";
   Request("POST", response, url, payload);

//repeat
   payload = "{\"row\": 0, \"col\": 0}";
   result = Request("POST", response, url, payload);

// Check if the HTTP response code is 400 (Bad Request)
   Assert(result == 400, "Invalid player move not handled correctly");
  }
-
TestPlayerWin(): Simulates the sequence of moves that leads to the player's win.
// Test function to check player's victory
void TestPlayerWin()
  {
   string url = "http://localhost:8000/start-game/";
   string response;
   int result = -1;
   int game_id = -1;

   Request("GET", response, url);

   js.Deserialize(response);
   game_id = js["game_id"].ToStr();

// Make moves for player X to win
   url = StringFormat("http://localhost:8000/play/%d/", game_id);

   string payload = "{\"row\": 0, \"col\": 0}";
   result = Request("POST", response, url, payload);
   Assert(result == 200, "Player X move 1 failed");

   payload = "{\"row\": 0, \"col\": 2}";
   result = Request("POST", response, url, payload);
   Assert(result == 200, "Player X move 2 failed");

   payload = "{\"row\": 2, \"col\": 2}";
   result = Request("POST", response, url, payload);
   Assert(result == 200, "Player X move 3 failed");

   payload = "{\"row\": 1, \"col\": 2}";
   result = Request("POST", response, url, payload);
   Assert(result == 200, "Player X move 4 failed");

// Check if the response contains information about the winner
   js.Deserialize(response); // Deserialize the updated game state

// Check if the HTTP response code is 200 (OK) after move 5
   Assert(result == 200 && js["winner"].ToStr() == "X", "Player X victory failed");

  }
This function performs a series of moves that will result in the player winning, and also checks to see if the API recognizes the win condition correctly.
- RunTests(): An aggregator function that runs all the defined tests.
// Function to run all tests
void RunTests()
  {
   TestGameInitialization();
   TestPlayerMove();
   TestInvalidPlayerMove();
   TestPlayerWin();
  }
This function simply calls all previously described test functions, running all tests at once.
Previously, we created the Requests library for interaction between MQL5 code and the REST API. In this article, we will continue to use this library, but with some significant improvements made to improve its functionality and efficiency.
Changes Made to the Requests Library
The new implementation of the Requests library has improvements, mainly aimed at flexibility and error diagnosis. Let's look at the main changes:
-
Enable debug option:
- Old implementation: In previous versions, the library did not provide a debugging option as such. Any debug output had to be implemented manually.
- Implementations of both the SendGetRequest and SendPostRequest functions now include a debug option. When enabled, this option allows you to print debug data, making it easier to trace and troubleshoot problems.
-
Improved error handling:
- Old implementation: Error handling was simpler; it only returned an error code or printed directly to the console.
- The new version offers more sophisticated error handling that allows you to better diagnose HTTP communication problems.
Why are these changes made? Changes to the Requests library were motivated by the need to:
- Improve Debugging: The ability to turn debugging on or off makes development and maintenance easier by allowing developers to quickly analyze API responses and identify problems.
- Improve error management: More efficient error handling is essential for reliable systems, especially when it comes to network communications, where a variety of problems can occur.
Impact of Changes
These improvements make the Requests library more versatile and reliable. With debugging capabilities, developers can get faster feedback as they develop and test their applications. Additionally, more efficient error handling helps identify and resolve API interaction issues, resulting in smoother, more reliable integration.
Change 1: Enabling the debug option
Previous implementations of SendGetRequest and SendPostRequest:
// Example of old SendGetRequest implementation
int SendGetRequest(const string url, const string query_param, string &out, string headers = "", const int timeout = 5000) {
   // ... code ...
   out = CharArrayToString(result, start_index, WHOLE_ARRAY, CP_UTF8);
   return (0);
}
New implementation with debugging:
// Example of new SendGetRequest implementation
int SendGetRequest(const string url, const string query_param, string &out, string headers = "", const int timeout = 5000, bool debug=false) {
   // ... code ...
   out = CharArrayToString(result, start_index, WHOLE_ARRAY, CP_UTF8);
   if(debug) {
       Print(out);
   }
   return res;
}
The new implementation includes a debug option. If it is true, the function prints the result, making debugging easier.
Change 2: Improving error handling
Previous implementations of SendGetRequest and SendPostRequest:
// Example of old implementation of SendGetRequest
int SendGetRequest(const string url, const string query_param, string &out, string headers = "", const int timeout = 5000) {
   // ... code ...
   if(res == -1) {
       return (_LastError);
   } else {
       // HTTP error handling
       out = CharArrayToString(result, 0, WHOLE_ARRAY, CP_UTF8);
       Print(out);
       return (ERR_HTTP_ERROR_FIRST + res);
   }
}
New implementation with improved error handling:
// Example if new implementation of SendGetRequest
int SendGetRequest(const string url, const string query_param, string &out, string headers = "", const int timeout = 5000, bool debug=false) {
   // ... code ...
   if(res == -1) {
       return (_LastError);
   } else {
       // HTTP error handling
       out = CharArrayToString(result, 0, WHOLE_ARRAY, CP_UTF8);
       if(debug) {
           Print(out);
       }
       return res;
   }
}
In the new implementation, HTTP error handling has become more accurate, with the ability to output data only when debugging mode is enabled.
Integration and Practical Tests
At this crucial stage of our project, we will demonstrate the integration of improvements implemented in the Requests library and automatic moves in a tic-tac-toe game in Python. In addition, we will conduct practical tests to evaluate the efficiency and reliability of the system as a whole. This step is necessary to ensure that all parts of our system work smoothly and reliably.
Integration Stages
Before you begin testing, it is important to understand how the new functionality was integrated. Below is the description of the main steps made to ensure a smooth integration:
-
Updating the Requests library: First, we've updated the Requests library to include the improvements we've implemented. This allowed for more effective communication.
-
Tic-tac-toe adaptation: An important step was the integration of automatic moves into the tic-tac-toe game in Python. We changed the game code so that it recognizes the machine's turn and activates the logic of automatic moves.
-
Implementation of API integration: Next, we adapted FastAPI to support automatic moves. This includes improved turn management, integration with the machine_move function, constant game state updates, and proper handling of game results.
Conducting the Tests
Now that the integration is complete, it's time for some practical tests to ensure everything works as expected. We have a series of tests covering various aspects of our implementation:
-
New game creation test (Swagger and Test Script): to ensure that new game creation is running smoothly, we will run this test through both the Swagger interface and our automated test script. This ensures that functionality is available in both ways.
-
Player move test (Swagger and Test Script): the functionality of a player making a valid move will be tested using both Swagger and a test script.
-
Player's invalid move test: to ensure that the API handles invalid moves correctly, we will run a test where we attempt to perform a move to an already occupied position, checking to see if the API returns the appropriate error code.
-
Player winning test: we will simulate a sequence of moves so that a player wins to ensure that the API correctly recognizes the winning condition.
Results and Evaluation
After conducting these tests, we expect to obtain reliable results that will confirm the integrity of our integrated system. We will evaluate whether automated games work as expected, whether errors are handled as expected, and whether the API provides clear and informative responses.
These practical tests are necessary to ensure that our system is ready for real-world interoperability and future expansions. With successful integration and thorough testing, we are closer to creating a reliable and efficient gaming system.
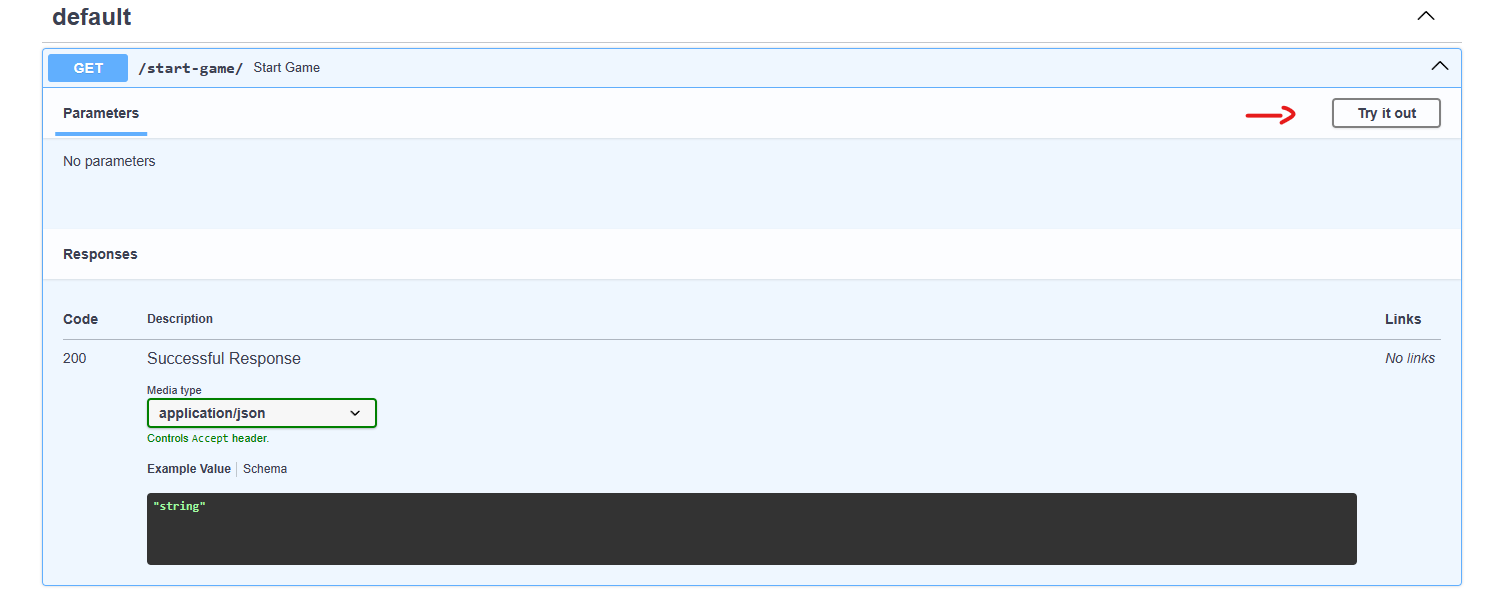
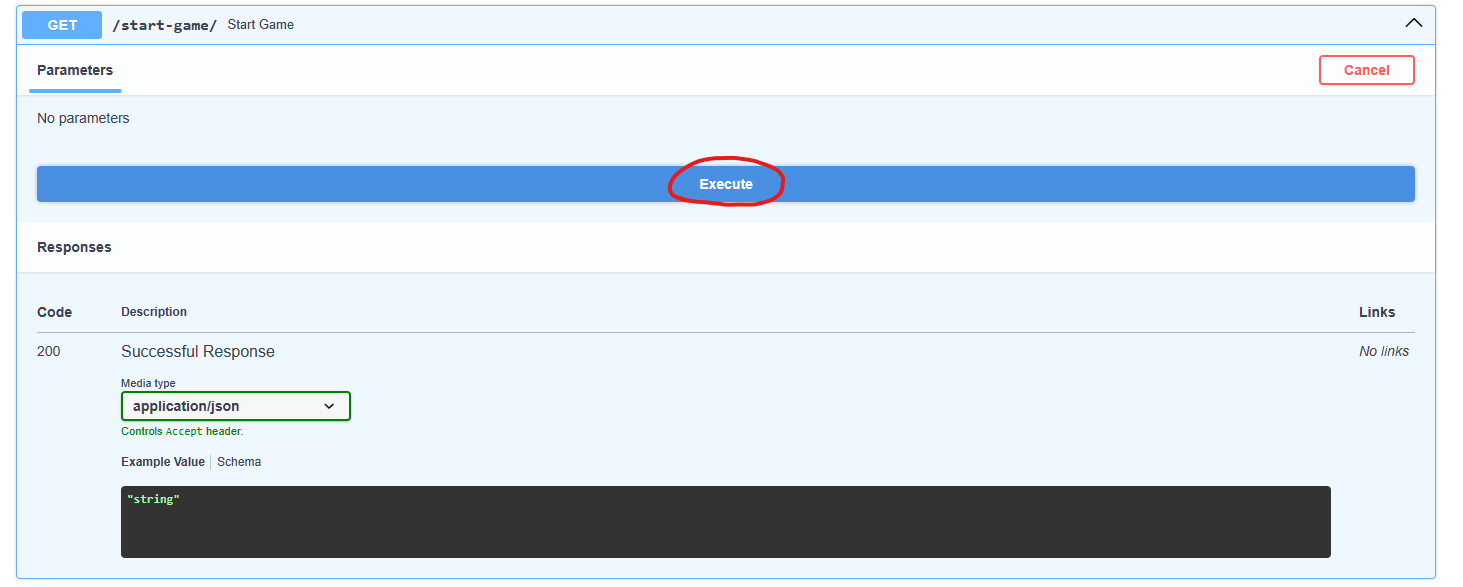
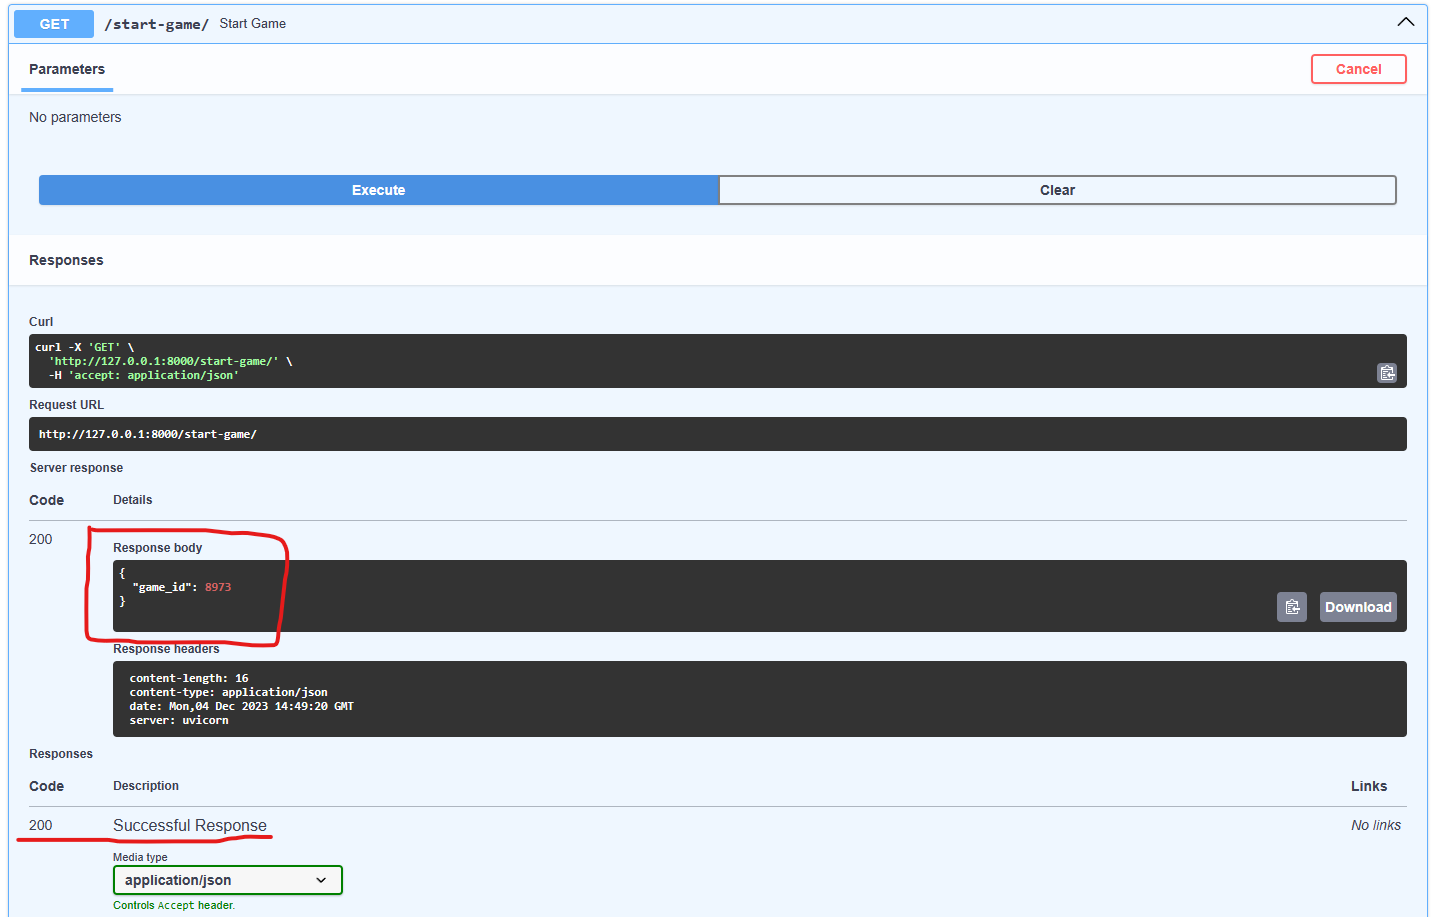
In the images above, you can see the process of testing the functionality of creating a new game, which plays an important role in our application. The test is carried out comprehensively and consistently, addressing the accessibility of the function in two distinct ways: through the Swagger interface and our automated testing script.
Swagger, an API documentation and testing tool, allows developers to interact with the API visually and effectively. In the image, you can see how the creation of a new game is started and tested directly through the Swagger interface, ensuring that the functionality is easily accessible and works as expected.
In addition, the testing process also involves the use of an automated test script, which performs rigorous checks to ensure the consistency and reliability of the functionality. This demonstrates our commitment to maintaining system quality, regardless of the testing approach used.
Conclusion
This article, which continues the series on REST APIs, was focused on the implementation and testing of automatic moves in the tic-tac-toe game in Python, integrated with the development of MQL5 functions. The main task was in two directions: to improve the tic-tac-toe game using an autonomous game and to develop unit tests in MQL5 to test interaction with the REST API. Integrating these features not only improves the game itself, but also creates the basis for more complete and effective tests.
When developing automated moves, it was very important to understand the existing logic of the game in order to effectively and harmoniously implement new functionality. The chosen strategy assumes a simple but effective approach that allows you to make the game more complex and dynamic. In addition, preparing the environment for the implementation of an MQL5 agent that simulates a real user is an important step towards more realistic testing.
As for testing, the creation and implementation of test scripts in MQL5 ensured a reliable connection between the MQL5 code and the REST API. The tests included initializing the game, performing correct and incorrect moves, and checking the winning conditions: this is necessary to ensure the reliability and stability of the system.
Improvements implemented in the Requests library, such as enabling a debugging option and more sophisticated error handling, have greatly improved the efficiency of interaction, and also made it easier to diagnose problems.
Finally, the integration and practical testing phase confirmed the effectiveness of the implemented improvements in both the tic-tac-toe game and the Requests library. Testing using the Swagger interface and automated test scripts confirmed the functionality and reliability of the system as a whole.
This article demonstrates how the combination of automated play and unit testing in MQL5 creates a robust development cycle, providing a reliable and efficient integrated system capable of delivering an enhanced gaming experience and valuable insights for future integrations and developments.
Translated from Portuguese by MetaQuotes Ltd.
Original article: https://www.mql5.com/pt/articles/13813
- Free trading apps
- Over 8,000 signals for copying
- Economic news for exploring financial markets
You agree to website policy and terms of use