
This is part of the larger: UTM Manager Guide - Other - 30 January 2023 - Traders' Blogs (mql5.com)
Trade Copier Installation Guide: Click here to view the installation guide.
Master: Copy to NT8 (experimental) Guide: UTM: Trade Copier NT8 Support - Other - 25 May 2024 - Traders' Blogs (mql5.com)
Trade Copier
The "Trade Copier" feature allows the seamless synchronization of trades across multiple MT5 installations. It consists of two primary roles: a "master" instance that broadcasts trades, and one or more "slave" instances that replicate the master's trades.
Master Mode: In "master" mode, the current MT5 installation acts as the central hub, broadcasting trades to all connected "slave" instances, ensuring uniformity across different platforms. Trades are only sent to the slaves when they are executed at the broker, either as market orders or when pending orders are triggered.
Slave Mode: The slave mode mirrors the master's actions, meaning all trade transactions, including the TP percentage, are copied precisely. Trades will enter, exit, or reach TP simultaneously with the master. However, slaves can have their own custom risk settings, allowing for individualized risk management while still following the master's trading strategy. In Slaves, only the 'Risk Management' tab settings apply; all other trade settings are ignored.
Important Notes:
-
MT5 Must Be Running: For the "Trade Copier" feature to work, both the master and slave MT5 installations must be running. If MT5 is off, the master cannot broadcast any actions, and the slave cannot receive them.
-
Stop-Loss Synchronization: Depending on the selected "Slave Stop Loss Mode," the slave instance will either follow the Master's stop-loss, use a 'Spread Ignore' stop-loss, or enter a stop-loss directly with the broker. Additionally, a failsafe stop-loss, which is twice the size of the normal stop-loss, can be entered with the broker for extra security. Slaves can also be set to always follow the Master's stop-loss settings, providing an extra layer of alignment with the Master's trading strategy.
-
Broker-Entered TP and SL: If the Slave has entered both the Take Profit (TP) and Stop Loss (SL) prices to the broker, and there is only one TP level set at 100%, then it's not necessary for both the Master and Slave MT5 installations to be running. This is because the broker will automatically handle the TP and SL, making the need for MT5 to be running redundant in this specific scenario.
-
Due to spread differences between brokers, in buy positions when the master triggers a Take Profit (TP), it may not TP at the same Risk-Reward (RR) level. This is because in buy positions, spreads can affect the slave's Stop Loss (SL) size slightly, causing RR levels to be slightly off.
- Always verify price differences between brokers, especially in extreme cases like with indices, where differences can be 7 pips or more. Positions could be entered as a buy instead of sell because the slave might misinterpret the position due to significant price discrepancies. To mitigate this, use the 'Use Stop Loss Size instead of Price' checkbox to counteract such discrepancies.
Activating the slave mode is simple:
- Open a slave MT5 installation.
- Open any random chart on MT5. (You can open ANY chart, and it will still copy over all trades from other pairs)
- Attach the UTM EA to the chart.
- Enable slave mode on the copier.
You are allowed to run one UTM slave instance per terminal. However, you can open unlimited slave terminals, depending on your system's capacity. For optimal performance, use the Memory Save mode, which conserves 90% of RAM.
Activations: After activating the EA on a PC/VPS, it's tied exclusively to that device, allowing you to run multiple MT5 terminals for copy trading without losing any additional activations.
ATTENTION! Always monitor the slave accounts closely.
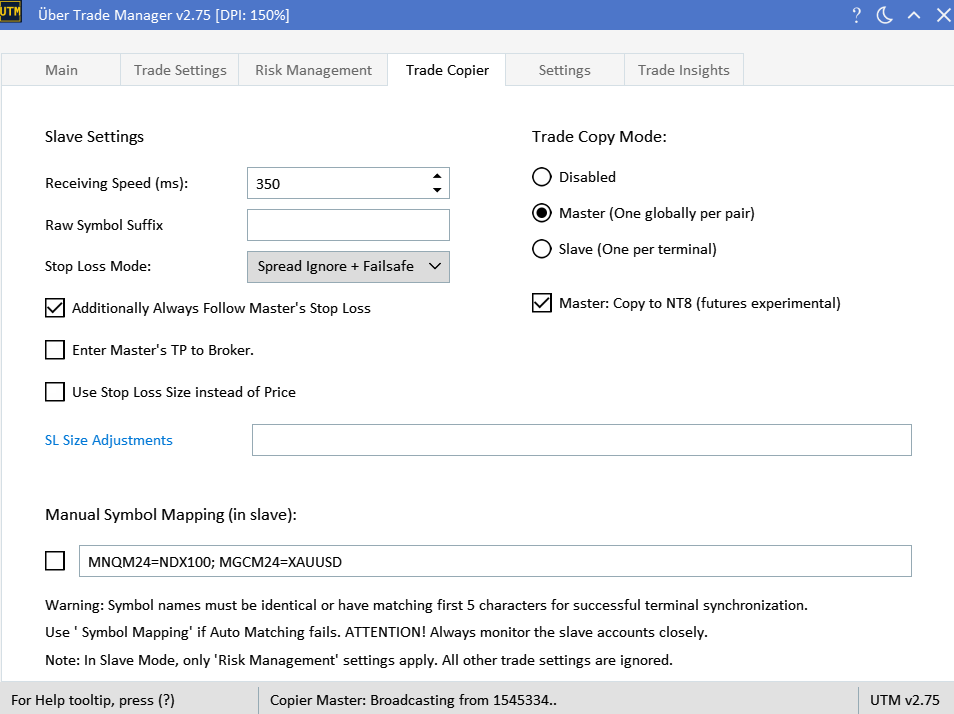
Slave Settings: Adjusting Receiving Speed in Slave Account
This feature determines the frequency at which the slave account checks for and processes new trades from the master account.
Parameters:
- Range: The adjustable range for the receiving speed is between 250 and 2000.
- Default Value: The standard value is set at 350.
Usage Recommendations:
- Fast Reception: If you desire rapid trade reception, set the value between 250 to 350. However, keep in mind that this could put a strain on your system resources.
- Balanced Operation: For most PCs and VPS setups, a value ranging from 350 to 750 should offer a good balance between speed and system performance.
- Relaxed System Resource Usage: If you're okay with a bit of a delay in trade reception (e.g., receiving trades every second) and prioritize minimal system resource usage, you can set the value closer to 750-1000.
By adjusting the receiving speed, traders can optimize their trade copier's performance based on their system capabilities and preferences.
Important Note: After modifying the receiving speed, you'll need to disable and then re-enable slaves in the copier mode for the changes to take effect.
Raw Symbol Suffix
Enter suffix for raw symbols (e.g., 'x', 'r', '.cash'). Example: Entering '.cash' matches 'EURUSD.cash'. Leave empty to match standard symbols like 'EURUSD'. Disable, Enable Slave for this to take effect.
Slave Settings: Stop Loss Mode
In this section, you can choose the type of stop-loss that the Slave instances will use. Here are the available options:
-
Master + Failsafe: In this mode, the Slave instance will follow the Master's stop-loss settings. If the Master's stop-loss is hit, the Slave will also close the trade. Note that only a failsafe stop-loss, which is twice the size of the normal stop-loss, is entered with the broker for extra security.
-
Spread Ignore + Failsafe: This mode uses a virtual 'Spread Ignore' stop-loss, which disregards the spread when calculating the stop-loss. Additionally, a failsafe stop-loss, which is twice the size of the normal stop-loss, is entered with the broker to provide an extra layer of security.
-
Broker-Entered: This is the standard stop-loss mode where the stop-loss is directly entered with the broker. This is the most straightforward and conventional method of setting a stop-loss.
Note: The failsafe stop-loss is twice the size of the original stop-loss and is entered with the broker. Choose your stop-loss mode based on your risk management strategy.
Slave Settings: Additionally Always Follow Master's Stop Loss
This checkbox allows you to add an extra layer of risk management to your Slave instances. When enabled, the Slave will always follow the Master's stop-loss settings, in addition to whatever stop-loss mode you've selected in the "Slave Stop Loss Selection."
For example, if you've selected "Spread Ignore + Failsafe" in the "Slave Stop Loss Selection," enabling this checkbox will make sure that the Slave also closes the trade if the Master's stop-loss is hit, providing an extra layer of alignment with the Master's trading strategy.
Slave Settings: Enter Master's TP to Broker
This checkbox allows you to synchronize the Take Profit (TP) settings between the Master and Slave instances. When this option is enabled, the Slave will enter the TP price it receives from the Master directly to the broker.
Slave Settings: Use Stop Loss Size instead of Price.
When enabled, the trade copier will use the stop loss size instead of the stop loss price in cases where prices do not match between brokers. This can help mitigate potential discrepancies in trades. For example, in indices, where prices may have extreme discrepancies between brokers.
SL Size Adjustments
The "SL Size Adjustments" feature in the Trade Copier allows for tailored control over stop loss settings for different symbols, accommodating discrepancies in pip sizes and pricing conventions between the master and slave brokers.
How It Works:
- Adjustment Factors: Specify factors for each symbol to modify the stop loss size. Use positive values (e.g., +10, +100) to increase the stop loss size or negative values (e.g., -10, -100) to decrease it relative to the master's settings.
- Configuration: Enter adjustments in the format: Symbol1=+10;Symbol2=-100. For example, if the master's stop loss is set at 10 pips, applying a factor of +10 to Symbol1 would increase it to 100 pips. Conversely, applying a factor of -10 to Symbol2 would reduce a 100 pips stop loss to just 10 pips.
This feature is only active when the 'Use Stop Loss Size instead of Price' option is enabled, ensuring that stop loss sizes are adjusted according to the specified factors, rather than directly copying the stop loss size from the master, as it can vary -+ 10 or 100 of factor.
Symbol Matching in the Trade Copier
The trade copier now features an enhanced symbol matching mechanism to ensure precise synchronization between the master and slave accounts. The process is as follows:
Auto-Matching Logic:
1. User-Defined Raw Symbol Matching: If a 'Raw Symbol Suffix' is specified in the Copier settings, the copier prioritizes matching symbols that end with this suffix. For example, entering '.i' will match symbols like 'EURUSD.i'. This is particularly useful for brokers with specific naming conventions for raw spread symbols.
2. Exact Match: If no 'Raw Symbol Suffix' is specified or no matching suffix is found, the system then attempts to find an exact match for the symbol sent from the master. For instance, if the master sends "EURUSD", it will look for "EURUSD" on the slave.
3. Fallback to Standard Symbols: If no exact match is found, the system will attempt to map with standard symbols, usually represented with six characters, such as "EURUSD". This acts as a fallback when no user-defined suffix or exact match is available.
If the auto-matching logic fails to find a match under these conditions, an alert will be triggered, notifying the user of the mismatch. In such cases, manual symbol mapping may be used as a remedy.
Custom Symbol Mapping:
For instances where the default auto-matching logic does not suffice, or when the symbols have different names across accounts, you can resort to the "Custom Symbol Mapping" feature. This tool permits to manually pair master symbols with corresponding slave symbols, overriding the default mapping process.
Format:
MasterSymbol1=SlaveSymbol1;MasterSymbol2=SlaveSymbol2
Examples:
- If the master uses 'XAUUSD' but the slave employs 'GOLDx', the mapping should be 'XAUUSD=GOLDx'.
- For 'NASDAQ' on the master and 'Tech100' on the slave, the mapping should read 'NASDAQ=Tech100'.
Please note, multiple mappings should be separated with semicolons without any spaces. This custom mapping ensures that trades are replicated accurately even when symbol names vary between accounts.
On Chart Slave Status
Following text on chart, displays the status of connected slave accounts in the master account. Shows the number of currently connected slaves and open positions across all slaves on that specific pair. This function allows quick monitoring of all slave trade activity and helps to ensure that all trades are opened and closed as the master did.


