监视多币种的交易信号(第三部分):引入搜索算法
Alexander Fedosov | 6 七月, 2020
内容
概述
在之前的文章里,我们创建了用于监视交易信号的应用程序结构。 我们还实现了拥有基本交互能力的应用程序界面。 现在是时候针对配置和搜索品种的算法充实其可视部分了。 我们将借助来自上一篇文章的项目作为基础,并将继续为其逐步添加新功能。
品种集保存系统
上一次,在第一个应用程序设置步骤中,我们创建了从市场观察里选择品种的工具。 可以按三种不同方式选择品种:
- 手工。 标记所需品种,然后单击下一步。
- 一套预定义集合。 单击“All(全部)”,“Major(直盘)”或 “Crosses(交叉盘)”会自动选择一组特定的预定义品种。
- 集合已保存 之前预备好的品种集用前两种方法得以配置,并以特定名称保存到文件中。
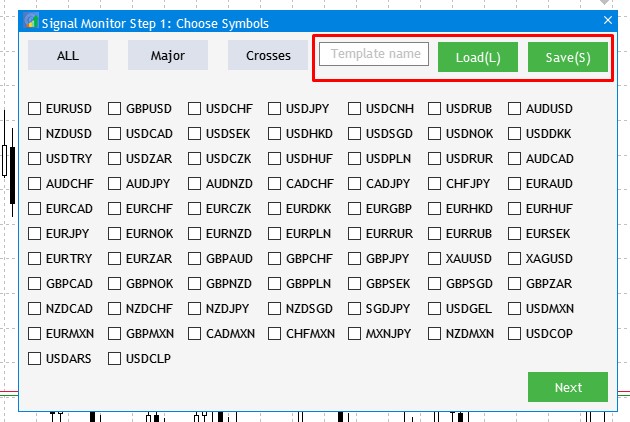
图例 1 应用程序设置步骤 1,和已保存的集合设置。
前两种方法非常简单,且它们是早前就已创建的。 第三种方式需要创建。 现在我们来更精确地定义我们要做什么。 我们将更深入地研究图例 1 中红框里元素的交互作用,这意味着:
- 所需品种由勾选符标记,用户在 “Template name(模板名称)”字段中输入名称,然后单击 “Save(保存)”或按 S 热键。 如果成功保存,则会显示相应的消息。
- 若要访问之前配置并保存的模板,应在字段中键入模板名称,然后按 “Load(加载)”或 L 热键。
打开项目,找到 CProgram 基类,并在其私密部分中添加两个方法。 该方法将负责加载和保存品种模板。
   bool              SaveSymbolSet(string file_name);
   bool              LoadSymbolSet(string file_name);
以下是这些方法如何被实现的。
//+------------------------------------------------------------------+
//| Save template to a file                                          |
//+------------------------------------------------------------------+
bool CProgram::SaveSymbolSet(string file_name)
{
   if(file_name=="")
   {
      MessageBox("Select the template name to record","Signal Monitor");
      return(false);
   }
   int h=FileOpen("Signal Monitor\\"+file_name+".bin",FILE_WRITE|FILE_BIN);
   if(h==INVALID_HANDLE)
   {
      MessageBox("Failed to create a configuration file","Signal Monitor");
      return(false);
   }
   else
      MessageBox("The "+file_name+" configuration has been successfully saved","Signal Monitor");
//--- Save the selection of timeframes and patterns
   for(int i=0; i<m_all_symbols; i++)
      m_save.tf[i]=m_checkbox[i].IsPressed();
//---
   FileWriteStruct(h,m_save);
   FileClose(h);
//---
   return(true);
}
//+------------------------------------------------------------------+
//| Load data to a panel                                             |
//+------------------------------------------------------------------+
bool CProgram::LoadSymbolSet(string file_name)
{
   if(file_name=="")
   {
      MessageBox("Select the template name to load","Signal Monitor");
      return(false);
   }
   int h=FileOpen("Signal Monitor\\"+file_name+".bin",FILE_READ|FILE_BIN);
   if(h==INVALID_HANDLE)
   {
      MessageBox("Configuration "+file_name+" not found","Signal Monitor");
      return(false);
   }
   ZeroMemory(m_save);
   FileReadStruct(h,m_save);
//--- Loading timeframes
   for(int i=0; i<m_all_symbols; i++)
   {
      m_checkbox[i].IsPressed(m_save.tf[i]);
      m_checkbox[i].Update(true);
   }
//---
   FileClose(h);
//---
   return(true);
}
不过,若尝试立即编译项目,则将触发与 m_save 变量有关的错误。 该结构含有一个名为 tf 的布尔类型参数。 它可记住用户所选的文件。 故需在应用类中创建此结构,并将其实例添加到基类。
//+------------------------------------------------------------------+
//| Class for creating the application                               |
//+------------------------------------------------------------------+
struct SAVE
{
   bool     tf[100];
};
class CProgram : public CWndEvents
{
...
        SAVE            m_save;
转到 OnEvent(),进入与按钮点击事件相关的部分,并在“第一步”条件中添加以下代码:
         //--- Save the template
         if(lparam==m_save_button.Id())
         {
            SaveSymbolSet(m_text_edit.GetValue());
         }
         //--- Load the template
         if(lparam==m_load_button.Id())
         {
            LoadSymbolSet(m_text_edit.GetValue());
         }
另外,实现上述按钮的热键用法。 以相同的方法,为按键事件添加检查,并针对所用键添加代码。
//--- Key press
   if(id==CHARTEVENT_KEYDOWN)
   {
      if(m_current_step==1)
      {
         short sym=TranslateKey((int)lparam);
         //--- if the entered character is successfully converted to Unicode
         if(sym>0)
         {
            if(ShortToString(sym)=="l" || ShortToString(sym)=="д")
               LoadSymbolSet(m_text_edit.GetValue());
            if(ShortToString(sym)=="s" || ShortToString(sym)=="ы")
               SaveSymbolSet(m_text_edit.GetValue());
         }
      }
   }
编译项目。 若成功编译将产生以下结果。
图例 2 保存和加载用户模板
添加和编辑交易信号
现在,转到应用程序的主要部分,该部分负责创建和编辑交易信号,以及进一步在监视器中跟踪它们。 信号创建和编辑的摸样如此这般。
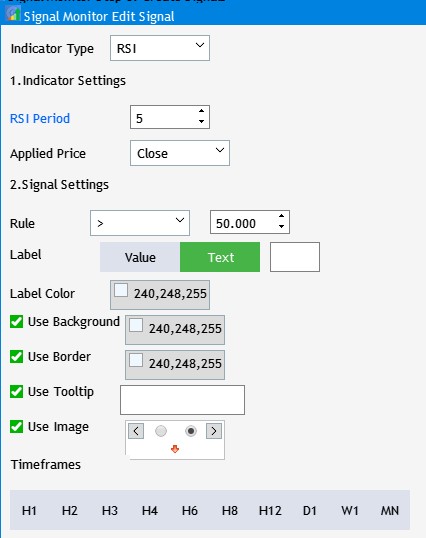
图例 3 信号创建和编辑窗口。
在当前阶段,该窗口显示各种控制参数的一组 GUI 元素。 然而,这些设置尚未在任何地方用到。 首先在界面上添加两个按钮。 它们是添加/保存交易信号。 另一个是取消创建/编辑按钮。 打开 Program.mqh ,并将这两个按钮的实现方法添加到基类中:
bool CreateButton3(CButton &button,string text,const int x_gap,const int y_gap);
两个 CButton 按钮的实例:
   CButton           m_new_signal;
   CButton           m_cancel_button;
现在转到 SetWindow.mqh ,并实现此方法。
//+------------------------------------------------------------------+
//|                                                                  |
//+------------------------------------------------------------------+
bool CProgram::CreateButton3(CButton &button,string text,const int x_gap,const int y_gap)
{
//---
   color baseclr=C'70,180,70';
   color pressed=C'70,170,70';
//--- Save the window pointer
   button.MainPointer(m_set_window);
//--- Set up properties before creation
   button.XSize(60);
   button.YSize(30);
   button.Font(m_base_font);
   button.FontSize(m_base_font_size);
   button.BackColor(baseclr);
   button.BackColorHover(baseclr);
   button.BackColorPressed(pressed);
   button.BorderColor(baseclr);
   button.BorderColorHover(baseclr);
   button.BorderColorPressed(pressed);
   button.LabelColor(clrWhite);
   button.LabelColorPressed(clrWhite);
   button.LabelColorHover(clrWhite);
   button.IsCenterText(true);
//--- Create the control
   if(!button.CreateButton(text,x_gap,y_gap))
      return(false);
//--- Add the element pointer to the base
   CWndContainer::AddToElementsArray(1,button);
   return(true);
}
若要令这两个按钮出现在交易窗口的添加信号界面里,需在 CreateSetWindow() 方法的主体末尾插入以下几行:
//--- Add/Cancel Buttons
   if(!CreateButton3(m_new_signal,"Add",m_set_window.XSize()-2*(60+10),m_set_window.YSize()-(30+10)))
      return(false);
   if(!CreateButton3(m_cancel_button,"Cancel",m_set_window.XSize()-(60+10),m_set_window.YSize()-(30+10)))
      return(false);
项目编译后,两个按钮将出现在交易信号创建窗口的底部。
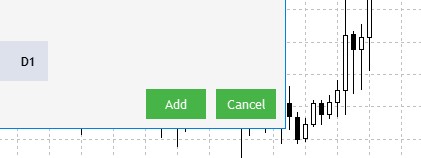
图例 4 添加信号创建和取消按钮。
现在,我们需要添加单击按钮时将会发生的事件。 取消按钮的作用是显而易见的:它不会在给定的窗口中保存任何动作和设置,且在不添加信号的情况下关闭该窗口。 我们来更详细地研究 “Add(添加)”按钮。
首先,我们确定单击 “Add” 时要执行的操作顺序。
- 单击按钮会保存交易信号创建窗口中 UI 元素所选定的参数。
- 成功保存后,关闭该窗口,且含有信号名称的一条记录将出现在主窗口的信号列表中。
- 在记录上单击之后,先前保存的集合会取代信号设置 UI 元素,且 “Add” 按钮将转换为“Save(保存)”。
为了将设置保存到文件当中,我们需要创建一组通用设定集,这集合将用于编辑窗口中的可视显示,以及随后的信号搜索。 因此,我们来创建一个结构,并将其命名为 SIGNAL。 创建和编辑窗口中的设定配置将被写入此结构。
struct SIGNAL
{
   int      ind_type;
   int      ind_period;
   int      app_price;
   int      rule_type;
   double   rule_value;
   int      label_type;
   uchar    label_value[10];
   color    label_color;
   color    back_color;
   color    border_color;
   bool     tooltip;
   uchar    tooltip_text[100];
   bool     image;
   int      img_index;
   bool     timeframes[21];
   TFNAME   tf_name[21];
};
我们来查看结构中的每个元素:
- ind_type — 包含被选作信号搜索基础的指标类型。 在界面中显示为 “Indicator Type(指标类型)”。
- ind_period — 所选指标的周期。
- app_price — 指标计算所用价格。 此值不适用于所有指标,因此仅在适用时才写入。 例如,它可用于 RSI,但不可用于 WPR。
- rule_type — 设置搜索交易信号时要用到的规则类型。 它在界面中显示为一个下拉菜单,其中包含 "=="、">="、"<=" 等字符。
- rule_value — 针对所选指标,搜索规则需应用的阈值。
- label_type — 此元素将存储文本标签的显示类型。 它可以是当前指标值,也可以是最长 3 个字符的自定义标签。
- label_value — 如果选择了第二个文本标签显示类型,则此参数将存储用户指定的自定义标签文本。
- label_color — 存储文本标签的颜色。
- back_color — 如果选择此选项,则存储信号模块在监视器中的背景色。
- border_color — 如果选择此选项,则存储信号模块在监视器中的边框颜色。
- tooltip — 包含是否使用工具提示的指示。
- tooltip_text — 如果使用工具提示,则此参数包含文本。
- image — 图像使用情况的指示。
- img_index — 保存图像的序列号(如果使用)。
- timeframes — 包含有关在第二步中选定工作时间帧设置信息的数组。
- tf_name — 保存搜索交易信号的时间帧。
现在,在基类中声明一个结构数组,从而保存所创建信号的设置。
SIGNAL m_signal_set[5]; 另外,在 CProgram 类的私密区域中创建两个方法,其一将一组参数保存到文件中,其二将一个参数从文件中加载到结构中。
   bool              SaveSignalSet(int index);
   bool              LoadSignalSet(int index);
此为它的实现:
//+------------------------------------------------------------------+
//|                                                                  |
//+------------------------------------------------------------------+
bool CProgram::SaveSignalSet(int index)
{
//---
   int h=FileOpen("Signal Monitor\\signal_"+string(index)+".bin",FILE_WRITE|FILE_BIN);
   if(h==INVALID_HANDLE)
   {
      MessageBox("Failed to create a configuration file","Signal Monitor");
      return(false);
   }
//--- Save the selection
   //--- Indicator type
   m_signal_set[index].ind_type=m_indicator_type.GetListViewPointer().SelectedItemIndex();
   //--- Indicator period
   m_signal_set[index].ind_period=(int)m_period_edit.GetValue();
   //--- Type of applied price
   m_signal_set[index].app_price=m_applied_price.GetListViewPointer().SelectedItemIndex();
   //--- Rule type
   m_signal_set[index].rule_type=m_rule_type.GetListViewPointer().SelectedItemIndex();
   //--- Rule value
   m_signal_set[index].rule_value=(double)m_rule_value.GetValue();
   //--- Text label display type
   m_signal_set[index].label_type=m_label_button[0].IsPressed()?0:1;
   //--- Save the value of the text field for the second type
   if(m_label_button[1].IsPressed())
      StringToCharArray(StringSubstr(m_text_box.GetValue(),0,3),m_signal_set[index].label_value);
   //--- Color of the text label
   m_signal_set[index].label_color=m_color_button[0].CurrentColor();
   //--- Background color
   if(m_set_param[0].IsPressed())
      m_signal_set[index].back_color=m_color_button[1].CurrentColor();
   else
      m_signal_set[index].back_color=clrNONE;
   //--- Border color
   if(m_set_param[1].IsPressed())
      m_signal_set[index].border_color=m_color_button[2].CurrentColor();
   else
      m_signal_set[index].border_color=clrNONE;
   //--- Tooltip value
   m_signal_set[index].tooltip=m_set_param[2].IsPressed();
   if(m_signal_set[index].tooltip)
      StringToCharArray(m_tooltip_text.GetValue(),m_signal_set[index].tooltip_text);
   //--- Selected image
   m_signal_set[index].image=m_set_param[3].IsPressed();
   if(m_signal_set[index].image)
      m_signal_set[index].img_index=m_pictures_slider.GetRadioButtonsPointer().SelectedButtonIndex();
   //--- Selected timegrames
   int tf=0;
   for(int i=0; i<21; i++)
   {
      if(!m_tf_button[i].IsLocked() && m_tf_button[i].IsPressed())
      {
         m_signal_set[index].timeframes[i]=true;
         StringToCharArray(m_tf_button[i].LabelText(),m_signal_set[index].tf_name[i].tf);
         tf++;
      }
      else
         m_signal_set[index].timeframes[i]=false;
   }
   //---
   if(tf<1)
   {
      MessageBox("No timeframes selected","Signal Monitor");
      FileClose(h);
      return(false);
   }
//---
   FileWriteStruct(h,m_signal_set[index]);
   FileClose(h);
   Print("Configuration signal_"+string(index)+" has been successfully saved");
//---
   return(true);
}
//+------------------------------------------------------------------+
//|                                                                  |
//+------------------------------------------------------------------+
bool CProgram::LoadSignalSet(int index)
{
   int h=FileOpen("Signal Monitor\\signal_"+string(index)+".bin",FILE_READ|FILE_BIN);
   if(h==INVALID_HANDLE)
   {
      MessageBox("Configuration not found","Signal Monitor");
      return(false);
   }
   ZeroMemory(m_signal_set[index]);
   FileReadStruct(h,m_signal_set[index]);
//--- Loading indicator type
   m_indicator_type.SelectItem(m_signal_set[index].ind_type);
   RebuildParameters(m_signal_set[index].ind_type);
   m_indicator_type.GetButtonPointer().Update(true);
//--- Loading indicator period
   m_period_edit.SetValue((string)m_signal_set[index].ind_period);
   m_period_edit.GetTextBoxPointer().Update(true);
//--- Loading applied price
   if(!m_applied_price.IsLocked())
   {
      m_applied_price.SelectItem(m_signal_set[index].app_price);
      m_applied_price.GetButtonPointer().Update(true);
   }
//--- Loading signal rule
   m_rule_type.SelectItem(m_signal_set[index].rule_type);
   m_rule_type.GetButtonPointer().Update(true);
   m_rule_value.SetValue((string)m_signal_set[index].rule_value);
   m_rule_value.GetTextBoxPointer().Update(true);
//--- Loading a text label
   if(m_signal_set[index].label_type==0)
   {
      m_label_button[0].IsPressed(true);
      m_label_button[0].Update(true);
      m_label_button[1].IsPressed(false);
      m_label_button[1].Update(true);
      m_text_box.IsLocked(true);
   }
   else
   {
      m_label_button[0].IsPressed(false);
      m_label_button[0].Update(true);
      m_label_button[1].IsPressed(true);
      m_label_button[1].Update(true);
      m_text_box.IsLocked(false);
      m_text_box.ClearTextBox();
      m_text_box.AddText(0,CharArrayToString(m_signal_set[index].label_value));
      m_text_box.Update(true);
   }
//--- Loading the color of the text label
   m_color_button[0].CurrentColor(m_signal_set[index].label_color);
   m_color_button[0].Update(true);
//--- Loading the background color
   if(m_signal_set[index].back_color==clrNONE)
   {
      m_set_param[0].IsPressed(false);
      m_set_param[0].Update(true);
      m_color_button[1].IsLocked(true);
      m_color_button[1].GetButtonPointer().Update(true);
   }
   else
   {
      m_set_param[0].IsPressed(true);
      m_set_param[0].Update(true);
      m_color_button[1].IsLocked(false);
      m_color_button[1].CurrentColor(m_signal_set[index].back_color);
      m_color_button[1].GetButtonPointer().Update(true);
   }
//--- Loading the border color
   if(m_signal_set[index].border_color==clrNONE)
   {
      m_set_param[1].IsPressed(false);
      m_set_param[1].Update(true);
      m_color_button[2].IsLocked(true);
      m_color_button[2].GetButtonPointer().Update(true);
   }
   else
   {
      m_set_param[1].IsPressed(true);
      m_set_param[1].Update(true);
      m_color_button[2].IsLocked(false);
      m_color_button[2].CurrentColor(m_signal_set[index].border_color);
      m_color_button[2].GetButtonPointer().Update(true);
   }
//--- Loading the tooltip value
   if(!m_signal_set[index].tooltip)
   {
      m_set_param[2].IsPressed(false);
      m_set_param[2].Update(true);
      m_tooltip_text.IsLocked(true);
      m_tooltip_text.Update(true);
   }
   else
   {
      m_set_param[2].IsPressed(true);
      m_set_param[2].Update(true);
      m_tooltip_text.IsLocked(false);
      m_tooltip_text.ClearTextBox();
      m_tooltip_text.AddText(0,CharArrayToString(m_signal_set[index].tooltip_text));
      m_tooltip_text.Update(true);
   }
//--- Loading the image
   if(!m_signal_set[index].image)
   {
      m_set_param[3].IsPressed(false);
      m_set_param[3].Update(true);
      m_pictures_slider.IsLocked(true);
      m_pictures_slider.GetRadioButtonsPointer().Update(true);
   }
   else
   {
      m_set_param[3].IsPressed(true);
      m_set_param[3].Update(true);
      m_pictures_slider.IsLocked(false);
      m_pictures_slider.GetRadioButtonsPointer().SelectButton(m_signal_set[index].img_index);
      m_pictures_slider.GetRadioButtonsPointer().Update(true);
   }
//--- Loading selected timeframes
   for(int i=0; i<21; i++)
   {
      if(!m_tf_button[i].IsLocked())
      {
         m_tf_button[i].IsPressed(m_signal_set[index].timeframes[i]);
         m_tf_button[i].Update(true);
      }
   }
//---
   FileClose(h);
   return(true);
}
如此,保存/加载算法的第一个动作既已完成。 现在,我们要为已创建信号记录构建一个对象。 在这些对象上单击,我们能够编辑之前已创建交易信号的参数。 为了实现这些对象,创建一个 CButton 类实例的数组。
CButton m_signal_editor[5]; 另外,添加创建对象的方法。
bool CreateSignalEditor(CButton &button,string text,const int x_gap,const int y_gap);
在 StepWindow.mqh 文件中实现此方法,因为这些对象属于主窗口。
//+------------------------------------------------------------------+
//| Creates a button with an image                                   |
//+------------------------------------------------------------------+
#resource "\\Images\\EasyAndFastGUI\\Icons\\bmp16\\settings_light.bmp"

bool CProgram::CreateSignalEditor(CButton &button,string text,const int x_gap,const int y_gap)
{
//---
   color baseclr=C'70,180,70';
   color pressed=C'70,170,70';
//--- Save the window pointer
   button.MainPointer(m_step_window);
//--- Set up properties before creation
   button.XSize(110);
   button.YSize(30);
   button.Font(m_base_font);
   button.FontSize(m_base_font_size);
   button.IconXGap(3);
   button.IconYGap(7);
   button.IconFile("Images\\EasyAndFastGUI\\Icons\\bmp16\\settings_light.bmp");
   button.BackColor(baseclr);
   button.BackColorHover(baseclr);
   button.BackColorPressed(pressed);
   button.BorderColor(baseclr);
   button.BorderColorHover(baseclr);
   button.BorderColorPressed(pressed);
   button.LabelColor(clrWhite);
   button.LabelColorPressed(clrWhite);
   button.LabelColorHover(clrWhite);
   button.IsCenterText(true);
//--- Create the control
   if(!button.CreateButton(text,x_gap,y_gap))
      return(false);
//--- Add the element pointer to the base
   CWndContainer::AddToElementsArray(0,button);
   return(true);
}
使用此方法,将五个对象添加到 CreateStepWindow() 主体中,这些都是信号列表中的对象。
//---
   for(int i=0; i<5; i++)
   {
      if(!CreateSignalEditor(m_signal_editor[i],"Signal_"+string(i),10,40*i+90))
         return(false);
   }
若要在应用程序启动后禁用这些元素的显示,只需将它们在 CreateGUI() 方法中隐藏。
//+------------------------------------------------------------------+
//| Creates the graphical interface of the program                   |
//+------------------------------------------------------------------+
bool CProgram::CreateGUI(void)
{
//--- Step 1-3. Symbol selection window.
   if(!CreateStepWindow("Signal Monitor Step 1: Choose Symbols"))
      return(false);
//---
   if(!CreateSetWindow("Signal Monitor Edit Signal"))
      return(false);
//--- Creating form 2 for the color picker
   if(!CreateColorWindow("Color Picker"))
      return(false);
//--- Finishing the creation of GUI
   CWndEvents::CompletedGUI();
   m_back_button.Hide();
   m_add_signal.Hide();
   m_signal_header.Hide();
   m_label_button[1].IsPressed(true);
   m_label_button[1].Update(true);
   for(int i=0; i<5; i++)
      m_signal_editor[i].Hide();
   return(true);
}
项目编译之前的下一步是创建一个方法,该方法将在初始设置期间删除所有以前保存的数据。 为此,创建 ClearSaves() 方法,并在 CProgram 类构造函数中对其进行调用。
//+------------------------------------------------------------------+
//|                                                                  |
//+------------------------------------------------------------------+
bool CProgram::ClearSaves(void)
{
   for(int i=0; i<5; i++)
      FileDelete("Signal Monitor\\signal_"+string(i)+".bin");
   m_total_signals=0;
   return(true);
}
现在,将以下内容添加到“添加信号”按钮单击事件:
//--- Add Signal button click event
      if(lparam==m_add_signal.Id())
      {
         m_set_window.OpenWindow();
         m_number_signal=-1;
         RebuildTimeframes();
         m_new_signal.LabelText("Add");
         m_new_signal.Update(true);
      }
项目编译后,添加新交易信号的机制既已准备就绪。 下一步是编辑先前创建的信号。
图例 5 添加新的交易信号。
我们汇总一切。 如图例 5 所示,我们已实现了单击 Add Signal 按钮时添加信号的能力。 还有,将新的信号名添加到信号列表的按钮。 目前,它是一个预设值,无法对其进行编辑。 不过,单击 Signal_0 不会引发任何事情,那么我们来解决此问题。 我们启用重新打开设置窗口,并在界面中明确加载先前保存的所选信号设置。 另一个想法是实现编辑已加载设置,并保存它们的可能性。
在 CProgram 基类中打开 OnEvent() 方法主体,并找到应对按钮单击事件的部分。 在其内添加以下代码:
//---
      for(int i=0; i<5; i++)
      {
         if(lparam==m_signal_editor[i].Id())
         {
            LoadSignalSet(i);
            m_new_signal.LabelText("Save");
            m_new_signal.Update(true);
            m_set_window.OpenWindow();
            m_number_signal=i;
         }
      }
在此判断哪个已创建信号按钮被按下了。 知道这一点后,利用 LoadSignalSet() 方法将以前保存的数据加载到设置窗口界面,并将按钮的名称从 “Add” 更改为 “Save”,然后打开设置窗口。
交易信号搜索算法
现在,创建和编辑交易信号的工具已准备就绪,是时候将其链接到应用程序里负责信号搜索和显示的部分了。 我们已为信号监控奠定了基础。 它拥有表格视图,其中包含数据行(在第一个设置步骤中选择的品种)和数据列(在第二个设置步骤中选择的时间帧)的名称。
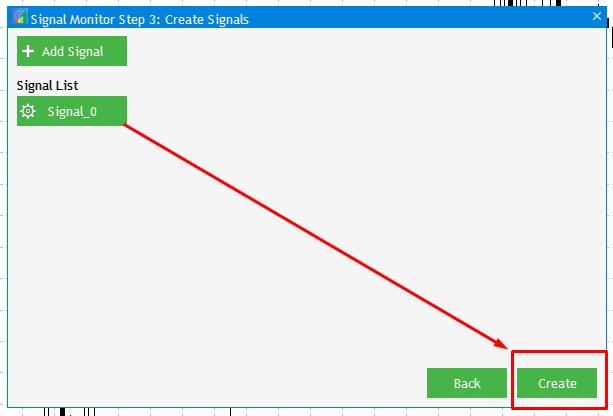
图例 6 创建交易信号监视器的按钮。
创建至少一个交易信号之后的动作顺序很简单。 单击 Create(创建),会触发基于先前整个设置数组形成交易信号监视器。 在继续对该系统进行编程之前,我们需要充实 ToMonitor() 方法,该方法在按 Create 后将被调用。
//--- Hide Step 3
   m_add_signal.Hide();

   m_signal_header.Hide();
   m_back_button.Hide();
   m_next_button.Hide();
   for(int i=0; i<5; i++)
      m_signal_editor[i].Hide();
由于我们已有的按钮对象允许显示和编辑当前已创建的交易信号,在跳到监视窗口时这些按钮也应隐藏,这与之前步骤 3 中的所有控件类似。
在第一篇文章里,当我们开发应用程序结构时,监视器元素之一是第一篇文章的图例 5 中所示的标示模块。 其目的是实时显示早前所创建交易信号之一的存在。 所以,第一步是创建一个对象作为标示模块。 这可通过在 CProgram 类中实现 CreateSignalButton() 方法来达成。
bool CreateSignalButton(CButton &button,const int x_gap,const int y_gap);
另外,添加 CButton 类实例的数组,它是创建完整标示模块集合所需的。
CButton m_signal_button[];
现在打开 StepWindow.mqh ,并将所创建方法的实现添加到文件末尾:
//+------------------------------------------------------------------+
//| Creates an indication block                                      |
//+------------------------------------------------------------------+
bool CProgram::CreateSignalButton(CButton &button,const int x_gap,const int y_gap)
{
//---
   color baseclr=C'220,225,235';
//--- Save the window pointer
   button.MainPointer(m_step_window);
//--- Set up properties before creation
   button.TwoState(false);
   button.XSize(40);
   button.YSize(20);
   button.IconXGap(2);
   button.IconYGap(button.YSize()/2-8);
   button.LabelXGap(19);
   button.LabelYGap(2);
   button.FontSize(m_base_font_size);
   button.BackColor(baseclr);
   button.BackColorHover(baseclr);
   button.BackColorPressed(baseclr);
   button.BorderColor(baseclr);
   button.BorderColorHover(baseclr);
   button.BorderColorPressed(baseclr);
   button.LabelColor(clrBlack);
   button.LabelColorPressed(clrSlateGray);
   button.IconFile("");
   button.IconFileLocked("");
   button.IsDoubleBorder(true);
//--- Create the control
   if(!button.CreateButton("",x_gap-button.XSize()/2,y_gap))
      return(false);
//--- Add the element pointer to the base
   CWndContainer::AddToElementsArray(0,button);
   return(true);
}
现在,将其应用到 To Monitor() 创建方法中。 为此,在方法主体中找到 “Timeframes” 部分,然后在该方法内添加代码,如下所示:
//--- Timeframes
   int tf=ArraySize(m_timeframes);
   ArrayResize(m_timeframe_label,tf);
//---
   for(int i=0; i<tf; i++)
   {
      if(!CreateTimeframeLabel(m_timeframe_label[i],110+50*i,m_step_window.CaptionHeight()+3,m_timeframes[i]))
         return;
      m_timeframe_label[i].Update(true);
   }
//-- Signal blocks
   int k=0;
   ArrayResize(m_signal_button,sy*tf);
   for(int j=0; j<sy; j++)
   {
      for(int i=0; i<tf; i++)
      {
         if(!CreateSignalButton(m_signal_button[k],m_timeframe_label[i].XGap()+m_timeframe_label[i].XSize()/2,m_step_window.CaptionHeight()+25+j*25))
            return;
         m_signal_button[k].Update(true);
         k++;
      }
   }
//--- Resize window
   AutoResize(m_timeframe_label[tf-1].XGap()+m_timeframe_label[tf-1].XSize()+5,m_symbol_label[sy-1].YGap()+m_symbol_label[sy-1].YSize()+5);
编译项目,并获取为将来显示交易信号用的备用布局。

图例 7 交易信号的备用布局。
现在回忆一下标示模块的哪些元素当显示信号时可以配置。
- 背景颜色。
- 表示模块边框的存在和颜色。
- 文本标签的颜色和值。
- 图标的存在。
- 工具提示的存在。
为了管理这些属性,在我们的 CProgram 基类的私密部分中设置以下方法:
   void              SetBorderColor(int index, color clr);
   void              SetLabel(int index, string text,color clr=clrBlack);
   void              SetIcon(int index,int number);
   void              SetBackground(int index,color clr);
   void              SetTooltip(int index,string text="\n");
它们的实现:
//+------------------------------------------------------------------+
//| Set the border color                                             |
//+------------------------------------------------------------------+
void CProgram::SetBorderColor(int index, color clr)
{
   m_signal_button[index].BorderColor(clr);
   m_signal_button[index].BorderColorHover(clr);
   m_signal_button[index].BorderColorPressed(clr);
   m_signal_button[index].Update(true);
}
//+------------------------------------------------------------------+
//| Set the label text                                               |
//+------------------------------------------------------------------+
void CProgram::SetLabel(int index, string text,color clr=clrBlack)
{
   m_signal_button[index].LabelColor(clr);
   m_signal_button[index].LabelColorHover(clr);
   m_signal_button[index].LabelColorPressed(clr);
   m_signal_button[index].LabelText(text);
   m_signal_button[index].Update(true);
}
//+------------------------------------------------------------------+
//| Set the background                                               |
//+------------------------------------------------------------------+
void CProgram::SetBackground(int index,color clr)
{
   m_signal_button[index].BackColor(clr);
   m_signal_button[index].BackColorHover(clr);
   m_signal_button[index].Update(true);
}
//+------------------------------------------------------------------+
//| Set the icon                                                     |
//+------------------------------------------------------------------+
void CProgram::SetIcon(int index,int number)
{
   //---
   string image[]=
   {
      "Images\\EasyAndFastGUI\\Icons\\bmp16\\arrow_up.bmp",
      "Images\\EasyAndFastGUI\\Icons\\bmp16\\arrow_down.bmp"
   };
   string path=(number>=0)?image[number]:"";
   if(number<0)
      m_signal_button[index].IsCenterText(true);
   else
      m_signal_button[index].IsCenterText(false);
   m_signal_button[index].IconFile(path);
   m_signal_button[index].IconFilePressed(path);
   m_signal_button[index].Update(true);
}
//+------------------------------------------------------------------+
//| Set the tooltip                                                  |
//+------------------------------------------------------------------+
void CProgram::SetTooltip(int index,string text="\n")
{
   m_signal_button[index].Tooltip(text);
   m_signal_button[index].ShowTooltip(true);
}
然后,我们需要创建一些必要的辅助方法,这些方法包括进一步的计算、正确的显示、还有最重要的是,每个所创建标示模块与特定数据行(选定的品种)和数据列(时间帧)的对应关系。 首先,创建基于表内索引判断标示模块的数据行和数据列的方法。
   int               GetRow(int index,int row_size);
   int               GetCol(int index,int row_size);
//+------------------------------------------------------------------+
//| Determining a row by the index                                   |
//+------------------------------------------------------------------+
int CProgram::GetRow(int index,int row_size)
{
   return(int(MathFloor(index/row_size)+1));
}
//+------------------------------------------------------------------+
//| Determining a column by the index                                |
//+------------------------------------------------------------------+
int CProgram::GetCol(int index,int row_size)
{
   return(int(MathMod(index,row_size)+1));
}
我们还需要能够从界面获取所需的数据。 即,我们需要将时间帧的文本显示转换为时间帧的枚举类型。 我们还需要能够根据标示模块索引找到表内对应的品种和时间帧。
//+------------------------------------------------------------------+
//| Return timeframe by row                                          |
//+------------------------------------------------------------------+
ENUM_TIMEFRAMES CProgram::StringToTimeframe(const string timeframe)
{
   if(timeframe=="M1")  return(PERIOD_M1);
   if(timeframe=="M2")  return(PERIOD_M2);
   if(timeframe=="M3")  return(PERIOD_M3);
   if(timeframe=="M4")  return(PERIOD_M4);
   if(timeframe=="M5")  return(PERIOD_M5);
   if(timeframe=="M6")  return(PERIOD_M6);
   if(timeframe=="M10") return(PERIOD_M10);
   if(timeframe=="M12") return(PERIOD_M12);
   if(timeframe=="M15") return(PERIOD_M15);
   if(timeframe=="M20") return(PERIOD_M20);
   if(timeframe=="M30") return(PERIOD_M30);
   if(timeframe=="H1")  return(PERIOD_H1);
   if(timeframe=="H2")  return(PERIOD_H2);
   if(timeframe=="H3")  return(PERIOD_H3);
   if(timeframe=="H4")  return(PERIOD_H4);
   if(timeframe=="H6")  return(PERIOD_H6);
   if(timeframe=="H8")  return(PERIOD_H8);
   if(timeframe=="H12") return(PERIOD_H12);
   if(timeframe=="D1")  return(PERIOD_D1);
   if(timeframe=="W1")  return(PERIOD_W1);
   if(timeframe=="MN")  return(PERIOD_MN1);
//--- The default value
   return(::Period());
}
//+------------------------------------------------------------------+
//| Determine the timeframe                                          |
//+------------------------------------------------------------------+
ENUM_TIMEFRAMES CProgram::GetTimeframe(int index)
{
   int tf=ArraySize(m_timeframes);
   return(StringToTimeframe((m_timeframe_label[GetCol(index,tf)-1].LabelText())));
}
//+------------------------------------------------------------------+
//| Determine the symbol                                             |
//+------------------------------------------------------------------+
string CProgram::GetSymbol(int index)
{
   int tf=ArraySize(m_timeframes);
   return(m_symbol_label[GetRow(index,tf)-1].LabelText());
}
下一个方法与信号搜索算法直接相关:它按指定品种和时间帧内搜索早前所创建信号的参数集。
bool GetSignal(string sy,ENUM_TIMEFRAMES tf,SIGNAL &signal_set);
设置则由 SIGNAL 结构传递一个参数集。
//+------------------------------------------------------------------+
//|                                                                  |
//+------------------------------------------------------------------+
bool CProgram::GetSignal(string sy,ENUM_TIMEFRAMES tf,SIGNAL &signal_set)
{
//--- Getting the indicator handle
   int h=INVALID_HANDLE;
   ENUM_APPLIED_PRICE app_price;
   switch(signal_set.app_price)
   {
   case  0:
      app_price=PRICE_CLOSE;
      break;
   case  1:
      app_price=PRICE_OPEN;
      break;
   case  2:
      app_price=PRICE_HIGH;
      break;
   case  3:
      app_price=PRICE_LOW;
      break;
   case  4:
      app_price=PRICE_MEDIAN;
      break;
   case  5:
      app_price=PRICE_TYPICAL;
      break;
   case  6:
      app_price=PRICE_WEIGHTED;
      break;
   default:
      app_price=PRICE_CLOSE;
      break;
   }
//---
   switch(signal_set.ind_type)
   {
   case  0:
      h=iATR(sy,tf,signal_set.ind_period);
      break;
   case  1:
      h=iCCI(sy,tf,signal_set.ind_period,app_price);
      break;
   case  2:
      h=iDeMarker(sy,tf,signal_set.ind_period);
      break;
   case  3:
      h=iForce(sy,tf,signal_set.ind_period,MODE_SMA,VOLUME_TICK);
      break;
   case  4:
      h=iWPR(sy,tf,signal_set.ind_period);
      break;
   case  5:
      h=iRSI(sy,tf,signal_set.ind_period,app_price);
      break;
   case  6:
      h=iMomentum(sy,tf,signal_set.ind_period,app_price);
      break;
   default:
      break;
   }
   if(h==INVALID_HANDLE)
   {
      Print(sy+". Failed to get handle");
      Print("Handle = ",h,"  error = ",GetLastError());
      return(false);
   }
   //---
   double arr[1];
   if(CopyBuffer(h,0,
    0,1,arr)!=1)
   {
      Print("sy= ",sy,"tf= ",EnumToString(tf)," Failed to get handle data ",GetLastError());
      return(false);
   }
   IndicatorRelease(h);
//--- Check the condition
   double r_value=signal_set.rule_value;
   double c_value=arr[0];
   m_ind_value=c_value;
   int s=0;
   switch(signal_set.rule_type)
   {
   case  0:
      if(c_value>r_value)
         s=1;
      break;
   case  1:
      if(c_value>=r_value)
         s=1;
      break;
   case  2:
      if(c_value==r_value)
         s=1;
      break;
   case  3:
      if(c_value<r_value)
         s=1;
      break;
   case  4:
      if(c_value<=r_value)
         s=1;
      break;
   default:
      s=0;
      break;
   }
//---
   if(s>0)
      return(true);
   return(false);
}
GetSignal() 方法从 SIGNAL 结构接收信息来生成交易信号,其中包括选择了哪些可用指标,为指标选择了哪些设置,以及设置了哪些搜索规则。 不要忘记,对于每个信号,可以按时间帧进行两次过滤。 第一次是在第二个设置步骤中执行,然后我们可以在交易信号创建窗口中过滤选定的值,如下图例 8 所示。
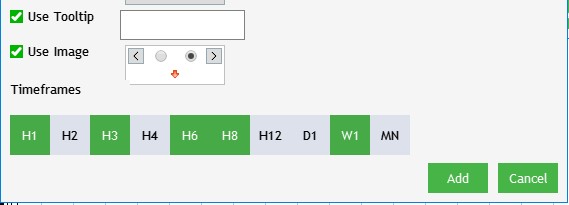
图例 8 为所创建信号选择时间帧。
我们的算法之所以考虑用此过滤器,而不是在给定的时间帧内寻找信号,是因为每个所创建交易信号均应检查其时间帧规范。 为此,在基类中创建 CheckTimeframe() 方法。 该方法将用作过滤器。
//+------------------------------------------------------------------+
//|                                                                  |
//+------------------------------------------------------------------+
bool CProgram::CheckTimeframe(ENUM_TIMEFRAMES tf,SIGNAL &signal_set)
{
   for(int i=0; i<21; i++)
   {
      if(StringToTimeframe(CharArrayToString(signal_set.tf_name[i].tf))==tf)
         return(true);
   }
   return(false);
}
现在,是时候创建搜索交易信号的机制了。 为此,在 CProgram 类的 public 部分里增加一个方法:SearchSignal()。
bool SearchSignals(void);
我们来更详细地分析其分步实现,并了解早前所创建辅助方法的用途。
//+------------------------------------------------------------------+
//|                                                                  |
//+------------------------------------------------------------------+
bool CProgram::SearchSignals(void)
{
//--- Search for set signals
   SIGNAL signal_set[];
   int cnt=0;
   for(int i=0; i<5; i++)
   {
      if(FileIsExist("Signal Monitor\\signal_"+string(i)+".bin"))
         cnt++;
   }
//---
   ArrayResize(signal_set,cnt);
   ZeroMemory(signal_set);
//---
   for(int i=0; i<cnt; i++)
   {
      int h=FileOpen("Signal Monitor\\signal_"+string(i)+".bin",FILE_READ|FILE_BIN);
      if(h==INVALID_HANDLE)
      {
         MessageBox("Configuration not found","Signal Monitor");
         return(false);
      }
      FileReadStruct(h,signal_set[i]);
      FileClose(h);
      for(int j=0; j<ArraySize(m_signal_button); j++)
      {
         //---
         string sy=GetSymbol(j);
         ENUM_TIMEFRAMES tf=GetTimeframe(j);
         //---
         if(!CheckTimeframe(tf,signal_set[i]))
            continue;
         //---
         if(GetSignal(sy,tf,signal_set[i]))
         {
            //---
            if(signal_set[i].label_type==1)
               SetLabel(j,CharArrayToString(signal_set[i].label_value),signal_set[i].label_color);
            else
               SetLabel(j,DoubleToString(m_ind_value,3),signal_set[i].label_color);
            //---
            if(signal_set[i].back_color!=clrNONE)
               SetBackground(j,signal_set[i].back_color);
            //---
            if(signal_set[i].border_color!=clrNONE)
               SetBorderColor(j,signal_set[i].border_color);
            else
               SetBorderColor(j,signal_set[i].back_color);
            //---
            if(signal_set[i].tooltip)
               SetTooltip(j,CharArrayToString(signal_set[i].tooltip_text));
            //---
            if(signal_set[i].image)
               SetIcon(j,signal_set[i].img_index);
            else
               SetIcon(j,-1);
         }
      }
   }
   return(true);
}
在第一步操作中,搜索方法收集有关已创建和已配置交易信号总数的数据。 然后,该方法循环遍历有关连接信号设置信息的文件,并将此数据读取到结构中。 该机制判断每个标示模块是否与表格内的品种和时间帧相对应。 根据此数据,检查是否需要在选定的时间帧内搜索交易信号。 如果时间帧匹配,则搜索信号。 如果发现信号,则根据信号配置为标示模块染色。 </ s4>现在,所创建方法可以应用了。 该方法应于 ToMonitor() 方法主体的末尾调用。
...
//--- Resize window
   AutoResize(m_timeframe_label[tf-1].XGap()+m_timeframe_label[tf-1].XSize()+5,m_symbol_label[sy-1].YGap()+m_symbol_label[sy-1].YSize()+5);
//---
   SearchSignals();
}
现在,我们尝试在确定时间间隔后启用重复搜索。 打开 SignalMonitor.mq5 文件,并在文件开头创建一个枚举:
//+------------------------------------------------------------------+
//|                                                                  |
//+------------------------------------------------------------------+
enum UPDATE
{
   MINUTE,        // 1 Minute
   MINUTE_15,     // 15 Minutes
   MINUTE_30,     // 30 Minutes
   HOUR,          // 1 Hour
   HOUR_4         // 4 Hours
};
现在可以轻松地将新设置添加到输入中:
input UPDATE Update = HOUR; // Update interval
创建两个计算用的变量。
int cnts=0;
datetime update;
在智能系统初始化里添加以下代码行:
//---
   switch(Update)
   {
   case MINUTE:
      cnts=60;
      break;
   case MINUTE_15:
      cnts=60*15;
      break;
   case MINUTE_30:
      cnts=60*30;
      break;
   case HOUR:
      cnts=3600;
      break;
   case HOUR_4:
      cnts=3600*4;
      break;
   default:
      cnts=1;
      break;
   }
   update=TimeLocal()+cnts;
由此,我们确定了更新间隔,并设置好下一个更新时间。 在 OnTick() 函数主体中,添加时间检查:如果已超过指定的时间间隔,则再次搜索交易信号。
//+------------------------------------------------------------------+
//| Expert tick function                                             |
//+------------------------------------------------------------------+
void OnTick()
{
   if(TimeLocal()>update)
   {
      program.SearchSignals();
      update=TimeLocal()+cnts;
   }
}
编译项目,并自行创建一组品种。 我们可以添加一个信号来演示监视器的操作。
在本系列文章的下一篇里,我们将继续扩充现有的功能,以便可以更灵活地设置交易信号,并且还将改善某些现有功能。
结束语
下面的文档里包含所有讲述的文件,这些文件已正确地排列在文件夹当中。 为了正确操作,您应该将 MQL5 文件夹保存到终端的根目录中。 若要打开 MQL5 文件夹所在的终端根目录,请在 MetaTrader 5 终端中按 Ctrl+Shift+D 组合键,或用关联菜单,如下图例 9 所示。
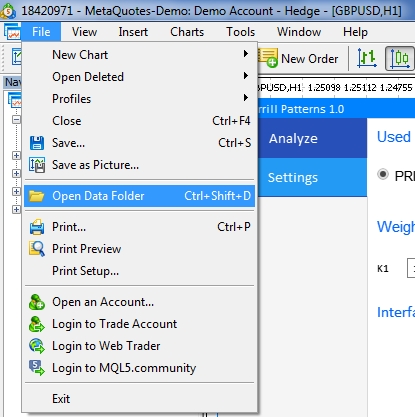
图例 9. 在 MetaTrader 5 终端根目录中打开 MQL5 文件夹