连续前行优化 (第五部分): 自动优化器项目概述和 GUI 的创建
Andrey Azatskiy | 22 六月, 2020
概述
在之前的文章中,我们研究了与终端直接相关的项目部分,以及讲述项目一般应用程序的部分。 前一篇文章先于本系列的其余部分。 这样做有两个原因。 首先,它可作为该应用程序的指南。 其次,它图解了应用程序的创建思路和逻辑,掌握它有助于理解代码。
这些文章可经以下链接获得:
- 连续前行优化 (第一部分): 操控优化报告
- 连续前行优化 (第二部分): 创建优化报告机器人的机理
- 连续前行优化 (第三部分): 将机器人适配为自动优化器
- 连续前行优化 (第四部分): 优化管理器(自动优化器)
较早的文章,本应用程序中所用的素材:
本文讲述在 Visual Studio IDE 及其组件中的项目结构。 这部分专述创建应用程序的 GUI。 它还研究了存储优化结果的管理目录结构,以及取自上一个项目的优化过程管理类的变化。
项目结构概览
由于本文还有一个部分会专述 C#,因此我们开始研究其文件结构:

下面附带的解决方案包含两个项目。 在第一篇文章中研究了它们当中之一,在后面的文章中分析了之二。这个项目是自动优化器。

鉴于项目拥有 GUI,因此这回再次用到 MVVM(模式l视图视图模型)方式。 项目模板已被划分为相应的板块。 由于项目逻辑应在模型部分中实现,因此与项目图形部分无关的类回位于 Model 子目录中,以后会进一步切分目录。
- 负责管理目录和终端目录取向的类位于Model/DirectoryManagers 文件夹中。
- 文件管理类则位于 Model/FileReaders 之下。
- 含有优化逻辑的对象,和相应的实例化类则位于 Model/OptimizationManagers 之下
- 管理终端及其配置文件的对象则位于 Model/Terminal 之下
取自前一篇文章中的对象已被修改,我们就从它开始。 对于所有不太熟悉前一部分的人来说,该讲述也将很有用。
创建应用程序的图形部分
我们进入到图形界面。 早前,我们曾研究过一种利用 C# 语言为 MetaTrader 5 创建附加组件的方法,以及利用 DLL 和 OnTimer 回调与智能交易系统的功能相结合的方法。 在当前的实现中,自动优化器将在终端外部实现。 现在,它作为外部优化管理器运行,并模仿交易员的操作,启动优化并处理结果。 甚而,由于避免了在同一台计算机上运行的多个终端同时进行优化,且将自动优化器实现为单例应用程序,我们可以绝对掌控计算机上安装的所有终端,包括正运行优化器的计算机。 在之前的项目中,这台计算机无法受控。
这就是为什么当前项目没有完全作为 DLL 来实现,但现在自动优化器项目被切分为一个 DLL 和一个可执行文件。
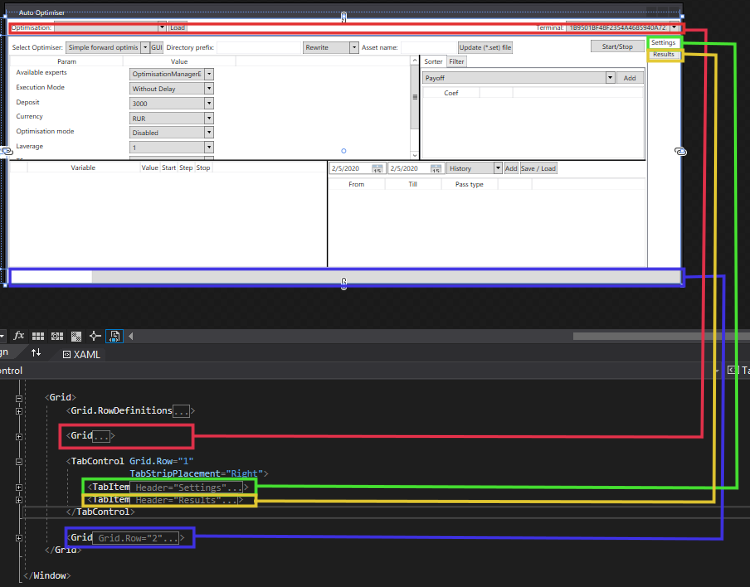
从上面的屏幕截图可以看出,项目窗口由 Header, Footer 和h含有两个选项卡的 TabControl 组成:Settings 和 Reports。 无论在中央部分中选择了哪个选项卡,都不会更改窗口的页眉部分和页脚,从而可轻易访问位于这些部分的所有控制元素。
窗口的页眉部分是经由以下 XAML 标记创建的:
<Grid>
        <Grid.ColumnDefinitions>
                <ColumnDefinition/>
                <ColumnDefinition/>
        </Grid.ColumnDefinitions>
        <WrapPanel Margin="2">
            <Label Content="Optimisation:"/>
            <ComboBox Width="200"
                      ItemsSource="{Binding SelectedOptimisationNames,UpdateSourceTrigger=PropertyChanged}"
                      SelectedItem="{Binding SelectedOptimisation}"
                      SelectedIndex="0"
                      IsEnabled="{Binding EnableMainTogles, UpdateSourceTrigger=PropertyChanged}"/>
            <Button Content="Load"
                    Margin="2,0,0,0"
                    Width="34"
                    Command="{Binding LoadResults}"
                    IsEnabled="{Binding EnableMainTogles, UpdateSourceTrigger=PropertyChanged}"/>
        </WrapPanel>

        <WrapPanel HorizontalAlignment="Right"
                   Margin="2"
                   Grid.Column="1">
            <Label Content="Terminal:"/>
            <ComboBox Width="200"
                      SelectedIndex="{Binding SelectedTerminalIndex}"
                      ItemsSource="{Binding Terminals,UpdateSourceTrigger=LostFocus}"
                      IsEnabled="{Binding EnableMainTogles, UpdateSourceTrigger=PropertyChanged}"/>
        </WrapPanel>
</Grid>
Grid 容器包含所考虑区域中所有可用的控制元素,它被划分为 2 列。 以下元素倍添加到第一列:参数名称(Optimisation),包含可用优化列表的组合框,以及优化加载按钮。 第二列包含参数名称,和含有可用终端 ID 的下拉列表。
表示图形窗口页脚(带有 ProgressBar)的 Grid 容器拥有类似的结构:
<Grid Grid.Row="2">
        <Grid.ColumnDefinitions>
                <ColumnDefinition Width="150"/>
                <ColumnDefinition/>
        </Grid.ColumnDefinitions>

        <Label Content="{Binding Status, UpdateSourceTrigger=PropertyChanged}"/>
        <ProgressBar Grid.Column="1"
                     Value="{Binding Progress, UpdateSourceTrigger=PropertyChanged}"
                     Minimum="0"
                     Maximum="100"/>
</Grid>
它将该区域划分为 2 部分,并限制了第一部分的大小。 结果就是,ProgressBar 占用了最大的容器部分。 进而,整体窗口宽度有变化的情况下 ProgressBar 的宽度会与之相适。 根据 XAML 标记规则,所有这三个组件都放置在 <Window/> 容器中。
<Window x:Class="Metatrader_Auto_Optimiser.AutoOptimiser"
        xmlns="http://schemas.microsoft.com/winfx/2006/xaml/presentation"
        xmlns:x="http://schemas.microsoft.com/winfx/2006/xaml"
        xmlns:d="http://schemas.microsoft.com/expression/blend/2008"
        xmlns:mc="http://schemas.openxmlformats.org/markup-compatibility/2006"
        xmlns:vm="clr-namespace:Metatrader_Auto_Optimiser.View_Model"
        xmlns:v="clr-namespace:Metatrader_Auto_Optimiser.View"
        mc:Ignorable="d"
        Title="Auto Optimiser" Height="500" Width="1200"
        MinHeight="500" MinWidth="1200">

    <Window.DataContext>
        <vm:AutoOptimiserVM/>
    </Window.DataContext>


    ...


</Window>
此容器定义名称空间引用:
- Metatrader_Auto_Optimiser.View_Model,当用户有动作(ViewModel),其内存储的回调会指示程序如何响应。
- Metatrader_Auto_Optimiser.View,当双击 ListView 对象,其内存储的类会把事件转换为命令。 这是将事件与 ViewModel 的 ICommand 接口结合操作所要求的。
此外,设置以下窗口大小:最小尺寸,和程序启动时窗口的初始打开尺寸。 然后,利用上述包含 ViewModel 名称空间的别名,为图形界面安装 DataContext。
面板的中央部分由一个包含 2 个选项卡的 TabControl 元素组成。 它作为主要部分,是我们的图形元素的“实体”。 “Settings” 选项卡的结构如下:
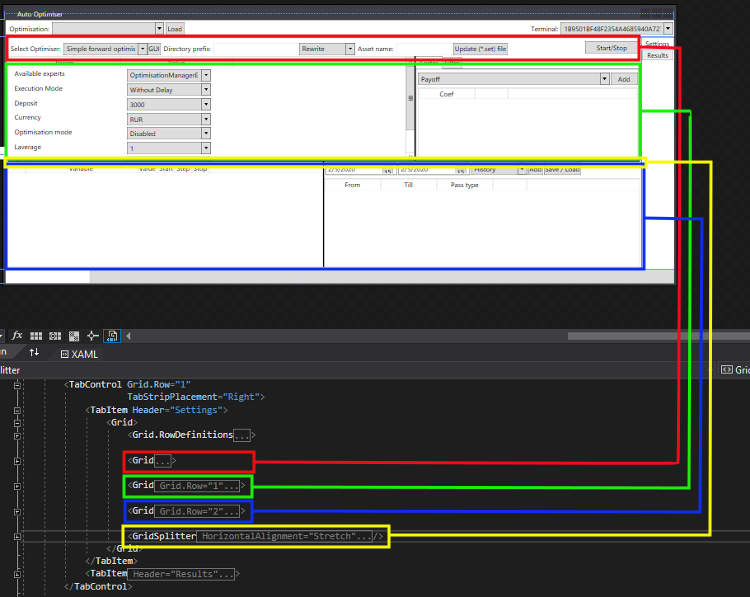
此选项卡也划分为三个部分。 该选项卡的上层部分含有一个面板,允许您设置自动优化器要保存的报告参数。 它还包括资产名称的选择,和更新 *set 文件的按钮。 “Settings” 选卡的中层部分包含优化器设置,和自动优化器处理时期望的过滤和排序参数的选项。 最后一部分允许设置智能交易系统参数,并选择优化和前向验证日期。 为了更加便捷,GridSplitter 元素位于前两个部分之间。 通过拖动它,可以调整这些选项卡的大小。 当您需要为机器人填写一长列优化参数时,这特别方便。
我们查看一下 “Settings” 选卡第一部分的标记代码:
<Grid>
        <Grid.ColumnDefinitions>
                <ColumnDefinition/>
                <ColumnDefinition Width="100"/>
        </Grid.ColumnDefinitions>

        <WrapPanel HorizontalAlignment="Left"
                VerticalAlignment="Bottom">
        <Label Content="Select Optimiser:"/>
        <ComboBox Width="150"
                IsEnabled="{Binding EnableMainTogles, UpdateSourceTrigger=PropertyChanged}"
                ItemsSource="{Binding Optimisers}"
                SelectedIndex="{Binding SelectedOptimiserIndex}"/>
        <Button Content="GUI"
                Command="{Binding ShowOptimiserGUI}"
                IsEnabled="{Binding EnableMainTogles, UpdateSourceTrigger=PropertyChanged}"/>
        <Label Content="Directory prefix:"/>
        <TextBox Width="150"
                IsEnabled="{Binding EnableMainTogles, UpdateSourceTrigger=PropertyChanged}"
                Text="{Binding DirPrefix}"/>
        <ComboBox Width="100"
                Margin="2,0,0,0"
                SelectedIndex="0"
                ItemsSource="{Binding FileFillingType}"
                IsEnabled="{Binding EnableMainTogles, UpdateSourceTrigger=PropertyChanged}"
                SelectedItem="{Binding FileWritingMode}"/>
        <Label Content="Asset name:"/>
        <TextBox Width="100"
                IsEnabled="{Binding EnableMainTogles, UpdateSourceTrigger=PropertyChanged}"
                Text="{Binding AssetName}"/>
        <Button Content="Update (*.set) file"
                Margin="2,0,0,0"
                IsEnabled="{Binding EnableMainTogles}"
                Command="{Binding UpdateSetFile}"/>
        </WrapPanel>
        <Button Content="Start/Stop"
                Grid.Column="2"
                Margin="2"
                Command="{Binding StartStopOptimisation}"/>

</Grid>
所描述的部分包括被切分开的两列。 第一列的宽度可以动态更改; 第二列的宽度则是固定的,等于 100 个像素。 第一列包括面板中的所有控件。 所有这些元素都在 WrapPanel 中提供,允许一个接一个地排列元素。 首先到达的是负责自动优化器选择和设置的控件。 这之后是与优化报告的文件夹命名相关的参数,以及报告的生成方式(覆盖写入,追价)。 最后一部分是所优化资产名称的规范,以及刷新机器人参数 *set 文件的按钮。 “Start/Stop” 按钮占据固定宽度的列,该按钮可启动和停止优化的起点。
“Settings” 选项卡的第二部分亦切分为两部分。
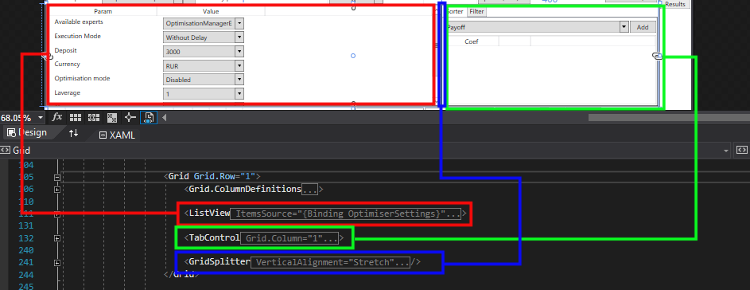
第一部分包含优化器设置参数列表的 ListView。 在此,参数的名称和数值,与终端中的优化程序设置字段相对应。 第二部分包含数据排序和过滤系数的规范。 这些列还含有 GridSplitter 元素,该元素分隔了所描述的区域。 创建元素的代码很简单,故在此勿需赘述。 完整的代码附带于下。 该选项卡的下层与上层完全相似,唯一的例外是包含优化日期的右侧被切分为两部分。 第一部分所含控件用于将数据添加到列表。 第二部分用于显示创建的列表。
图形界面的最后一个元素是 “Results” 选项卡,该选项卡可查看优化结果,以及前向验证和历史测试的结果。
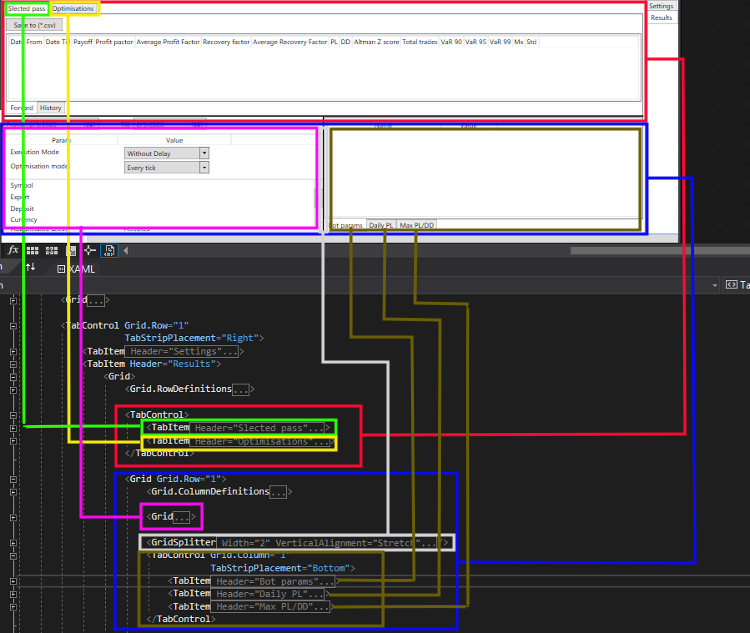
从所附图片可以看出,该选项卡比之前一个,具有更有趣的结构。 它被切分为两部分,并由 GridSplitter 元素分隔,由于能够调整每部分的尺寸,故可以对优化结果进行更详细的研究。 上部包含 TabItem 分组的两个元素,一个嵌套在另一个之中。 位于前向验证测试和历史测试里的 “Selected pass” 选项卡,不如 “Optimisations” 选项卡那么有趣,不过我们稍后会回来。
选项卡的下部包含两个由垂直 GridSplitter 分隔的字段。 第一个意在为上部表中选择的测试指定日期和模式,而另一个显示 表中汇总的变量数量,以方便显示和阅读。 它还提供了所选优化通关递次的参数列表(“ Bot Params” 选项卡)。
标记元素与其在 “Optimisations”选项卡中的结果进行比较,结构如下:
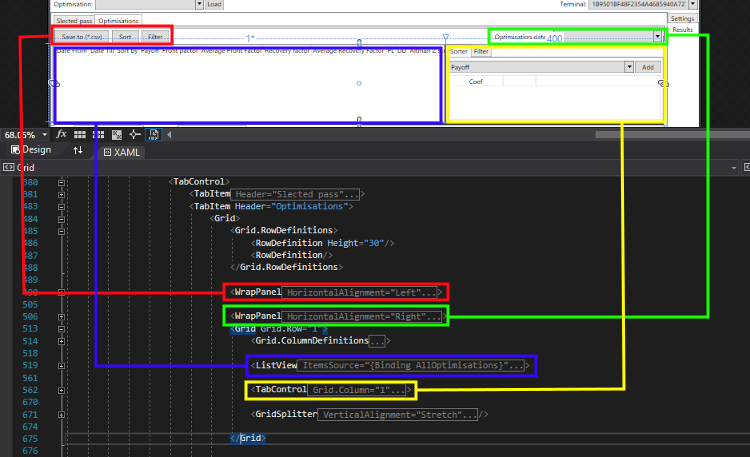
与 “Selected pass” 相似,此选项卡含有 “Save to (*csv)” 按钮,该按钮将选定日期的所有已完成优化结果保存到文件之中。 表中还有两个按钮,可对数据进行排序和过滤,从而显示所有优化结果。 结果表的结构类似于位于选项卡 “Selected pass.History” 和 “Selected pass.Forward” 中的表。 创建表数据的标记部分如下所示:
<ListView ItemsSource="{Binding AllOptimisations}"
          SelectedIndex="{Binding SelecterReportItem}"
          v:ListViewExtention.DoubleClickCommand="{Binding StartTestReport}">
        <ListView.View>
                <GridView>
                        <GridViewColumn Header="Date From" DisplayMemberBinding="{Binding From}"/>
                        <GridViewColumn Header="Date Till" DisplayMemberBinding="{Binding Till}"/>
                        <GridViewColumn Header="Sort by" DisplayMemberBinding="{Binding SortBy}"/>
                        <GridViewColumn Header="Payoff" DisplayMemberBinding="{Binding Payoff}"/>
                        <GridViewColumn Header="Profit pactor" DisplayMemberBinding="{Binding ProfitFactor}"/>
                        <GridViewColumn Header="Average Profit Factor" DisplayMemberBinding="{Binding AverageProfitFactor}"/>
                        <GridViewColumn Header="Recovery factor" DisplayMemberBinding="{Binding RecoveryFactor}"/>
                        <GridViewColumn Header="Average Recovery Factor" DisplayMemberBinding="{Binding AverageRecoveryFactor}"/>
                        <GridViewColumn Header="PL" DisplayMemberBinding="{Binding PL}"/>
                        <GridViewColumn Header="DD" DisplayMemberBinding="{Binding DD}"/>
                        <GridViewColumn Header="Altman Z score" DisplayMemberBinding="{Binding AltmanZScore}"/>
                        <GridViewColumn Header="Total trades" DisplayMemberBinding="{Binding TotalTrades}"/>
                        <GridViewColumn Header="VaR 90" DisplayMemberBinding="{Binding VaR90}"/>
                        <GridViewColumn Header="VaR 95" DisplayMemberBinding="{Binding VaR95}"/>
                        <GridViewColumn Header="VaR 99" DisplayMemberBinding="{Binding VaR99}"/>
                        <GridViewColumn Header="Mx" DisplayMemberBinding="{Binding Mx}"/>
                        <GridViewColumn Header="Std" DisplayMemberBinding="{Binding Std}"/>
                </GridView>
        </ListView.View>
</ListView>
包含优化结果过滤器和排序参数的 TabItem 与 “Settings” 选卡里的同项完全一致。 尽管它们在标记中是分开的,但 ViewModel 的排列,会在其中一个变化时,立即呈现在另一个当中。 下一篇文章将研究更改渲染的机制。
从本节可以看出,图形界面标记非常简单。 我没有在程序中提供相应的视觉效果,因为主要任务是功能。 如果要美化该应用程序,请编辑 App.xaml 文件,该文件用作中央项目存储。
从“优化管理”系列文章及其修订中借用来的类
在该项目中,我所用的对象,是在之前“优化管理”系列里创建的。 由于上面的文章中提供了这些对象,因此我不再提供每个对象的详细说明。 不过,我们来深入讨论其中的一些,尤其是那些在本项目中被修改的内容。 借用对象的完整列表如下:
- RelayCommand — 实现 ICommand 接口,通过该接口,用户执行的所有 GUI 操作都将传递到 ViewModel 项目部分。
- ListViewExtention — 将双击 ListView 元素的事件传递给 ICommand 接口。 故此,我们能够利用 ListView 容器,并与用到的 MVVM 模板贴合。 该类用作双击事件的包装器。
- DirectoryInfoExtention — 该类包含 DirectoryInfo 类的扩展方法。
- Config — 该类用作终端配置文件的包装。 该类就像处理 Config 类型对象一样操控文件。 它还减少了代码行数量,并剔除了一些错误。
- TerminalManager — 该类负责从第三方应用程序启动和停止终端。 它是专为 MetaTrader 5 终端而创建的,并在启动前支持所有终端配置方法。
- SetFileManager — 操控测试器配置 *.set 文件的类。
- TerminalDirectory — 该类是终端目录的管理器。 它能提供关键目录的访问,且勿需在所需的文件夹里拼写完整路径。
清单中的最后四个对象可视为 C# 代码与终端协同操控的专有 API。 文章这一部分讲述的修改仅是内部的。 换言之,操控这些类的外部接口(公开方法和属性)在其代码签名中保持不变。 相应地,即使您用新对象替换了先前项目里这些对象的旧有实现,该项目也能正常编译并运行。
修改结构后的第一个对象是 Config 类。 该类代表的是一个在终端文档相应部分说明的表。 在其属性中,包含所有表字段。 通过修改属性,您可在终端初始化文件的特定部分中更改特定键的值。 初始化文件 *.ini 以一种常用格式表示。 Windows OS 内核提供了操控此格式的函数。 我们已将其中两个导入到我们的 C# 代码中。 在该类的前一版实现中,所用方法是直接导入到 Config 类。 在当前的实现中,这些方法在单独的 IniFileManager 类中实现。
class IniFileManager
{
    private const int SIZE = 1024; //Maximum size (for reading the value from the file)

    public static string GetParam(string section, string key, string path)
    {
        //To get the value
        StringBuilder buffer = new StringBuilder(SIZE);

        //Get value to buffer
        if (GetPrivateProfileString(section, key, null, buffer, SIZE, path) == 0)
            ThrowCErrorMeneger("GetPrivateProfileStrin", Marshal.GetLastWin32Error(), path);

        //Return the received value
        return buffer.Length == 0 ? null : buffer.ToString();
    }
    /// <summary>
    /// Return error
    /// </summary>
    /// <param name="methodName">Method name</param>
    /// <param name="er">Error code</param>
    private static void ThrowCErrorMeneger(string methodName, int er, string path)
    {
        if (er > 0)
        {
            if (er == 2)
            {
                if (!File.Exists(path))
                    throw new Exception($"{path} - File doesn1t exist");
            }
            else
            {
                throw new Exception($"{methodName} error {er} " +
                    $"See System Error Codes (https://docs.microsoft.com/en-us/windows/desktop/Debug/system-error-codes) for details");
            }
        }
    }

    public static void WriteParam(string section, string key, string value, string path)
    {
        //Write value to the INI-file
        if (WritePrivateProfileString(section, key, value, path) == 0)
            ThrowCErrorMeneger("WritePrivateProfileString", Marshal.GetLastWin32Error(), path);
    }
}
生成的 Config 文件仅提供配置文件中包含的字段。 在之前有关优化管理的文章中层提供了此对象的完整讲述。
下一个修订的类是 TerminalManager。 该类的内容保持不变。 我们不会研究该类的操作方法和构件,因为它只是借来的类。 不过,在启动和停止终端操作时,该类在应用程序中起着重要作用。 因此,此处是该类的完整实现代码。
class TerminalManager
{
    /// <summary>
    /// Constructor
    /// </summary>
    /// <param name="TerminalChangeableDirectory">
    /// Path to the directory with mutable files (the one in AppData)
    /// </param>
    public TerminalManager(DirectoryInfo TerminalChangeableDirectory) :
        this(TerminalChangeableDirectory, new DirectoryInfo(File.ReadAllText(TerminalChangeableDirectory.GetFiles().First(x => x.Name == "origin.txt").FullName)), false)
    {
    }
    /// <summary>
    /// Constructor
    /// </summary>
    /// <param name="TerminalChangeableDirectory">
    /// Path to the directory with mutable files
    /// </param>
    /// <param name="TerminalInstallationDirectory">
    /// Path to the terminal folder
    /// </param>
    public TerminalManager(DirectoryInfo TerminalChangeableDirectory, DirectoryInfo TerminalInstallationDirectory, bool isPortable)
    {
        this.TerminalInstallationDirectory = TerminalInstallationDirectory;
        this.TerminalChangeableDirectory = TerminalChangeableDirectory;

        TerminalID = TerminalChangeableDirectory.Name;

        CheckDirectories();

        Process.Exited += Process_Exited;

        Portable = isPortable;
    }
    /// <summary>
    /// Destructor
    /// </summary>
    ~TerminalManager()
    {
        Close();
        Process.Exited -= Process_Exited;
    }
    /// <summary>
    /// Terminal startup process
    /// </summary>
    private readonly System.Diagnostics.Process Process = new System.Diagnostics.Process();
    /// <summary>
    /// Running process completion event
    /// </summary>
    public event Action<TerminalManager> TerminalClosed;

    #region Terminal start Arguments
    /// <summary>
    /// Login for start - flag /Login
    /// </summary>
    public uint? Login { get; set; } = null;
    /// <summary>
    /// Platform launch under a certain profile.
    /// The profile must be created in advance and located in the /profiles/charts/ folder of the trading platform
    /// </summary>
    public string Profile { get; set; } = null;
    /// <summary>
    /// Config file as a /Config object
    /// </summary>
    public Config Config { get; set; } = null;
    /// <summary>
    /// Flag of terminal launch in /portable mode
    /// </summary>
    private bool _portable;
    public bool Portable
    {
        get => _portable;
        set
        {
            _portable = value;
            if (value && !TerminalInstallationDirectory.GetDirectories().Any(x => x.Name == "MQL5"))
            {
                WindowStyle = System.Diagnostics.ProcessWindowStyle.Minimized;

                if (Run())
                {
                    System.Threading.Thread.Sleep(1000);
                    Close();
                }
                WaitForStop();
                WindowStyle = System.Diagnostics.ProcessWindowStyle.Normal;
            }
        }
    }
    /// <summary>
    /// window style of the launched process
    /// </summary>
    public System.Diagnostics.ProcessWindowStyle WindowStyle { get; set; } = System.Diagnostics.ProcessWindowStyle.Normal;
    #endregion

    #region Terminal directories
    /// <summary>
    /// Path to terminal installation folder
    /// </summary>
    public DirectoryInfo TerminalInstallationDirectory { get; }
    /// <summary>
    /// Path to terminal folder with variable files
    /// </summary>
    public DirectoryInfo TerminalChangeableDirectory { get; }
    /// <summary>
    /// Path to the MQL5 folder
    /// </summary>
    public DirectoryInfo MQL5Directory => (Portable ? TerminalInstallationDirectory : TerminalChangeableDirectory).GetDirectory("MQL5");
    #endregion

    /// <summary>
    /// Terminal ID folder name in AppData directory
    /// </summary>
    public string TerminalID { get; }
    /// <summary>
    /// Flag of whether the terminal is currently running or not
    /// </summary>
    public bool IsActive => Process.StartInfo.FileName != "" && !Process.HasExited;

    #region .ex5 files relative paths
    /// <summary>
    /// List of full EA names
    /// </summary>
    public List<string> Experts => GetEX5FilesR(MQL5Directory.GetDirectory("Experts"));
    /// <summary>
    /// List of full indicator names
    /// </summary>
    public List<string> Indicators => GetEX5FilesR(MQL5Directory.GetDirectory("Indicators"));
    /// <summary>
    /// List of full script names
    /// </summary>
    public List<string> Scripts => GetEX5FilesR(MQL5Directory.GetDirectory("Scripts"));
    #endregion

    /// <summary>
    /// Terminal launch
    /// </summary>
    public bool Run()
    {
        if (IsActive)
            return false;
        // Set path to the terminal
        Process.StartInfo.FileName = Path.Combine(TerminalInstallationDirectory.FullName, "terminal64.exe");
        Process.StartInfo.WindowStyle = WindowStyle;
        // Set data for terminal launch (if any data were set)
        if (Config != null && File.Exists(Config.Path))
            Process.StartInfo.Arguments = $"/config:{Config.Path} ";
        if (Login.HasValue)
            Process.StartInfo.Arguments += $"/login:{Login.Value} ";
        if (Profile != null)
            Process.StartInfo.Arguments += $"/profile:{Profile} ";
        if (Portable)
            Process.StartInfo.Arguments += "/portable";

        // Notify the process of the need to call an Exit event after closing the terminal
        Process.EnableRaisingEvents = true;

        // Run the process and save the launch status to the IsActive variable
        return Process.Start();
    }
    /// <summary>
    /// Wait for the terminal operation to complete
    /// </summary>
    public void WaitForStop()
    {
        if (IsActive)
            Process.WaitForExit();
    }
    /// <summary>
    /// Stop the process
    /// </summary>
    public void Close()
    {
        if (IsActive)
            Process.Kill();
    }
    /// <summary>
    /// Wait for the terminal operation to complete for a certain time
    /// </summary>
    public bool WaitForStop(int miliseconds)
    {
        if (IsActive)
            return Process.WaitForExit(miliseconds);
        return true;
    }
    /// <summary>
    /// Search for files with the Ex5 extension
    /// Search is performed recursively - files are searched in the specified folder and in all subfolders
    /// </summary>
    /// <param name="path">Path to the folder where search begins</param>
    /// <param name="RelativeDirectory">Folder relative to which oath is returned</param>
    /// <returns>List of paths to the found files</returns>
    private List<string> GetEX5FilesR(DirectoryInfo path, string RelativeDirectory = null)
    {
        if (RelativeDirectory == null)
            RelativeDirectory = path.Name;
        string GetRelevantPath(string pathToFile)
        {
            string[] path_parts = pathToFile.Split('\\');
            int i = path_parts.ToList().IndexOf(RelativeDirectory) + 1;
            string ans = path_parts[i];

            for (i++; i < path_parts.Length; i++)
            {
                ans = Path.Combine(ans, path_parts[i]);
            }

            return ans;
        }

        List<string> files = new List<string>();
        IEnumerable<DirectoryInfo> directories = path.GetDirectories();

        files.AddRange(path.GetFiles("*.ex5").Select(x => GetRelevantPath(x.FullName)));

        foreach (var item in directories)
            files.AddRange(GetEX5FilesR(item, RelativeDirectory));

        return files;
    }
    /// <summary>
    /// Terminal closing event
    /// </summary>
    /// <param name="sender"></param>
    /// <param name="e"></param>
    private void Process_Exited(object sender, EventArgs e)
    {
       TerminalClosed?.Invoke(this);
    }
    /// <summary>
    /// Check the correctness of the passed terminal path
    /// </summary>
    private void CheckDirectories()
    {
        if (!TerminalInstallationDirectory.Exists)
            throw new ArgumentException("PathToTerminalInstallationDirectory doesn`t exists");
        if (!TerminalChangeableDirectory.Exists)
            throw new ArgumentException("PathToTerminalChangeableDirectory doesn`t exists");
        if (!TerminalInstallationDirectory.GetFiles().Any(x => x.Name == "terminal64.exe"))
            throw new ArgumentException($"Can`t find terminal (terminal64.exe) in the instalation folder {TerminalInstallationDirectory.FullName}");
    }
}
现在,该类尚未实现 ITerminalManager 接口(因为这是最后一次)。 我决定在实现所述应用程序时不运行单元测试,以便加快开发过程,并最大程度地减少项目数量。 结果就是,该对象不需要任何接口。
下一个修改涉及一种判断终端是否正在运行的新方法。 在以前的版本里,该属性从 Run 方法中接收一个值(为其分配了 false 值),并在 回调 里完成优化。 然而,这不是一个很好的决定,有时可能不起作用。 因此,我修改了 IsActive 属性取值器。 现在,取值器直接访问 Process 对象的 HasExited 属性。 只不过,在首次启动之前尝试访问该属性将生成一条错误消息。 我研究了 Process 类的细节,并注意到,当您通过所描述的对象启动过程时,其 StartInfo.FileName 属性将以可执行文件的路径来填充。 在第一次启动之前,它等于一个空值(“”)。 这就是为啥 IsActive 取值器看起来很奇怪的原因。 首先,取值器检查名称是否存在,然后检查 Process.HasExited 属性。 换句话说,默认情况下,我们假设终端是关闭的,并且只能通过 TerminalManager 类启动。 所以,如果 StartInfo.FileName ==“”,则返回 false(这意味着终端尚未运行)。 如果终端已启动,则比较 HasExited 属性的值。 若每次从我们的对象启动终端,以及关闭终端时,属性值都会改变。 由于此功能,在运行自动优化器时,终端应始终关闭。
由修改了内部结构的最后一个对象来结束讲述。 它是 SetFileManager 类,以及 UpdateParams 方法。
/// <summary>
/// Clear all recorded data in Params and load data from the required file
/// </summary>
public virtual void UpdateParams()
{
    _params.Clear();

    using (var file = FileInfo.OpenText())
    {
        string line;
        while ((line = file.ReadLine()) != null)
        {
            if (line[0].CompareTo(';') != 0 && line[0].CompareTo('#') != 0)
            {
                string[] key_value = line.Replace(" ", "").Split('=');
                string[] value_data = key_value[1].Split(new[] { '|' }, StringSplitOptions.RemoveEmptyEntries);

                ParamsItem item = new ParamsItem
                {
                    Variable = key_value[0],
                    Value = (value_data.Length > 0 ? value_data[0] : null),
                    Start = (value_data.Length > 1 ? value_data[1] : null),
                    Step = (value_data.Length > 2 ? value_data[2] : null),
                    Stop = (value_data.Length > 3 ? value_data[3] : null),
                    IsOptimize = (value_data.Length > 4 ? value_data[4].CompareTo("Y") == 0 : false)
                };

                _params.Add(item);
            }
        }
    }
}
该类中的 修改仅涉及一个方法,故在此我将不提供完整的类代码。 我在测试应用程序期间发现,有时 *.set 文件包含由终端生成的优化程序机器人参数,其中某些参数可能为空。 例如,终端可以填充 Value 字段,而不能为优化填充初始值或最终值。 这取决于参数类型。 例如,字符串参数仅填充 “Value” 字段。 在以下代码中实现修改之目的是为了避免上述问题。
数据目录结构
在早前的文章中,我们已经提到了本地 “Data” 目录,该目录存储优化报告和自动优化器创建的其他工作文件。 现在,是详细研究该目录的时候了。 在终端可执行文件启动期间,会创建 Data 目录。 只当自动优化器启动时,该目录不存在,才会创建。 否则,其路径将保存在以下类的相应属性之中。 该目录同时充当工作和存储文件夹。 如果您需要访问文件并进行存储,请在此目录中进行操作。 以下对象创建并存储目录:
/// <summary>
/// The object describing the Data directory with the auto optimizer's mutable files.
/// </summary>
class WorkingDirectory
{
    /// <summary>
    /// Default constructor
    /// </summary>
    public WorkingDirectory()
    {
        // Create a root directory with mutable files
        WDRoot = new DirectoryInfo("Data");
        if (!WDRoot.Exists)
            WDRoot.Create();
        // Create a subdirectory with optimization reports
        Reports = WDRoot.GetDirectory("Reports", true);
    }
    /// <summary>
    /// Nested directory with optimization reports
    /// </summary>
    public DirectoryInfo Reports { get; }
    /// <summary>
    /// Root directory with mutable files and folders
    /// </summary>
    public DirectoryInfo WDRoot { get; }

    /// <summary>
    /// Get or create (if not previously created) a directory nested inside the Reports directory.
    /// The resulting directory stores the results of a particular optimization pass.
    /// </summary>
    /// <param name="Symbol">The symbol on which the optimization was performed</param>
    /// <param name="ExpertName">Robot name</param>
    /// <param name="DirectoryPrefix">Prefix added to the directory name</param>
    /// <param name="OptimiserName">The name of the use optimizer</param>
    /// <returns>
    /// Path to the directory with the optimization results.
    /// The name of the directory is formed as follows: public DirectoryInfo WDRoot { get; }
    /// {DirectoryPrefix} {OptimiserName} {ExpertName} {Symbol}
    /// </returns>
    public DirectoryInfo GetOptimisationDirectory(string Symbol, string ExpertName,
                                                  string DirectoryPrefix, string OptimiserName)
    {
        return Reports.GetDirectory($"{DirectoryPrefix} {OptimiserName} {ExpertName} {Symbol}", true);
    }

    /// <summary>
    /// Path to Data/Tester
    /// Needed to temporarily move files from the terminal directory of the same name
    /// </summary>
    public DirectoryInfo Tester => WDRoot.GetDirectory("Tester", true);

}
该类充当所所述目录的管理器。 这非常方便,因为无论自动优化器可执行文件在哪里,我们始终可以通过访问此对象的 WDRoot 属性来获取所需目录的正确路径。 在此构造函数中,我们创建 Data 目录(如果尚未存在)。 否则,将其地址保存在上述属性之中。 另外,保存 “Reports” 子目录的路径。 传递的 true 参数指示如果目录不存在,则应创建该目录。
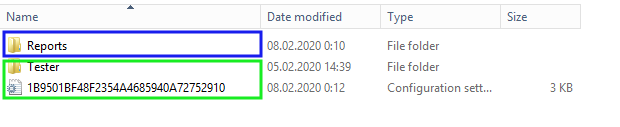
结果则是,首次启动后将立即创建 Data 目录。 创建目录后,该目录只有一个子目录 “Reports”,且该子目录为空。 在首次启动优化或测试期间,调用所述对象的 相应属性来创建 Tester 子目录。 创建配置文件{Terminal ID}.ini,并依据您默认选择的配置文件进行复制。 如此,可避免覆盖源配置文件。 创建 Tester 目录是为了临时复制早前所执行优化的缓存。 它 与可变终端目录中所提供的相关 Tester 目录部分类似。

该目录仅包含 “cache” 文件夹。 来自所选终端同一目录中的所有文件,都会移至该缓存文件夹。 优化过程结束后,文件将被恢复到先前的位置。 这一操作能确保优化过程的执行。 根据优化器逻辑,如果终端目录中包含同配置优化过程的文件,则优化器将加载之前的已执行优化,替代启动新过程。 这一解决方案很好,可以节省大量时间。 但这完全不符合我们的目的。 由于我们针对自己的自动优化器调整了保存的优化报告副本(本系列的第三篇和第一篇),因此我们必须创建一个报告。 为了生成报告,我们需要启动优化过程。 这就是为何我们要模拟此文件缺失的原因。 为此,要将这些文件临时转移到我们的本地目录。 成功完成优化过程后,将利用 GetOptimisationDirectory 方法在 Reports 目录中创建一个子目录。
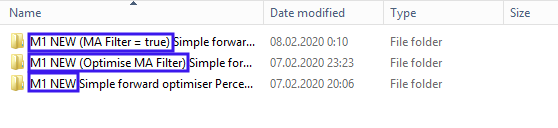
在上面的屏幕截图中,在优化启动之前,要在自动优化器设置中指定颜色圈定的目录前缀。 它能够区分同一智能交易系统的不同优化结果。 每个目录存储三个包含执行优化结果的文件:
- Forward.xml — 仅向前验证测试
- History.xml — 仅历史复盘测试
- Report.xml — 所有传递的历史时间段内执行的所有优化。
这些文件均具有类似的结构,本系列的第一篇文章中对此进行了讲述。 当您在 GUI 中单击 “Load” 按钮时,自动优化器会将所有三个文件从选定目录里加载到相应的表中。 如果找不到这三个文件中的任何一个,或所有文件都不存在,则会生成一条相应的消息。 与缺失文件相对应的表显示为空白。
若您需要将一台计算机上的自动优化器程序的优化结果转移至另一台计算机,只需复制 Reports 目录,并将其移至第二台计算机上的相关目录即可。 启动后,自动优化器将访问存有结果的所需目录。 因此,结果可供下载和进一步分析。
结束语
在本系列的第一篇文章里,我们研究了优化报告的创建和上传。 然后,我们开始研究自动优化器项目。 在前一篇文章中,我们分析了已就绪的项目。 目的是表达本系列的最终目的。 另外,前一篇文章还提供了有关已完工的自动优化器的使用指南。 在本文中,我们研究了自动优化器的技术层面实现。 在进入分析项目的逻辑部分之前,我们已研究了图形界面,以及从之前系列文章中借来的文件修订。 本文的简介中提供了指向之前系列文章的链接。 在下一篇文章中,我们将研究程序逻辑部分的实现。
附件包含第四篇文章中所分析的拥有交易机器人的自动优化器项目。 若要使用该项目,请编译自动优化器项目文件,和测试机器人文件。 然后将 ReportManager.dll(在第一篇文章中讲述)复制到 MQL5/Libraries 目录,您便可以开始测试 EA。 有关如何将自动优化器与您的智能交易系统相链接的详细信息,请参阅本系列文章的第三、四篇。