改进面板:增加透明化、改变背景色以及继承于 CAppDialog/CWndClient
Vladimir Karputov | 9 八月, 2018
目录
- 简介
- 当拖曳时透明化面板
- 实现
- 继续实现
- OnDialogDragStart 处理函数: 面板开始拖曳
- OnDialogDragProcess 处理函数: 面板的持续拖曳
- OnDialogDragEnd 处理函数: 面板的拖曳结束
- 在面板上加上按钮,在拖曳时也变得透明
- 向面板上加上两个按钮: 设置面板背景颜色和抬头标题的颜色
- 继承于 CAppDialog
- 继承于CWndClient
- 新项目. 它们是怎样帮助研究面板的?
- 结论
简介
基于 CAppDialog 类的面板没有方法直接访问面板中控件的属性,例如背景颜色和边框颜色,所以,所有的面板都是灰色的。
如果不能改变控件的颜色,有些设计想法就无法实现,这个问题可以通过继承并加入我们自己的方法来解决。但是这种方案需要在创建的代码中做很多修改,有没有更简单更快速的方法来访问面板控件的 "Background Color(背景色)" 和 "Frame Color (边框色)" 属性呢?
当拖曳时透明化面板
我首先将会展示,对于基于CAppDialog 类的面板 (这是一个代码示例 "Live panel.mq5"),可以做到什么。

这个 gif 图片显示了,当您拖曳面板时,只会保留它的外部边框,当移动面板时,外部边框的颜色还会不断变化,当拖曳完毕时,表单又变得正常了,工作区域被重新填充。
所有的工作都与 CDialog 类相关,它位于 [data folder]\MQL5\Include\Controls\Dialog.mqh.
下面的代码显示了面板包含的对象 (在 CDialog 类的私有部分声明的对象) 以及它们是如何以图形元件方式实现可视化的://+------------------------------------------------------------------+ //| Class CDialog | //| 用法: 用于创建对话框 | //| 和指标面板的基类 | //+------------------------------------------------------------------+ class CDialog : public CWndContainer { private: //--- 依赖的控件 CPanel m_white_border; // "白色边框" 对象 CPanel m_background; // 背景对象 CEdit m_caption; // 窗口标题对象 CBmpButton m_button_close; // "关闭"按钮对象 CWndClient m_client_area; // 客户区域对象 protected:

为了使面板在拖曳的时候变得透明,我们需要考虑四点。
1. 我们感兴趣的是Border(边框)和Back(背景)图形元件 (通过 CPanel 类的 m_white_border 和 m_background 创建) 以及 Client(客户区) 元件 (通过 CWndClient 类的 m_client_area 对象创建 ). CDialog::CreateWhiteBorder, CDialog::CreateBackground 和 CDialog::CreateClientArea 函数展示了元件是如何创建的,颜色是怎样为它们设置的。
2. 在创建过程中,面板会收到唯一的名称,例如,在所有图形对象名称之前加上一个数字前缀 (下面的图片显示的是 03082 前缀):

3. 在 CDialog 有三个事件处理函数:
| 处理拖曳操作 | |
|---|---|
| OnDialogDragStart | DialogDragStart 事件的虚拟处理函数 |
| OnDialogDragProcess | DialogDragProcess 事件的虚拟处理函数 |
| OnDialogDragEnd | DialogDragEnd 事件的虚拟处理函数 |
4. 来自文章"如何创建任何复杂度的图形化面板"中的解决方案 — 迭代所有面板对象 (在此,ExtDialog 是面板类对象):
   int total=ExtDialog.ControlsTotal();
   for(int i=0;i<total;i++)
     {
      CWnd*obj=ExtDialog.Control(i);
...
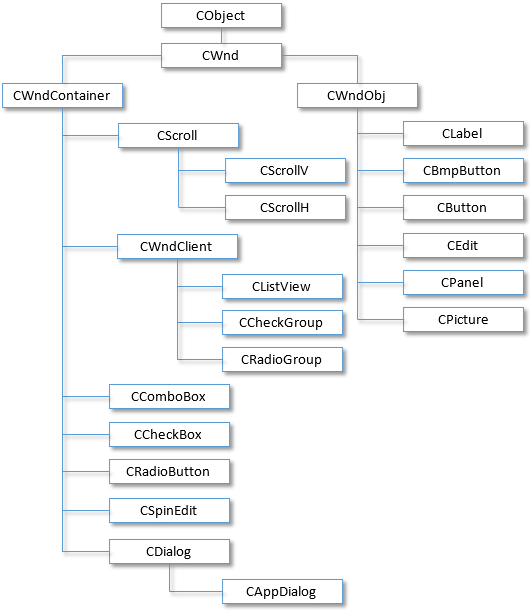
为什么在迭代的时候声明指向obj 对象的 CWnd 类型的 指针呢?
因为 CWnd 是所有其他子类的基类:
我们将需要两个宏定义用于操作颜色,我们也需要重新定义三个函数,它们来自 CDialog 类用于处理面板的拖曳:
//+------------------------------------------------------------------+
//|                                                   Live panel.mq5 |
//|                        Copyright 2018, MetaQuotes Software Corp. |
//|                                              http://www.mql5.com |
//+------------------------------------------------------------------+
#property copyright "Copyright 2018, MetaQuotes Software Corp."
#property link      "http://www.mql5.com"
#property version   "1.000"
#property description "在拖曳面板时,面板的透明度将会有所变化"
#include <Controls\Dialog.mqh>
#define XRGB(r,g,b)    (0xFF000000|(uchar(r)<<16)|(uchar(g)<<8)|uchar(b))
#define GETRGB(clr)    ((clr)&0xFFFFFF)
//+------------------------------------------------------------------+
//| Class CLivePanel                                                 |
//| 使用: 控件应用程序的主对话框                                          |
//+------------------------------------------------------------------+
class CLivePanel : public CAppDialog
  {
public:
                     CLivePanel(void);
                    ~CLivePanel(void);
   //--- 创建
   virtual bool      Create(const long chart,const string name,const int subwin,const int x1,const int y1,const int x2,const int y2);
   //--- 拖曳的处理函数
   virtual bool      OnDialogDragStart(void);
   virtual bool      OnDialogDragProcess(void);
   virtual bool      OnDialogDragEnd(void);

  };
我将跳过面板操作的标准部分 (创建、删除和事件传递),让我们着重于更详细的拖曳事件处理函数部分。
OnDialogDragStart 处理函数: 面板开始拖曳
我们 取得前缀, 然后循环迭代面板中的所有对象并且搜索使用这个前缀的 "Border", "Back" 或 "Client":
//+------------------------------------------------------------------+
//| 开始拖曳对话框                                                     |
//+------------------------------------------------------------------+
bool CLivePanel::OnDialogDragStart(void)
  {
   string prefix=Name();
   int total=ExtDialog.ControlsTotal();
   for(int i=0;i<total;i++)
     {
      CWnd*obj=ExtDialog.Control(i);
      string name=obj.Name();
      //---
      if(name==prefix+"Border")
        {
         CPanel *panel=(CPanel*) obj;
         panel.ColorBackground(clrNONE);
         ChartRedraw();
        }
      if(name==prefix+"Back")
        {
         CPanel *panel=(CPanel*) obj;
         panel.ColorBackground(clrNONE);
         ChartRedraw();
        }
      if(name==prefix+"Client")
        {
         CWndClient *wndclient=(CWndClient*) obj;
         wndclient.ColorBackground(clrNONE);
         wndclient.ColorBorder(clrNONE);
         ChartRedraw();
        }
     }
   return(CDialog::OnDialogDragStart());
  }
当对象找到后,我们就通过使用 clrNONE 颜色,来删除背景颜色 ( 使用 ColorBackground 方法) 和边框的颜色 (使用 ColorBorder 方法)。表单的透明化就是以这种方法实现的。
OnDialogDragProcess 处理函数: 面板的持续拖曳
我们只搜索一个对象, 例如 "Back", 并且 动态改变它的颜色 (使用两个宏定义: XRGB 和 GETRGB):
//+------------------------------------------------------------------+
//| 继续拖曳对话框                                                      |
//+------------------------------------------------------------------+
bool CLivePanel::OnDialogDragProcess(void)
  {
   string prefix=Name();
   int total=ExtDialog.ControlsTotal();
   for(int i=0;i<total;i++)
     {
      CWnd*obj=ExtDialog.Control(i);
      string name=obj.Name();
      if(name==prefix+"Back")
        {
         CPanel *panel=(CPanel*) obj;
         color clr=(color)GETRGB(XRGB(rand()%255,rand()%255,rand()%255));
         panel.ColorBorder(clr);
         ChartRedraw();
        }
     }
   return(CDialog::OnDialogDragProcess());
  }
现在,我们通过 "Border", "Back" 或者 "Client" 对象恢复了背景和边框的颜色。
//+------------------------------------------------------------------+
//| 拖曳对话框结束                                                      |
//+------------------------------------------------------------------+
bool CLivePanel::OnDialogDragEnd(void)
  {
   string prefix=Name();
   int total=ExtDialog.ControlsTotal();
   for(int i=0;i<total;i++)
     {
      CWnd*obj=ExtDialog.Control(i);
      string name=obj.Name();
      //---
      if(name==prefix+"Border")
        {
         CPanel *panel=(CPanel*) obj;
         panel.ColorBackground(CONTROLS_DIALOG_COLOR_BG);
         panel.ColorBorder(CONTROLS_DIALOG_COLOR_BORDER_LIGHT);
         ChartRedraw();
        }
      if(name==prefix+"Back")
        {
         CPanel *panel=(CPanel*) obj;
         panel.ColorBackground(CONTROLS_DIALOG_COLOR_BG);
         color border=(m_panel_flag) ? CONTROLS_DIALOG_COLOR_BG : CONTROLS_DIALOG_COLOR_BORDER_DARK;
         panel.ColorBorder(border);
         ChartRedraw();
        }
      if(name==prefix+"Client")
        {
         CWndClient *wndclient=(CWndClient*) obj;
         wndclient.ColorBackground(CONTROLS_DIALOG_COLOR_CLIENT_BG);
         wndclient.ColorBorder(CONTROLS_DIALOG_COLOR_CLIENT_BORDER);
         ChartRedraw();
        }
     }
   return(CDialog::OnDialogDragEnd());
  }
在面板上加上按钮,在拖曳时也变得透明
这个例子位于 "Live panel and Button.mq5" 的代码中。
为了能操作按钮,我们首先需要在我们的 EA 交易中包含按钮类,并且加入用于按钮位置和大小的宏定义:
#property description "当拖曳面板时面板会有透明化改变,"
#property description " 但是加上的按钮颜色并没有改变"
#include <Controls\Dialog.mqh>
#include <Controls\Button.mqh>
#define XRGB(r,g,b)    (0xFF000000|(uchar(r)<<16)|(uchar(g)<<8)|uchar(b))
#define GETRGB(clr)    ((clr)&0xFFFFFF)
//+------------------------------------------------------------------+
//| 定义                                |
//+------------------------------------------------------------------+
//--- 缩进和距离
#define INDENT_LEFT                         (11)      // 与左边的缩进 (包括允许的边框宽度)
#define INDENT_TOP                          (11)      // 与顶部的缩进 (包括允许的边框宽度)
#define CONTROLS_GAP_X                      (5)       // X 坐标上的距离
//--- 用于按钮
#define BUTTON_WIDTH                        (100)     //  X 坐标上的大小
#define BUTTON_HEIGHT                       (20)      // Y 坐标上的大小
//+------------------------------------------------------------------+
//| Class CLivePanelAndButton                                        |
//| 使用: 控件应用程序的主对话框                                          |
//+------------------------------------------------------------------+
class CLivePanelAndButton : public CAppDialog
另外,为了能够操作按钮,我们需要声明 CButton 类的对象:
//+------------------------------------------------------------------+
//| Class CLivePanelAndButton                                        |
//| 使用: 控件应用程序的主对话框                                          |
//+------------------------------------------------------------------+
class CLivePanelAndButton : public CAppDialog
  {
private:
   CButton           m_button1;                       // 按钮对象

public:
                     CLivePanelAndButton(void);
以及按钮创建的过程:
   virtual bool      OnDialogDragEnd(void);

protected:
   //--- 创建依赖的控件
   bool              CreateButton1(void);

  };
CreateButton1 代码 — 在创建按钮之后,不要忘记把按钮加到面板上:
//+------------------------------------------------------------------+
//| 创建 "Button1" 按钮                                               |
//+------------------------------------------------------------------+
bool CLivePanelAndButton::CreateButton1(void)
  {
//--- 坐标
   int x1=INDENT_LEFT;        // x1            = 11  像素
   int y1=INDENT_TOP;         // y1            = 11  像素
   int x2=x1+BUTTON_WIDTH;    // x2 = 11 + 100 = 111 像素
   int y2=y1+BUTTON_HEIGHT;   // y2 = 11 + 20  = 32  像素
//--- 创建
   if(!m_button1.Create(0,"Button1",0,x1,y1,x2,y2))
      return(false);
   if(!m_button1.Text("Button1"))
      return(false);
   if(!Add(m_button1))
      return(false);
//--- 成功
   return(true);
  }
这里是在以上面板上加入一个按钮的结果:

您可以看到,面板在拖曳的时候变成透明,而加上的按钮控件还是保持原样的,有两个选项: 在拖曳时只使面板背景透明,或者使面板和按钮都透明。让我们考虑第二个选项: 当拖曳面板时也使按钮看起来透明.
让我们使用 "Live panel and transparent Button.mq5 的代码".
当一个简单或者组合的控件加到面板上的时候,创建控件的对象就会被加到 m_client_area 对象 (请记住, m_client_area 对象是声明在 CDialog 类中的). 所以,当侦测到面板被拖曳的时候,我们需要在循环中迭代所有加到m_client_area中的对象。这可以在第一个处理函数 OnDialogDragStart (开始拖曳面板)中方便地完成:
//+------------------------------------------------------------------+
//| 开始拖曳对话框                                                      |
//+------------------------------------------------------------------+
bool CLivePaneTransparentButton::OnDialogDragStart(void)
  {
   string prefix=Name();
   int total=ExtDialog.ControlsTotal();
   for(int i=0;i<total;i++)
     {
      CWnd*obj=ExtDialog.Control(i);
      string name=obj.Name();
      //---
      if(name==prefix+"Border")
        {
         CPanel *panel=(CPanel*) obj;
         panel.ColorBackground(clrNONE);
         ChartRedraw();
        }
      if(name==prefix+"Back")
        {
         CPanel *panel=(CPanel*) obj;
         panel.ColorBackground(clrNONE);
         ChartRedraw();
        }
      if(name==prefix+"Client")
        {
         CWndClient *wndclient=(CWndClient*) obj;
         wndclient.ColorBackground(clrNONE);
         wndclient.ColorBorder(clrNONE);
         //---
         int client_total=wndclient.ControlsTotal();
         for(int j=0;j<client_total;j++)
           {
            CWnd*client_obj=wndclient.Control(j);
            string client_name=client_obj.Name();
            if(client_name=="Button1")
              {
               CButton *button=(CButton*) client_obj;
               button.ColorBackground(clrNONE);
               ChartRedraw();
              }
           }
         ChartRedraw();
        }
     }
   return(CDialog::OnDialogDragStart());
  }
当第一次侦测到拖曳的时候,面板和按钮都将变得透明,
不需要再修改第二个处理函数 OnDialogDragProcess (继续拖曳面板). 第三个处理函数 OnDialogDragEnd (拖曳面板结束)需要修改,因为我们需要恢复按钮原来的颜色:
//+------------------------------------------------------------------+
//| 拖曳对话框结束                                                      |
//+------------------------------------------------------------------+
bool CLivePaneTransparentButton::OnDialogDragEnd(void)
  {
   string prefix=Name();
   int total=ExtDialog.ControlsTotal();
   for(int i=0;i<total;i++)
     {
      CWnd*obj=ExtDialog.Control(i);
      string name=obj.Name();
      //---
      if(name==prefix+"Border")
        {
         CPanel *panel=(CPanel*) obj;
         panel.ColorBackground(CONTROLS_DIALOG_COLOR_BG);
         panel.ColorBorder(CONTROLS_DIALOG_COLOR_BORDER_LIGHT);
         ChartRedraw();
        }
      if(name==prefix+"Back")
        {
         CPanel *panel=(CPanel*) obj;
         panel.ColorBackground(CONTROLS_DIALOG_COLOR_BG);
         color border=(m_panel_flag) ? CONTROLS_DIALOG_COLOR_BG : CONTROLS_DIALOG_COLOR_BORDER_DARK;
         panel.ColorBorder(border);
         ChartRedraw();
        }
      if(name==prefix+"Client")
        {
         CWndClient *wndclient=(CWndClient*) obj;
         wndclient.ColorBackground(CONTROLS_DIALOG_COLOR_CLIENT_BG);
         wndclient.ColorBorder(CONTROLS_DIALOG_COLOR_CLIENT_BORDER);
         //---
         int client_total=wndclient.ControlsTotal();
         for(int j=0;j<client_total;j++)
           {
            CWnd*client_obj=wndclient.Control(j);
            string client_name=client_obj.Name();
            if(client_name=="Button1")
              {
               CButton *button=(CButton*) client_obj;
               button.ColorBackground(CONTROLS_BUTTON_COLOR_BG);
               ChartRedraw();
              }
           }
         ChartRedraw();
        }
     }
   return(CDialog::OnDialogDragEnd());
  }
现在,在面板的拖曳过程中修改面板对话框和按钮颜色已经在 "Live panel and transparent Button.mq5" 的代码中完全实现了:

向面板上加上两个按钮: 设置面板背景颜色和抬头标题的颜色
这个例子的代码在 "Live panel and button Clicks.mq5" 中, 并且是在之前代码 "Live panel and transparent Button.mq5" 的基础上创建的。然而,并非处理面板的拖曳事件,我们现在需要“抓住”按钮点击事件了。面板将有两个按钮:一个用于面板背景的改变,第二个 - 改变标题的颜色。
为了抓住面板中控件相关的事件,我们需要声明一个事件处理函数并且写出这个处理函数:
//+------------------------------------------------------------------+
//| Class CLivePaneButtonClicks                                      |
//| 使用: 控件应用程序的主对话框                                          |
//+------------------------------------------------------------------+
class CLivePaneButtonClicks : public CAppDialog
  {
private:
   CButton           m_button1;                       // 按钮对象
   CButton           m_button2;                       // 按钮对象

public:
                     CLivePaneButtonClicks(void);
                    ~CLivePaneButtonClicks(void);
   //--- 创建
   virtual bool      Create(const long chart,const string name,const int subwin,const int x1,const int y1,const int x2,const int y2);
   //--- 图表事件处理函数
   virtual bool      OnEvent(const int id,const long &lparam,const double &dparam,const string &sparam);

protected:
   //--- 创建依赖的控件
   bool              CreateButton1(void);
   bool              CreateButton2(void);
   //--- 依赖控件事件的处理函数
   void              OnClickButton1(void);
   void              OnClickButton2(void);

  };
//+------------------------------------------------------------------+
//| 事件的处理                                                   |
//+------------------------------------------------------------------+
EVENT_MAP_BEGIN(CLivePaneButtonClicks)
ON_EVENT(ON_CLICK,m_button1,OnClickButton1)
ON_EVENT(ON_CLICK,m_button2,OnClickButton2)
EVENT_MAP_END(CAppDialog)
//+------------------------------------------------------------------+
//| 构造函数                                                           |
//+------------------------------------------------------------------+
这个事件处理函数就是 OnEvent 方法, 它是使用来自Defines.mqh文件中 Events模块和 "Macro of event handling map" 模块写的 (参见文章如何创建任意复杂度的图形化面板以获得详细信息)。
处理函数是按以下方式实现的:
- CLivePaneButtonClicks 类的 OnEvent 事件处理函数:
- 如果点击了 m_button1 控件, 就调用 OnClickButton1 处理函数
- 如果点击了 m_button2 控件, 就调用 OnClickButton2 处理函数
- 然后返回父类 CAppDialog 类的 OnEvent 事件处理函数
OnClickButton1 和 OnClickButton2 处理函数
这两个处理函数都包含循环迭代面板中包含的所有对象 (它们列在实现 段落了) — 在我们的例子中,就是循环迭代 ExtDialog 面板对象中的所有对象。这样,会调用到 CWndContainer::ControlsTotal() 方法
//+------------------------------------------------------------------+
//| 事件处理函数                                                       |
//+------------------------------------------------------------------+
void CLivePaneButtonClicks::OnClickButton1(void)
  {
   string prefix=Name();
   int total=ExtDialog.ControlsTotal();
   for(int i=0;i<total;i++)
     {
      CWnd*obj=ExtDialog.Control(i);
      string name=obj.Name();
      //---
      if(name==prefix+"Client")
        {
         CWndClient *wndclient=(CWndClient*) obj;
         color clr=(color)GETRGB(XRGB(rand()%255,rand()%255,rand()%255));
         wndclient.ColorBackground(clr);
         ChartRedraw();
         return;
        }
     }
  }
//+------------------------------------------------------------------+
//| 事件处理函数                                                        |
//+------------------------------------------------------------------+
void CLivePaneButtonClicks::OnClickButton2(void)
  {
   string prefix=Name();
   int total=ExtDialog.ControlsTotal();
   for(int i=0;i<total;i++)
     {
      CWnd*obj=ExtDialog.Control(i);
      string name=obj.Name();
      //---
      if(name==prefix+"Caption")
        {
         CEdit *edit=(CEdit*) obj;
         color clr=(color)GETRGB(XRGB(rand()%255,rand()%255,rand()%255));
         edit.ColorBackground(clr);
         ChartRedraw();
         return;
        }
     }
  }
在 OnClickButton1 处理函数中,我们搜索客户区域对象中名称前缀+"Client" 的对象(这将是 CWndClient 类的对象). 在 OnClickButton2 中,搜索对象名称为前缀+"Caption" (CEdit 类对象). 在这两种情况下,所找到对象的背景色是随机选择的。这里是结果:

继承于 CAppDialog
这种实现的设计与使用标准库的例子 (\MQL5\Experts\Examples\Controls\ and \MQL5\Indicators\Examples\Panels\SimplePanel\)所使用的是不同的. 区别如下: the CMyAppDialog 类派生于CAppDialog ,创建在 MyAppDialog.mqh 文件中。在这个类中,只有三个方法用于管理表单颜色和标题颜色。它没有方法来创建增加控件,OnEvent 处理函数和按钮点击处理函数。
CButton 类对象 (增加的控件 - 两个按钮) 是在主 MyAppWindow.mq5 文件中创建的,另外,按钮点击事件是在 MyAppWindow.mq5 文件中的 OnChartEvent 处理函数中监控的,颜色修改的方法也是在这里调用的。
让我们在我们的类中加上三个方法:
- CMyAppDialog::ColorBackground — 设置背景色,
- void CMyAppDialog::ColorCaption — 设置标题颜色,
- color CMyAppDialog::ColorCaption — 取得标题颜色.
访问对象属性的算法和之前代码中使用的类似: 我们循环迭代构成面板的所有对象并比较对象名称,我们还需要另外一个方法来取得背景颜色,但是,这不能通过简单的方案来实现。
//+------------------------------------------------------------------+
//|                                                  MyAppDialog.mqh |
//|                        Copyright 2018, MetaQuotes Software Corp. |
//|                                              http://www.mql5.com |
//+------------------------------------------------------------------+
#property copyright "Copyright 2018, MetaQuotes Software Corp."
#property link      "http://www.mql5.com"
#property version   "1.00"
#property description "派生于 CAppDialog 的 CMyAppDialog 类"
#property description "增加了用于设置背景颜色和标题颜色的方法"
#include <Controls\Dialog.mqh>
//+------------------------------------------------------------------+
//| Class CLivePanelTwoButtons                                       |
//| 使用: 控件应用程序的主对话框                                          |
//+------------------------------------------------------------------+
class CMyAppDialog : public CAppDialog
  {
public:
   void              ColorBackground(const color clr);
   color             ColorCaption(void);
   void              ColorCaption(const color clr);
//--- 构造函数和析构函数
public:
                     CMyAppDialog(void){};
                    ~CMyAppDialog(void){};
  };
//+------------------------------------------------------------------+
//| 设置背景颜色                                                       |
//+------------------------------------------------------------------+
void CMyAppDialog::ColorBackground(const color clr)
  {
   string prefix=Name();
   int total=ControlsTotal();
   for(int i=0;i<total;i++)
     {
      CWnd*obj=Control(i);
      string name=obj.Name();
      //---
      if(name==prefix+"Client")
        {
         CWndClient *wndclient=(CWndClient*) obj;
         wndclient.ColorBackground(clr);
         ChartRedraw();
         return;
        }
     }
//---
  }
//+------------------------------------------------------------------+
//| 设置标题颜色                                                       |
//+------------------------------------------------------------------+
void CMyAppDialog::ColorCaption(const color clr)
  {
   string prefix=Name();
   int total=ControlsTotal();
   for(int i=0;i<total;i++)
     {
      CWnd*obj=Control(i);
      string name=obj.Name();
      //---
      if(name==prefix+"Caption")
        {
         CEdit *edit=(CEdit*) obj;
         edit.ColorBackground(clr);
         ChartRedraw();
         return;
        }
     }
//---
  }
//+------------------------------------------------------------------+
//| 取得标题颜色                                                       |
//+------------------------------------------------------------------+
color CMyAppDialog::ColorCaption(void)
  {
   string prefix=Name();
   int total=ControlsTotal();
   color clr=clrNONE;
   for(int i=0;i<total;i++)
     {
      CWnd*obj=Control(i);
      string name=obj.Name();
      //---
      if(name==prefix+"Caption")
        {
         CEdit *edit=(CEdit*) obj;
         clr=edit.ColorBackground(clr);
         return clr;
        }
     }
//--- 返回颜色
   return clr;
  }
//+------------------------------------------------------------------+
"MyAppWindow.mq5" 是主文件,用于生成颜色的 XRGB 和 GETRGB 宏定义就是在这个文件中声明的。在 OnInit 中 创建面板,加上按钮并运行面板.
//+------------------------------------------------------------------+
//|                                                  MyAppWindow.mq5 |
//|                        Copyright 2018, MetaQuotes Software Corp. |
//|                                              http://www.mql5.com |
//+------------------------------------------------------------------+
#property copyright "Copyright 2018, MetaQuotes Software Corp."
#property link      "http://www.mql5.com"
#property version   "1.00"
#property description "基于 CMyAppDialog 类的 MyAppWindow 应用程序"
#property description "增加了按钮,用于设置背景和抬头颜色"
#include "MyAppDialog.mqh"
#include <Controls\Button.mqh>
//--- 用于操作颜色的宏定义
#define XRGB(r,g,b)    (0xFF000000|(uchar(r)<<16)|(uchar(g)<<8)|uchar(b))
#define GETRGB(clr)    ((clr)&0xFFFFFF)
//+------------------------------------------------------------------+
//| 定义                                                              |
//+------------------------------------------------------------------+
//--- 缩进和距离
#define INDENT_LEFT                         (11)      // 与左边的缩进 (包括允许的边框宽度)
#define INDENT_TOP                          (11)      // 与顶部的缩进 (包括允许的边框宽度)
#define CONTROLS_GAP_X                      (5)       // X 坐标上的距离
//--- 用于按钮
#define BUTTON_WIDTH                        (100)     //  X 坐标上的大小
#define BUTTON_HEIGHT                       (20)      // Y 坐标上的大小
//---
CMyAppDialog         AppWindow;
CButton              m_button1;                       // 按钮对象
CButton              m_button2;                       // 按钮对象
//+------------------------------------------------------------------+
//| EA交易初始化函数                                                    |
//+------------------------------------------------------------------+
int OnInit()
  {
//--- 创建应用程序对话框
   if(!AppWindow.Create(0,"CMyAppDialog: change Back and Caption colors",0,40,40,380,344))
      return(INIT_FAILED);
//--- 创建依赖的控件
   if(!CreateBackButton())
      return(false);
   if(!CreateCaptionButton())
      return(false);
//--- 运行应用程序
   AppWindow.Run();
//--- 成功
   return(INIT_SUCCEEDED);
  }
//+------------------------------------------------------------------+
//| EA 交易终止函数                                                     |
//+------------------------------------------------------------------+
void OnDeinit(const int reason)
  {
//---
   Comment("");
//--- 销毁对话框
   AppWindow.Destroy(reason);
  }
//+------------------------------------------------------------------+
//| EA 交易图表事件函数                                                 |
//+------------------------------------------------------------------+
void OnChartEvent(const int id,         // 事件 ID
                  const long& lparam,   // 长整数类型的事件参数
                  const double& dparam, // 双精度小数类型的事件参数
                  const string& sparam) // 字符串类型的事件参数
  {
//--- 我们首先处理按钮事件
   if((StringFind(sparam,"Back")!=-1) && id==(CHARTEVENT_OBJECT_CLICK))
     {
      Print(__FUNCSIG__," sparam=",sparam);
      AppWindow.ColorBackground(GetRandomColor());
     }
   if((StringFind(sparam,"Caption")!=-1) && id==(CHARTEVENT_OBJECT_CLICK))
     {
      Print(__FUNCSIG__," sparam=",sparam);
      AppWindow.ColorCaption(GetRandomColor());
     }
//--- 然后,所有其他事件都由 CMyAppDialog 类的方法来处理
   AppWindow.ChartEvent(id,lparam,dparam,sparam);
  }
//+------------------------------------------------------------------+
//| 创建 "Button1" 按钮                                                |
//+------------------------------------------------------------------+
bool CreateBackButton(void)
  {
//--- 坐标
   int x1=INDENT_LEFT;        // x1            = 11  像素
   int y1=INDENT_TOP;         // y1            = 11  像素
   int x2=x1+BUTTON_WIDTH;    // x2 = 11 + 100 = 111 像素
   int y2=y1+BUTTON_HEIGHT;   // y2 = 11 + 20  = 32  像素
//--- 创建
   if(!m_button1.Create(0,"Back",0,x1,y1,x2,y2))
      return(false);
   if(!m_button1.Text("Back"))
      return(false);
   if(!AppWindow.Add(m_button1))
      return(false);
//--- 成功
   return(true);
  }
//+------------------------------------------------------------------+
//| 创建 "Button2"                                                    |
//+------------------------------------------------------------------+
bool CreateCaptionButton(void)
  {
//--- 坐标
   int x1=INDENT_LEFT+2*(BUTTON_WIDTH+CONTROLS_GAP_X);   // x1 = 11  + 2 * (100 + 5) = 221 像素
   int y1=INDENT_TOP;                                    // y1                       = 11  像素
   int x2=x1+BUTTON_WIDTH;                               // x2 = 221 + 100           = 321 像素
   int y2=y1+BUTTON_HEIGHT;                              // y2 = 11  + 20            = 31  像素
//--- 创建
   if(!m_button2.Create(0,"Caption",0,x1,y1,x2,y2))
      return(false);
   if(!m_button2.Text("Caption"))
      return(false);
   if(!AppWindow.Add(m_button2))
      return(false);
//--- 成功
   return(true);
  }
//+------------------------------------------------------------------+
//| 随机取得颜色                                                       |
//+------------------------------------------------------------------+
color GetRandomColor()
  {
   color clr=(color)GETRGB(XRGB(rand()%255,rand()%255,rand()%255));
   return clr;
  }
//+------------------------------------------------------------------+
OnChartEvent 事件处理函数也位于主文件中,它会无条件地把所有事件发送给面板, 但是当侦测到点击按钮的事件 (CHARTEVENT_OBJECT_CLICK) 时, 它调用面板类的方法 (AppWindow.ColorBackground 或者 AppWindow.ColorCaption)。
这就是两个文件是如何工作的: 主 mq5 文件和 mqh 包含文件, 面板类就位于其中。
继承于CWndClient
让我们探讨让这个类继承于CWndClient : 我们将会创建一个 CWndClient 类的对象,这个对象将包含下面的功能:
- 创建 CMyWndClient 对象, 也就是面板的客户区域;
- 在客户区域中创建对象用于加上两个按钮;
- 处理所增加按钮的点击事件 (改变客户区域背景颜色和面板抬头的颜色);
- 另外, 会启用客户区域的水平滚动功能 (请记住,CWndClient 类是与 "Client area(客户区域)" 控件结合的,是用于创建可滚动客户区域的基类);
- 相应地,会有处理函数来处理点击水平滚动条 (在客户区域中移动所增加的按钮).
让我们仔细看看 MyWndClient.mq5 和 MyWndClient.mqh 文件。
它与标准库示例 (\MQL5\Experts\Examples\Controls\ and \MQL5\Indicators\Examples\Panels\SimplePanel\) 的区别是,包含文件中有一个派生于CWndClient 10 — 客户区域的一个类。完整的面板对话框创建过程看起来如下.
- 创建一个面板 ( CAppDialog 类的 AppWindow 对象调用 Create 方法).
- 创建我们的客户区域 ( MyWndClient.mqh 包含文件中 CMyWndClient 类的 ClientArea 对象调用 Create 方法).
- 把创建好的客户区域加到面板上 (事实上就是把客户区域应用到面板上).
CAppDialog           AppWindow;
CMyWndClient         ClientArea;
//+------------------------------------------------------------------+
//| EA交易初始化函数                                                    |
//+------------------------------------------------------------------+
int OnInit()
  {
//--- 创建应用程序对话框
   bool result_create=false;
   if(!InpTwoButtonsVisible)
     {
      //--- 在创建了面板之后,一个按钮将是可见的
      result_create=AppWindow.Create(0,"CAppDialog with CMyWndClient",0,40,40,360,344);
     }
   else
     {
      //--- 在创建面板之后,两个按钮将是可见的
      result_create=AppWindow.Create(0,"CAppDialog with CMyWndClient",0,40,40,420,344);
     }
   if(!result_create)
      return(INIT_FAILED);
//--- 创建面板
   PrintFormat("Application Rect: Height=%d  Width=%d",AppWindow.Rect().Height(),AppWindow.Rect().Width());
   CRect inner_rect=ClientArea.GetClientRect(GetPointer(AppWindow));
   PrintFormat("Client Area: Height=%d  Width=%d",inner_rect.Height(),inner_rect.Width());
   ClientArea.Create(0,"MyWndClient",0,0,0,inner_rect.Width(),inner_rect.Height());
   AppWindow.Add(ClientArea);
//--- 设置所有者
   ClientArea.SetOwner(GetPointer(AppWindow));
//--- 隐藏不可见的对象
   ClientArea.HideInvisble(HideInvisble);
//--- 运行应用程序
   AppWindow.Run();
//--- 成功
   return(INIT_SUCCEEDED);
  }
可执行文件有两个输入参数:
- panel width — 创建正常宽度的面板还是宽面板;
- hide the invisible — 显示还是隐藏控件.
当创建面板时,只会考虑到panel width(面板宽度)参数,这里是使用 normal width(正常宽度) 的面板是如何创建的:
//+------------------------------------------------------------------+
//| EA交易初始化函数                                                    |
//+------------------------------------------------------------------+
int OnInit()
  {
//--- 创建应用程序对话框
   bool result_create=false;
   if(!InpTwoButtonsVisible)
     {
      //--- 在创建了面板之后,一个按钮将是可见的
      result_create=AppWindow.Create(0,"CAppDialog with CMyWndClient",0,40,40,360,344);
     }
   else
     {
      //--- 在创建面板之后,两个按钮将是可见的
      result_create=AppWindow.Create(0,"CAppDialog with CMyWndClient",0,40,40,420,344);
     }
   if(!result_create)
      return(INIT_FAILED);
//--- 创建面板

如何创建一个wide panel(更宽的面板):
//+------------------------------------------------------------------+
//| EA交易初始化函数                                                    |
//+------------------------------------------------------------------+
int OnInit()
  {
//--- 创建应用程序对话框
   bool result_create=false;
   if(!InpTwoButtonsVisible)
     {
      //--- 在创建了面板之后,一个按钮将是可见的
      result_create=AppWindow.Create(0,"CAppDialog with CMyWndClient",0,40,40,360,344);
     }
   else
     {
      //--- 在创建面板之后,两个按钮将是可见的
      result_create=AppWindow.Create(0,"CAppDialog with CMyWndClient",0,40,40,420,344);
     }
   if(!result_create)
      return(INIT_FAILED);
//--- 创建面板

面板创建代码只在宽度上有所区别 (360 和 420). 宽度在创建两个按钮的时候没有考虑在内。比较最后两幅图,现在把它们相互应用。

您可以看到,"Caption" 按钮没有在正常宽度面板的边界之内,也就是说没有容纳在客户区域中。当加上的控件超出了边界,就从用户角度强制隐藏 (但不是删除或者销毁)。确定一个控件是否应当隐藏的过程,从控件被加到客户区域的时候开始,也就是说,在调用 CWndContainer::Add 的时候,在我们的例子中,'Add' 方法是在 AddButton2 中调用的:
//+------------------------------------------------------------------+
//| 创建 "Button2"                                                    |
//+------------------------------------------------------------------+
bool CMyWndClient::AddButton2(void)
  {
...
   if(!Add(m_button2))
     {
      Print("Add(m_button2) --> false");
      return(false);
     }
//--- 成功
   return(true);
  }
//+------------------------------------------------------------------+
//| 把控件加到组中(通过引用)                                             |
//+------------------------------------------------------------------+
bool CWndContainer::Add(CWnd &control)
  {
//--- 通过指针添加
   return(Add((CWnd*)GetPointer(control)));
  }
然后,最重要的部分是要按顺序调用 - 也就是说,需要在确定后隐藏控件。
//+------------------------------------------------------------------+
//| 把控件加到组中 (通过指针)                                            |
//+------------------------------------------------------------------+
bool CWndContainer::Add(CWnd *control)
  {
//--- 检查指针
   if(control==NULL)
      return(false);
//--- 修正所增加控件的坐标
   control.Shift(Left(),Top());
 //--- "投射" 组标志 "visibility" 到增加的元件中
   if(IS_VISIBLE && control.IsVisible())
     {
      //--- 只有在组是可见并且元件完全位于组的范围之内的时候,元件才将是可见的
      control.Visible(Contains(control));
     }
   else
      control.Hide();
//--- "投射" 组标记 "enabled" 到增加的元件中
   if(IS_ENABLED)
      control.Enable();
   else
      control.Disable();
//--- 加上
   return(m_controls.Add(control));
  }
对象的可见性只是在控件被加到客户区域的时候才设置,这在面板最小化再最大化之后可以重现来说是不便的,
例如: 两个输入参数都设为 "false",然后最小化再最大化面板. 结果,Caption 按钮是在面板创建之后创建的,但是它是隐藏的(按钮没有被容纳在客户区域中,所以被隐藏)。但是在最小化和最大化面板之后,已经加上的控件的可见性不再检查了,所以 Caption 按钮就变得可见了:

该文件包含了派生于客户区域类 CWndClient 类的类,所需的功能都包含在这个文件中:
- 创建我们的客户区域,
- 创建和加上控件,
- 处理面板最大化事件
- 处理点击水平滚动条事件
- 处理按钮点击事件 — 改变客户区域的背景色和面板标题的颜色。
因为面板类是派生于CWndClient, 而 CWndClient 是 "Client area(客户区域)" 组合控件,是创建有滚动条的客户区域的基类, 我们需要在我们的客户区域中启用水平滚动条:
//+------------------------------------------------------------------+
//| 创建面板                                                           |
//+------------------------------------------------------------------+
bool CMyWndClient::Create(const long chart,const string name,const int subwin,const int x1,const int y1,const int x2,const int y2)
  {
//---
   if(!CWndClient::Create(chart,name,subwin,x1,y1,x2,y2))
      return(false);
//--- 启用水平滚动条
   if(!HScrolled(true))
      return(false);
   m_scroll_h.MaxPos(5);
   m_scroll_h.CurrPos(5);
   Print("CurrPos: ",m_scroll_h.CurrPos());
   if(!AddButton1())
让我们设置滚动条使之可以移动: 最大位置数值, 并把滚动位置设在最右边的位置。
水平滚动也用于侦测面板最大化时间,为此我们需要为m_scroll_h对象“抓住”ON_SHOW 事件,调用 OnShowScrollH 处理函数。
//+------------------------------------------------------------------+
//| 事件的处理                                                         |
//+------------------------------------------------------------------+
EVENT_MAP_BEGIN(CMyWndClient)
ON_EVENT(ON_CLICK,m_button1,OnClickButton1)
ON_EVENT(ON_CLICK,m_button2,OnClickButton2)
ON_EVENT(ON_SHOW,m_scroll_h,OnShowScrollH)
EVENT_MAP_END(CWndClient)
EVENT_MAP_BEGIN 实际上是 OnEvent 方法, 是使用Defines.mqh文件中 Events 模块的宏定义和事件处理映射宏定义 模块写的 (如需详细内容请参照文章 如何创建任何复杂度的图形界面)。
在 OnShowScrollH 处理函数中,我们需要检查内部 m_hide_invisble 标记的值 (这个标记值等于MyWndClient.mq5文件中输入变量 "hide the invisible", 通过 CMyWndClient::HideInvisble 方法调用). 如果控件不需要被隐藏,就退出过程:
//+------------------------------------------------------------------+
//| 出现滚动,显示/隐藏按钮                                              |
//+------------------------------------------------------------------+
void CMyWndClient::OnShowScrollH(void)
  {
   if(!m_hide_invisble)
      return;
   int total=CWndClient::ControlsTotal();
   for(int i=0;i<total;i++)
     {
      CWnd*obj=Control(i);
      string name=obj.Name();
      //---
      if(StringFind(name,"Button")!=-1)
        {
         CButton *button=(CButton*)obj;
         button.Visible(Contains(GetPointer(button)));
         ChartRedraw();
        }
     }
  }
如果不可见的元件需要被隐藏,就循环迭代客户区域中所有的对象,找到名称含有 "Button" 的元件并强制检查/设置可见性。
让我们设置点击水平滚动时在客户区域中移动两个按钮的功能,为了这个目标我们要重载 OnScrollLineRight 和 OnScrollLineLeft 函数, 它们是点击了水平滚动按钮的处理函数。如果右侧水平滚动按钮被电解,就把按钮(使用 ShiftButton 方法) 移动 m_scroll_size 的长度。如果点击了左边的按钮,就把按钮移动 "-m_scroll_size", 也就是负的偏移:
//+------------------------------------------------------------------+
//| 事件处理函数                                                       |
//+------------------------------------------------------------------+
bool CMyWndClient::OnScrollLineRight(void)
  {
   Print(__FUNCTION__);
   ShiftButton(GetPointer(m_button1),m_scroll_size);
   ShiftButton(GetPointer(m_button2),m_scroll_size);
   return(true);
  }
//+------------------------------------------------------------------+
//| 事件处理函数                                                       |
//+------------------------------------------------------------------+
bool CMyWndClient::OnScrollLineLeft(void)
  {
   Print(__FUNCTION__);
   ShiftButton(GetPointer(m_button1),-m_scroll_size);
   ShiftButton(GetPointer(m_button2),-m_scroll_size);
   return(true);
  }
在 CMyWndClient::ShiftButton 方法中,我们取得按钮对象的坐标,再设置坐标的偏移,再偏移按钮并强制检查/设置按钮可见性:
//+------------------------------------------------------------------+
//| 按钮向左边或右边偏移 (根据 shift)                                     |
//+------------------------------------------------------------------+
bool CMyWndClient::ShiftButton(CButton *button,const int shift)
  {
   Print(__FUNCTION__);
//--- 偏移按钮
   CRect rect=button.Rect();
   rect.Move(rect.left+shift,rect.top);
   button.Move(rect.left,rect.top);
   button.Visible(Contains(GetPointer(button)));
   return(true);
  }
这里是它看起来的样子 (不要忘记把 "hide the invisible" 参数设为 true):

新项目. 它们是怎样帮助研究面板的?
为了写些东西,您必须需要学习代码,当开始创建面板时,学习这些类可能需要很多时间和精力。这主要是因为没有可视化的类的结构展现,可能很难知道那些标准库的类是用于创建面板的。
幸运的是,不久之前在 MetaEditor 中展示了新的项目。
项目是一个独立文件,扩展名是 MQPROJ,它保存程序的设置,编译参数和在项目中使用的所有文件的信息。导航器提供了一个独立页面用于操作项目,所有的文件,就像包含文件,资源文件,头文件和其他文件都可以在这个页面归类。
注意创建出来的页面的描述: "所有的文件,例如包含文件,资源文件,头文件和其他文件都可以在这个页面上归类."!这正是我们所需要的!
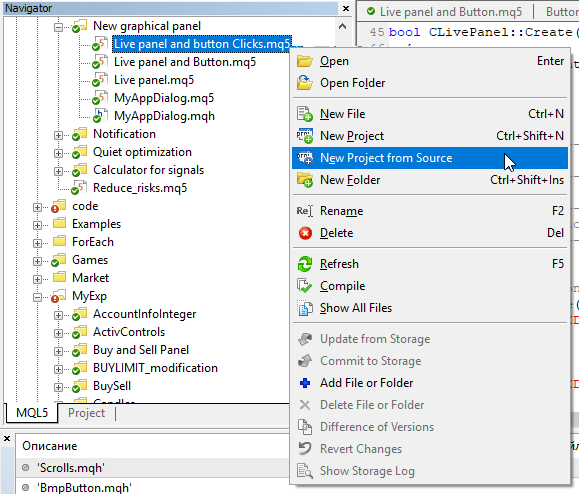
让我们尝试使用最新的文件 "Live panel and button Clicks.mq5" 创建一个新项目,右键点击 "Live panel and button Clicks.mq5" 面板并选择 "New Project from Source":
这样,就会创建一个新的项目,而项目页面会在导航器中打开。页面上含有所有使用的文件:
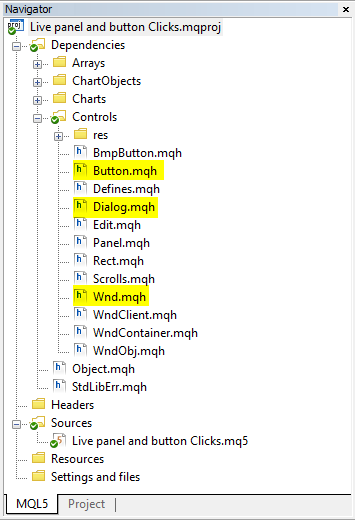
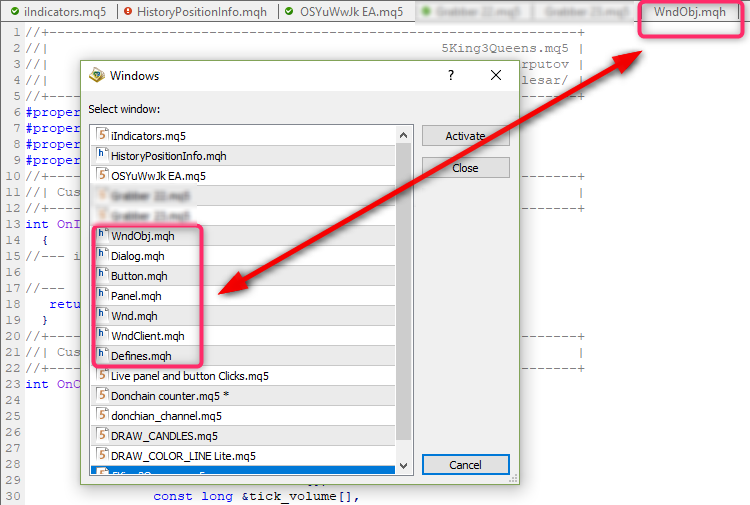
以及 Wnd.mqh (包含 CWnd 类), Dialog.mqh (包含 CDialog 和 CAppDialog 类)以及 Button.mhq (包含 CButton). 从这个页面中,您可以方便地切换到需要的类,这比从 MetaEditor 页面导航要方便的多。例如,我有各种文件的选择,很难进入到所需文件,例如 Dialog.mqh, 使用页面搜索:)
结论
这篇文章展示了一种不大常规的方法来访问面板控件的 "Background Color", "Frame Color" 和 "Header Color" 属性,我以前没有看过这样的方法。重点是理解,所有面板对象都是派生于父 CWnd 类, 就是这个对象,即创建面板的类,是包含所有控件的容器。所以您可以循环迭代所有控件并取得/设置想要的属性。
| 文件名 | 注释 |
|---|---|
| Live panel.mq5 | 一个没有加上控件的面板. 当被拖曳时变成透明 |
| Live panel and Button.mq5 | 一个加上按钮的面板. 在拖曳时,面板变得透明而按钮保持原有颜色 |
| Live panel and transparent Button.mq5 | 一个加上按钮的面板. 在拖曳时,面板和按钮都变得透明 |
| Live panel and button Clicks.mq5 | 一个含有两个按钮的面板. 处理了按钮的点击: 为面板和抬头部分生成背景色 |
| MyAppWindow.mq5 and MyAppDialog.mqh | 一个通过继承 CAppDialog 创建面板的实例 |
| MyWndClient.mq5 and MyWndClient.mqh | 通过继承客户区域类 CWndClient 来创建面板的实例 |