Construtor de estratégia baseado nos padrões de Merill
Alexander Fedosov | 13 janeiro, 2020
Índice
- Introdução
- Formulação da tarefa e do protótipo da aplicação
- Implementação de um Construtor de Estratégia para Teste
- Demonstração e exemplo de operação do construtor de estratégia
- Conclusão
Introdução
No artigo anterior, nós consideramos a aplicação dos padrões de Merill a diferentes dados, como em valores de preço em um gráfico de par de moeda e dos indicadores padrão do MetaTrader 5: ATR, WPR, CCI, RSI, entre outros. Uma interface gráfica foi desenvolvida para explorar essa ideia. O principal objetivo da interface é testar e encontrar métodos eficientes de uso dos padrões. Além disso, as configurações bem-sucedidas encontradas devem ser incorporadas às estratégias de negociação e testadas. Neste artigo, nós desenvolveremos um kit de ferramentas básico para criar tais estratégias de negociação e testá-las.
Formulação da tarefa e do protótipo da aplicação
Antes de começar a desenvolver o aplicativo, vamos determinar uma lista dos recursos e elementos de interface necessários. Primeiro, nós definimos duas seções:
- A guia Construtor
- A guia Configurações
A guia Construtor apresentará o conjunto principal de elementos de interface necessários para formar uma estratégia de negociação. Considere todos os elementos básicos:
- Tabela de símbolos, que consiste em uma lista completa de símbolos disponíveis na plataforma, na guia Observação do Mercado.
- Opção de filtro para a tabela de símbolos, que permite uma busca conveniente dos grupos de símbolos necessários.
- Duas seções idênticas para gerar os sinais de Compra e Venda. As seções contêm elementos idênticos, portanto, apenas uma descrição da seção é fornecida abaixo.
- Intervalo de tempo para teste.
- Seleção do período gráfico atual.
- A última seção na guia Construtor é o bloco com os resultados do teste relacionado à estratégia de negociação que foi definida.
Vamos considerar a seção Geração de Sinal:
- Um padrão selecionado no conjunto de padrões de Merill.
- Um conjunto de três sinais aos quais os padrões podem ser aplicados. Cada um dos sinais pode ser desativado. Ou seja, se apenas um sinal for selecionado, a entrada no mercado será realizada com base nesse sinal. Se mais sinais forem selecionados, a entrada será executada por qualquer um deles. Os padrões de Merill podem ser aplicados aos indicadores e também ao preço.
- Definir o Take Profit e o Stop Loss.
Na guia Configurações se encontram os parâmetros de indicadores padrão e permite carregar indicadores personalizados.
Com base nos recursos desejados, que foram especificados acima, vamos criar um protótipo de nosso aplicativo. A Figura 1 abaixo mostra o esquema e um conjunto de elementos de interface para a guia Construtor:
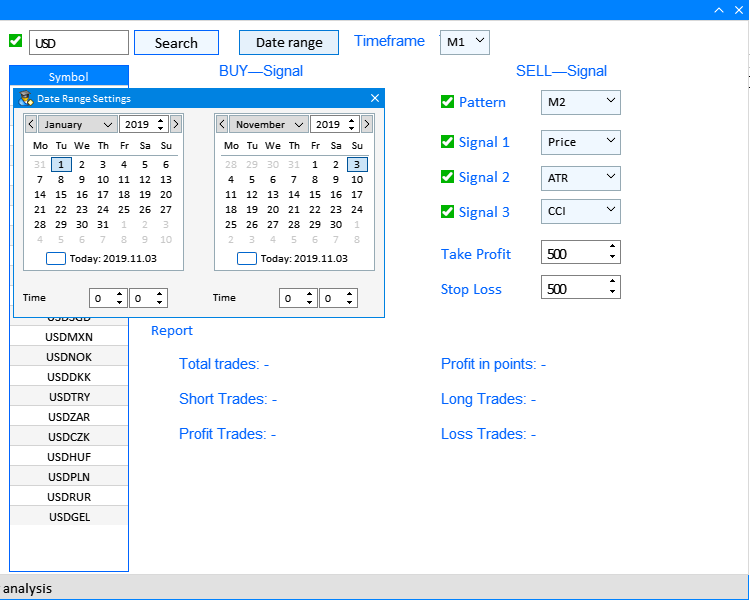
Fig.1 Protótipo da guia Construtor e elementos da interface.
Vamos também criar um protótipo para a guia Configurações e organizar os elementos nessa guia.
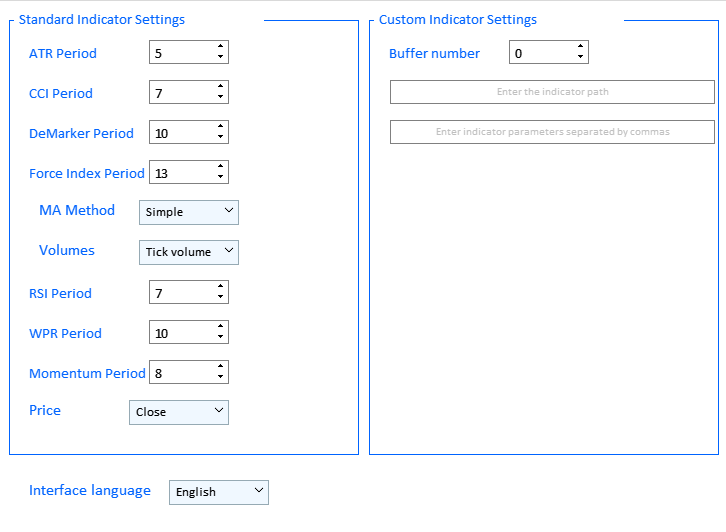
Fig.2 Protótipo da guia Configurações e elementos da interface.
Devemos prestar atenção na segunda subseção onde se encontram as Configurações do Indicador Personalizado e o campo de entrada. A entrada com os valores corretos e a operação de um indicador de terceiros correspondem à sintaxe da função iCustom. Antes de tudo, isso diz respeito à entrada correta do caminho do indicador:
name
[in] Nome do indicador personalizado, que contém o caminho relativo ao diretório raiz dos indicadores (MQL5/Indicators/). Se o indicador estiver localizado em um subdiretório, por exemplo, MQL5/Indicators/Examples, o nome deverá ter a seguinte aparência: "Examples\\nome_do_indicador" (é necessário utilizar como separador uma barra invertida dupla em vez de uma barra invertida simples).
Para aplicar um indicador de terceiros a um dos sinais, selecione Custom na lista suspensa para qualquer um dos sinais, conforme mostrado abaixo na Fig. 3:
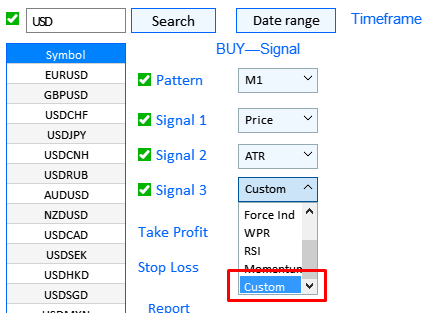
Fig.3 Selecionando o uso de um indicador personalizado.
A sequência completa de ações relacionadas à configuração e uso do Construtor de Estratégia será descrita mais adiante neste artigo, após a implementação do aplicativo.
Implementação de um Construtor de Estratégia para Teste
Antes de prosseguir com a criação da interface gráfica do aplicativo, vamos determinar seus elementos básicos, com base no restante dos elementos será construído e desenvolvido.
O aplicativo possui duas janelas: a janela principal do aplicativo e uma caixa de diálogo para a configuração do período. A janela principal possui duas guias: Construtor e Configurações. Para implementar isso, o principal método de criação de interface CreateGUI() combina dois métodos de criação da janela:
- CreateWindow() cria a janela principal.
- CreateDateSetting() cria a janela Configurações do período.
//+------------------------------------------------------------------+
//| Creates the graphical interface of the program                   |
//+------------------------------------------------------------------+
bool CProgram::CreateGUI(void)
{
//--- Creating a panel
   if(!CreateWindow("Merrill Constructor"))
      return(false);
//--- Creating a dialog window
   if(!CreateDateSetting())
      return(false);
//--- Finishing the creation of GUI
   CWndEvents::CompletedGUI();
   return(true);
}
//+------------------------------------------------------------------+
Vamos considerar o conteúdo de cada um dos métodos. O método CreateDateSetting() é mais fácil de implementar e contém elementos simples. O elemento da interface implementado por esse método é mostrado separadamente na Fig.4:
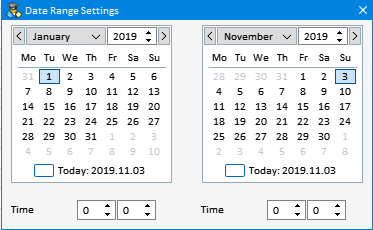
Fig.4 Caixa de diálogo de Configurações do período.
A janela consiste na caixa de diálogo, além de dois elementos do calendário e dois elementos para a definição do horário inicial e final. Nós já definimos o conteúdo do elemento. Agora, vamos implementá-lo dentro do método CreateDateSetting().
//+------------------------------------------------------------------+
//| Creates a date range selection dialog box                        |
//+------------------------------------------------------------------+
bool CProgram::CreateDateSetting(void)
{
//--- Add the pointer to the window array
   CWndContainer::AddWindow(m_window[1]);
//--- Coordinates
   int x=m_date_range.X();
   int y=m_date_range.Y()+m_date_range.YSize();
//--- Properties
   m_window[1].XSize(372);
   m_window[1].YSize(230);
   m_window[1].WindowType(W_DIALOG);
   m_window[1].IsMovable(true);
//--- Creating the form
   if(!m_window[1].CreateWindow(m_chart_id,m_subwin,"",x,y))
      return(false);
//---
   if(!CreateCalendar(m_calendar1,m_window[1],10,25,D'01.01.2019',1))
      return(false);
   if(!CreateCalendar(m_calendar2,m_window[1],201,25,m_calendar2.Today(),1))
      return(false);
//---
   if(!CreateTimeEdit(m_time_edit1,m_window[1],10,200,"Time",1))
      return(false);
   if(!CreateTimeEdit(m_time_edit2,m_window[1],200,200,"Time",1))
      return(false);
//---
   return(true);
}
Agora vamos ao método CreateWindow() que implementa a janela principal do aplicativo. A estrutura do método é extensa, por isso vamos dividi-la em componentes-chave de forma separada. O primeira é a criação da própria janela e de sua estrutura básica, ou seja, de duas guias, Construtor e Configurações.
//+------------------------------------------------------------------+
//| Creates a form for controls                                      |
//+------------------------------------------------------------------+
bool CProgram::CreateWindow(const string caption_text)
{
#define VERSION " 1.0"
   color caption=C'0,130,255';
   int ygap=30;
//--- Add the pointer to the window array
   CWndContainer::AddWindow(m_window[0]);
//--- Properties
   m_window[0].XSize(900);
   m_window[0].YSize(600);
   m_window[0].FontSize(9);
   m_window[0].CloseButtonIsUsed(true);
   m_window[0].CollapseButtonIsUsed(true);
   m_window[0].CaptionColor(caption);
   m_window[0].CaptionColorHover(caption);
   m_window[0].CaptionColorLocked(caption);
//--- Creating the form
   if(!m_window[0].CreateWindow(m_chart_id,m_subwin,caption_text+VERSION,10,20))
      return(false);
//--- Tabs
   if(!CreateTabs(150,20))
      return(false);
Esta parte do código cria a janela principal, enquanto o método CreateTabs() é responsável pela adição das duas guias descritas acima:
//+------------------------------------------------------------------+
//| Create a group with tabs                                         |
//+------------------------------------------------------------------+
bool CProgram::CreateTabs(const int x_gap,const int y_gap)
{
//--- Save the pointer to the main control
   m_tabs1.MainPointer(m_window[0]);
//--- Properties
   m_tabs1.IsCenterText(true);
   m_tabs1.PositionMode(TABS_LEFT);
   m_tabs1.AutoXResizeMode(true);
   m_tabs1.AutoYResizeMode(true);
   m_tabs1.AutoYResizeBottomOffset(25);
   m_tabs1.TabsYSize(40);
//--- Add tabs with the specified properties
   for(int i=0; i<ArraySize(m_tabs_names); i++)
      m_tabs1.AddTab(m_tabs_names[i],150);
//--- Creating a control
   if(!m_tabs1.CreateTabs(x_gap,y_gap))
      return(false);
//--- Add the object to the common array of object groups
   CWndContainer::AddToElementsArray(0,m_tabs1);
   return(true);
}
No protótipo acima, nós definimos o conteúdo dos elementos para cada uma das guias: Construtor (Fig.1) e Configurações (Fig.2). Agora vamos considerar a implementação dos elementos contidos nas guias. A guia Construtor contém muitos tipos de elementos repetidos e, portanto, nós vamos considerar apenas as subseções principais e a lista de métodos usados para a implementação desses elementos.
//---- Constructor tab
//--- Symbols filter
   if(!CreateSymbolsFilter(10,10))
      return(false);
   if(!CreateSymbolsTable(10,45))
      return(false);
//--- Working timeframe
   if(!CreateTextLabel(m_text_labels1[2],290,10,"Timeframe",0))
      return(false);
   if(!CreateTimeframe1(440,10))
      return(false);
//--- Date range
   if(!CreateButton(m_date_range,240,10))
      return(false);
//--- Text labels
   if(!CreateTextLabel(m_text_labels1[0],int(0.35*(m_window[0].XSize()-150)-100),10+ygap,"BUY—Signal",0))
      return(false);
   if(!CreateTextLabel(m_text_labels1[1],int(0.75*(m_window[0].XSize()-150)-100),10+ygap,"SELL—Signal",0))
      return(false);
//--- Pattern selection
   if(!PatternType1(int(0.35*(m_window[0].XSize()-150)-100),40+ygap,0))
      return(false);
   if(!CreateCheckBox(m_checkbox[0],int(0.35*(m_window[0].XSize()-150)-120),45+ygap,"Pattern"))
      return(false);
   if(!PatternType2(int(0.75*(m_window[0].XSize()-150)-100),40+ygap,0))
      return(false);
   if(!CreateCheckBox(m_checkbox[1],int(0.75*(m_window[0].XSize()-150)-120),45+ygap,"Pattern"))
      return(false);
//--- Selecting the application of patterns
   if(!AppliedType1(int(0.35*(m_window[0].XSize()-150)-100),80+ygap))
      return(false);
   if(!AppliedType2(int(0.35*(m_window[0].XSize()-150)-100),50+33*2+ygap))
      return(false);
   if(!AppliedType3(int(0.35*(m_window[0].XSize()-150)-100),50+33*3+ygap))
      return(false);
   if(!AppliedType4(int(0.75*(m_window[0].XSize()-150)-100),80+ygap))
      return(false);
   if(!AppliedType5(int(0.75*(m_window[0].XSize()-150)-100),50+33*2+ygap))
      return(false);
   if(!AppliedType6(int(0.75*(m_window[0].XSize()-150)-100),50+33*3+ygap))
      return(false);
//--- Signal checkboxes
   for(int i=2; i<8; i++)
   {
      if(i<5)
         if(!CreateCheckBox(m_checkbox[i],int(0.35*(m_window[0].XSize()-150)-120),50+35*(i-1)+ygap,"Signal "+string(i-1)))
            return(false);
      if(i>=5)
         if(!CreateCheckBox(m_checkbox[i],int(0.75*(m_window[0].XSize()-150)-120),50+35*(i-4)+ygap,"Signal "+string(i-4)))
            return(false);
   }
//--- Take Profit and Stop Loss settings
   if(!CreateEditValue(m_takeprofit1,int(0.35*(m_window[0].XSize()-150)-120),50+35*4+ygap,"Take Profit",500,0))
      return(false);
   if(!CreateEditValue(m_stoploss1,int(0.35*(m_window[0].XSize()-150)-120),50+35*5+ygap,"Stop Loss",500,0))
      return(false);
   if(!CreateEditValue(m_takeprofit2,int(0.75*(m_window[0].XSize()-150)-120),50+35*4+ygap,"Take Profit",500,0))
      return(false);
   if(!CreateEditValue(m_stoploss2,int(0.75*(m_window[0].XSize()-150)-120),50+35*5+ygap,"Stop Loss",500,0))
      return(false);
//--- Report
   if(!CreateReportFrame(m_frame[2],"",int(0.35*(m_window[0].XSize()-150)-120),60+35*6+ygap))
      return(false);
   for(int i=0; i<6; i++)
   {
      if(i<3)
         if(!CreateTextLabel(m_report_text[i],int(0.4*(m_window[0].XSize()-150)-120),60+35*(7+i)+ygap,"",0))
            return(false);
      if(i>=3)
         if(!CreateTextLabel(m_report_text[i],int(0.75*(m_window[0].XSize()-150)-120),60+35*(7+i-3)+ygap,"",0))
            return(false);
      m_report_text[i].IsCenterText(false);
   }
Vamos ver o que as principais partes da interface implementam e em quais métodos elas consistem.
1. Filtro de símbolos.
Consiste nos métodos CreateSymbolsFilter() e CreateSymbolsTable(). Eles implementam o seguinte elemento:

Fig.5 Filtro de símbolos.
CreateSymbolsFilter() implementa um campo de entrada com uma caixa de seleção e um botão de Busca.
//+------------------------------------------------------------------+
//| Creates a checkbox with the "Symbols filter" input field         |
//+------------------------------------------------------------------+
bool CProgram::CreateSymbolsFilter(const int x_gap,const int y_gap)
{
//--- Save the pointer to the main control
   m_symb_filter.MainPointer(m_tabs1);
//--- Attach to tab
   m_tabs1.AddToElementsArray(0,m_symb_filter);
//--- Properties
   m_symb_filter.CheckBoxMode(true);
   m_symb_filter.YSize(25);
   m_symb_filter.FontSize(11);
   m_symb_filter.XSize(200);
   m_symb_filter.GetTextBoxPointer().XGap(20);
   m_symb_filter.GetTextBoxPointer().XSize(100);
   m_symb_filter.GetTextBoxPointer().YSize(25);
   m_symb_filter.GetTextBoxPointer().AutoSelectionMode(true);
   m_symb_filter.SetValue("USD"); // "EUR,USD" "EURUSD,GBPUSD" "EURUSD,GBPUSD,AUDUSD,NZDUSD,USDCHF"
//--- Creating a control
   if(!m_symb_filter.CreateTextEdit("",x_gap,y_gap))
      return(false);
//--- Enable the checkbox
   m_symb_filter.IsPressed(true);
//--- Add the object to the common array of object groups
   CWndContainer::AddToElementsArray(0,m_symb_filter);
//---
   if(!CreateRequest(x_gap+125,y_gap))
      return(false);
   return(true);
}
CreateSymbolsTable() implementa uma tabela que gera os símbolos do par de moeda filtrados na janela Observação de Mercado.
//+------------------------------------------------------------------+
//| Creates a symbol table                                           |
//+------------------------------------------------------------------+
bool CProgram::CreateSymbolsTable(const int x_gap,const int y_gap)
{
#define ROWS1_TOTAL    1
//--- Save the pointer to the main control
   m_table_symb.MainPointer(m_tabs1);
//--- Attach to tab
   m_tabs1.AddToElementsArray(0,m_table_symb);
//--- Array of column widths
   int width[1]= {119};
//--- Array of text alignment in columns
   ENUM_ALIGN_MODE align[1]= {ALIGN_CENTER};
//--- Array of text offset along the X axis in the columns
   int text_x_offset[1]= {5};
//--- Properties
   m_table_symb.XSize(120);
   m_table_symb.TableSize(1,ROWS1_TOTAL);
   m_table_symb.ColumnsWidth(width);
   m_table_symb.TextAlign(align);
   m_table_symb.FontSize(10);
   m_table_symb.TextXOffset(text_x_offset);
   m_table_symb.ShowHeaders(true);
   m_table_symb.SelectableRow(true);
   m_table_symb.IsWithoutDeselect(true);
   m_table_symb.IsZebraFormatRows(clrWhiteSmoke);
   m_table_symb.AutoYResizeMode(true);
   m_table_symb.AutoYResizeBottomOffset(3);
   m_table_symb.HeadersColor(C'0,130,255');
   m_table_symb.HeadersColorHover(clrCornflowerBlue);
   m_table_symb.HeadersTextColor(clrWhite);
   m_table_symb.BorderColor(C'0,100,255');
//--- Creating a control
   if(!m_table_symb.CreateTable(x_gap,y_gap))
      return(false);
//--- Add the object to the common array of object groups
   CWndContainer::AddToElementsArray(0,m_table_symb);
   return(true);
}
2. Funcionamento do período gráfico e do botão "Intervalo de tempo".
Todos os elementos implementam a seleção de um período gráfico para teste. O botão Intervalo de tempo abre a caixa de diálogo apropriada, que foi descrita acima. O método CreateButton() implementa o botão. CreateTextLabel() cria um rótulo apropriado, CreateTimeframe1() implementa a seleção do período gráfico. CreateButton() e CreateTextLabel() são métodos universais, que serão usados posteriormente. O código deles é fornecido aqui apenas uma vez. Os elementos são exibidos separadamente na Fig.6:
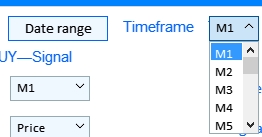
Fig.6 O botão Intervalo de tempo e seleção manual do período gráfico.
//+------------------------------------------------------------------+
//| Creates a text label in the first tab                            |
//+------------------------------------------------------------------+
bool CProgram::CreateTextLabel(CTextLabel &text_label,const int x_gap,const int y_gap,string label_text,int tab)
{
//--- Save the window pointer
   text_label.MainPointer(m_tabs1);
//--- Attach to tab
   m_tabs1.AddToElementsArray(tab,text_label);
//---
   text_label.Font("Trebuchet");
   text_label.FontSize(11);
   text_label.XSize(200);
   text_label.LabelColor(C'0,100,255');
   text_label.IsCenterText(true);
//--- Creation of a button
   if(!text_label.CreateTextLabel(label_text,x_gap,y_gap))
      return(false);
//--- Add the element pointer to the data base
   CWndContainer::AddToElementsArray(0,text_label);
   return(true);
}
//+------------------------------------------------------------------+
//| Creates a button to show the date range selection window         |
//+------------------------------------------------------------------+
bool CProgram::CreateButton(CButton &button,const int x_gap,const int y_gap)
{
//--- Save the pointer to the main control
   button.MainPointer(m_tabs1);
//--- Attach to tab
   m_tabs1.AddToElementsArray(0,button);
//--- Properties
   button.XSize(100);
   button.YSize(25);
   button.FontSize(11);
   button.IsHighlighted(false);
   button.IsCenterText(true);
   button.BorderColor(C'0,100,255');
   button.BackColor(clrAliceBlue);
//--- Creating a control
   if(!button.CreateButton("Date range",x_gap,y_gap))
      return(false);
//--- Add the element pointer to the data base
   CWndContainer::AddToElementsArray(0,button);
   return(true);
}
O método CreateTimeframe1() é uma lista suspensa com todos os períodos gráficos disponíveis.
//+------------------------------------------------------------------+
//|                                                                  |
//+------------------------------------------------------------------+
bool CProgram::CreateTimeframe1(const int x_gap,const int y_gap)
{
//--- Pass the object to the panel
   m_timeframe1.MainPointer(m_tabs1);
//--- Attach to tab
   m_tabs1.AddToElementsArray(0,m_timeframe1);
//--- Array of the item values in the list view
   string timeframe_names[21]=
   {
      "M1","M2","M3","M4","M5","M6","M10","M12","M15","M20","M30",
      "H1","H2","H3","H4","H6","H8","H12","D1","W1","MN"
   };
//--- Set properties before creation
   m_timeframe1.XSize(50);
   m_timeframe1.YSize(25);
   m_timeframe1.ItemsTotal(21);
   m_timeframe1.FontSize(12);
   m_timeframe1.LabelColor(C'0,100,255');
   CButton *but=m_timeframe1.GetButtonPointer();
   but.FontSize(10);
   but.XSize(50);
   but.BackColor(clrAliceBlue);
   but.XGap(1);
   m_timeframe1.GetListViewPointer().FontSize(10);
//--- Save the item values in the combobox list view
   for(int i=0; i<21; i++)
      m_timeframe1.SetValue(i,timeframe_names[i]);
//--- Get the list view pointer
   CListView *lv=m_timeframe1.GetListViewPointer();
//--- Set the list view properties
   lv.LightsHover(true);
   m_timeframe1.SelectItem(0);
//--- Creating a control
   if(!m_timeframe1.CreateComboBox("",x_gap,y_gap))
      return(false);
//--- Add the object to the common array of object groups
   CWndContainer::AddToElementsArray(0,m_timeframe1);
   return(true);
}
3. Rótulos de texto das seções e elementos da seleção do padrão para os sinais de Compra e Venda.
Os rótulos de texto são criados usando o método CreateTextLabel() que nós consideramos anteriormente. Os outros dois métodos implementam as caixas de seleção e os menus suspensos para a seleção do padrão de Merill para teste.

Fig.7 Rótulos de texto nas seções e a seleção dos padrões.
O método CreateCheckBox() cria caixas de seleção de Padrões.
//+------------------------------------------------------------------+
//|                                                                  |
//+------------------------------------------------------------------+
bool CProgram::CreateCheckBox(CCheckBox &checkbox,const int x_gap,const int y_gap,const string text)
{
//--- Save the pointer to the main control
   checkbox.MainPointer(m_tabs1);
//--- Attach to tab
   m_tabs1.AddToElementsArray(0,checkbox);
//--- Properties
   checkbox.YSize(25);
   checkbox.GreenCheckBox(true);
   checkbox.IsPressed(true);
   checkbox.FontSize(12);
   checkbox.LabelColor(C'0,100,255');
   checkbox.LabelColorPressed(C'0,100,255');
//--- Creating a control
   if(!checkbox.CreateCheckBox(text,x_gap,y_gap))
      return(false);
//--- Add the element pointer to the data base
   CWndContainer::AddToElementsArray(0,checkbox);
   return(true);
}
Os métodos PatternType1() e PatternType2() são idênticos.
//+------------------------------------------------------------------+
//| Creates combobox 1                                               |
//+------------------------------------------------------------------+
bool CProgram::PatternType1(const int x_gap,const int y_gap,const int tab)
{
//--- Total number of the list items
#define ITEMS_TOTAL1 32
//--- Pass the object to the panel
   m_combobox1.MainPointer(m_tabs1);
//--- Attach to tab
   m_tabs1.AddToElementsArray(tab,m_combobox1);
//--- Array of the item values in the list view
   string pattern_names[ITEMS_TOTAL1]=
   {
      "M1","M2","M3","M4","M5","M6","M7","M8",
      "M9","M10","M11","M12","M13","M14","M15","M16",
      "W1","W2","W3","W4","W5","W6","W7","W8",
      "W9","W10","W11","W12","W13","W14","W15","W16"
   };
//--- Set properties before creation
   m_combobox1.XSize(200);
   m_combobox1.YSize(25);
   m_combobox1.ItemsTotal(ITEMS_TOTAL1);
   m_combobox1.GetButtonPointer().FontSize(10);
   m_combobox1.GetButtonPointer().BackColor(clrAliceBlue);
   m_combobox1.GetListViewPointer().FontSize(10);
//--- Save the item values in the combobox list view
   for(int i=0; i<ITEMS_TOTAL1; i++)
      m_combobox1.SetValue(i,pattern_names[i]);
//--- Get the list view pointer
   CListView *lv=m_combobox1.GetListViewPointer();
//--- Set the list view properties
   lv.LightsHover(true);
   m_combobox1.SelectItem(0);
//--- Creating a control
   if(!m_combobox1.CreateComboBox("",x_gap,y_gap))
      return(false);
//--- Add the object to the common array of object groups
   CWndContainer::AddToElementsArray(0,m_combobox1);
   return(true);
}
4. Seleção dos padrões e das caixas de verificação de sinal.
Este bloco de interface consiste em um conjunto de sinais para configurar os sinais de Compra e Venda. Cada bloco consiste em um seletor opcional de um a três sinais, que pode ser usado como as condições de entrada. Ele consiste nos métodos CreateCheckBox() e AppliedTypeN().
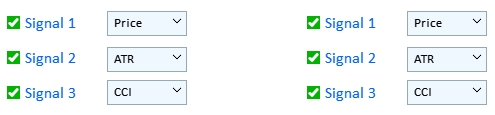
Fig.8 Uso dos padrões e das caixas de verificação de sinal.
As estruturas dos métodos AppliedType1()—AppliedType6() são semelhantes: elas representam uma lista suspensa com uma seleção de um array de dados para procurar os sinais baseados nos padrões.
//+------------------------------------------------------------------+
//|                                                                  |
//+------------------------------------------------------------------+
bool CProgram::AppliedType1(const int x_gap,const int y_gap)
{
//--- Pass the object to the panel
   m_applied1.MainPointer(m_tabs1);
//--- Attach to tab
   m_tabs1.AddToElementsArray(0,m_applied1);
//--- Array of the item values in the list view
   string pattern_names[9]=
   {
      "Price","ATR","CCI","DeMarker","Force Ind","WPR","RSI","Momentum","Custom"
   };
//--- Set properties before creation
   m_applied1.XSize(200);
   m_applied1.YSize(25);
   m_applied1.ItemsTotal(9);
   m_applied1.GetButtonPointer().FontSize(10);
   m_applied1.GetButtonPointer().BackColor(clrAliceBlue);
   m_applied1.GetListViewPointer().FontSize(10);
//--- Save the item values in the combobox list view
   for(int i=0; i<9; i++)
      m_applied1.SetValue(i,pattern_names[i]);
//--- Get the list view pointer
   CListView *lv=m_applied1.GetListViewPointer();
//--- Set the list view properties
   lv.LightsHover(true);
   m_applied1.SelectItem(0);
//--- Creating a control
   if(!m_applied1.CreateComboBox("",x_gap,y_gap))
      return(false);
//--- Add the object to the common array of object groups
   CWndContainer::AddToElementsArray(0,m_applied1);
   return(true);
}
5. Configurações do Take Profit e Stop Loss.
A seção da interface que permite configurar o Take Profit e o Stop Loss separadamente para os sinais de compra e venda. Os níveis são definidos em pontos.

Fig.9 Campos de entrada para o Take Profit e Stop Loss.
O método universal CreateEditValue() é usado para implementar esses campos de entrada.
//+------------------------------------------------------------------+
//| Creates an input field                                           |
//+------------------------------------------------------------------+
bool CProgram::CreateEditValue(CTextEdit &text_edit,const int x_gap,const int y_gap,const string label_text,const int value,const int tab)
{
//--- Save the pointer to the main control
   text_edit.MainPointer(m_tabs1);
//--- Attach to tab
   m_tabs1.AddToElementsArray(tab,text_edit);
//--- Properties
   text_edit.XSize(210);
   text_edit.YSize(24);
   text_edit.LabelColor(C'0,100,255');
   text_edit.FontSize(12);
   text_edit.MaxValue(1000);
   text_edit.MinValue(10);
   text_edit.SpinEditMode(true);
   text_edit.SetValue((string)value);
   text_edit.GetTextBoxPointer().AutoSelectionMode(true);
   text_edit.GetTextBoxPointer().XGap(100);
//--- Creating a control
   if(!text_edit.CreateTextEdit(label_text,x_gap,y_gap))
      return(false);
//--- Add the object to the common array of object groups
   CWndContainer::AddToElementsArray(0,text_edit);
   return(true);
}
6. Relatório e resultados do teste.
Este bloco consiste nos resultados do teste. Ele é implementado usando o método CreateTextLabel(), que foi considerado acima.
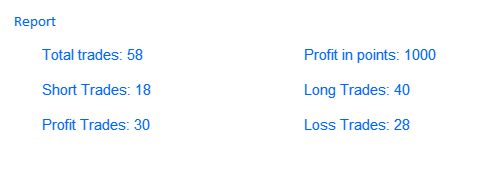
Fig.10 Bloco de relatório.
Nós consideramos a implementação da guia Construtor. Agora, vamos continuar com a guia Configurações.
1. Parâmetros do indicador padrão.
Esta seção inclui todas as configurações dos indicadores oferecidos para teste e análise.
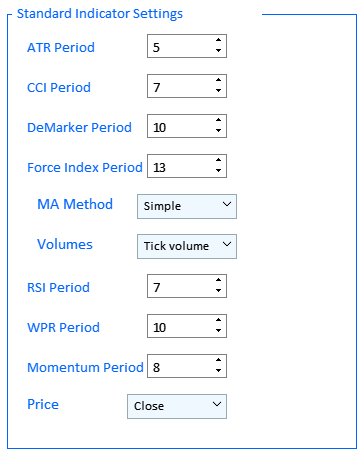
Fig.11 Bloco com as configurações padrão do indicador.
Este bloco é implementado usando três vezes o método CreateFrame() que cria uma seção visual com um quadro. Nós também usamos aqui um método de campo de entrada universal para criar os parâmetros dos indicadores CreateIndSetting() e um conjunto de métodos IndicatorSetting1()—IndicatorSetting4() para as listas suspensas dos parâmetros Ma Method, Volumes e Price.
//+------------------------------------------------------------------+
//|                                                                  |
//+------------------------------------------------------------------+
bool CProgram::CreateFrame(CFrame &frame,const string text,const int x_gap,const int y_gap)
{
//--- Save the pointer to the main control
   frame.MainPointer(m_tabs1);
//--- Attach to tab
   m_tabs1.AddToElementsArray(1,frame);
//---
   frame.XSize(350);
   frame.YSize(500);
   frame.LabelColor(C'0,100,255');
   frame.BorderColor(C'0,100,255');
   frame.FontSize(11);
   frame.AutoYResizeMode(true);
   frame.AutoYResizeBottomOffset(100);
   frame.GetTextLabelPointer().XSize(250);
//--- Creating a control
   if(!frame.CreateFrame(text,x_gap,y_gap))
      return(false);
//--- Add the object to the common array of object groups
   CWndContainer::AddToElementsArray(0,frame);
   return(true);
}
//+------------------------------------------------------------------+
//|                                                                  |
//+------------------------------------------------------------------+
bool CProgram::IndicatorSetting1(const int x_gap,const int y_gap,const string text)
{
//--- Pass the object to the panel
   m_ind_set1.MainPointer(m_tabs1);
//--- Attach to tab
   m_tabs1.AddToElementsArray(1,m_ind_set1);
//--- Array of the item values in the list view
   string pattern_names[4]=
   {
      "Simple","Exponential","Smoothed","Linear weighted"
   };
//--- Set properties before creation
   m_ind_set1.XSize(200);
   m_ind_set1.YSize(25);
   m_ind_set1.ItemsTotal(4);
   m_ind_set1.FontSize(12);
   m_ind_set1.LabelColor(C'0,100,255');
   CButton *but=m_ind_set1.GetButtonPointer();
   but.FontSize(10);
   but.XSize(100);
   but.BackColor(clrAliceBlue);
   m_ind_set1.GetListViewPointer().FontSize(10);
//--- Save the item values in the combobox list view
   for(int i=0; i<4; i++)
      m_ind_set1.SetValue(i,pattern_names[i]);
//--- Get the list view pointer
   CListView *lv=m_ind_set1.GetListViewPointer();
//--- Set the list view properties
   lv.LightsHover(true);
   m_ind_set1.SelectItem(0);
//--- Creating a control
   if(!m_ind_set1.CreateComboBox(text,x_gap,y_gap))
      return(false);
//--- Add the object to the common array of object groups
   CWndContainer::AddToElementsArray(0,m_ind_set1);
   return(true);
}
//+------------------------------------------------------------------+
//|                                                                  |
//+------------------------------------------------------------------+
bool CProgram::IndicatorSetting3(const int x_gap,const int y_gap,const string text)
{
//--- Pass the object to the panel
   m_ind_set3.MainPointer(m_tabs1);
//--- Attach to tab
   m_tabs1.AddToElementsArray(1,m_ind_set3);
//--- Array of the item values in the list view
   string pattern_names[2]=
   {
      "Tick volume","Real Volume"
   };
//--- Set properties before creation
   m_ind_set3.XSize(200);
   m_ind_set3.YSize(25);
   m_ind_set3.ItemsTotal(2);
   m_ind_set3.FontSize(12);
   m_ind_set3.LabelColor(C'0,100,255');
   CButton *but=m_ind_set3.GetButtonPointer();
   but.FontSize(10);
   but.XSize(100);
   but.BackColor(clrAliceBlue);
   m_ind_set3.GetListViewPointer().FontSize(10);
//--- Save the item values in the combobox list view
   for(int i=0; i<2; i++)
      m_ind_set3.SetValue(i,pattern_names[i]);
//--- Get the list view pointer
   CListView *lv=m_ind_set3.GetListViewPointer();
//--- Set the list view properties
   lv.LightsHover(true);
   lv.ItemYSize(20);
   lv.YSize(42);
   m_ind_set3.SelectItem(0);
//--- Creating a control
   if(!m_ind_set3.CreateComboBox(text,x_gap,y_gap))
      return(false);
//--- Add the object to the common array of object groups
   CWndContainer::AddToElementsArray(0,m_ind_set3);
   return(true);
}
//+------------------------------------------------------------------+
//|                                                                  |
//+------------------------------------------------------------------+
bool CProgram::IndicatorSetting4(const int x_gap,const int y_gap,const string text)
{
//--- Pass the object to the panel
   m_ind_set4.MainPointer(m_tabs1);
//--- Attach to tab
   m_tabs1.AddToElementsArray(1,m_ind_set4);
//--- Array of the item values in the list view
   string pattern_names[4]=
   {
      "Open","Close","High","Low"
   };
//--- Set properties before creation
   m_ind_set4.XSize(200);
   m_ind_set4.YSize(25);
   m_ind_set4.ItemsTotal(4);
   m_ind_set4.FontSize(12);
   m_ind_set4.LabelColor(C'0,100,255');
   CButton *but=m_ind_set4.GetButtonPointer();
   but.FontSize(10);
   but.XSize(100);
   but.BackColor(clrAliceBlue);
   m_ind_set4.GetListViewPointer().FontSize(10);
//--- Save the item values in the combobox list view
   for(int i=0; i<4; i++)
      m_ind_set4.SetValue(i,pattern_names[i]);
//--- Get the list view pointer
   CListView *lv=m_ind_set4.GetListViewPointer();
//--- Set the list view properties
   lv.LightsHover(true);
   lv.ItemYSize(20);
   lv.YSize(82);
   m_ind_set4.SelectItem(1);
//--- Creating a control
   if(!m_ind_set4.CreateComboBox(text,x_gap,y_gap))
      return(false);
//--- Add the object to the common array of object groups
   CWndContainer::AddToElementsArray(0,m_ind_set4);
   return(true);
}
2. Idioma da interface.
O controle "Idioma da Interface" é implementado como uma lista suspensa contendo duas opções: inglês e russo. Este elemento é implementado usando o método LanguageSetting():
//+------------------------------------------------------------------+
//|                                                                  |
//+------------------------------------------------------------------+
bool CProgram::LanguageSetting(const int x_gap,const int y_gap,const string text)
{
//--- Pass the object to the panel
   m_language_set.MainPointer(m_tabs1);
//--- Attach to tab
   m_tabs1.AddToElementsArray(1,m_language_set);
//--- Array of the item values in the list view
   string pattern_names[2]=
   {
      "Русский","English"
   };
//--- Set properties before creation
   m_language_set.XSize(200);
   m_language_set.YSize(25);
   m_language_set.ItemsTotal(2);
   m_language_set.FontSize(12);
   m_language_set.LabelColor(C'0,100,255');
   CButton *but=m_language_set.GetButtonPointer();
   but.FontSize(10);
   but.XSize(100);
   but.BackColor(clrAliceBlue);
   but.XGap(140);
   m_language_set.GetListViewPointer().FontSize(10);
//--- Save the item values in the combobox list view
   for(int i=0; i<2; i++)
      m_language_set.SetValue(i,pattern_names[i]);
//--- Get the list view pointer
   CListView *lv=m_language_set.GetListViewPointer();
//--- Set the list view properties
   lv.LightsHover(true);
   lv.ItemYSize(20);
   lv.YSize(42);
   m_language_set.SelectItem(1);
//--- Creating a control
   if(!m_language_set.CreateComboBox(text,x_gap,y_gap))
      return(false);
//--- Add the object to the common array of object groups
   CWndContainer::AddToElementsArray(0,m_language_set);
   return(true);
}
3. Parâmetros dos indicadores personalizados.
Ele consiste em uma seção visual com o cabeçalho e o quadro, criado com o auxílio do método CreateFrame(), que foi mencionado acima, e um campo de entrada para o valor do indicador que foi criado usando o método CreateIndSetting() e um novo método CreateCustomEdit() para inserir o nome do indicador e seus parâmetros separados por vírgula.
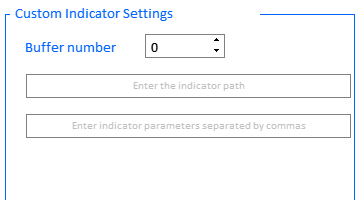
Fig.12 Parâmetros dos indicadores personalizados.
//+------------------------------------------------------------------+
//|                                                                  |
//+------------------------------------------------------------------+
bool CProgram::CreateCustomEdit(CTextEdit &text_edit,const int x_gap,const int y_gap,const string default_text)
{
//--- Save the pointer to the main control
   text_edit.MainPointer(m_tabs1);
//--- Attach to tab
   m_tabs1.AddToElementsArray(1,text_edit);
//--- Properties
   text_edit.XSize(100);
   text_edit.YSize(24);
   text_edit.LabelColor(C'0,100,255');
   CTextBox *box=text_edit.GetTextBoxPointer();
   box.AutoSelectionMode(true);
   box.XSize(325);
   box.XGap(1);
   box.DefaultTextColor(clrSilver);
   box.DefaultText(default_text);
//--- Creating a control
   if(!text_edit.CreateTextEdit("",x_gap,y_gap))
      return(false);
//--- Add the object to the common array of object groups
   CWndContainer::AddToElementsArray(0,text_edit);
   return(true);
}
Nós finalizamos a parte visual. Agora vamos analisar o algoritmo de teste das estratégias de negociação configuradas.
Para explicar o algoritmo de teste usando este aplicativo, nós precisamos determinar a sequência de ações que nos permitirá executar corretamente o teste e receber o seu resultado. Uma sequência de ações bem composta pode destacar o princípio de cada interação com a interface do aplicativo.
Passo 1. Seleção do idioma da interface
De acordo com nossa implementação, esta opção está disponível na guia Configurações, em uma lista suspensa. Vamos descrever como alterar o idioma da interface. Isso é feito por um evento personalizado da seleção de itens da caixa de combinação, que chama o método ChangeLanguage().
//--- Selection of a combo box item
   if(id==CHARTEVENT_CUSTOM+ON_CLICK_COMBOBOX_ITEM)
   {
      //--- Changing the interface language
      if(ChangeLanguage(lparam))
         Update(true);
   }
Agora, vamos considerar o método de alteração do idioma da interface. Embora o método seja um pouco extenso, sua ideia é simples.
//+------------------------------------------------------------------+
//| Changing the interface language                                  |
//+------------------------------------------------------------------+
bool CProgram::ChangeLanguage(const long id)
{
//--- Check the element ID
   if(id!=m_language_set.Id())
      return(false);
   m_lang_index=m_language_set.GetListViewPointer().SelectedItemIndex();
//---
   if(m_lang_index==0)
   {
      //--- Constructor tab
      m_tabs1.Text(0,"Конструктор");
      m_tabs1.Text(1,"Настройки");
      m_table_symb.SetHeaderText(0,"Символ");
      m_request.LabelText("Поиск");
      m_date_range.LabelText("Диапазон дат");
      m_timeframe1.LabelText("Таймфрейм");
      for(int i=0; i<8; i++)
      {
         if(i<2)
            m_checkbox[i].LabelText("Паттерн");
         else if(i>=2 && i<5)
            m_checkbox[i].LabelText("Сигнал "+string(i-1));
         else if(i>=5)
            m_checkbox[i].LabelText("Сигнал "+string(i-4));
      }
      m_takeprofit1.LabelText("Тейк Профит");
      m_takeprofit2.LabelText("Тейк Профит");
      m_stoploss1.LabelText("Стоп Лосс");
      m_stoploss2.LabelText("Стоп Лосс");
      m_frame[2].GetTextLabelPointer().LabelText("Отчёт");
      string report_label[6]=
      {
         "Всего трейдов: ","Короткие трейды: ","Прибыльные трейды: ",
         "Прибыль в пунктах: ","Длинные трейды: ","Убыточные трейды: "
      };
      for(int i=0; i<6; i++)
         m_report_text[i].LabelText(report_label[i]+"-");
      //--- Settings tab
      m_frame[0].GetTextLabelPointer().LabelText("Настройки стандартных индикаторов");
      m_frame[1].GetTextLabelPointer().LabelText("Настройки кастомных индикаторов");
      m_custom_buffer.LabelText("Номер буфера");
      m_custom_path.GetTextBoxPointer().DefaultText("Введите адрес индикатора");
      m_custom_param.GetTextBoxPointer().DefaultText("Введите параметры индикатора через запятую");
      m_language_set.LabelText("Язык интерфейса");
      //--- Date Range window
      m_window[1].LabelText("Настройки диапазона дат");
      m_time_edit1.LabelText("Время");
      m_time_edit2.LabelText("Время");
      m_time_edit3.LabelText("Время");
      m_time_edit4.LabelText("Время");
      m_status_bar.SetValue(0,"Не выбран символ для анализа");
   }
   else
   {
      //--- Constructor tab
      m_tabs1.Text(0,"Constructor");
      m_tabs1.Text(1,"Settings");
      m_table_symb.SetHeaderText(0,"Symbol");
      m_request.LabelText("Search");
      m_date_range.LabelText("Date range");
      m_timeframe1.LabelText("Timeframe");
      for(int i=0; i<8; i++)
      {
         if(i<2)
            m_checkbox[i].LabelText("Pattern");
         else if(i>=2 && i<5)
            m_checkbox[i].LabelText("Signal "+string(i-1));
         else if(i>=5)
            m_checkbox[i].LabelText("Signal "+string(i-4));
      }
      m_takeprofit1.LabelText("Take Profit");
      m_takeprofit2.LabelText("Take Profit");
      m_stoploss1.LabelText("Stop Loss");
      m_stoploss2.LabelText("Stop Loss");
      m_frame[2].GetTextLabelPointer().LabelText("Report");
      string report_label[6]=
      {
         "Total trades: ","Short Trades: ","Profit Trades: ",
         "Profit in points: ","Long Trades: ","Loss Trades: "
      };
      for(int i=0; i<6; i++)
         m_report_text[i].LabelText(report_label[i]+"-");
      //--- Settings tab
      m_frame[0].GetTextLabelPointer().LabelText("Standard Indicator Settings");
      m_frame[1].GetTextLabelPointer().LabelText("Custom Indicator Settings");
      m_custom_buffer.LabelText("Buffer number");
      m_custom_path.GetTextBoxPointer().DefaultText("Enter the indicator path");
      m_custom_param.GetTextBoxPointer().DefaultText("Enter indicator parameters separated by commas");
      m_language_set.LabelText("Interface language");
      //--- Date Range window
      m_window[1].LabelText("Date Range Settings");
      m_time_edit1.LabelText("Time");
      m_time_edit2.LabelText("Time");
      m_time_edit3.LabelText("Time");
      m_time_edit4.LabelText("Time");
      m_status_bar.SetValue(0,"No symbol selected for analysis");
   }
   return(true);
}
Passo 2. Configurações dos parâmetros do indicador
Na mesma guia, os valores dos parâmetros do indicador são definidos caso os testes sejam com indicadores específicos. Opcionalmente, os parâmetros do indicador personalizado são configurados: número do buffer, nome ou parâmetros separados por vírgulas. Observe que apenas os valores numéricos são suportados para os indicadores personalizados.
Passo 3. Configurações da tabela de símbolos.
Na parte superior da guia Construtor, nós configuramos os símbolos necessários disponíveis na janela Observação de mercado. Isso é feito pelo método RequestData(). O método é chamado pelo evento de pressionamento do botão "Buscar".
   //--- Button click event
   if(id==CHARTEVENT_CUSTOM+ON_CLICK_BUTTON)
   {
      //--- Requesting data
      RequestData(lparam);
....
//+------------------------------------------------------------------+
//| Output of symbols to the symbols table                           |
//+------------------------------------------------------------------+
bool CProgram::RequestData(const long id)
{
//--- Check the element ID
//---
   if(id==m_request.Id())
   {
      //--- Hide the table
      m_table_symb.Hide();
      //--- Initialize the table
      GetSymbols(m_symb_filter);
      RebuildingTables(m_table_symb);
      //--- Show the table
      m_table_symb.Show();
   }
   return(true);
}
Passo 4. Seleção do intervalo de tempo do teste
Este evento ocorre com um clique no botão "Intervalo de tempo". A lógica é simples: ele abre uma caixa de diálogo para definir o intervalo de tempo.
//--- Button click event
   if(id==CHARTEVENT_CUSTOM+ON_CLICK_BUTTON)
   {
...
      //---
      if(lparam==m_date_range.Id())
      {
         int x=m_date_range.X();
         int y=m_date_range.Y()+m_date_range.YSize();
         m_window[1].X(x);
         m_window[1].Y(y);
         m_window[1].OpenWindow();
         string val=(m_lang_index==0)?"Настройки диапазона дат":"Date Range Settings";
         m_window[1].LabelText(val);
      }
...
Tenha cuidado ao selecionar as datas. Se as datas estiverem definidas incorretamente, o aplicativo retornará mensagens de erro. Os erros mais comuns incluem o seguinte: a data final é maior que a data atual na plataforma ou a data inicial é maior que a data inicial.
Passo 5. Definição do período gráfico.
O período gráfico se aplica a todos os seis sinais, que podem ser configurados no construtor.
Passo 6. Ativando os sinais de venda/compra e selecionando um padrão para teste.
O teste é realizado em duas direções por padrão: compra e venda. No entanto, um dos modos podem ser desativados, como mostra a figura 13 abaixo.
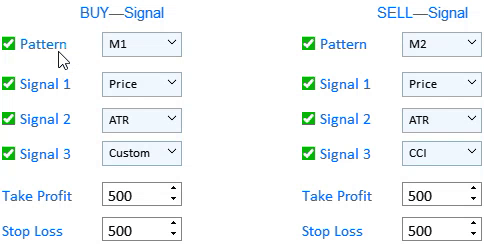
Fig.13 Desativando os sinais de compra ou venda.
O padrão de Merill para os testes adicionais pode ser selecionado à esquerda do rótulo do Padrão. Os detalhes dos padrões de Merill foram descritos no artigo anterior.
Passo 7. Seleção dos sinais para teste e configuração do Take Profit e Stop Loss
A Figura 13 mostra que até três sinais podem ser configurados simultaneamente para cada tipo de entrada no mercado. Os sinais operam de acordo com o operador lógico OR. Assim, se todos os três sinais de compra forem definidos em um teste, uma negociação será registrada se algum dos três sinais surgir. O mesmo se aplica à venda de sinais. Na lista suspensa à direita dos rótulos de texto do Sinal, você pode selecionar o tipo de dados ao qual o padrão selecionado será aplicado.
Passo 8. Execução do teste
Após a execução dos passos 1-7, nós selecionamos o instrumento de teste através do clique com o botão esquerdo na tabela. O algoritmo de teste é iniciado por um evento personalizado ao clicar em um item da lista ou da tabela.
//--- Event of pressing on a list or table item
   if(id==CHARTEVENT_CUSTOM+ON_CLICK_LIST_ITEM)
   {
      //--- Select a symbol for further work
      //--- Check the element ID
      if(lparam==m_table_symb.Id())
      {
         //--- Exit if the line is not selected
         if(m_table_symb.SelectedItem()==WRONG_VALUE)
         {
            //--- Show the full symbol description in the status bar
            m_status_bar.SetValue(0,"Не выбран символ для анализа");
            m_status_bar.GetItemPointer(0).Update(true);
         }
         //--- Get a selected symbol
         string symbol=m_table_symb.GetValue(0,m_table_symb.SelectedItem());
         //--- Show the full symbol description in the status bar
         m_status_bar.SetValue(0,"Selected symbol: "+::SymbolInfoString(symbol,SYMBOL_DESCRIPTION));
         m_status_bar.GetItemPointer(0).Update(true);
         GetResult(symbol);
      }
   }
O teste é realizado pelo método GetResult(). Considere isso com mais detalhes.
//+------------------------------------------------------------------+
//|                                                                  |
//+------------------------------------------------------------------+
void CProgram::GetResult(const string symbol)
{
//--- Get the date range
   m_start_date=StringToTime(TimeToString(m_calendar1.SelectedDate(),TIME_DATE)+" "+(string)m_time_edit1.GetHours()+":"+(string)m_time_edit1.GetMinutes()+":00");
   m_end_date=StringToTime(TimeToString(m_calendar2.SelectedDate(),TIME_DATE)+" "+(string)m_time_edit2.GetHours()+":"+(string)m_time_edit2.GetMinutes()+":00");
//--- Check specified dates
   if(m_start_date>m_end_date || m_end_date>TimeCurrent())
   {
      if(m_lang_index==0)
         MessageBox("Неправильно выбран диапазон дат!","Ошибка",MB_OK);
      else if(m_lang_index==1)
         MessageBox("Incorrect date range selected!","Error",MB_OK);
      return;
   }
//--- Проверка выбора паттернов
   int buy_pat=m_combobox1.GetListViewPointer().SelectedItemIndex();
   int sell_pat=m_combobox2.GetListViewPointer().SelectedItemIndex();
   if(buy_pat==sell_pat)
   {
      if(m_lang_index==0)
         MessageBox("Паттерн на покупку и продажу не может быть одинаков!","Ошибка",MB_OK);
      else if(m_lang_index==1)
         MessageBox("The pattern for buying and selling cannot be the same!","Error",MB_OK);
      return;
   }
//---
   ZeroMemory(m_report);
   datetime cur_date=m_start_date;
   string tf=m_timeframe1.GetListViewPointer().SelectedItemText();
   int applied1=m_applied1.GetListViewPointer().SelectedItemIndex();
   int applied2=m_applied2.GetListViewPointer().SelectedItemIndex();
   int applied3=m_applied3.GetListViewPointer().SelectedItemIndex();
   int applied4=m_applied4.GetListViewPointer().SelectedItemIndex();
   int applied5=m_applied5.GetListViewPointer().SelectedItemIndex();
   int applied6=m_applied6.GetListViewPointer().SelectedItemIndex();
//---
   while(cur_date<m_end_date)
   {
      if(
         BuySignal(symbol,m_start_date,applied1,1) ||
         BuySignal(symbol,m_start_date,applied2,2) ||
         BuySignal(symbol,m_start_date,applied3,3))
      {
         CalculateBuyDeals(symbol,m_start_date);
         cur_date=m_start_date;
         continue;
      }
      if(
         SellSignal(symbol,m_start_date,applied4,1) ||
         SellSignal(symbol,m_start_date,applied5,2) ||
         SellSignal(symbol,m_start_date,applied6,3))
      {

         CalculateSellDeals(symbol,m_start_date);
         cur_date=m_start_date;
         continue;
      }
      m_start_date+=PeriodSeconds(StringToTimeframe(tf));
      cur_date=m_start_date;
   }
//--- Output the report
   PrintReport();
}
Este método inclui as verificações se o intervalo de tempo está definido corretamente. Outra verificação é realizada para garantir que o usuário não tenha definido os mesmos padrões para testar os sinais de compra e venda. O método GetResult() inclui três métodos para trabalhar com os dados especificados nas configurações.
1. Métodos de busca de sinal: BuySignal() e SellSignal(). Eles são semelhantes. Por isso, nós vamos considerar apenas um deles.
//+------------------------------------------------------------------+
//|                                                                  |
//+------------------------------------------------------------------+
bool CProgram::BuySignal(const string symbol,datetime start,int applied,int signal)
{
//--- Exit if the buy signal is disabled
   if(!m_checkbox[0].IsPressed())
      return(false);
//---
   int Handle=INVALID_HANDLE;
   string tf=m_timeframe1.GetListViewPointer().SelectedItemText();
//--- Preparing data
   if(m_checkbox[signal+1].IsPressed())
   {
      //--- Price
      if(applied==0)
      {
         MqlRates rt[];
         int sl=0,tp=0;
         POINTS pat;
         double arr[];
         int copied=CopyRates(symbol,StringToTimeframe(tf),m_start_date,5,rt);
         int app_price=m_ind_set4.GetListViewPointer().SelectedItemIndex();
         ArrayResize(arr,copied);
         //Print(m_start_date+": "+copied);
         if(copied<5)
            return(false);
         //---
         for(int i=0; i<copied; i++)
         {
            if(app_price==0)
               arr[i]=rt[i].open;
            else if(app_price==1)
               arr[i]=rt[i].close;
            else if(app_price==2)
               arr[i]=rt[i].high;
            else if(app_price==3)
               arr[i]=rt[i].low;
         }
         //--- Pattern search
         pat.A=arr[0];
         pat.B=arr[1];
         pat.C=arr[2];
         pat.D=arr[3];
         pat.E=arr[4];
         //--- If the pattern is found, check the signal
         if(GetPatternType(pat)==m_combobox1.GetListViewPointer().SelectedItemIndex())
         {
            m_start_date=IndexToDate(m_start_date,StringToTimeframe(tf),5);
            return(true);
         }
         return(false);
      }
      //--- ATR
      if(applied==1)
         Handle=iATR(symbol,StringToTimeframe(tf),int(m_ind_setting[0].GetValue()));
      //--- CCI
      if(applied==2)
      {
         int app_price;
         switch(m_ind_set4.GetListViewPointer().SelectedItemIndex())
         {
         case  0:
            app_price=PRICE_OPEN;
            break;
         case  1:
            app_price=PRICE_CLOSE;
            break;
         case  2:
            app_price=PRICE_HIGH;
            break;
         case  3:
            app_price=PRICE_LOW;
            break;
         default:
            app_price=PRICE_CLOSE;
            break;
         }
         Handle=iCCI(symbol,StringToTimeframe(tf),int(m_ind_setting[1].GetValue()),app_price);
      }
      //--- DeMarker
      if(applied==3)
         Handle=iDeMarker(symbol,StringToTimeframe(tf),int(m_ind_setting[2].GetValue()));
      //--- Force Index
      if(applied==4)
      {
         int force_period=int(m_ind_setting[3].GetValue());
         ENUM_MA_METHOD force_ma_method;
         ENUM_APPLIED_VOLUME force_applied_volume;
         switch(m_ind_set1.GetListViewPointer().SelectedItemIndex())
         {
         case  0:
            force_ma_method=MODE_SMA;
            break;
         case  1:
            force_ma_method=MODE_EMA;
            break;
         case  2:
            force_ma_method=MODE_SMMA;
            break;
         case  3:
            force_ma_method=MODE_LWMA;
            break;
         default:
            force_ma_method=MODE_SMA;
            break;
         }
         switch(m_ind_set3.GetListViewPointer().SelectedItemIndex())
         {
         case  0:
            force_applied_volume=VOLUME_TICK;
            break;
         case  1:
            force_applied_volume=VOLUME_REAL;
            break;
         default:
            force_applied_volume=VOLUME_TICK;
            break;
         }
         Handle=iForce(symbol,StringToTimeframe(tf),force_period,force_ma_method,force_applied_volume);
      }
      //--- WPR
      if(applied==5)
         Handle=iWPR(symbol,StringToTimeframe(tf),int(m_ind_setting[5].GetValue()));
      //--- RSI
      if(applied==6)
         Handle=iRSI(symbol,StringToTimeframe(tf),int(m_ind_setting[4].GetValue()),PRICE_CLOSE);
      //--- Momentum
      if(applied==7)
         Handle=iMomentum(symbol,StringToTimeframe(tf),int(m_ind_setting[6].GetValue()),PRICE_CLOSE);
      //--- Custom
      if(applied==8)
      {
         string str[];
         double arr[];
         string parameters=m_custom_param.GetValue();
         StringSplit(parameters,',',str);
         if(ArraySize(str)>20)
         {
            if(m_lang_index==0)
               MessageBox("Количество параметров не должно быть больше 20!","Ошибка",MB_OK);
            else if(m_lang_index==1)
               MessageBox("The number of parameters should not be more than 20!","Error",MB_OK);
         }
         ArrayResize(arr,ArraySize(str));
         for(int i=0; i<ArraySize(str); i++)
            arr[i]=StringToDouble(str[i]);
         string name=m_custom_path.GetValue();
         Handle=GetCustomValue(StringToTimeframe(tf),name,arr);
      }
      //---
      if(applied>0)
      {
         if(Handle==INVALID_HANDLE)
         {
            if(m_lang_index==0)
               MessageBox("Не удалось получить хендл индикатора!","Ошибка",MB_OK);
            else if(m_lang_index==1)
               MessageBox("Failed to get indicator handle!","Error",MB_OK);
         }
         double arr[];
         int buffer=(applied==8)?int(m_custom_buffer.GetValue()):0;
         int copied=CopyBuffer(Handle,buffer,m_start_date,5,arr);
         //---
         int sl=0,tp=0;
         POINTS pat;
         if(copied<5)
            return(false);
         //--- Pattern search condition
         pat.A=arr[0];
         pat.B=arr[1];
         pat.C=arr[2];
         pat.D=arr[3];
         pat.E=arr[4];
         //--- If the pattern is found, check the signal
         if(GetPatternType(pat)==m_combobox1.GetListViewPointer().SelectedItemIndex())
         {
            m_start_date=IndexToDate(m_start_date,StringToTimeframe(tf),5);
            return(true);
         }
         return(false);
      }
      return(false);
   }
   return(false);
}
A ideia do método está na sequência predefinida de ações:
- Verifica se algum sinal de compra é permitido, bem como o sinal específico.
- Verifica o array de dados, à qual os padrões serão aplicados.
- Prepara os dados para busca e procura o padrão especificado usando o método GetPatternType().
2. Métodos para processar o sinal encontrado CalculateBuyDeals() e CalculateSellDeals().
//+------------------------------------------------------------------+
//|                                                                  |
//+------------------------------------------------------------------+
void CProgram::CalculateBuyDeals(const string symbol,datetime start)
{
   MqlRates rt[];
   int TP=int(m_takeprofit1.GetValue());
   int SL=int(m_stoploss1.GetValue());
   string tf=m_timeframe1.GetListViewPointer().SelectedItemText();
   int copied=CopyRates(symbol,StringToTimeframe(tf),m_start_date,m_end_date,rt);
   double deal_price=iOpen(symbol,StringToTimeframe(tf),copied);
   for(int j=0; j<copied; j++)
   {
      if((iHigh(symbol,StringToTimeframe(tf),copied-j)-deal_price)/SymbolInfoDouble(symbol,SYMBOL_POINT)>=TP)
      {
         m_report.profit_trades++;
         m_report.profit+=TP;
         m_report.long_trades++;
         m_report.total_trades++;
         m_start_date=IndexToDate(m_start_date,StringToTimeframe(tf),j);
         return;
      }
      else if((deal_price-iLow(symbol,StringToTimeframe(tf),copied-j))/SymbolInfoDouble(symbol,SYMBOL_POINT)>=SL)
      {
         m_report.loss_trades++;
         m_report.profit-=SL;
         m_report.long_trades++;
         m_report.total_trades++;
         m_start_date=IndexToDate(m_start_date,StringToTimeframe(tf),j);
         return;
      }
   }
   m_start_date=m_end_date;
}
//+------------------------------------------------------------------+
//|                                                                  |
//+------------------------------------------------------------------+
void CProgram::CalculateSellDeals(const string symbol,datetime start)
{
   MqlRates rt[];
   int TP=int(m_takeprofit2.GetValue());
   int SL=int(m_stoploss2.GetValue());
   string tf=m_timeframe1.GetListViewPointer().SelectedItemText();
   int copied=CopyRates(symbol,StringToTimeframe(tf),m_start_date,m_end_date,rt);
   double deal_price=iOpen(symbol,StringToTimeframe(tf),copied);
   for(int j=0; j<copied; j++)
   {
      if((deal_price-iLow(symbol,StringToTimeframe(tf),copied-j))/SymbolInfoDouble(symbol,SYMBOL_POINT)>=TP)
      {
         m_report.profit_trades++;
         m_report.profit+=TP;
         m_report.short_trades++;
         m_report.total_trades++;
         m_start_date=IndexToDate(m_start_date,StringToTimeframe(tf),j);
         return;
      }
      else if((iHigh(symbol,StringToTimeframe(tf),copied-j)-deal_price)/SymbolInfoDouble(symbol,SYMBOL_POINT)>=SL)
      {
         m_report.loss_trades++;
         m_report.profit-=SL;
         m_report.short_trades++;
         m_report.total_trades++;
         m_start_date=IndexToDate(m_start_date,StringToTimeframe(tf),j);
         return;
      }
   }
   m_start_date=m_end_date;
}
Sua tarefa é manipular o sinal encontrado e registrar estatísticas, com base nas quais o Relatório será gerado.
3. O método PrintReport(), que gera resultados de teste.
//+------------------------------------------------------------------+
//|                                                                  |
//+------------------------------------------------------------------+
void CProgram::PrintReport(void)
{
   if(m_lang_index==0)
   {
      string report_label[6]=
      {
         "Всего трейдов: ","Короткие трейды: ","Прибыльные трейды: ",
         "Прибыль в пунктах: ","Длинные трейды: ","Убыточные трейды: "
      };
      //---
      m_report_text[0].LabelText(report_label[0]+string(m_report.total_trades));
      m_report_text[1].LabelText(report_label[1]+string(m_report.short_trades));
      m_report_text[2].LabelText(report_label[2]+string(m_report.profit_trades));
      m_report_text[3].LabelText(report_label[3]+string(m_report.profit));
      m_report_text[4].LabelText(report_label[4]+string(m_report.long_trades));
      m_report_text[5].LabelText(report_label[5]+string(m_report.loss_trades));
   }
   else
   {
      string report_label[6]=
      {
         "Total trades: ","Short Trades: ","Profit Trades: ",
         "Profit in points: ","Long Trades: ","Loss Trades: "
      };
      //---
      m_report_text[0].LabelText(report_label[0]+string(m_report.total_trades));
      m_report_text[1].LabelText(report_label[1]+string(m_report.short_trades));
      m_report_text[2].LabelText(report_label[2]+string(m_report.profit_trades));
      m_report_text[3].LabelText(report_label[3]+string(m_report.profit));
      m_report_text[4].LabelText(report_label[4]+string(m_report.long_trades));
      m_report_text[5].LabelText(report_label[5]+string(m_report.loss_trades));
   }
   Update(true);
}
Exibe os dados de teste no aplicativo. Assim, finalizamos com a exibição do algoritmo do aplicativo.
Demonstração e exemplo de operação do construtor de estratégia
Como exemplo, eu decidi gravar um pequeno vídeo, que mostra a operação do contrutor de estratégia.
Conclusão
O arquivo anexado abaixo contém todos os arquivos descritos corretamente organizados em pastas. Para uma operação correta, você deve salvar a pasta MQL5 na pasta raiz da plataforma. Para abrir o diretório raiz da plataforma, onde a pasta MQL5 está localizada, pressione a combinação de teclas Ctrl+Shift+D na plataforma MetaTrader 5 ou use o menu de contexto como é exibido na Fig. 7 abaixo.
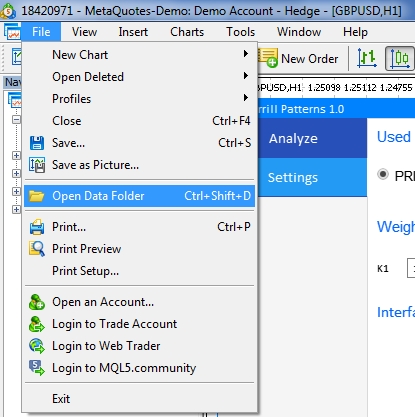
Fig. 14. Abrindo a pasta MQL5 no diretório raiz da plataforma MetaTrader 5