マルチ通貨システム エキスパートアドバイザーの作成
Maxim Khrolenko | 24 11月, 2015
イントロダクション
一つ以上のトレーディングシンボルをトレードし、複数の戦略を用いるトレーダーがいると信じています。このアプローチは潜在的に利益を拡大させるだけではなく、効果的な資金管理におけるリスクを最小限にします。エキスパートアドバイザーを作成する際は、プログラムの戦略の効果をチェックする上での最初のステップは、最適な入力パラメーターを決定するための最適化です。
パラメーター値が特定されることで、エキスパートアドバイザーはトレードの準備が完了します。しかしながら、未だ答えられていない重要な質問が残っています。もしトレーダーがすべての戦略を一つのエキスパートアドバイザーに詰め込めば、どのようなテスト結果を得ることができるのでしょうか?いくつかのシンボルや戦略における減少は重なり合い、総合的な減少や証拠金請求という結果につながると、驚きとともに気づくでしょう。
この記事は、この重要な質問に対する答えを発見させてくれるマルチ通貨システムエキスパートアドバイザーの作成のコンセプトを紹介します。
1. エキスパートアドバイザーのストラクチャー
一般的に、エキスパートアドバイザーのストラクチャーは以下の通りです:
図1. マルチ通貨システムエキスパートアドバイザーのストラクチャー
ご覧の通り、そのプログラムはforループに基づいています。それぞれの戦略は、ループにて調整され、各反復はそれぞれのシンボルを個別にトレードすることを担います。ループ内のストラテジーの回数を調整することができます。そのようなプログラムを「処理」できる十分なリソースを持ったコンピューターがあることが重要です。
MetaTrader 5のトレードされるシンボルにつき一つのポジションがあることに注意しましょう。そのようなポジションは実行された買い・売り注文注文の合計を表します。したがって、一つのシンボルにおけるマルチ戦略テストの結果は同じシンボルにおける同じ戦略の個別のテスト結果の合計と一致しません。
エキスパートアドバイザーのストラクチャーを詳しく見るため、二つのシンボルをトレードする2つの戦略を取得します。
戦略A:
- 買い:Low価格に基づいて計算されたBollinger Bandsインジケーターの低い番にAsk価格が達している。
クロージング: BId価格が、Hign価格に基づいて計算されたBolllinger Bandsのバンド価格に達している。 - 売り: Bid価格がHigh価格に基づいて計算されたBollinger Bandsの上バンドに達している。
クロージング: Ask価格がLow価格に基づいて計算されたBollinger Bandsインジケーターの上バンドに達している。 - 制限:特定のバーにおいて、一つの取引しか実行できません。
戦略 В:
- 買い: 手前のバーが下り気味で(クローズ < オープン)、Ask価格が前のバーのHighに達している。
クロージング: ストップロスか利食いによる - Sell:前のバーが上がり気味(クローズ > オープン)であり、Bid価格が前のバーのLowに達している
クロージング: ストップロスか利食いによる - 制限:特定のバーにおいて、一つの取引しか実行できません。
エキスパートアドバイザーがテストされる際に基づくシンボルにおける新しいティックから離れるために、マルチ通貨モードでのトレーディングに関してOnTimer()関数を使用することが望ましいです。
このため、エキスパートアドバイザーを初期化する際に、EventSetTimer()関数を用いてプログラムの計算の呼び出しのためのイベントを生成する頻度を明記し、EventKillTimer()関数を用いてターミナルにイベントの生成の停止を命令します;
// Include standard libraries
// Create external parameters
// Create arrays, variables, indicator handles, etc.

//--- Initialization of the Expert Advisor
int OnInit()
  {
   //--- Set event generation frequency
   EventSetTimer(1); // 1 second
   // ...
   return(0);
  }
void OnTimer()
  {
   // ...
  }
//--- Deinitialization of the Expert Advisor
void OnDeinit(const int reason)
  {
   //--- Stop event generation
   EventKillTimer();
   // ...
  }
EventSetTimer()の代わりに、EventSetMillisecondTimer()を使うことができ、 頻度がミリ秒単位で設定されていますが、頻度プログラムの計算の呼び出しによって間違って使用してはいけません。
アカウント、ポジションシンボルの設定、トレーディング昨日へのアクセスのため、 CAccountInfo、CPositionInfo、CSymbolInfoやCTradeクラスを用いいます。エキスパートアドバイザーにそれらを加えましょう。
//--- Include standard libraries
#include <Trade\AccountInfo.mqh>
#include <Trade\PositionInfo.mqh>
#include <Trade\SymbolInfo.mqh>
#include <Trade\Trade.mqh>
エキスパートアドバイザーはforループに基づいてるため、外部パラメーターの配列を作成する必要があります。まずそれぞれの戦略におけるシンボルの数に等しい定数を作成しましょう。
//--- Number of traded symbols for each strategy
#define Strategy_A 2
#define Strategy_B 2
次に外部パラメーターを作成します。定数を用いて、それらがコピーされる配列のサイズを決定します。さらに、インジケーターハンドルやその他のグローバル変数を作成します。
戦略Aのシンボルに関する例が以下に紹介されています。
//------------------- External parameters of strategy A
input string          Data_for_Strategy_A="Strategy A -----------------------";
//--- Symbol 0
input string          Symbol_A0      = "EURUSD";   // Symbol
input bool            IsTrade_A0     = true;       // Permission for trading
//--- Bollinger Bands (BB) parameters
input ENUM_TIMEFRAMES Period_A0      = PERIOD_H1;  // ВВ period
input uint            BBPeriod_A0    = 20;         // Period for calculation of the moving average of BB
input int             BBShift_A0     = 0;          // Horizontal shift of ВВ
input double          BBDeviation_A0 = 2.0;        // Number of standard deviations of BB
//...
//--- General parameters of strategy A
input double          DealOfFreeMargin_A = 1.0;    // Percent of free margin for a deal
input uint            MagicNumber_A      = 555;    // Magic number
input uint            Slippage_A         = 100;    // Permissible slippage for a deal
//...
//------------- Set variables of strategy A -----
//--- Arrays for external parameters
string          Symbol_A[Strategy_A];
bool            IsTrade_A[Strategy_A];
ENUM_TIMEFRAMES Period_A[Strategy_A];
int             BBPeriod_A[Strategy_A];
int             BBShift_A[Strategy_A];
double          BBDeviation_A[Strategy_A];
//--- Arrays for global variables
double          MinLot_A[Strategy_A],MaxLot_A[Strategy_A];
double          Point_A[Strategy_A],ContractSize_A[Strategy_A];
uint            DealNumber_A[Strategy_A];
datetime        Locked_bar_time_A[Strategy_A],time_arr_A[];
//--- Indicator handles
int             BB_handle_high_A[Strategy_A];
int             BB_handle_low_A[Strategy_A];
//--- Arrays for indicator values
double          BB_upper_band_high[],BB_lower_band_high[];
double          BB_upper_band_low[],BB_lower_band_low[];
//--- Class
CTrade          Trade_A;
//...
//--- Set global variables for all strategies
long            Leverage;
//--- Classes
CAccountInfo    AccountInfo;
CPositionInfo   PositionInfo;
CSymbolInfo     SymbolInfo;
特定のシンボルにおけるトレーディングを停止できるよう、forツープの初めに配置されるBoolean変数IsTrade_A0を作成しました。
2. エキスパートアドバイザーの初期化
まずは、レバレッジなどすべての戦略において必要となる値を取得しましょう。レバレッジはトレーディングアカウントに適用され、戦略やシンボルに関連しないので、配列に値をコピーする必要はありません。
//--- Get the leverage for the account
   Leverage=AccountInfo.Leverage();
外部変数を配列にコピーします。
//--- Copy external variables to arrays
   Symbol_A[0]     =Symbol_A0;
   IsTrade_A[0]    =IsTrade_A0;
   Period_A[0]     =Period_A0;
   BBPeriod_A[0]   =(int)BBPeriod_A0;
   BBShift_A[0]    =BBShift_A0;
   BBDeviation_A[0]=BBDeviation_A0;
外部パラメーターが変換を要する種類によって定義されていれば、配列にコピーする際により便利な方法で実行されます。
この場合、BBPeriod_A0が uintとしてユーザーが負の値を設定しないよう作成されたとわかります。ここでは、それをintに変換し、intとして作成された配列にコピーします。さもなければ、コンパイラがインジケーターハンドルにuint型のパラメーターを挿入しようとした時警告を発します。
トレードされるシンボルがMarket Watchにて使用できるか、一つの戦略において一回以上使用されているかを見てみましょう。
//--- Check for the symbol in the Market Watch
   for(int i=0; i<Strategy_A; i++)
     {
      if(IsTrade_A[i]==false) continue;
      if(IsSymbolInMarketWatch(Symbol_A[i])==false)
        {
         Print(Symbol_A[i]," could not be found on the server!");
         ExpertRemove();
        }
     }

//--- Check whether the symbol is used more than once
   if(Strategy_A>1)
     {
      for(int i=0; i<Strategy_A-1; i++)
        {
         if(IsTrade_A[i]==false) continue;
         for(int j=i+1; j<Strategy_A; j++)
           {
            if(IsTrade_A[j]==false) continue;
            if(Symbol_A[i]==Symbol_A[j])
              {
               Print(Symbol_A[i]," is used more than once!");
               ExpertRemove();
              }
           }
        }
     }
//--- The IsSymbolInMarketWatch() function
bool IsSymbolInMarketWatch(string f_Symbol)
  {
   for(int s=0; s<SymbolsTotal(false); s++)
     {
      if(f_Symbol==SymbolName(s,false))
         return(true);
     }
   return(false);
  }
シンボルが正しく選択された場合、それぞれにおける入力パラメーターでのエラーのチェックは、インジケーターハンドルを作成し、ロットの計算に必要なデータを取得し、特定の戦略により定義されるその他のことを行います。
forループの中に上記のアクションを実装します。
//--- General actions
   for(int i=0; i<Strategy_A; i++)
     {
      if(IsTrade_A[i]==false) continue;
      //--- Check for errors in input parameters
      //...
      //--- Set indicator handles
      BB_handle_high_A[i]=iBands(Symbol_A[i],Period_A[i],BBPeriod_A[i],BBShift_A[i],BBDeviation_A[i],
                                 PRICE_HIGH);
      if(BB_handle_high_A[i]<0)
        {
         Print("Failed to create a handle for Bollinger Bands based on High prices for ",Symbol_A[i]," . Handle=",INVALID_HANDLE,
               "\n Error=",GetLastError());
         ExpertRemove();
        }
      //...
      //--- Calculate data for the Lot
      //--- set the name of the symbol for which the information will be obtained
      SymbolInfo.Name(Symbol_A[i]);
      //--- minimum and maximum volume size in trading operations
      MinLot_A[i]=SymbolInfo.LotsMin();
      MaxLot_A[i]=SymbolInfo.LotsMax();
      //--- point value
      Point_A[i]=SymbolInfo.Point();
      //--- contract size
      ContractSize_A[i]=SymbolInfo.ContractSize();

      //--- Set some additional parameters
     }
次にCTradeクラスのTrade_Aを用いて戦略Aのトレードにおけるパラメーターを設定します。
//--- Set parameters for trading operations
//--- set the magic number
   Trade_A.SetExpertMagicNumber(MagicNumber_A);
//--- set the permissible slippage in points upon deal execution
   Trade_A.SetDeviationInPoints(Slippage_A);
//--- order filling mode, use the mode that is allowed by the server
   Trade_A.SetTypeFilling(ORDER_FILLING_RETURN);
//--- logging mode, it is advisable not to call this method as the class will set the optimal mode by itself
   Trade_A.LogLevel(1);
//--- the function to be used for trading: true - OrderSendAsync(), false - OrderSend().
   Trade_A.SetAsyncMode(true);
同じ手続きがそれぞれの戦略において繰り返されます。
- 外部パラメーターを配列にコピーします;
- シンボルが正しく選択されたかチェックします;
- エラーをチェックし、インジケーターハンドルを設定、ロットのデータや特定の戦略において必要なすべての計算を行います;
- トレーディングにおけるパラメーターの設定を行います。
最後に、同じシンボルがいくつかの戦略において使用されるかをチェックすると良いでしょう(二つの戦略における例が以下に紹介されています。)
//--- Check whether one and the same symbol is used in several strategies
   for(int i=0; i<Strategy_A; i++)
     {
      if(IsTrade_A[i]==false) continue;
      for(int j=0; j<Strategy_B; j++)
        {
         if(IsTrade_B[j]==false) continue;
         if(Symbol_A[i]==Symbol_B[j])
           {
            Print(Symbol_A[i]," is used in several strategies!");
            ExpertRemove();
           }
        }
     }
3. "For" ループのトレーディング
OnTimer()関数の中のforループのフレームワークは以下の通りです;
void OnTimer()
  {
//--- Check if the terminal is connected to the trade server
   if(TerminalInfoInteger(TERMINAL_CONNECTED)==false) return;

//--- Section A: Main loop of the FOR operator for strategy A -----------
   for(int A=0; A<Strategy_A; A++)
     {
      //--- A.1: Check whether the symbol is allowed to be traded
      if(IsTrade_A[A]==false)
         continue; // terminate the current FOR iteration

     }

//--- Section В: Main loop of the FOR operator for strategy В -----------
   for(int B=0; B<Strategy_B; B++)
     {
      //--- B.1: Check whether the symbol is allowed to be traded
      if(IsTrade_B[B]==false)
         continue; // terminate the current FOR iteration

     }
  }
もしシングルストラテジーに基づく、シングルシンボルエキスパートアドバイザーはすべての計算が終了される条件を持っており、return演算子を用います。今回の場合、現在の反復を終了し、次のシンボル反復に進む必要があります。このためにcontinue演算子を用いるのがベストです。
後続の計算を終了する条件を持つforループ付きの戦略を追加することでマルチ戦略エキスパートアドバイザーを向上するのであれば、以下のパターンを使用できます;
//--- Section N: Main loop of the FOR operator for strategy N -----------
for(int N=0; N<Strategy_N; N++)
  {

   //...
   bool IsInterrupt=false;
   for(int i=0; i<Number; i++)
     {
      if(...) // terminate all calculations
        {
         IsInterrupt=true;
         break;
        }
     }
   if(IsInterrupt=true)
      continue; // terminate the current FOR iteration
   //...

  }
forループのフレームワークを作成した後、別のEAのコードを挿入し、配列要素といくつかの変数を変換します。
例えば、すでに定義されている変数_SymbolからSymbol_A[i]に、_PointからPoint_A[i]に変更します。これらの変数の値は、特定のシンボルにおいては典型的であり、初期化しすぐ配列にコピーされます。
インジケーターの値を見つけましょう:
 //--- A.3: Lower band of BB calculated based on High prices
 if(CopyBuffer(BB_handle_high_A[A],LOWER_BAND,BBShift_A[A],1,BB_lower_band_high)<=0)
    continue; // terminate the current FOR iteration
 ArraySetAsSeries(BB_lower_band_high,true);
買いポジションのクロージングの実装のため、以下のコードを記述します;
 //--- A.7.1: Calculate the current Ask and Bid prices
 SymbolInfo.Name(Symbol_A[A]);
 SymbolInfo.RefreshRates();
 double Ask_price=SymbolInfo.Ask();
 double Bid_price=SymbolInfo.Bid();

 if(PositionSelect(Symbol_A[A]))
   {
    //--- A.7.2: Closing a BUY position
    if(PositionInfo.PositionType()==POSITION_TYPE_BUY)
      {
       if(Bid_price>=BB_lower_band_high[0] || DealNumber_A[A]==0)
         {
          if(!Trade_A.PositionClose(Symbol_A[A]))
            {
             Print("Failed to close the Buy ",Symbol_A[A]," position. Code=",Trade_A.ResultRetcode(),
                   " (",Trade_A.ResultRetcodeDescription(),")");
             continue; // terminate the current FOR iteration
            }
          else
            {
             Print("The Buy ",Symbol_A[A]," position closed successfully. Code=",Trade_A.ResultRetcode(),
                   " (",Trade_A.ResultRetcodeDescription(),")");
             continue; // terminate the current FOR iteration
            }
         }
      }

    //...
   }
買いポジションのオープン:
 //--- A.9.1: for a Buy
 if(Ask_price<=BB_lower_band_low[0])
   {
    //...

    //--- A.9.1.3: Execute a deal
    if(!Trade_A.Buy(OrderLot,Symbol_A[A]))
      {
       Print("The Buy ",Symbol_A[A]," has been unsuccessful. Code=",Trade_A.ResultRetcode(),
             " (",Trade_A.ResultRetcodeDescription(),")");
       continue; // terminate the current FOR iteration
      }
    else
      {
       Print("The Buy ",Symbol_A[A]," has been successful. Code=",Trade_A.ResultRetcode(),
             " (",Trade_A.ResultRetcodeDescription(),")");
       continue; // terminate the current FOR iteration
      }
   }
タイマーイベントの生成を終了し、インジケーターハンドルを削除することを忘れないでください。
4. テスト結果
エキスパートアドバイザーが準備できれば、個別にそれぞれの戦略とシンボルをテストし、それらを同時にトレーディングする際にテストモードにて取得されたテスト結果を比較します。
ユーザーはすでに入力パラメーターの最適値を特定していると想定しています。
以下はストラテジーテスターの設定です;

図2. ストラテジーテスター設定
戦略A結果、EURUSD:
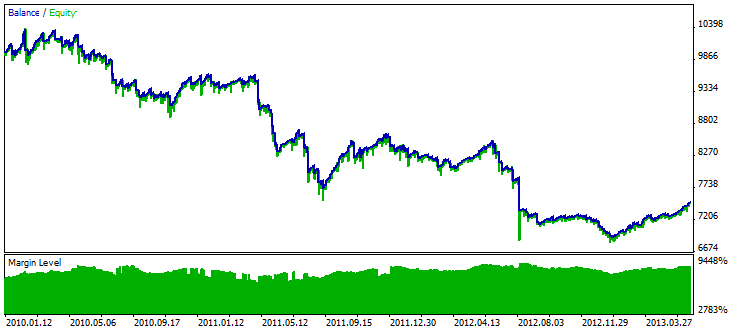
図3. 戦略Aテスト結果, EURUSD
戦略A結果, GBPUSD:
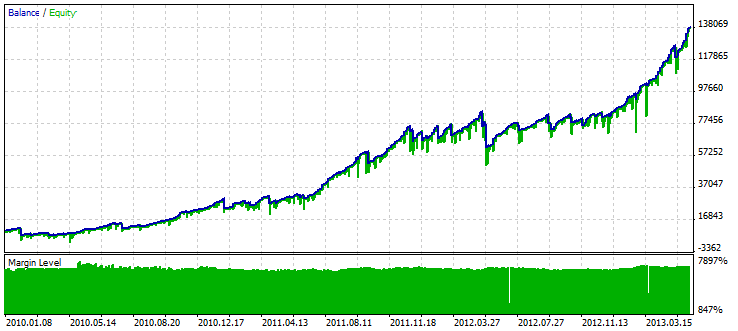
図4. 戦略Aテスト結果, GBPUSD
戦略B結果, AUDUSD:
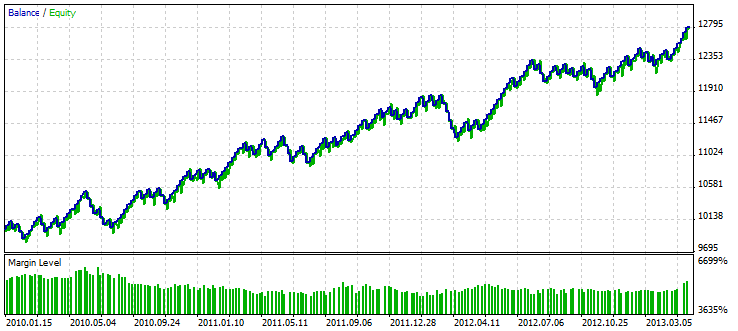
図5. 戦略Вテスト結果, AUDUSD
戦略B結果, EURJPY:
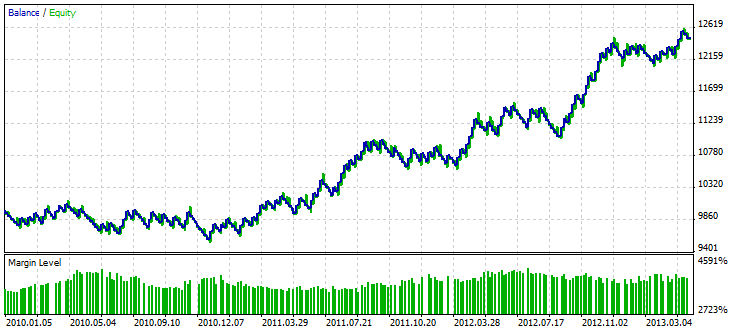
図. 6. 戦略Вテスト結果, EURJPY
すべてのストラテジーとシンボルのテスト結果:
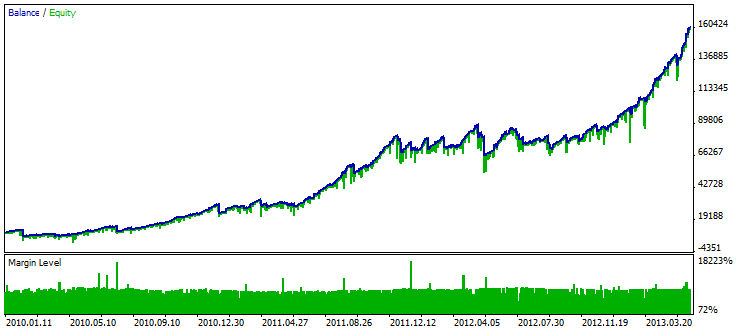
図 7. すべてのストラテジーとシンボルのテスト結果
結論
いかなる戦略も実行できるマルチ通貨システム エキスパートアドバイザーのストラクチャーを取得することができました。
そのようなエキスパートアドバイザーはあなたの全ての戦略を用いてトレーディングの効率性を高めることでしょう。エキスパートアドバイザー一つのみ、一つのアカウントで稼働できる場合でも便利であると証明されています。エキスパートアドバイザーのソースコードは、上記の内容を学習の手助けとなるようこの記事に添付されています。