メリルパターンに基づくストラテジービルダー
Alexander Fedosov | 24 1月, 2020
目次
イントロダクション
前回の記事では、通貨シンボルチャートの価格値や標準MetaTrader5インジケータの値(ATR、WPR、CCI、RSIなど)など、さまざまなデータにメリルパターンを適用することを考察しました。 グラフィカルインターフェイスは、このアイデアを探求するために開発されました。 このインターフェイスの主な目的は、効率的なパターン使用メソッドをテストして見つけることです。 さらに、成功した構成は、トレード戦略に組み込まれ、テストする必要があります。 この記事では、トレード戦略を構築し、テストするための基本的なツールキットを開発します。
タスク ステートメントとアプリケーション プロトタイプ
アプリケーションの開発を開始する前に、必要な機能とインターフェイス要素の一覧を決定します。 まず、次の 2 つのセクションを定義します。
- [コンストラクタ] タブ
- [設定] タブ
[コンストラクタ]タブには、トレード戦略を形成するために必要なインタフェース要素のメインセットが表示されます。 すべての基本的な要素を考えてみましょう。
- シンボル表は、ターミナルの [マーケットウォッチ] タブで使用できるシンボルの完全なリストで構成されます。
- フィルターオプションシンボル テーブルの場合は、必要なシンボル グループを検索できます。
- 売買シグナルを生成するための2つの同一のセクション. このセクションには同じ要素が含まれているため、以下に示すセクションの説明は 1 つだけです。
- テストの日付範囲。
- 現在の時間枠の選択。
- [コンストラクタ]タブの直近のセクションは、設定されたトレード戦略に関連するテスト結果を含むブロックです。
シグナル生成セクションを考えてみましょう。
- メリルパターンのセットから選択されたパターン。
- パターンを適用できる 3 つのシグナルのセット。 各シグナルを無効にすることができます。 つまり、シグナルが 1 つだけ選択されている場合、相場参入はこのシグナルに基づいて実行されます。 さらにシグナルが選択されている場合、インプットはいずれかによって実行されます。 メリルパターンは、インジケータだけでなく、価格に適用することができます。
- テイクプロフィットと ストップロス を設定します。
[設定] タブは、標準のインジケータ パラメータに使用され、カスタム インジケータをアップロードできます。
上記で指定した目的の機能に基づいて、アプリケーションのプロトタイプを作成します。 次の図1 は、[コンストラクタ] タブのスキームとインターフェイス要素のセットを示します。
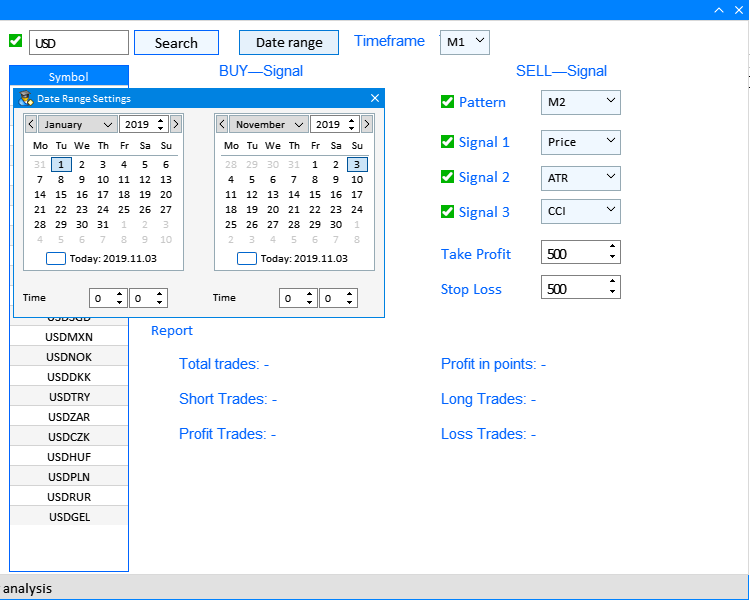
図1 コンストラクタタブのプロトタイプとインタフェース要素。
また、[設定] タブのプロトタイプを作成し、このタブで要素を配置します。
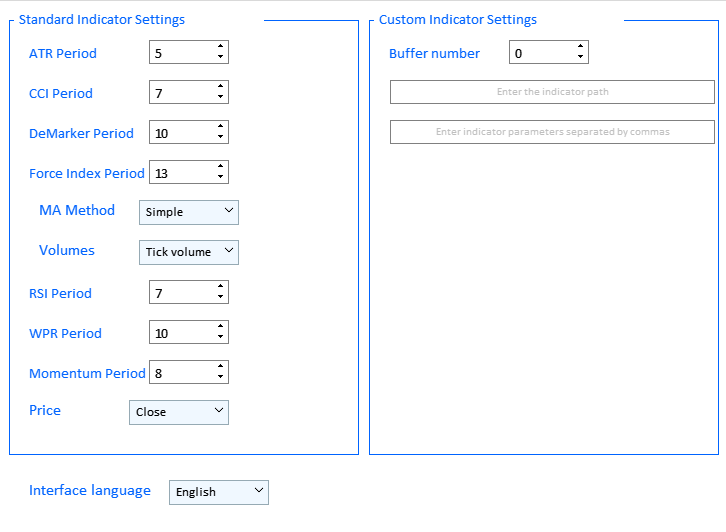
図2 [設定]タブのプロトタイプとインタフェース要素
2番目のサブセクション、カスタム インジケータの設定、およびインプットフィールドに注意してください。 正しい値のインプットとサードパーティのインジケータの操作は、iCustom 関数の構文に対応します。 まず第一に、インジケータパスの正しいインプットに関するものです。
名前
[in] ファイル数を指定します。 インジケータルートディレクトリ (MQL5/Indicators/) に対する相対パスを含むカスタムインジケータ名です。 インジケータがサブディレクトリにある場合(MQL5/Indicators/examplesなど)、名前は"Exampleindicator_name" (区切り文字として単一の円シンボルの代わりに二重円シンボルが必要です)に応じます。
いずれかのシグナルにサードパーティのインジケータを適用するには、次の図3 に示すように、いずれかのシグナルのドロップダウン リストで [カスタム] を選択します。
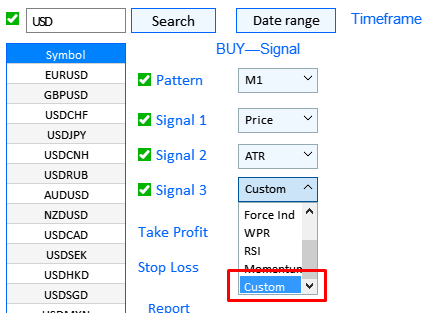
図3 カスタムインジケータの使用の選択
ストラテジーコンストラクタのセットアップと使用に関するアクションの完全なシーケンスについては、アプリケーションのソフトウェア実装後の記事で詳しく説明します。
テスト用の戦略ビルダーの実装
アプリケーションのグラフィカルインターフェイスの作成に進む前に、残りの要素が構築および開発される基本的な要素を決定しましょう。
アプリケーションには、メイン アプリケーション ウィンドウと日付範囲設定用のダイアログ ボックスの 2 つのウィンドウがあります。 このメイン ウィンドウには、[コンストラクタ] と [設定] の 2 つのタブがあります。 これを実装するために、メイン インターフェイス作成メソッド CreateGUI() は、次の 2 つのウィンドウ作成メソッドを組み合わせています。
- CreateWindow()はメイン ウィンドウを作成します。
- CreateDateSetting()によって[日付範囲の設定]ウィンドウが作成されます。
//+------------------------------------------------------------------+
//| Creates the graphical interface of the program                   |
//+------------------------------------------------------------------+
bool CProgram::CreateGUI(void)
{
//--- Creating a panel
   if(!CreateWindow("Merrill Constructor"))
      return(false);
//--- Creating a dialog window
   if(!CreateDateSetting())
      return(false);
//--- Finishing the creation of GUI
   CWndEvents::CompletedGUI();
   return(true);
}
//+------------------------------------------------------------------+
各メソッドの内容を考えてみましょう。 CreateDateSetting()メソッドは実装が簡単で、シンプルな要素があります。 このメソッドを通じて実装されるインターフェイス要素を図4 に示します。
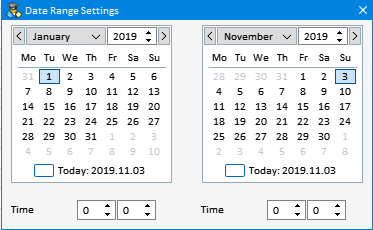
図4 [日付範囲の設定]ダイアログボックス
このウィンドウは、ダイアログ ボックスと、2 つのカレンダー要素と、開始時刻と終了時刻を設定するための 2 つの要素で構成されます。 この要素の内容を定義しました。 次に、CreateDate Setting()メソッド内で実装してみましょう。
//+------------------------------------------------------------------+
//| Creates a date range selection dialog box                        |
//+------------------------------------------------------------------+
bool CProgram::CreateDateSetting(void)
{
//--- Add the pointer to the window array
   CWndContainer::AddWindow(m_window[1]);
//--- Coordinates
   int x=m_date_range.X();
   int y=m_date_range.Y()+m_date_range.YSize();
//--- Properties
   m_window[1].XSize(372);
   m_window[1].YSize(230);
   m_window[1].WindowType(W_DIALOG);
   m_window[1].IsMovable(true);
//--- Creating the form
   if(!m_window[1].CreateWindow(m_chart_id,m_subwin,"",x,y))
      return(false);
//---
   if(!CreateCalendar(m_calendar1,m_window[1],10,25,D'01.01.2019',1))
      return(false);
   if(!CreateCalendar(m_calendar2,m_window[1],201,25,m_calendar2.Today(),1))
      return(false);
//---
   if(!CreateTimeEdit(m_time_edit1,m_window[1],10,200,"Time",1))
      return(false);
   if(!CreateTimeEdit(m_time_edit2,m_window[1],200,200,"Time",1))
      return(false);
//---
   return(true);
}
次に、メイン アプリケーション ウィンドウを実装する CreateWindow() メソッドに進みます。 メソッド構造は広範囲にわたるので、別々の主要なコンポーネントに分割してみましょう。 1 つ目は、ウィンドウ自体とその基本的な構造 (コンストラクタと設定) の 2 つのタブの作成です。
//+------------------------------------------------------------------+
//| Creates a form for controls                                      |
//+------------------------------------------------------------------+
bool CProgram::CreateWindow(const string caption_text)
{
#define VERSION " 1.0"
   color caption=C'0,130,255';
   int ygap=30;
//--- Add the pointer to the window array
   CWndContainer::AddWindow(m_window[0]);
//--- Properties
   m_window[0].XSize(900);
   m_window[0].YSize(600);
   m_window[0].FontSize(9);
   m_window[0].CloseButtonIsUsed(true);
   m_window[0].CollapseButtonIsUsed(true);
   m_window[0].CaptionColor(caption);
   m_window[0].CaptionColorHover(caption);
   m_window[0].CaptionColorLocked(caption);
//--- Creating the form
   if(!m_window[0].CreateWindow(m_chart_id,m_subwin,caption_text+VERSION,10,20))
      return(false);
//--- Tabs
   if(!CreateTabs(150,20))
      return(false);
コードのこの部分ではメイン ウィンドウが作成されますが、CreateTabs()メソッドは上記の 2 つのタブを追加します。
//+------------------------------------------------------------------+
//| Create a group with tabs                                         |
//+------------------------------------------------------------------+
bool CProgram::CreateTabs(const int x_gap,const int y_gap)
{
//--- Save the pointer to the main control
   m_tabs1.MainPointer(m_window[0]);
//--- Properties
   m_tabs1.IsCenterText(true);
   m_tabs1.PositionMode(TABS_LEFT);
   m_tabs1.AutoXResizeMode(true);
   m_tabs1.AutoYResizeMode(true);
   m_tabs1.AutoYResizeBottomOffset(25);
   m_tabs1.TabsYSize(40);
//--- Add tabs with the specified properties
   for(int i=0; i<ArraySize(m_tabs_names); i++)
      m_tabs1.AddTab(m_tabs_names[i],150);
//--- Creating a control
   if(!m_tabs1.CreateTabs(x_gap,y_gap))
      return(false);
//--- Add the object to the common array of object groups
   CWndContainer::AddToElementsArray(0,m_tabs1);
   return(true);
}
上記のプロトタイプでは、各タブの要素の内容を定義しました: コンストラクタ (図1) と設定 (図2)。 次に、タブに含まれる要素の実装について考えてみましょう。 [コンストラクタ] タブには多くの繰り返し要素型が含まれているため、メイン サブセクションと要素の実装に使用するメソッドの一覧のみを考慮します。
//---- Constructor tab
//--- Symbols filter
   if(!CreateSymbolsFilter(10,10))
      return(false);
   if(!CreateSymbolsTable(10,45))
      return(false);
//--- Working timeframe
   if(!CreateTextLabel(m_text_labels1[2],290,10,"Timeframe",0))
      return(false);
   if(!CreateTimeframe1(440,10))
      return(false);
//--- Date range
   if(!CreateButton(m_date_range,240,10))
      return(false);
//--- Text labels
   if(!CreateTextLabel(m_text_labels1[0],int(0.35*(m_window[0].XSize()-150)-100),10+ygap,"BUY—Signal",0))
      return(false);
   if(!CreateTextLabel(m_text_labels1[1],int(0.75*(m_window[0].XSize()-150)-100),10+ygap,"SELL—Signal",0))
      return(false);
//--- Pattern selection
   if(!PatternType1(int(0.35*(m_window[0].XSize()-150)-100),40+ygap,0))
      return(false);
   if(!CreateCheckBox(m_checkbox[0],int(0.35*(m_window[0].XSize()-150)-120),45+ygap,"Pattern"))
      return(false);
   if(!PatternType2(int(0.75*(m_window[0].XSize()-150)-100),40+ygap,0))
      return(false);
   if(!CreateCheckBox(m_checkbox[1],int(0.75*(m_window[0].XSize()-150)-120),45+ygap,"Pattern"))
      return(false);
//--- Selecting the application of patterns
   if(!AppliedType1(int(0.35*(m_window[0].XSize()-150)-100),80+ygap))
      return(false);
   if(!AppliedType2(int(0.35*(m_window[0].XSize()-150)-100),50+33*2+ygap))
      return(false);
   if(!AppliedType3(int(0.35*(m_window[0].XSize()-150)-100),50+33*3+ygap))
      return(false);
   if(!AppliedType4(int(0.75*(m_window[0].XSize()-150)-100),80+ygap))
      return(false);
   if(!AppliedType5(int(0.75*(m_window[0].XSize()-150)-100),50+33*2+ygap))
      return(false);
   if(!AppliedType6(int(0.75*(m_window[0].XSize()-150)-100),50+33*3+ygap))
      return(false);
//--- Signal checkboxes
   for(int i=2; i<8; i++)
   {
      if(i<5)
         if(!CreateCheckBox(m_checkbox[i],int(0.35*(m_window[0].XSize()-150)-120),50+35*(i-1)+ygap,"Signal "+string(i-1)))
            return(false);
      if(i>=5)
         if(!CreateCheckBox(m_checkbox[i],int(0.75*(m_window[0].XSize()-150)-120),50+35*(i-4)+ygap,"Signal "+string(i-4)))
            return(false);
   }
//--- Take Profit and Stop Loss settings
   if(!CreateEditValue(m_takeprofit1,int(0.35*(m_window[0].XSize()-150)-120),50+35*4+ygap,"Take Profit",500,0))
      return(false);
   if(!CreateEditValue(m_stoploss1,int(0.35*(m_window[0].XSize()-150)-120),50+35*5+ygap,"Stop Loss",500,0))
      return(false);
   if(!CreateEditValue(m_takeprofit2,int(0.75*(m_window[0].XSize()-150)-120),50+35*4+ygap,"Take Profit",500,0))
      return(false);
   if(!CreateEditValue(m_stoploss2,int(0.75*(m_window[0].XSize()-150)-120),50+35*5+ygap,"Stop Loss",500,0))
      return(false);
//--- Report
   if(!CreateReportFrame(m_frame[2],"",int(0.35*(m_window[0].XSize()-150)-120),60+35*6+ygap))
      return(false);
   for(int i=0; i<6; i++)
   {
      if(i<3)
         if(!CreateTextLabel(m_report_text[i],int(0.4*(m_window[0].XSize()-150)-120),60+35*(7+i)+ygap,"",0))
            return(false);
      if(i>=3)
         if(!CreateTextLabel(m_report_text[i],int(0.75*(m_window[0].XSize()-150)-120),60+35*(7+i-3)+ygap,"",0))
            return(false);
      m_report_text[i].IsCenterText(false);
   }
メイン インターフェイス パーツが実装する内容と、構成されるメソッドを見てみましょう。
1. シンボル フィルタ:
シンボルCreateSymbolsFilter()メソッドとCreateSymbolsTable()メソッドで構成されます。 次の要素を実装します。

図5 シンボルフィルタ
CreateSymbolsFilter()は、チェックボックスと検索ボタンを持つインプットフィールドを実装します。
//+------------------------------------------------------------------+
//| Creates a checkbox with the "Symbols filter" input field         |
//+------------------------------------------------------------------+
bool CProgram::CreateSymbolsFilter(const int x_gap,const int y_gap)
{
//--- Save the pointer to the main control
   m_symb_filter.MainPointer(m_tabs1);
//--- Attach to tab
   m_tabs1.AddToElementsArray(0,m_symb_filter);
//--- Properties
   m_symb_filter.CheckBoxMode(true);
   m_symb_filter.YSize(25);
   m_symb_filter.FontSize(11);
   m_symb_filter.XSize(200);
   m_symb_filter.GetTextBoxPointer().XGap(20);
   m_symb_filter.GetTextBoxPointer().XSize(100);
   m_symb_filter.GetTextBoxPointer().YSize(25);
   m_symb_filter.GetTextBoxPointer().AutoSelectionMode(true);
   m_symb_filter.SetValue("USD"); // "EUR,USD" "EURUSD,GBPUSD" "EURUSD,GBPUSD,AUDUSD,NZDUSD,USDCHF"
//--- Creating a control
   if(!m_symb_filter.CreateTextEdit("",x_gap,y_gap))
      return(false);
//--- Enable the checkbox
   m_symb_filter.IsPressed(true);
//--- Add the object to the common array of object groups
   CWndContainer::AddToElementsArray(0,m_symb_filter);
//---
   if(!CreateRequest(x_gap+125,y_gap))
      return(false);
   return(true);
}
CreateSymbolsTable()は、[マーケットウォッチ] ウィンドウからフィルタ処理された通貨シンボルを出力するテーブルを実装します。
//+------------------------------------------------------------------+
//| Creates a symbol table                                           |
//+------------------------------------------------------------------+
bool CProgram::CreateSymbolsTable(const int x_gap,const int y_gap)
{
#define ROWS1_TOTAL    1
//--- Save the pointer to the main control
   m_table_symb.MainPointer(m_tabs1);
//--- Attach to tab
   m_tabs1.AddToElementsArray(0,m_table_symb);
//--- Array of column widths
   int width[1]= {119};
//--- Array of text alignment in columns
   ENUM_ALIGN_MODE align[1]= {ALIGN_CENTER};
//--- Array of text offset along the X axis in the columns
   int text_x_offset[1]= {5};
//--- Properties
   m_table_symb.XSize(120);
   m_table_symb.TableSize(1,ROWS1_TOTAL);
   m_table_symb.ColumnsWidth(width);
   m_table_symb.TextAlign(align);
   m_table_symb.FontSize(10);
   m_table_symb.TextXOffset(text_x_offset);
   m_table_symb.ShowHeaders(true);
   m_table_symb.SelectableRow(true);
   m_table_symb.IsWithoutDeselect(true);
   m_table_symb.IsZebraFormatRows(clrWhiteSmoke);
   m_table_symb.AutoYResizeMode(true);
   m_table_symb.AutoYResizeBottomOffset(3);
   m_table_symb.HeadersColor(C'0,130,255');
   m_table_symb.HeadersColorHover(clrCornflowerBlue);
   m_table_symb.HeadersTextColor(clrWhite);
   m_table_symb.BorderColor(C'0,100,255');
//--- Creating a control
   if(!m_table_symb.CreateTable(x_gap,y_gap))
      return(false);
//--- Add the object to the common array of object groups
   CWndContainer::AddToElementsArray(0,m_table_symb);
   return(true);
}
2. タスク時間と "日付範囲" ボタン。
すべての要素は、テスト用のタスク時間枠の選択を実装します。 [日付範囲] ボタンをクリックすると、上記の適切なダイアログ ボックスが開きます。 CreateButton()メソッドは、ボタンを実装します。 CreateTextLabel()は適切なラベルを作成し、CreateTimeframe1()は時間枠の選択を実装します。 CreateButton()と、CreateTextLabel()は、さらに使用するユニバーサルメソッドです。 このコードはここで 1 回だけ使われます。 この要素は図6に別々に示されています:
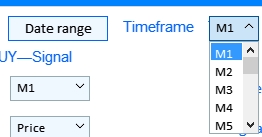
図6 日付範囲ボタンと手動の時間枠の選択。
//+------------------------------------------------------------------+
//| Creates a text label in the first tab                            |
//+------------------------------------------------------------------+
bool CProgram::CreateTextLabel(CTextLabel &text_label,const int x_gap,const int y_gap,string label_text,int tab)
{
//--- Save the window pointer
   text_label.MainPointer(m_tabs1);
//--- Attach to tab
   m_tabs1.AddToElementsArray(tab,text_label);
//---
   text_label.Font("Trebuchet");
   text_label.FontSize(11);
   text_label.XSize(200);
   text_label.LabelColor(C'0,100,255');
   text_label.IsCenterText(true);
//--- Creation of a button
   if(!text_label.CreateTextLabel(label_text,x_gap,y_gap))
      return(false);
//--- Add the element pointer to the data base
   CWndContainer::AddToElementsArray(0,text_label);
   return(true);
}
//+------------------------------------------------------------------+
//| Creates a button to show the date range selection window         |
//+------------------------------------------------------------------+
bool CProgram::CreateButton(CButton &button,const int x_gap,const int y_gap)
{
//--- Save the pointer to the main control
   button.MainPointer(m_tabs1);
//--- Attach to tab
   m_tabs1.AddToElementsArray(0,button);
//--- Properties
   button.XSize(100);
   button.YSize(25);
   button.FontSize(11);
   button.IsHighlighted(false);
   button.IsCenterText(true);
   button.BorderColor(C'0,100,255');
   button.BackColor(clrAliceBlue);
//--- Creating a control
   if(!button.CreateButton("Date range",x_gap,y_gap))
      return(false);
//--- Add the element pointer to the data base
   CWndContainer::AddToElementsArray(0,button);
   return(true);
}
CreateTimeframe1()メソッドは、使用可能なすべての時間枠を含むドロップダウンリストです。
//+------------------------------------------------------------------+
//|                                                                  |
//+------------------------------------------------------------------+
bool CProgram::CreateTimeframe1(const int x_gap,const int y_gap)
{
//--- Pass the object to the panel
   m_timeframe1.MainPointer(m_tabs1);
//--- Attach to tab
   m_tabs1.AddToElementsArray(0,m_timeframe1);
//--- Array of the item values in the list view
   string timeframe_names[21]=
   {
      "M1","M2","M3","M4","M5","M6","M10","M12","M15","M20","M30",
      "H1","H2","H3","H4","H6","H8","H12","D1","W1","MN"
   };
//--- Set properties before creation
   m_timeframe1.XSize(50);
   m_timeframe1.YSize(25);
   m_timeframe1.ItemsTotal(21);
   m_timeframe1.FontSize(12);
   m_timeframe1.LabelColor(C'0,100,255');
   CButton *but=m_timeframe1.GetButtonPointer();
   but.FontSize(10);
   but.XSize(50);
   but.BackColor(clrAliceBlue);
   but.XGap(1);
   m_timeframe1.GetListViewPointer().FontSize(10);
//--- Save the item values in the combobox list view
   for(int i=0; i<21; i++)
      m_timeframe1.SetValue(i,timeframe_names[i]);
//--- Get the list view pointer
   CListView *lv=m_timeframe1.GetListViewPointer();
//--- Set the list view properties
   lv.LightsHover(true);
   m_timeframe1.SelectItem(0);
//--- Creating a control
   if(!m_timeframe1.CreateComboBox("",x_gap,y_gap))
      return(false);
//--- Add the object to the common array of object groups
   CWndContainer::AddToElementsArray(0,m_timeframe1);
   return(true);
}
3. 売買シグナルのセクションとパターン選択要素のテキストラベル。
テキスト ラベルは、前に考えたCreateTextLabel()メソッドを使用して作成されます。 他の 2 つのメソッドは、テスト用のメリル パターンを選択するためのチェックボックスとドロップダウン メニューを実装します。

図7 セクションとパターン選択のテキストラベル。
CreateCheckBox()メソッドはパターンチェックボックスを作成します。
//+------------------------------------------------------------------+
//|                                                                  |
//+------------------------------------------------------------------+
bool CProgram::CreateCheckBox(CCheckBox &checkbox,const int x_gap,const int y_gap,const string text)
{
//--- Save the pointer to the main control
   checkbox.MainPointer(m_tabs1);
//--- Attach to tab
   m_tabs1.AddToElementsArray(0,checkbox);
//--- Properties
   checkbox.YSize(25);
   checkbox.GreenCheckBox(true);
   checkbox.IsPressed(true);
   checkbox.FontSize(12);
   checkbox.LabelColor(C'0,100,255');
   checkbox.LabelColorPressed(C'0,100,255');
//--- Creating a control
   if(!checkbox.CreateCheckBox(text,x_gap,y_gap))
      return(false);
//--- Add the element pointer to the data base
   CWndContainer::AddToElementsArray(0,checkbox);
   return(true);
}
メソッド パターンタイプ1() とパターンタイプ2()は同じです。
//+------------------------------------------------------------------+
//| Creates combobox 1                                               |
//+------------------------------------------------------------------+
bool CProgram::PatternType1(const int x_gap,const int y_gap,const int tab)
{
//--- Total number of the list items
#define ITEMS_TOTAL1 32
//--- Pass the object to the panel
   m_combobox1.MainPointer(m_tabs1);
//--- Attach to tab
   m_tabs1.AddToElementsArray(tab,m_combobox1);
//--- Array of the item values in the list view
   string pattern_names[ITEMS_TOTAL1]=
   {
      "M1","M2","M3","M4","M5","M6","M7","M8",
      "M9","M10","M11","M12","M13","M14","M15","M16",
      "W1","W2","W3","W4","W5","W6","W7","W8",
      "W9","W10","W11","W12","W13","W14","W15","W16"
   };
//--- Set properties before creation
   m_combobox1.XSize(200);
   m_combobox1.YSize(25);
   m_combobox1.ItemsTotal(ITEMS_TOTAL1);
   m_combobox1.GetButtonPointer().FontSize(10);
   m_combobox1.GetButtonPointer().BackColor(clrAliceBlue);
   m_combobox1.GetListViewPointer().FontSize(10);
//--- Save the item values in the combobox list view
   for(int i=0; i<ITEMS_TOTAL1; i++)
      m_combobox1.SetValue(i,pattern_names[i]);
//--- Get the list view pointer
   CListView *lv=m_combobox1.GetListViewPointer();
//--- Set the list view properties
   lv.LightsHover(true);
   m_combobox1.SelectItem(0);
//--- Creating a control
   if(!m_combobox1.CreateComboBox("",x_gap,y_gap))
      return(false);
//--- Add the object to the common array of object groups
   CWndContainer::AddToElementsArray(0,m_combobox1);
   return(true);
}
4. パターンとシグナルのチェックボックスの使用を選択します。
このインターフェイス ブロックは、買いシグナルと売りシグナルを設定するためのシグナルのセットで構成されます。 各ブロックは、1 ~ 3 個のシグナルのオプションのセレクタで構成され、インプット条件として使用できます。 CreateCheckBox() と AppliedTypeN()メソッドで構成されます。
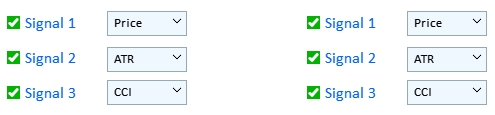
図8 パターンとシグナルチェックボックスの使用
メソッドの構造AppliedType1()—AppliedType6() は類似しており、パターンベースのシグナルを検索するデータ配列の選択を含むドロップダウンリストを表します。
//+------------------------------------------------------------------+
//|                                                                  |
//+------------------------------------------------------------------+
bool CProgram::AppliedType1(const int x_gap,const int y_gap)
{
//--- Pass the object to the panel
   m_applied1.MainPointer(m_tabs1);
//--- Attach to tab
   m_tabs1.AddToElementsArray(0,m_applied1);
//--- Array of the item values in the list view
   string pattern_names[9]=
   {
      "Price","ATR","CCI","DeMarker","Force Ind","WPR","RSI","Momentum","Custom"
   };
//--- Set properties before creation
   m_applied1.XSize(200);
   m_applied1.YSize(25);
   m_applied1.ItemsTotal(9);
   m_applied1.GetButtonPointer().FontSize(10);
   m_applied1.GetButtonPointer().BackColor(clrAliceBlue);
   m_applied1.GetListViewPointer().FontSize(10);
//--- Save the item values in the combobox list view
   for(int i=0; i<9; i++)
      m_applied1.SetValue(i,pattern_names[i]);
//--- Get the list view pointer
   CListView *lv=m_applied1.GetListViewPointer();
//--- Set the list view properties
   lv.LightsHover(true);
   m_applied1.SelectItem(0);
//--- Creating a control
   if(!m_applied1.CreateComboBox("",x_gap,y_gap))
      return(false);
//--- Add the object to the common array of object groups
   CWndContainer::AddToElementsArray(0,m_applied1);
   return(true);
}
5.テイクプロフィットと ストップロス の設定。
買いシグナルと売りシグナルにTPとSLを別々に設定できるインターフェイスセクション。 このレベルはポイントで設定されます。

図9 テイクプロフィットおよび ストップロス インプットフィールド
インプットフィールドを実装するには、ユニバーサル メソッドCreateEditValue()を使用します。
//+------------------------------------------------------------------+
//| Creates an input field                                           |
//+------------------------------------------------------------------+
bool CProgram::CreateEditValue(CTextEdit &text_edit,const int x_gap,const int y_gap,const string label_text,const int value,const int tab)
{
//--- Save the pointer to the main control
   text_edit.MainPointer(m_tabs1);
//--- Attach to tab
   m_tabs1.AddToElementsArray(tab,text_edit);
//--- Properties
   text_edit.XSize(210);
   text_edit.YSize(24);
   text_edit.LabelColor(C'0,100,255');
   text_edit.FontSize(12);
   text_edit.MaxValue(1000);
   text_edit.MinValue(10);
   text_edit.SpinEditMode(true);
   text_edit.SetValue((string)value);
   text_edit.GetTextBoxPointer().AutoSelectionMode(true);
   text_edit.GetTextBoxPointer().XGap(100);
//--- Creating a control
   if(!text_edit.CreateTextEdit(label_text,x_gap,y_gap))
      return(false);
//--- Add the object to the common array of object groups
   CWndContainer::AddToElementsArray(0,text_edit);
   return(true);
}
6. テスト結果とレポート。
このブロックは、テスト結果で構成されます。 上記で考慮したCreateTextLabel()メソッドを使用して実装されます。
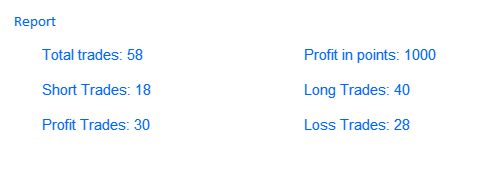
図10 レポート ブロック
[コンストラクタ] タブの実装について検討しました。 次に、 [設定] に進みましょう。
1. 標準インジケータパラメータ。
このセクションには、テストと分析に提供されるすべてのインジケータ設定があります。
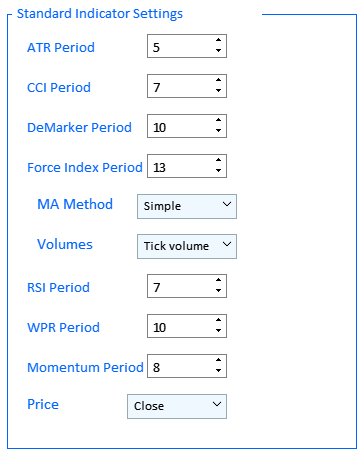
図11 標準インジケータ設定のブロック。
このブロックは、フレームを持つビジュアル セクションを作成する 3 つの CreateFrame() メソッドを使用して実装されます。 また、ここでは、インジケータパラメータCreateIndSetting()を作成するためのユニバーサルインプットフィールドメソッドとIndicatorSetting1()のセットを使用します — Ma メソッド、ボリューム、および価格パラメータのドロップダウンリストのIndicatorSetting4()メソッドです。
//+------------------------------------------------------------------+
//|                                                                  |
//+------------------------------------------------------------------+
bool CProgram::CreateFrame(CFrame &frame,const string text,const int x_gap,const int y_gap)
{
//--- Save the pointer to the main control
   frame.MainPointer(m_tabs1);
//--- Attach to tab
   m_tabs1.AddToElementsArray(1,frame);
//---
   frame.XSize(350);
   frame.YSize(500);
   frame.LabelColor(C'0,100,255');
   frame.BorderColor(C'0,100,255');
   frame.FontSize(11);
   frame.AutoYResizeMode(true);
   frame.AutoYResizeBottomOffset(100);
   frame.GetTextLabelPointer().XSize(250);
//--- Creating a control
   if(!frame.CreateFrame(text,x_gap,y_gap))
      return(false);
//--- Add the object to the common array of object groups
   CWndContainer::AddToElementsArray(0,frame);
   return(true);
}
//+------------------------------------------------------------------+
//|                                                                  |
//+------------------------------------------------------------------+
bool CProgram::IndicatorSetting1(const int x_gap,const int y_gap,const string text)
{
//--- Pass the object to the panel
   m_ind_set1.MainPointer(m_tabs1);
//--- Attach to tab
   m_tabs1.AddToElementsArray(1,m_ind_set1);
//--- Array of the item values in the list view
   string pattern_names[4]=
   {
      "Simple","Exponential","Smoothed","Linear weighted"
   };
//--- Set properties before creation
   m_ind_set1.XSize(200);
   m_ind_set1.YSize(25);
   m_ind_set1.ItemsTotal(4);
   m_ind_set1.FontSize(12);
   m_ind_set1.LabelColor(C'0,100,255');
   CButton *but=m_ind_set1.GetButtonPointer();
   but.FontSize(10);
   but.XSize(100);
   but.BackColor(clrAliceBlue);
   m_ind_set1.GetListViewPointer().FontSize(10);
//--- Save the item values in the combobox list view
   for(int i=0; i<4; i++)
      m_ind_set1.SetValue(i,pattern_names[i]);
//--- Get the list view pointer
   CListView *lv=m_ind_set1.GetListViewPointer();
//--- Set the list view properties
   lv.LightsHover(true);
   m_ind_set1.SelectItem(0);
//--- Creating a control
   if(!m_ind_set1.CreateComboBox(text,x_gap,y_gap))
      return(false);
//--- Add the object to the common array of object groups
   CWndContainer::AddToElementsArray(0,m_ind_set1);
   return(true);
}
//+------------------------------------------------------------------+
//|                                                                  |
//+------------------------------------------------------------------+
bool CProgram::IndicatorSetting3(const int x_gap,const int y_gap,const string text)
{
//--- Pass the object to the panel
   m_ind_set3.MainPointer(m_tabs1);
//--- Attach to tab
   m_tabs1.AddToElementsArray(1,m_ind_set3);
//--- Array of the item values in the list view
   string pattern_names[2]=
   {
      "Tick volume","Real Volume"
   };
//--- Set properties before creation
   m_ind_set3.XSize(200);
   m_ind_set3.YSize(25);
   m_ind_set3.ItemsTotal(2);
   m_ind_set3.FontSize(12);
   m_ind_set3.LabelColor(C'0,100,255');
   CButton *but=m_ind_set3.GetButtonPointer();
   but.FontSize(10);
   but.XSize(100);
   but.BackColor(clrAliceBlue);
   m_ind_set3.GetListViewPointer().FontSize(10);
//--- Save the item values in the combobox list view
   for(int i=0; i<2; i++)
      m_ind_set3.SetValue(i,pattern_names[i]);
//--- Get the list view pointer
   CListView *lv=m_ind_set3.GetListViewPointer();
//--- Set the list view properties
   lv.LightsHover(true);
   lv.ItemYSize(20);
   lv.YSize(42);
   m_ind_set3.SelectItem(0);
//--- Creating a control
   if(!m_ind_set3.CreateComboBox(text,x_gap,y_gap))
      return(false);
//--- Add the object to the common array of object groups
   CWndContainer::AddToElementsArray(0,m_ind_set3);
   return(true);
}
//+------------------------------------------------------------------+
//|                                                                  |
//+------------------------------------------------------------------+
bool CProgram::IndicatorSetting4(const int x_gap,const int y_gap,const string text)
{
//--- Pass the object to the panel
   m_ind_set4.MainPointer(m_tabs1);
//--- Attach to tab
   m_tabs1.AddToElementsArray(1,m_ind_set4);
//--- Array of the item values in the list view
   string pattern_names[4]=
   {
      "Open","Close","High","Low"
   };
//--- Set properties before creation
   m_ind_set4.XSize(200);
   m_ind_set4.YSize(25);
   m_ind_set4.ItemsTotal(4);
   m_ind_set4.FontSize(12);
   m_ind_set4.LabelColor(C'0,100,255');
   CButton *but=m_ind_set4.GetButtonPointer();
   but.FontSize(10);
   but.XSize(100);
   but.BackColor(clrAliceBlue);
   m_ind_set4.GetListViewPointer().FontSize(10);
//--- Save the item values in the combobox list view
   for(int i=0; i<4; i++)
      m_ind_set4.SetValue(i,pattern_names[i]);
//--- Get the list view pointer
   CListView *lv=m_ind_set4.GetListViewPointer();
//--- Set the list view properties
   lv.LightsHover(true);
   lv.ItemYSize(20);
   lv.YSize(82);
   m_ind_set4.SelectItem(1);
//--- Creating a control
   if(!m_ind_set4.CreateComboBox(text,x_gap,y_gap))
      return(false);
//--- Add the object to the common array of object groups
   CWndContainer::AddToElementsArray(0,m_ind_set4);
   return(true);
}
2. インターフェイス言語。
"インターフェイス言語" コントロールは、英語とロシア語の 2 つのオプションを含むドロップダウン リストとして実装します。 この要素は、LanguageSetting()メソッドを使用して実装されます。
//+------------------------------------------------------------------+
//|                                                                  |
//+------------------------------------------------------------------+
bool CProgram::LanguageSetting(const int x_gap,const int y_gap,const string text)
{
//--- Pass the object to the panel
   m_language_set.MainPointer(m_tabs1);
//--- Attach to tab
   m_tabs1.AddToElementsArray(1,m_language_set);
//--- Array of the item values in the list view
   string pattern_names[2]=
   {
      "Русский","English"
   };
//--- Set properties before creation
   m_language_set.XSize(200);
   m_language_set.YSize(25);
   m_language_set.ItemsTotal(2);
   m_language_set.FontSize(12);
   m_language_set.LabelColor(C'0,100,255');
   CButton *but=m_language_set.GetButtonPointer();
   but.FontSize(10);
   but.XSize(100);
   but.BackColor(clrAliceBlue);
   but.XGap(140);
   m_language_set.GetListViewPointer().FontSize(10);
//--- Save the item values in the combobox list view
   for(int i=0; i<2; i++)
      m_language_set.SetValue(i,pattern_names[i]);
//--- Get the list view pointer
   CListView *lv=m_language_set.GetListViewPointer();
//--- Set the list view properties
   lv.LightsHover(true);
   lv.ItemYSize(20);
   lv.YSize(42);
   m_language_set.SelectItem(1);
//--- Creating a control
   if(!m_language_set.CreateComboBox(text,x_gap,y_gap))
      return(false);
//--- Add the object to the common array of object groups
   CWndContainer::AddToElementsArray(0,m_language_set);
   return(true);
}
3.カスタムインジケータパラメータ。
上記の CreateFrame() メソッドを使用して作成されるヘッダとフレームを持つビジュアル セクションとCreateIndSetting()を使用して作成されたインジケータ値のインプットフィールドと、インジケータ名とそのパラメータのコンマ区切りリストをインプットするための新しいメソッドCreateCustomEdit()で構成されます。
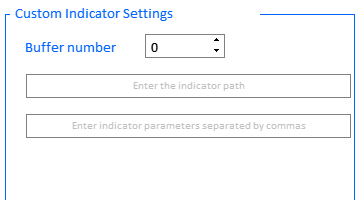
図12 カスタムインジケータパラメータ。
//+------------------------------------------------------------------+
//|                                                                  |
//+------------------------------------------------------------------+
bool CProgram::CreateCustomEdit(CTextEdit &text_edit,const int x_gap,const int y_gap,const string default_text)
{
//--- Save the pointer to the main control
   text_edit.MainPointer(m_tabs1);
//--- Attach to tab
   m_tabs1.AddToElementsArray(1,text_edit);
//--- Properties
   text_edit.XSize(100);
   text_edit.YSize(24);
   text_edit.LabelColor(C'0,100,255');
   CTextBox *box=text_edit.GetTextBoxPointer();
   box.AutoSelectionMode(true);
   box.XSize(325);
   box.XGap(1);
   box.DefaultTextColor(clrSilver);
   box.DefaultText(default_text);
//--- Creating a control
   if(!text_edit.CreateTextEdit("",x_gap,y_gap))
      return(false);
//--- Add the object to the common array of object groups
   CWndContainer::AddToElementsArray(0,text_edit);
   return(true);
}
これで視覚的な部分を検討しました。 では、構成されたトレード戦略のテストのアルゴリズムを分析してみましょう。
このアプリケーションを使用してテストのアルゴリズムを説明するには、テストを正しく実行し、結果を受け取ることを可能にする一連のアクションを決定する必要があります。 適切に構成された一連のアクションは、アプリケーション インターフェイスとの各データのやり取りの原則を強調できます。
ステップ 1. インターフェイス言語の選択
実装によると、このオプションはドロップダウン リストの [設定] タブで使用できます。 インターフェイス言語の切り替え方法について説明します。 ChangeLanguage() メソッドを呼び出すコンボ ボックス項目選択のカスタム イベントによって行われます。
//--- Selection of a combo box item
   if(id==CHARTEVENT_CUSTOM+ON_CLICK_COMBOBOX_ITEM)
   {
      //--- Changing the interface language
      if(ChangeLanguage(lparam))
         Update(true);
   }
では、インターフェイス言語の変更方法について考えてみましょう。 このメソッドは少し長いですが、そのアイデアは簡単です。
//+------------------------------------------------------------------+
//| Changing the interface language                                  |
//+------------------------------------------------------------------+
bool CProgram::ChangeLanguage(const long id)
{
//--- Check the element ID
   if(id!=m_language_set.Id())
      return(false);
   m_lang_index=m_language_set.GetListViewPointer().SelectedItemIndex();
//---
   if(m_lang_index==0)
   {
      //--- Constructor tab
      m_tabs1.Text(0,"Конструктор");
      m_tabs1.Text(1,"Настройки");
      m_table_symb.SetHeaderText(0,"Символ");
      m_request.LabelText("Поиск");
      m_date_range.LabelText("Диапазон дат");
      m_timeframe1.LabelText("Таймфрейм");
      for(int i=0; i<8; i++)
      {
         if(i<2)
            m_checkbox[i].LabelText("Паттерн");
         else if(i>=2 && i<5)
            m_checkbox[i].LabelText("Сигнал "+string(i-1));
         else if(i>=5)
            m_checkbox[i].LabelText("Сигнал "+string(i-4));
      }
      m_takeprofit1.LabelText("Тейк Профит");
      m_takeprofit2.LabelText("Тейк Профит");
      m_stoploss1.LabelText("Стоп Лосс");
      m_stoploss2.LabelText("Стоп Лосс");
      m_frame[2].GetTextLabelPointer().LabelText("Отчёт");
      string report_label[6]=
      {
         "Всего трейдов: ","Короткие трейды: ","Прибыльные трейды: ",
         "Прибыль в пунктах: ","Длинные трейды: ","Убыточные трейды: "
      };
      for(int i=0; i<6; i++)
         m_report_text[i].LabelText(report_label[i]+"-");
      //--- Settings tab
      m_frame[0].GetTextLabelPointer().LabelText("Настройки стандартных индикаторов");
      m_frame[1].GetTextLabelPointer().LabelText("Настройки кастомных индикаторов");
      m_custom_buffer.LabelText("Номер буфера");
      m_custom_path.GetTextBoxPointer().DefaultText("Введите адрес индикатора");
      m_custom_param.GetTextBoxPointer().DefaultText("Введите параметры индикатора через запятую");
      m_language_set.LabelText("Язык интерфейса");
      //--- Date Range window
      m_window[1].LabelText("Настройки диапазона дат");
      m_time_edit1.LabelText("Время");
      m_time_edit2.LabelText("Время");
      m_time_edit3.LabelText("Время");
      m_time_edit4.LabelText("Время");
      m_status_bar.SetValue(0,"Не выбран символ для анализа");
   }
   else
   {
      //--- Constructor tab
      m_tabs1.Text(0,"Constructor");
      m_tabs1.Text(1,"Settings");
      m_table_symb.SetHeaderText(0,"Symbol");
      m_request.LabelText("Search");
      m_date_range.LabelText("Date range");
      m_timeframe1.LabelText("Timeframe");
      for(int i=0; i<8; i++)
      {
         if(i<2)
            m_checkbox[i].LabelText("Pattern");
         else if(i>=2 && i<5)
            m_checkbox[i].LabelText("Signal "+string(i-1));
         else if(i>=5)
            m_checkbox[i].LabelText("Signal "+string(i-4));
      }
      m_takeprofit1.LabelText("Take Profit");
      m_takeprofit2.LabelText("Take Profit");
      m_stoploss1.LabelText("Stop Loss");
      m_stoploss2.LabelText("Stop Loss");
      m_frame[2].GetTextLabelPointer().LabelText("Report");
      string report_label[6]=
      {
         "Total trades: ","Short Trades: ","Profit Trades: ",
         "Profit in points: ","Long Trades: ","Loss Trades: "
      };
      for(int i=0; i<6; i++)
         m_report_text[i].LabelText(report_label[i]+"-");
      //--- Settings tab
      m_frame[0].GetTextLabelPointer().LabelText("Standard Indicator Settings");
      m_frame[1].GetTextLabelPointer().LabelText("Custom Indicator Settings");
      m_custom_buffer.LabelText("Buffer number");
      m_custom_path.GetTextBoxPointer().DefaultText("Enter the indicator path");
      m_custom_param.GetTextBoxPointer().DefaultText("Enter indicator parameters separated by comMA");
      m_language_set.LabelText("Interface language");
      //--- Date Range window
      m_window[1].LabelText("Date Range Settings");
      m_time_edit1.LabelText("Time");
      m_time_edit2.LabelText("Time");
      m_time_edit3.LabelText("Time");
      m_time_edit4.LabelText("Time");
      m_status_bar.SetValue(0,"No symbol selected for analysis");
   }
   return(true);
}
ステップ 2. インジケータパラメータの設定
同じタブの下で、特定のインジケータがテストされる場合に、インジケータパラメータ値が設定されます。 必要に応じて、カスタム インジケータ パラメータ (バッファ番号、名前、またはパラメータをコンマで区切って) を構成します。 カスタムインジケータでは数値のみがサポートされることに注意してください。
ステップ 3. シンボルのテーブルの設定。
[コンストラクタ] タブの上部で、[マーケット ウォッチ] ウィンドウから使用できる必要なシンボルを構成します。 これは、RequestData() メソッドによって行われます。 このメソッドは、"Search" ボタンの押下イベントによって呼び出されます。
   //--- Button click event
   if(id==CHARTEVENT_CUSTOM+ON_CLICK_BUTTON)
   {
      //--- Requesting data
      RequestData(lparam);
....
//+------------------------------------------------------------------+
//| Output of symbols to the symbols table                           |
//+------------------------------------------------------------------+
bool CProgram::RequestData(const long id)
{
//--- Check the element ID
//---
   if(id==m_request.Id())
   {
      //--- Hide the table
      m_table_symb.Hide();
      //--- Initialize the table
      GetSymbols(m_symb_filter);
      RebuildingTables(m_table_symb);
      //--- Show the table
      m_table_symb.Show();
   }
   return(true);
}
ステップ 4. テスト時間範囲の選択
このイベントは、"日付範囲" ボタンをクリックすると発生します。 ロジックは簡単です:日付範囲を設定するためのダイアログボックスが開きます。
//--- Button click event
   if(id==CHARTEVENT_CUSTOM+ON_CLICK_BUTTON)
   {
...
      //---
      if(lparam==m_date_range.Id())
      {
         int x=m_date_range.X();
         int y=m_date_range.Y()+m_date_range.YSize();
         m_window[1].X(x);
         m_window[1].Y(y);
         m_window[1].OpenWindow();
         string val=(m_lang_index==0)?"Настройки диапазона дат":"Date Range Settings";
         m_window[1].LabelText(val);
      }
...
日付を選択する際には注意が必要です。 日付が正しく設定されていない場合、アプリはエラー メッセージを返します。 最も一般的なエラーには、終了日がターミナルの現在の日付より後であるか、終了日が開始日より前です。
ステップ 5. タスク時間を設定します。
タスク時間は、コンストラクタで設定できる 6 つのシグナルすべてに適用されます。
ステップ 6. 売り/買いシグナルを有効にし、テストのパターンを選択します。
テストは、デフォルトでは、売買の両方の 2 つの方向で実行されます。 ただし、次の図13 に示すように、いずれかのモードを無効にすることができます。
図13 売買シグナルの無効化
さらにテストするためのメリルパターンは、パターンラベルの左側で選択できます。 メリルパターンの詳細については、前回の記事で説明しました。
ステップ 7. テイクプロフィットおよび ストップロス のテストおよび設定のシグナルの選択
図13 は、相場参入タイプごとに最大 3 つのシグナルを同時に設定できることを示します。 このシグナルは論理OR原理に従って動作します。 したがって、3つの買いシグナルがすべてテストで設定されている場合、3つのシグナルのいずれかが出現した場合、相場インプットが登録されます。 同じことが売りシグナルにも当てはまります。 [シグナルテキスト ラベル] の右側にあるドロップダウン リストで、選択したパターンを適用するデータ タイプを選択できます。
ステップ 8. テストの実行
ステップ1~7の後、表の左クリックでテストツールを選択します。 テスト アルゴリズムは、リストまたはテーブル項目をクリックするカスタム イベントによって起動されます。
//--- Event of pressing on a list or table item
   if(id==CHARTEVENT_CUSTOM+ON_CLICK_LIST_ITEM)
   {
      //--- Select a symbol for further work
      //--- Check the element ID
      if(lparam==m_table_symb.Id())
      {
         //--- Exit if the line is not selected
         if(m_table_symb.SelectedItem()==WRONG_VALUE)
         {
            //--- Show the full symbol description in the status bar
            m_status_bar.SetValue(0,"Не выбран символ для анализа");
            m_status_bar.GetItemPointer(0).Update(true);
         }
         //--- Get a selected symbol
         string symbol=m_table_symb.GetValue(0,m_table_symb.SelectedItem());
         //--- Show the full symbol description in the status bar
         m_status_bar.SetValue(0,"Selected symbol: "+::SymbolInfoString(symbol,SYMBOL_DESCRIPTION));
         m_status_bar.GetItemPointer(0).Update(true);
         GetResult(symbol);
      }
   }
このテストは GetResult() メソッドによって実行されます。 詳しくみてみましょう。
//+------------------------------------------------------------------+
//|                                                                  |
//+------------------------------------------------------------------+
void CProgram::GetResult(const string symbol)
{
//--- Get the date range
   m_start_date=StringToTime(TimeToString(m_calendar1.SelectedDate(),TIME_DATE)+" "+(string)m_time_edit1.GetHours()+":"+(string)m_time_edit1.GetMinutes()+":00");
   m_end_date=StringToTime(TimeToString(m_calendar2.SelectedDate(),TIME_DATE)+" "+(string)m_time_edit2.GetHours()+":"+(string)m_time_edit2.GetMinutes()+":00");
//--- Check specified dates
   if(m_start_date>m_end_date || m_end_date>TimeCurrent())
   {
      if(m_lang_index==0)
         MessageBox("Неправильно выбран диапазон дат!","Ошибка",MB_OK);
      else if(m_lang_index==1)
         MessageBox("Incorrect date range selected!","Error",MB_OK);
      return;
   }
//--- Проверка выбора паттернов
   int buy_pat=m_combobox1.GetListViewPointer().SelectedItemIndex();
   int sell_pat=m_combobox2.GetListViewPointer().SelectedItemIndex();
   if(buy_pat==sell_pat)
   {
      if(m_lang_index==0)
         MessageBox("Паттерн на покупку и продажу не может быть одинаков!","Ошибка",MB_OK);
      else if(m_lang_index==1)
         MessageBox("The pattern for buying and selling cannot be the same!","Error",MB_OK);
      return;
   }
//---
   ZeroMemory(m_report);
   datetime cur_date=m_start_date;
   string tf=m_timeframe1.GetListViewPointer().SelectedItemText();
   int applied1=m_applied1.GetListViewPointer().SelectedItemIndex();
   int applied2=m_applied2.GetListViewPointer().SelectedItemIndex();
   int applied3=m_applied3.GetListViewPointer().SelectedItemIndex();
   int applied4=m_applied4.GetListViewPointer().SelectedItemIndex();
   int applied5=m_applied5.GetListViewPointer().SelectedItemIndex();
   int applied6=m_applied6.GetListViewPointer().SelectedItemIndex();
//---
   while(cur_date<m_end_date)
   {
      if(
         BuySignal(symbol,m_start_date,applied1,1) ||
         BuySignal(symbol,m_start_date,applied2,2) ||
         BuySignal(symbol,m_start_date,applied3,3))
      {
         CalculateBuyDeals(symbol,m_start_date);
         cur_date=m_start_date;
         continue;
      }
      if(
         SellSignal(symbol,m_start_date,applied4,1) ||
         SellSignal(symbol,m_start_date,applied5,2) ||
         SellSignal(symbol,m_start_date,applied6,3))
      {

         CalculateSellDeals(symbol,m_start_date);
         cur_date=m_start_date;
         continue;
      }
      m_start_date+=PeriodSeconds(StringToTimeframe(tf));
      cur_date=m_start_date;
   }
//--- Output the report
   PrintReport();
}
このメソッドには、日付範囲が正しく設定されているかどうかを確認するメソッドが含まれます。 別のチェックは、ユーザーが売買シグナルの両方をテストするための同じパターンを設定していないことを確認するために実行されます。 GetResult() メソッドには、設定で指定されたデータを操作するための 3 つのメソッドがあります。
1. シグナル検索方法: BuySignal() とSellSignal(). これらは似ています。 一つを考えてみましょう。
//+------------------------------------------------------------------+
//|                                                                  |
//+------------------------------------------------------------------+
bool CProgram::BuySignal(const string symbol,datetime start,int applied,int signal)
{
//--- Exit if the buy signal is disabled
   if(!m_checkbox[0].IsPressed())
      return(false);
//---
   int Handle=INVALID_HANDLE;
   string tf=m_timeframe1.GetListViewPointer().SelectedItemText();
//--- Preparing data
   if(m_checkbox[signal+1].IsPressed())
   {
      //--- Price
      if(applied==0)
      {
         MqlRates rt[];
         intSL=0,tp=0;
         POINTS pat;
         double arr[];
         int copied=CopyRates(symbol,StringToTimeframe(tf),m_start_date,5,rt);
         int app_price=m_ind_set4.GetListViewPointer().SelectedItemIndex();
         ArrayResize(arr,copied);
         //Print(m_start_date+": "+copied);
         if(copied<5)
            return(false);
         //---
         for(int i=0; i<copied; i++)
         {
            if(app_price==0)
               arr[i]=rt[i].open;
            else if(app_price==1)
               arr[i]=rt[i].close;
            else if(app_price==2)
               arr[i]=rt[i].high;
            else if(app_price==3)
               arr[i]=rt[i].low;
         }
         //--- Pattern search
         pat.A=arr[0];
         pat.B=arr[1];
         pat.C=arr[2];
         pat.D=arr[3];
         pat.E=arr[4];
         //--- If the pattern is found, check the signal
         if(GetPatternType(pat)==m_combobox1.GetListViewPointer().SelectedItemIndex())
         {
            m_start_date=IndexToDate(m_start_date,StringToTimeframe(tf),5);
            return(true);
         }
         return(false);
      }
      --- ATR
      if(applied==1)
         Handle=iATR(symbol,StringToTimeframe(tf),int(m_ind_setting[0].GetValue()));
      --- CCI
      if(applied==2)
      {
         int app_price;
         switch(m_ind_set4.GetListViewPointer().SelectedItemIndex())
         {
         case  0:
            app_price=PRICE_OPEN;
            break;
         case  1:
            app_price=PRICE_CLOSE;
            break;
         case  2:
            app_price=PRICE_HIGH;
            break;
         case  3:
            app_price=PRICE_LOW;
            break;
         default:
            app_price=PRICE_CLOSE;
            break;
         }
         Handle=iCCI(symbol,StringToTimeframe(tf),int(m_ind_setting[1].GetValue()),app_price);
      }
      //--- DeMarker
      if(applied==3)
         Handle=iDeMarker(symbol,StringToTimeframe(tf),int(m_ind_setting[2].GetValue()));
      //--- Force Index
      if(applied==4)
      {
         int force_period=int(m_ind_setting[3].GetValue());
         ENUM_MA_METHOD force_ma_method;
         ENUM_APPLIED_VOLUME force_applied_volume;
         switch(m_ind_set1.GetListViewPointer().SelectedItemIndex())
         {
         case  0:
            force_ma_method=MODE_SMA;
            break;
         case  1:
            force_ma_method=MODE_EMA;
            break;
         case  2:
            force_ma_method=MODE_SMMA;
            break;
         case  3:
            force_ma_method=MODE_LWMA;
            break;
         default:
            force_ma_method=MODE_SMA;
            break;
         }
         switch(m_ind_set3.GetListViewPointer().SelectedItemIndex())
         {
         case  0:
            force_applied_volume=VOLUME_TICK;
            break;
         case  1:
            force_applied_volume=VOLUME_REAL;
            break;
         default:
            force_applied_volume=VOLUME_TICK;
            break;
         }
         Handle=iForce(symbol,StringToTimeframe(tf),force_period,force_ma_method,force_applied_volume);
      }
      --- WPR
      if(applied==5)
         Handle=iWPR(symbol,StringToTimeframe(tf),int(m_ind_setting[5].GetValue()));
      --- RSI
      if(applied==6)
         Handle=iRSI(symbol,StringToTimeframe(tf),int(m_ind_setting[4].GetValue()),PRICE_CLOSE);
      //--- Momentum
      if(applied==7)
         Handle=iMomentum(symbol,StringToTimeframe(tf),int(m_ind_setting[6].GetValue()),PRICE_CLOSE);
      //--- Custom
      if(applied==8)
      {
         string str[];
         double arr[];
         string parameters=m_custom_param.GetValue();
         StringSplit(parameters,',',str);
         if(ArraySize(str)>20)
         {
            if(m_lang_index==0)
               MessageBox("Количество параметров не должно быть больше 20!","Ошибка",MB_OK);
            else if(m_lang_index==1)
               MessageBox("The number of parameters should not be more than 20!","Error",MB_OK);
         }
         ArrayResize(arr,ArraySize(str));
         for(int i=0; i<ArraySize(str); i++)
            arr[i]=StringToDouble(str[i]);
         string name=m_custom_path.GetValue();
         Handle=GetCustomValue(StringToTimeframe(tf),name,arr);
      }
      //---
      if(applied>0)
      {
         if(Handle==INVALID_HANDLE)
         {
            if(m_lang_index==0)
               MessageBox("Не удалось получить хендл индикатора!","Ошибка",MB_OK);
            else if(m_lang_index==1)
               MessageBox("Failed to get indicator handle!","Error",MB_OK);
         }
         double arr[];
         int buffer=(applied==8)?int(m_custom_buffer.GetValue()):0;
         int copied=CopyBuffer(Handle,buffer,m_start_date,5,arr);
         //---
         intSL=0,tp=0;
         POINTS pat;
         if(copied<5)
            return(false);
         //--- Pattern search condition
         pat.A=arr[0];
         pat.B=arr[1];
         pat.C=arr[2];
         pat.D=arr[3];
         pat.E=arr[4];
         //--- If the pattern is found, check the signal
         if(GetPatternType(pat)==m_combobox1.GetListViewPointer().SelectedItemIndex())
         {
            m_start_date=IndexToDate(m_start_date,StringToTimeframe(tf),5);
            return(true);
         }
         return(false);
      }
      return(false);
   }
   return(false);
}
このメソッドのアイデアは、アクションのプリセットシーケンスにあります。
- 買いシグナルが許可されているかどうかを確認し、特定のシグナルをチェックします。
- パターンが適用されるデータ配列をチェックします。
- 検索用のデータを準備し、GetPatternType() メソッドを使用して指定されたパターンを詳しく見ることができます。
2. 見つかったシグナルを処理するためのメソッドCalculateBuyDeals()とCalculateSellDeals()です.
//+------------------------------------------------------------------+
//|                                                                  |
//+------------------------------------------------------------------+
void CProgram::CalculateBuyDeals(const string symbol,datetime start)
{
   MqlRates rt[];
   intTP=int(m_takeprofit1.GetValue());
   intSL=int(m_stoploss1.GetValue());
   string tf=m_timeframe1.GetListViewPointer().SelectedItemText();
   int copied=CopyRates(symbol,StringToTimeframe(tf),m_start_date,m_end_date,rt);
   double deal_price=iOpen(symbol,StringToTimeframe(tf),copied);
   for(int j=0; j<copied; j++)
   {
      if((iHigh(symbol,StringToTimeframe(tf),copied-j)-deal_price)/SymbolInfoDouble(symbol,SYMBOL_POINT)>=TP)
      {
         m_report.profit_trades++;
         m_report.profit+=TP;
         m_report.long_trades++;
         m_report.total_trades++;
         m_start_date=IndexToDate(m_start_date,StringToTimeframe(tf),j);
         return;
      }
      else if((deal_price-iLow(symbol,StringToTimeframe(tf),copied-j))/SymbolInfoDouble(symbol,SYMBOL_POINT)>=SL)
      {
         m_report.loss_trades++;
         m_report.profit-=SL;
         m_report.long_trades++;
         m_report.total_trades++;
         m_start_date=IndexToDate(m_start_date,StringToTimeframe(tf),j);
         return;
      }
   }
   m_start_date=m_end_date;
}
//+------------------------------------------------------------------+
//|                                                                  |
//+------------------------------------------------------------------+
void CProgram::CalculateSellDeals(const string symbol,datetime start)
{
   MqlRates rt[];
   intTP=int(m_takeprofit2.GetValue());
   intSL=int(m_stoploss2.GetValue());
   string tf=m_timeframe1.GetListViewPointer().SelectedItemText();
   int copied=CopyRates(symbol,StringToTimeframe(tf),m_start_date,m_end_date,rt);
   double deal_price=iOpen(symbol,StringToTimeframe(tf),copied);
   for(int j=0; j<copied; j++)
   {
      if((deal_price-iLow(symbol,StringToTimeframe(tf),copied-j))/SymbolInfoDouble(symbol,SYMBOL_POINT)>=TP)
      {
         m_report.profit_trades++;
         m_report.profit+=TP;
         m_report.short_trades++;
         m_report.total_trades++;
         m_start_date=IndexToDate(m_start_date,StringToTimeframe(tf),j);
         return;
      }
      else if((iHigh(symbol,StringToTimeframe(tf),copied-j)-deal_price)/SymbolInfoDouble(symbol,SYMBOL_POINT)>=SL)
      {
         m_report.loss_trades++;
         m_report.profit-=SL;
         m_report.short_trades++;
         m_report.total_trades++;
         m_start_date=IndexToDate(m_start_date,StringToTimeframe(tf),j);
         return;
      }
   }
   m_start_date=m_end_date;
}
このタスクは、見つかったシグナルを処理し、レポートが生成される統計を記録することです。
3. テスト結果を出力する PrintReport() メソッド。
//+------------------------------------------------------------------+
//|                                                                  |
//+------------------------------------------------------------------+
void CProgram::PrintReport(void)
{
   if(m_lang_index==0)
   {
      string report_label[6]=
      {
         "Всего трейдов: ","Короткие трейды: ","Прибыльные трейды: ",
         "Прибыль в пунктах: ","Длинные трейды: ","Убыточные трейды: "
      };
      //---
      m_report_text[0].LabelText(report_label[0]+string(m_report.total_trades));
      m_report_text[1].LabelText(report_label[1]+string(m_report.short_trades));
      m_report_text[2].LabelText(report_label[2]+string(m_report.profit_trades));
      m_report_text[3].LabelText(report_label[3]+string(m_report.profit));
      m_report_text[4].LabelText(report_label[4]+string(m_report.long_trades));
      m_report_text[5].LabelText(report_label[5]+string(m_report.loss_trades));
   }
   else
   {
      string report_label[6]=
      {
         "Total trades: ","Short Trades: ","Profit Trades: ",
         "Profit in points: ","Long Trades: ","Loss Trades: "
      };
      //---
      m_report_text[0].LabelText(report_label[0]+string(m_report.total_trades));
      m_report_text[1].LabelText(report_label[1]+string(m_report.short_trades));
      m_report_text[2].LabelText(report_label[2]+string(m_report.profit_trades));
      m_report_text[3].LabelText(report_label[3]+string(m_report.profit));
      m_report_text[4].LabelText(report_label[4]+string(m_report.long_trades));
      m_report_text[5].LabelText(report_label[5]+string(m_report.loss_trades));
   }
   Update(true);
}
アプリケーションのテスト データを表示します。 したがって、アルゴリズムは完全に実行されました。
ストラテジービルダー操作のデモンストレーションと例
例として、戦略ビルダーの操作を示す短いビデオを録画することにしました。
結論
以下に添付されたアーカイブには、フォルダに適切に配置されたすべての説明ファイルがあります。 正しく操作するには、MQL5 フォルダをターミナルのルート ディレクトリに保存します。 MQL5フォルダがあるターミナルルートディレクトリを開くには、MetaTrader5ターミナルでCtrl+Shift+Dキーの組み合わせを押すか、以下の図7に示すようにコンテキストメニューを使用します。
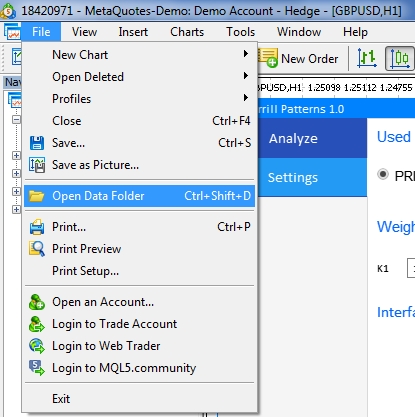
図14. メタトレーダー 5 ターミナルルートで MQL5 フォルダを開く