Libro de Recetas MQL5: Desarrollo de un Marco de Trabajo para un Sistema de Trading Basado en la Estrategia de Triple Pantalla
Anatoli Kazharski | 28 mayo, 2014
Introducción
Al buscar o desarrollar sistemas de trading, muchos traders deben de haber oído hablar de la estrategia de Triple Pantalla presentada por el Dr. Alexander Elder. Hay mucha gente en internet que tiene una opinión negativa de esta estrategia. Sin embargo, mucha gente cree que le puede ayudar a obtener beneficios. Usted no debe creer ninguna de las dos opiniones. Todo se debería experimentar siempre de primera mano. Si estudia programación, tendrá la posibilidad de comprobar el rendimiento de la estrategia de trading usando back-testing.
En este artículo desarrollaremos un marco de trabajo para un sistema de trading basado en la estrategia de Triple Pantalla en MQL5. El Asesor Experto no se desarrollará de cero. En lugar de ello, simplemente modificaremos el programa del artículo anterior "MQL5 Cookbook: Using Indicators to Set Trading Conditions in Expert Advisors" (“Libro de Recetas MQL5: Usar Indicadores Para Configurar Condiciones de Trading en Asesores Expertos”), que sustancialmente ya vale para nuestros propósitos. El artículo también demostrará cómo se pueden modificar fácilmente los patrones de programas ya hechos.
El Asesor Experto del artículo anterior ya nos daba la posibilidad de activar/desactivar los niveles de Stop Loss/Take Profit y Trailing Stop, aumentar el volumen de posición e invertir la posición en la señal opuesta. Todas las funciones necesarias ya están en sus lugares correspondientes. De modo que nuestra tarea se centrará ahora en cambiar la lista de parámetros externos añadiendo opciones adicionales y modificando algunas funciones ya existentes.
Para ilustrarlo mejor, haremos que se generen señales en tres marcos usando el indicador Moving Average (Media Móvil, o MA). Más tarde, continuando con el experimento en el marco de trabajo ya desarrollado, podrá emplear cualquier otro indicador modificando ligeramente el código. También implementaremos la oportunidad de configurar marcos cronológicos para cada pantalla. Si el parámetro responsable del período de indicador tiene un valor de cero, esto implicará que la pantalla correspondiente no se está usando. En otras palabras, el sistema puede componerse de uno o dos marcos cronológicos.
Antes de empezar, haga una copia de la carpeta con los archivos del Asesor Experto del artículo anterior y cámbiele el nombre.
Desarrollo de Asesor Experto
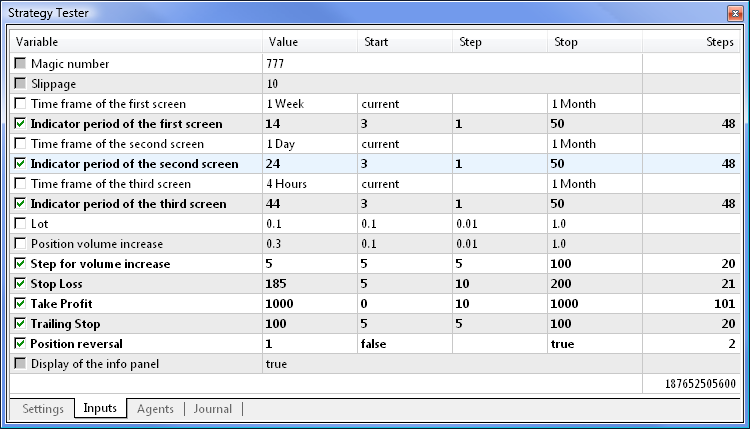
Empecemos con los parámetros externos. Abajo está el código de la lista actualizada. Las líneas nuevas se destacan. Los marcos cronológicos se declaran con el tipo de enumeración ENUM_TIMEFRAMES. Podrá seleccionar cualquier marco cronológico de la lista desplegable.
//--- External parameters of the Expert Advisor
sinput   long              MagicNumber=777;        // Magic number
sinput   int               Deviation=10;           // Slippage
//---
input    ENUM_TIMEFRAMES   Screen01TimeFrame=PERIOD_W1;  // Time frame of the first screen
input    int               Screen01IndicatorPeriod=14;   // Indicator period of the first screen
//---
input    ENUM_TIMEFRAMES   Screen02TimeFrame=PERIOD_D1;  // Time frame of the second screen
input    int               Screen02IndicatorPeriod=24;   // Indicator period of the second screen
//---
input    ENUM_TIMEFRAMES   Screen03TimeFrame=PERIOD_H4;  // Time frame of the third screen
input    int               Screen03IndicatorPeriod=44;   // Indicator period of the third screen
//---
input    double            Lot=0.1;                      // Lot
input    double            VolumeIncrease=0.1;           // Position volume increase
input    double            VolumeIncreaseStep=10;        // Step for position volume increase
input    double            StopLoss=50;                  // Stop Loss
input    double            TakeProfit=100;               // Take Profit
input    double            TrailingStop=10;              // Trailing Stop
input    bool              Reverse=true;                 // Position reversal
sinput   bool              ShowInfoPanel=true;           // Display of the info panel
El parámetro IndicatorSegments, así como la variable AllowedNumberOfSegments y la función CorrectInputParameters() se han eliminado para simplificar el ejemplo. Los que estén interesados en esta condición pueden tratar de implementarla por su cuenta. También debería eliminar la enumeración de indicadores en el archivo Enums.mqh ya que el Asesor Experto solo empleará un indicador.
Puesto que habrá un indicador separado en cada marco cronológico, necesitaremos una variable separada para obtener un identificador de cada uno de los indicadores:
//--- Indicator handles
int                  Screen01IndicatorHandle=INVALID_HANDLE;   // Indicator handle on the first screen
int                  Screen02IndicatorHandle=INVALID_HANDLE;   // Indicator handle on the second screen
int                  Screen03IndicatorHandle=INVALID_HANDLE;   // Indicator handle on the third screen
La nueva barra se comprobará usando el marco cronológico mínimo. Al configurar el marco cronológico mínimo en los parámetros externos, no tenemos que seguir un orden específico, como por ejemplo máximo, intermedio, mínimo. El orden inverso y básicamente cualquier otro orden serían válidos. De modo que necesitamos una función que identifique el marco cronológico mínimo a partir de todos los marcos especificados.
Puesto que el Asesor Experto se puede configurar para operar en tres marcos cronológicos, así como en dos o en uno, todas las opciones deben ser consideradas al determinar el marco cronológico mínimo. Abajo está el código de la función GetMinimumTimeframe():
//+------------------------------------------------------------------+
//| Determining the minimum time frame for the new bar check         |
//+------------------------------------------------------------------+
ENUM_TIMEFRAMES GetMinimumTimeframe(ENUM_TIMEFRAMES timeframe1,int period1,
                                    ENUM_TIMEFRAMES timeframe2,int period2,
                                    ENUM_TIMEFRAMES timeframe3,int period3)
  {
//--- Default minimum time frame value
   ENUM_TIMEFRAMES timeframe_min=PERIOD_CURRENT;

//--- Convert time frame values to seconds for calculations
   int t1= PeriodSeconds(timeframe1);
   int t2= PeriodSeconds(timeframe2);
   int t3= PeriodSeconds(timeframe3);

//--- Check for incorrect period values
   if(period1<=0 && period2<=0 && period3<=0)
      return(timeframe_min);

//--- Conditions for a single time frame
   if(period1>0 && period2<=0 && period3<=0)
      return(timeframe1);
   if(period2>0 && period1<=0 && period3<=0)
      return(timeframe2);
   if(period3>0 && period1<=0 && period2<=0)
      return(timeframe3);

//--- Conditions for two time frames
   if(period1>0 && period2>0 && period3<=0)
     {
      timeframe_min=(MathMin(t1,t2)==t1) ? timeframe1 : timeframe2;
      return(timeframe_min);
     }
   if(period1>0 && period3>0 && period2<=0)
     {
      timeframe_min=(MathMin(t1,t3)==t1) ? timeframe1 : timeframe3;
      return(timeframe_min);
     }
   if(period2>0 && period3>0 && period1<=0)
     {
      timeframe_min=(MathMin(t2,t3)==t2) ? timeframe2 : timeframe3;
      return(timeframe_min);
     }

//--- Conditions for three time frames
   if(period1>0 && period2>0 && period3>0)
     {
      timeframe_min=(int)MathMin(t1,t2)==t1 ? timeframe1 : timeframe2;
      int t_min=PeriodSeconds(timeframe_min);
      timeframe_min=(int)MathMin(t_min,t3)==t_min ? timeframe_min : timeframe3;
      return(timeframe_min);
     }
   return(WRONG_VALUE);
  }
Para guardar el valor del marco cronológico mínimo, crearemos otra variable de alcance global:
//--- Variable for determining the minimum time frame
ENUM_TIMEFRAMES  MinimumTimeframe=WRONG_VALUE;
La función GetMinimumTimeframe() deberá llamarse al inicializar el Asesor Experto en la función OnInit().
//+------------------------------------------------------------------+
//| Expert initialization function                                   |
//+------------------------------------------------------------------+
int OnInit()
  {
//--- Determine the minimum time frame for the new bar check
   MinimumTimeframe=GetMinimumTimeframe(Screen01TimeFrame,Screen01IndicatorPeriod,
                                        Screen02TimeFrame,Screen02IndicatorPeriod,
                                        Screen03TimeFrame,Screen03IndicatorPeriod);
//--- Get indicator handles
   GetIndicatorHandles();
//--- Initialize the new bar
   CheckNewBar();
//--- Get the properties
   GetPositionProperties(P_ALL);
//--- Set the info panel
   SetInfoPanel();
//---
   return(0);
  }
El valor de la variable MinimumTimeframe se usará después en las funciones CheckNewBar() y GetBarsData().
La función GetIndicatorHandle() tiene ahora el aspecto que se muestra debajo. El período y marco cronológico se especifican para cada indicador.
//+------------------------------------------------------------------+
//| Getting indicator handles                                        |
//+------------------------------------------------------------------+
void GetIndicatorHandles()
  {
//--- Get handles of the indicators specified in the parameters
   if(Screen01IndicatorPeriod>0)
     Screen01IndicatorHandle=iMA(_Symbol,Screen01TimeFrame,Screen01IndicatorPeriod,0,MODE_SMA,PRICE_CLOSE);
   if(Screen02IndicatorPeriod>0)
     Screen02IndicatorHandle=iMA(_Symbol,Screen02TimeFrame,Screen02IndicatorPeriod,0,MODE_SMA,PRICE_CLOSE);
   if(Screen03IndicatorPeriod>0)
     Screen03IndicatorHandle=iMA(_Symbol,Screen03TimeFrame,Screen03IndicatorPeriod,0,MODE_SMA,PRICE_CLOSE);

//--- If the indicator handle for the first time frame could not be obtained
   if(Screen01IndicatorHandle==INVALID_HANDLE)
     Print("Failed to get the indicator handle for Screen 1!");
//--- If the indicator handle for the second time frame could not be obtained
   if(Screen01IndicatorHandle==INVALID_HANDLE)
     Print("Failed to get the indicator handle for Screen 2!");
//--- If the indicator handle for the third time frame could not be obtained
   if(Screen01IndicatorHandle==INVALID_HANDLE)
     Print("Failed to get the indicator handle for Screen 3!");
  }
Además, debemos añadir arrays para obtener valores de indicador (separadamente para cada marco cronológico):
//--- Arrays for values of the indicators
double               indicator_buffer1[];
double               indicator_buffer2[];
double               indicator_buffer3[];
La función GetIndicatorsData() para obtener valores de indicador tiene ahora el aspecto que se muestra debajo. Se comprueba la precisión de los identificadores obtenidos, y si todo está bien, los arrays se llenan con valores de indicador.
//+------------------------------------------------------------------+
//| Getting indicator values                                         |
//+------------------------------------------------------------------+
bool GetIndicatorsData()
  {
//--- Number of indicator buffer values for determining the trading signal
   int NumberOfValues=3;
//--- If indicator handles have not been obtained
   if((Screen01IndicatorPeriod>0 && Screen01IndicatorHandle==INVALID_HANDLE) ||
      (Screen02IndicatorPeriod>0 && Screen02IndicatorHandle==INVALID_HANDLE) ||
      (Screen03IndicatorPeriod>0 && Screen03IndicatorHandle==INVALID_HANDLE))
      //--- try to get them again
      GetIndicatorHandles();

//--- If the time frame of the first screen is used and the indicator handle has been obtained
   if(Screen01TimeFrame>0 && Screen01IndicatorHandle!=INVALID_HANDLE)
     {
      //--- Reverse the indexing order (... 3 2 1 0)
      ArraySetAsSeries(indicator_buffer1,true);
      //--- Get indicator values
      if(CopyBuffer(Screen01IndicatorHandle,0,0,NumberOfValues,indicator_buffer1)<NumberOfValues)
        {
         Print("Failed to copy the values ("+
                  _Symbol+"; "+TimeframeToString(Period())+") to the indicator_buffer1 array! Error ("+
                  IntegerToString(GetLastError())+"): "+ErrorDescription(GetLastError()));
         //---
         return(false);
        }
     }
//--- If the time frame of the second screen is used and the indicator handle has been obtained
   if(Screen02TimeFrame>0 && Screen02IndicatorHandle!=INVALID_HANDLE)
     {
      //--- Reverse the indexing order (... 3 2 1 0)
      ArraySetAsSeries(indicator_buffer2,true);
      //--- Get indicator values
      if(CopyBuffer(Screen02IndicatorHandle,0,0,NumberOfValues,indicator_buffer2)<NumberOfValues)
        {
         Print("Failed to copy the values ("+
                  _Symbol+"; "+TimeframeToString(Period())+") to the indicator_buffer2 array! Error ("+
                  IntegerToString(GetLastError())+"): "+ErrorDescription(GetLastError()));
         //---
         return(false);
        }
     }
//--- If the time frame of the third screen is used and the indicator handle has been obtained
   if(Screen03TimeFrame>0 && Screen03IndicatorHandle!=INVALID_HANDLE)
     {
      //--- Reverse the indexing order (... 3 2 1 0)
      ArraySetAsSeries(indicator_buffer3,true);
      //--- Get indicator values
      if(CopyBuffer(Screen03IndicatorHandle,0,0,NumberOfValues,indicator_buffer3)<NumberOfValues)
        {
         Print("Failed to copy the values ("+
                  _Symbol+"; "+TimeframeToString(Period())+") to the indicator_buffer3 array! Error ("+
                  IntegerToString(GetLastError())+"): "+ErrorDescription(GetLastError()));
         //---
         return(false);
        }
     }
//---
   return(true);
  }
Las funciones GetTradingSignal() y GetSignal() se deberían modificar según la tarea que tengamos entre manos. Abajo está el código de estas funciones.
//+------------------------------------------------------------------+
//| Determining trading signals                                      |
//+------------------------------------------------------------------+
ENUM_ORDER_TYPE GetTradingSignal()
  {
//--- If there is no position
   if(!pos.exists)
     {
      //--- A Sell signal
      if(GetSignal()==ORDER_TYPE_SELL)
         return(ORDER_TYPE_SELL);
      //--- A Buy signal
      if(GetSignal()==ORDER_TYPE_BUY)
         return(ORDER_TYPE_BUY);
     }
//--- If the position exists
   if(pos.exists)
     {
      //--- Get the position type
      GetPositionProperties(P_TYPE);
      //--- Get the last deal price
      GetPositionProperties(P_PRICE_LAST_DEAL);

      //--- A Sell signal
      if(pos.type==POSITION_TYPE_BUY &&
         GetSignal()==ORDER_TYPE_SELL)
         return(ORDER_TYPE_SELL);
      if(pos.type==POSITION_TYPE_SELL &&
         GetSignal()==ORDER_TYPE_SELL &&
         close_price[1]<pos.last_deal_price-CorrectValueBySymbolDigits(VolumeIncreaseStep*_Point))
         return(ORDER_TYPE_SELL);

      //--- A Buy signal
      if(pos.type==POSITION_TYPE_SELL &&
         GetSignal()==ORDER_TYPE_BUY)
         return(ORDER_TYPE_BUY);
      if(pos.type==POSITION_TYPE_BUY &&
         GetSignal()==ORDER_TYPE_BUY &&
         close_price[1]>pos.last_deal_price+CorrectValueBySymbolDigits(VolumeIncreaseStep*_Point))
         return(ORDER_TYPE_BUY);

     }
//--- No signal
   return(WRONG_VALUE);
  }
La función GetSignal(), al igual que cuando determinamos el marco cronológico mínimo, tiene en cuenta todas las posibles variantes de estados del parámetro externo relativas a las condiciones de apertura de posición. Abajo puede ver el código de la función:
//+------------------------------------------------------------------+
//| Checking the condition and returning a signal                    |
//+------------------------------------------------------------------+
ENUM_ORDER_TYPE GetSignal()
  {
//--- A SELL SIGNAL: the current value of the indicators on completed bars is lower than on the previous bars
//--- Conditions for a single time frame
   if(Screen01IndicatorPeriod>0 && Screen02IndicatorPeriod<=0 && Screen03IndicatorPeriod<=0)
     {
      if(indicator_buffer1[1]<indicator_buffer1[2])
         return(ORDER_TYPE_SELL);
     }
   if(Screen01IndicatorPeriod<=0 && Screen02IndicatorPeriod>0 && Screen03IndicatorPeriod<=0)
     {
      if(indicator_buffer2[1]<indicator_buffer2[2])
         return(ORDER_TYPE_SELL);
     }
//---
   if(Screen01IndicatorPeriod<=0 && Screen02IndicatorPeriod<=0 && Screen03IndicatorPeriod>0)
     {
      if(indicator_buffer3[1]<indicator_buffer3[2])
         return(ORDER_TYPE_SELL);
     }

//--- Conditions for two time frames
   if(Screen01IndicatorPeriod>0 && Screen02IndicatorPeriod>0 && Screen03IndicatorPeriod<=0)
     {
      if(indicator_buffer1[1]<indicator_buffer1[2] &&
         indicator_buffer2[1]<indicator_buffer2[2])
         return(ORDER_TYPE_SELL);
     }
   if(Screen01IndicatorPeriod<=0 && Screen02IndicatorPeriod>0 && Screen03IndicatorPeriod>0)
     {
      if(indicator_buffer2[1]<indicator_buffer2[2] &&
         indicator_buffer3[1]<indicator_buffer3[2])
         return(ORDER_TYPE_SELL);
     }
   if(Screen01IndicatorPeriod>0 && Screen02IndicatorPeriod<=0 && Screen03IndicatorPeriod>0)
     {
      if(indicator_buffer1[1]<indicator_buffer1[2] &&
         indicator_buffer3[1]<indicator_buffer3[2])
         return(ORDER_TYPE_SELL);
     }

//--- Conditions for three time frames
   if(Screen01IndicatorPeriod>0 && Screen02IndicatorPeriod>0 && Screen03IndicatorPeriod>0)
     {
      if(indicator_buffer1[1]<indicator_buffer1[2] &&
         indicator_buffer2[1]<indicator_buffer2[2] &&
         indicator_buffer3[1]<indicator_buffer3[2]
         )
         return(ORDER_TYPE_SELL);
     }

//--- A BUY SIGNAL: the current value of the indicators on completed bars is higher than on the previous bars
//--- Conditions for a single time frame
   if(Screen01IndicatorPeriod>0 && Screen02IndicatorPeriod<=0 && Screen03IndicatorPeriod<=0)
     {
      if(indicator_buffer1[1]>indicator_buffer1[2])
         return(ORDER_TYPE_BUY);
     }
   if(Screen01IndicatorPeriod<=0 && Screen02IndicatorPeriod>0 && Screen03IndicatorPeriod<=0)
     {
      if(indicator_buffer2[1]>indicator_buffer2[2])
         return(ORDER_TYPE_BUY);
     }
   if(Screen01IndicatorPeriod<=0 && Screen02IndicatorPeriod<=0 && Screen03IndicatorPeriod>0)
     {
      if(indicator_buffer3[1]>indicator_buffer3[2])
         return(ORDER_TYPE_BUY);
     }

//--- Conditions for two time frames
   if(Screen01IndicatorPeriod>0 && Screen02IndicatorPeriod>0 && Screen03IndicatorPeriod<=0)
     {
      if(indicator_buffer1[1]>indicator_buffer1[2] &&
         indicator_buffer2[1]>indicator_buffer2[2])
         return(ORDER_TYPE_BUY);
     }
   if(Screen01IndicatorPeriod<=0 && Screen02IndicatorPeriod>0 && Screen03IndicatorPeriod>0)
     {
      if(indicator_buffer2[1]>indicator_buffer2[2] &&
         indicator_buffer3[1]>indicator_buffer3[2])
         return(ORDER_TYPE_BUY);
     }
   if(Screen01IndicatorPeriod>0 && Screen02IndicatorPeriod<=0 && Screen03IndicatorPeriod>0)
     {
      if(indicator_buffer1[1]>indicator_buffer1[2] &&
         indicator_buffer3[1]>indicator_buffer3[2])
         return(ORDER_TYPE_BUY);
     }

//--- Conditions for three time frames
   if(Screen01IndicatorPeriod>0 && Screen02IndicatorPeriod>0 && Screen03IndicatorPeriod>0)
     {
      if(indicator_buffer1[1]>indicator_buffer1[2] &&
         indicator_buffer2[1]>indicator_buffer2[2] &&
         indicator_buffer3[1]>indicator_buffer3[2]
         )
         return(ORDER_TYPE_BUY);
     }

//--- No signal
   return(WRONG_VALUE);
  }
Ahora solo debemos hacer pequeños cambios a las funciones OnInit() y OnDeinit(). Puede ver los cambios resaltados en el código de abajo:
//+------------------------------------------------------------------+
//| Expert initialization function                                   |
//+------------------------------------------------------------------+
int OnInit()
  {
//--- Determine the minimum time frame for the new bar check
   MinimumTimeframe=GetMinimumTimeframe(Screen01TimeFrame,Screen01IndicatorPeriod,
                                        Screen02TimeFrame,Screen02IndicatorPeriod,
                                        Screen03TimeFrame,Screen03IndicatorPeriod);
//--- Get indicator handles
   GetIndicatorHandles();
//--- Initialize the new bar
   CheckNewBar();
//--- Get the properties
   GetPositionProperties(P_ALL);
//--- Set the info panel
   SetInfoPanel();
//---
   return(0);
  }
//+------------------------------------------------------------------+
//| Expert deinitialization function                                 |
//+------------------------------------------------------------------+
void OnDeinit(const int reason)
  {
//--- Print the deinitialization reason to the journal
   Print(GetDeinitReasonText(reason));
//--- When deleting from the chart
   if(reason==REASON_REMOVE)
     {
      //--- Delete all objects relating to the info panel from the chart
      DeleteInfoPanel();
      //--- Delete the indicator handles
      IndicatorRelease(Screen01IndicatorHandle);
      IndicatorRelease(Screen02IndicatorHandle);
      IndicatorRelease(Screen03IndicatorHandle);
     }
  }
El marco de trabajo para sistemas de trading basado en estrategia de Triple Pantalla está listo. Se puede modificar en cualquier momento, cambiando los indicadores o añadiendo condiciones adicionales, si es necesario.
Optimizar Parámetros y Simular el Asesor Experto
Procedamos ahora a la optimización de parámetros y comprobación de resultados. El Probador de Estrategias se debe configurar tal y como se muestra abajo (asegúrese de especificar el marco cronológico más bajo de los tres):

Fig. 1. Configuración de Probador de Estrategias.
Los parámetros del Asesor Experto para la optimización se han configurado tal y como se muestra abajo. Los marcos cronológicos se pueden configurar para la optimización, pero yo prefiero configurarlos manualmente.

Fig. 2. Configuración del Asesor Experto.
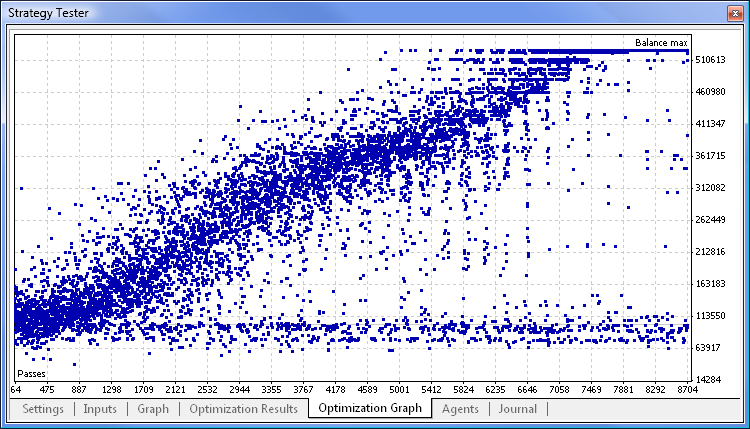
La optimización ha durado 30 minutos en un procesador dual-core. Abajo puede ver el Gráfico de Optimización:

Fig. 3. Gráfico de Optimización.
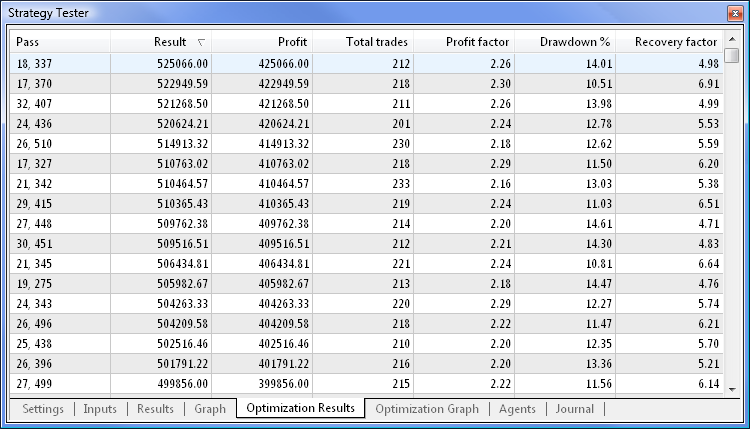
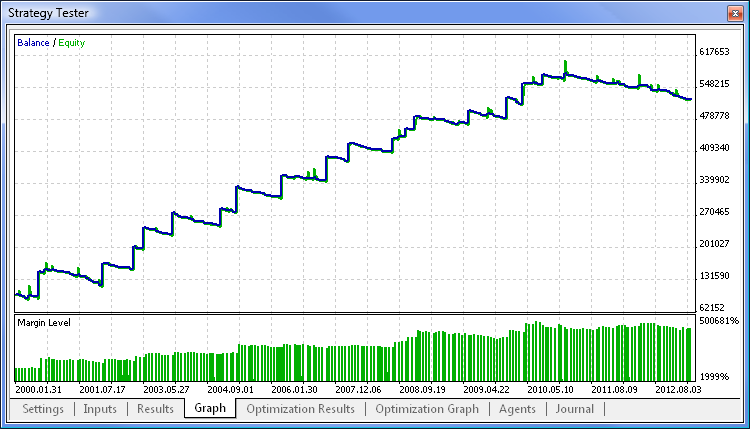
Los resultados de la simulación de saldo máximo muestran una menor reducción que los resultados de la simulación del factor máximo de recuperación, lo que se debe a que lo resultados de la simulación de saldo máximo se usan por motivos de demostración:

Fig. 4. Resultados de la simulación de saldo máximo.

Fig. 5. Gráfico de la simulación de saldo máximo.
Conclusión
Este artículo ha demostrado que el Asesor Experto se puede modificar con bastante rapidez si las funciones principales están disponibles. Puede obtener un nuevo sistema de trading simplemente cambiando el bloque de señales e indicadores. Puede encontrar un archivo adjunto al artículo para descargar con los códigos fuente del Asesor Experto descritos aquí para estudiarlos por su cuenta, así como un archivo con la configuración de los parámetros de entrada.