Manual charting and trading toolkit (Part III). Optimization and new tools
Oleh Fedorov | 14 January, 2022
Introduction
In the previous articles (1, 2), I described the Shortcuts library and showed a library use example as an Expert Advisor. To some extent, the library is similar to a living organism. It is born, shown to public and meets the environment where it will "live". However, the environment is changing, and it has its own laws. One of the main laws is "Improve". So, one has to always develop and improve further. This article shows some of the results of this improvement process.
So, our library consists of five files.
The main file is Shortcuts.mqh. This file stores the keystroke processing logic. Furthermore, this is the only file which is directly included into an Expert Advisor or indicator. Accordingly, it includes the rest of the files and initializes them.
File GlobalVariables.mqh contains all global variables. These are mainly the settings using which you can set line color, line thickness, line elongation coefficients, and more.
File Mouse.mqh contains the description of the class that processes mouse movements. It stores current cursor coordinates, both in pixels and in "price-time" coordinates, and the current bar number.
Utilites.mqh contains helper functions. It calculates bar extreme values, line intersection points and other useful parameters which may not be directly related to drawing, but which determine all its aspects.
File Graphics.mqh is responsible for drawing based on the data from other files. Mainly the functions from this file call the Shortcuts.mqh file.
I do not always strictly group the functions. Some calculations can be made inside the drawing functions. So far, it's convenient for me to develop and maintain this structure. Perhaps someday I will improve the overall arrangement.
This implementation shows how the library code can be used in an indicator.
Optimizing library performance
Changes here are minimal.
Why did I choose an Expert Advisor in initial library versions, and not an indicator? It is simple. Every Expert Advisor runs in its own execution thread. Ideally they do not affect each other and, therefore, the terminal does not slow down much if we need to handle keyboard shortcuts on multiple charts.
However, the purpose of the Expert Advisor is to trade, while this program does not perform any trading operations. Furthermore, when an indicator is attached to a chart, it is much easier to run another Expert Advisor on it. Therefore, I decide to implement an indicator. Here arises a question of performance speed. This is especially important if the user has a lot of open windows. If for example the user has 40 open tabs (there can be more of them), then it will be hard even to handles keystroke checks if all charts at once process the keystrokes.
And then I understood: Why do we need to handle all of the charts? All checks should only be performed in the active window.
The code is very simple.
/* Shortcuts.mqh */

void CShortcuts::OnChartEvent(
  const int id,
  const long &lparam,
  const double &dparam,
  const string &sparam
)
 {
 //...

  if(ChartGetInteger(0,CHART_BRING_TO_TOP)==false)
   {
    return;
   }

 //...
At the beginning of the function, we need to add a check that this chart is active, that is, that the chart is in the foreground. If it is false, nothing should be done.
I did not measure the real performance or the gain in speed as a percentage. But according to the reviews of users who downloaded the library and who really use a lot of tabs, the application has become more responsive even in the form of an indicator. This is exactly what we need.
Also, do not forget about the purpose of the application.
First, it is designed to execute episodic functions (so, it is not called at every tick) and thus it consumes resources for a very limited time.
Second, the graphics themselves are a source of speed problems if your computer is not powerful enough. The more objects on the chart, the harder it is to process them. Nevertheless, it is a graphics library and thus you have to accept the cost of drawing and carefully control what is being drawn.
Third, the most resource-intensive function in the program is the extremum search function. But I do not know how to implement it faster. Therefore, I consider the current implementation optimal for now. Anyway, this function is called not so often, only when drawing lines and some other useful shapes and thus its non-optimal performance can be ignored so far.
All other functions are called much less often, and they work fast enough, so there is no need to discuss them.
Code refactoring: managing connectivity
The code version presented in the previous articles assumes that the application is monolithic and that its parts will not be used separately. That is why the code used the global settings directly, while some utilities depended on the mouse class.
Due to this, I could write the code faster, but from the point of view of reuse it was inconvenient. If I need to connect the existing utility file to a new project which does not use the mouse or graphics, I still have to connect the global settings file and the mouse class.
This is wrong and inconvenient.
That is why I decided to slightly modify the code. All global variables are still used. We cannot remove them, as they are the settings.
I have added private fields containing copies of these variable to the main classes. To store these values, it is necessary to add special "public" functions. They are also needed to read the values.
It looks like this:
private:
  /* Fields */
  //---
  static int          m_TrendLengthCoefficient;

public:
  /* Methods */
  //---
  static int          TrendLengthCoefficient(void) {return m_TrendLengthCoefficient;}
  //---
  static void         TrendLengthCoefficient(int _coefficient) {m_TrendLengthCoefficient=_coefficient;}
The process seems long and tedious, considering the number of existing settings.
But the advantage is great. First, the class becomes independent of external files. If anyone wants to use the class, they can use only the required variables and set their values as needed.
Second, such variables can be changed at runtime. For example, someone wants to write a function that builds a fan of lines from a single point. Each line is twice as long as the previous one, and they diverge at different angles. How to do this? Using the current implementation of the CUtilites class: before each drawing, set the parameter described for the example - TrendLengthCoefficient, placing the starting points at the same coordinates, while the final points should be placed at some circle of an arbitrary radius.
Third, data inside the class can be grouped in any convenient way. You can create structures or even complete classes that store separately, say, data relating to the rectangles, data relating to diagonal lines, and data about levels. From the point of view of the end user, the interface (the way to access the data) has not changed.
Fourth, the data should not necessarily be stored in RAM. Sometimes variables can be stored in the terminal's global variables, or generally stored in files or even a database. Some parameters can be calculated on the fly based on other parameters. With this "correct" organization of data access, as shown in the example above, the end user can reuse the code without worrying about the direct implementation of data structures. It is anyway very convenient, despite additional effort required to writing excessive code, calling unnecessary functions, and having to initialize the required variables each time an instance is created.
Therefore, I have rewritten anything I could in the current library version to match the new style, so that the utilities file can now be used "as is" in any project.
The mouse class originally contained all the related functions, so there was nothing to fix in it. The drawing class is useless without the utilities. Nevertheless, I have changed all external settings in it for the new form of fields.
So, here is what we have. The mouse and the utilities are quite independent classes which can be used on their own or in combinations. The drawing class uses both of them, but it is independent of other external files except the dispatcher that should initialize the class. The class containing keyboard shortcuts is the managing class, i.e., the dispatcher that makes the entire code work as needed. Thus, the interconnection of the classes is now much weaker, which results in the above-mentioned benefits.
"Crosshair" tool
In the previous version of the library, when drawing a trend line, a crosshair was drawn at the end of the line to shoe the time and price levels. To create it, I used two simple lines, vertical and horizontal. However, in order to show it on an arbitrary point of the chart, I had to press two keys, H and I. Sometimes it is convenient, but sometimes you want less effort. Therefore, I have added the Crosshair tool.
The tool works in a common way. Move the cursor to the desired place and press X - this will generate the Crosshair. Below is the function code.
/* Graphics.mqh */

//+------------------------------------------------------------------+
//| Draws a crosshair at specified coordinates. If the coordinates   |
//|   are not set, the mouse pointer coordinates are used.           |
//+------------------------------------------------------------------+
//| Parameters:                                                      |
//|   datetime _time - crosshair time                                |
//|   double _price - price level                                    |
//+------------------------------------------------------------------+
void CGraphics::DrawCross(datetime _time=-1,double _price=-1)
 {
  datetime time;
  double price;
//---
  if(_time==-1)
   {
    time=CMouse::Time();
   }
  else
   {
    time=_time;
   }

  if(_price==-1)
   {
    price=CMouse::Price();
   }
  else
   {
    price=NormalizeDouble(_price,Digits());
   }
  DrawSimple(OBJ_HLINE,time,price);
  DrawSimple(OBJ_VLINE,time,price);

 }
For those familiar with the code from the previous version, there is nothing special here. First, the coordinates are set. If these coordinates are passed using the parameters, then exactly these values are used. If the default parameters are set, then the coordinates of the mouse pointer are used.
Further, the line is drawn using the function that was described in the second article.
For this function to work exactly the described way, it should be called from the Shortcuts.mqh file upon a certain event - pressing the X key.
/* GlobalVariables.mqh */

  // ...

  input string   Cross_Key="X";                       // Crosshair where the mouse was clicked

  // ...
  /* Shortcuts.mqh */

  void CShortcuts::OnChartEvent( /* ... */ )
    switch(id)
     {
       case CHARTEVENT_KEYDOWN:

       // ...

       //--- Draw a crosshair
       if(CUtilites::GetCurrentOperationChar(Cross_Key) == lparam)
        {
         m_graphics.DrawCross();
        }
     }
Trendline by Arbitrary Extrema tool
The ability to create a trend line by extremes with a certain number of bars on the left and on the right is convenient. However, sometimes you may want to draw a line by arbitrary extrema. This can be done using the Q command.
The below gif shows an example of how this function works.

Because my screen capturing app has some specific features, I had to click on the chart every time before drawing. In real conditions, you should simply activate the chart, and then you can draw as many lines as you need.
The line is drawn in two steps. In the first step, you should press Q. It activates the arbitrary line drawing mode and marks the first point - thus it is clear that the command was executed.
If you do not want to use this extreme point (where the marker is), you can press Q once again — this will switch the mode and will cancel the drawing. (Someday, I will probably change this behavior by setting the Esc key to cancel, although I personally feel comfortable the way it works now).
If the first point is correct, the next point is selected by clicking near the second extremum. If it works, the marker is no longer needed. It is deleted and the trend line is drawn.
The parameters of the "arbitrary" line do not depend on the T mode, so you can configure, say, that T draws a bold line 4 px wide, four times longer than the spacing between the extrema, while Q draws a thin line which is twice as long as the spacing.
As usual, the code is split across multiple files.
Let's star from the end, from the processing of the CHARTEVENT_KEYDOWN event:
/* Shortcuts.mqh */

void CShortcuts::OnChartEvent(
  const int id,
  const long &lparam,
  const double &dparam,
  const string &sparam
)
 {
   //...

   switch(id)
   {

   //...

     case CHARTEVENT_KEYDOWN:
      if(CUtilites::GetCurrentOperationChar(Free_Line_Key) == lparam)
       {
        m_graphics.ToggleFreeLineMode();
        if(m_graphics.IsFreeLineMode()){
          m_graphics.DrawFreeLine(CMouse::Bar(),CMouse::Above());
        }
       }

    //...
If the program determines that the Q key is pressed (the letter is stored in the Free_Line_Key external variable), then it switches the drawing mode. If after mode switching it turns out that the mode is on, a command is generated to execute the line drawing function.
The click is processed in the event
/* Shortcuts.mqh */

        //...

    case CHARTEVENT_CLICK:
        ChartClick_Handler();
      break;

      //...

}

//+------------------------------------------------------------------+
//| Processing a click on a free chart field                         |
//+------------------------------------------------------------------+
void CShortcuts::ChartClick_Handler()
 {

//---
  if(m_graphics.IsFreeLineMode()){
    m_graphics.DrawFreeLine(
      CMouse::Bar(),CMouse::Above()
    );
  }

 }
Once again, please note that when the key is pressed, the drawing mode switches immediately, even before any drawing begins (the name of my function starts with Toggle). This state remains until it is switched again using the keys or after the line is drawn. When you click, the program first checks if there is anything to be drawn. If there is, it draws and switches to the neutral mode.
The ChartClick_Handler function is implemented separately, as I plan to add more modes that require clicks on the chart. For example, the mode of deleting complex objects such as crosshairs or vertical levels that were described in the previous article, may sometimes require a click on the chart to cancel the menu. So far it seems that a separate implementation of click functions will simplify further development. But all these features will be implemented later.
As for now, let's continue to consider how the drawing works.
/* Graphics.mqh */


//+------------------------------------------------------------------+
//|  Draws a line by arbitrary specified extrema. In the current     |
//|    implementation, the first extremum is set by a hot key        |
//|    (Q by default), the second is set by clicking near the        |
//|    required top                                                  |
//+------------------------------------------------------------------+
//|  Parameters:                                                     |
//|    int _bar - bar to start search at                             |
//|    bool _isUp - top or bottom?                                   |
//|    int _fractalSizeRight - number of bars to the right of extr   |
//|    int _fractalSizeLeft -  number of bars to the left of extremum|
//+------------------------------------------------------------------+
void CGraphics::DrawFreeLine(
  int _bar,
  bool _isUp,
  int _fractalSizeRight=1,
  int _fractalSizeLeft=1
)
 {
//--- Variables
  double    selectedPrice,countedPrice,trendPrice1,trendPrice2;
  datetime  selectedTime,countedTime,trendTime1,trendTime2;
  int       selectedBar,countedBar;
  int       bar1,bar2;

  string trendName="",trendDescription="p2;";
  int fractalForFirstSearch = MathMax(_fractalSizeRight,_fractalSizeLeft)* 2;

//--- Search for a bar that meets the extremum criteria
  selectedBar = CUtilites::GetNearesExtremumSearchAround(
    _bar,
    _isUp,
    _fractalSizeLeft,
    _fractalSizeRight
  );

//--- Building the starting marker
  if(0==m_Clicks_Count)
   {
    m_Clicks_Count=1;
    if(_isUp)
     {
      m_First_Point_Price=iHigh(NULL,PERIOD_CURRENT,selectedBar);
     }
    else
     {
      m_First_Point_Price=iLow(NULL,PERIOD_CURRENT,selectedBar);
     }
    m_First_Point_Time=iTime(NULL,PERIOD_CURRENT,selectedBar);
    //---
    m_First_Point_Time=CUtilites::DeepPointSearch(
                         m_First_Point_Time,
                         _isUp,
                         ENUM_TIMEFRAMES(Period())
                       );
    //---
    DrawFirstPointMarker(_isUp);

   }
//--- Processing a click on the chart
  else
   {
    ObjectDelete(0,m_First_Point_Marker_Name);
    if(_isUp)
     {
      countedPrice=iHigh(NULL,PERIOD_CURRENT,selectedBar);
     }
    else
     {
      countedPrice=iLow(NULL,PERIOD_CURRENT,selectedBar);
     }
    countedTime=iTime(NULL,PERIOD_CURRENT,selectedBar);
    //--- Move a point in time on smaller timeframes
    countedTime=CUtilites::DeepPointSearch(countedTime,_isUp,ENUM_TIMEFRAMES(Period()));

    //--- The line is always drawn from left to right.
    //--- If it is not convenient, you can comment this part
    //---   up to the next comment
    if(countedTime<m_First_Point_Time)
     {
      trendTime1=countedTime;
      trendPrice1=countedPrice;
      trendTime2=m_First_Point_Time;
      trendPrice2=m_First_Point_Price;
     }
    else
     {
      trendTime2=countedTime;
      trendPrice2=countedPrice;
      trendTime1=m_First_Point_Time;
      trendPrice1=m_First_Point_Price;
     }
    //--- Set the description for future correction
    trendDescription+=TimeToString(trendTime2)+";"+DoubleToString(trendPrice2,Digits());

    //selectedPrice=CUtilites::EquationDirect(
    //                trendTime1,trendPrice1,trendTime2,trendPrice2,selectedTime
    //              );
    trendName=CUtilites::GetCurrentObjectName(allPrefixes[0],OBJ_TREND);

    TrendCreate(
      0,                    // Chart ID
      trendName,            // Line name
      0,                    // Subwindow number
      trendTime1,           // time of the first point
      trendPrice1,          // price of the first point
      trendTime2,           // time of the second point
      trendPrice2,          // price of the second point
      CUtilites::GetTimeFrameColor(
        CUtilites::GetAllLowerTimeframes()
      ),                    // line color
      Trend_Line_Style,     // line style
      Trend_Line_Width,     // line width
      false,                // background object
      true,                 // is the line selected
      true                  // ray to the right
    );

    bar1=iBarShift(NULL,0,trendTime1);
    bar2=iBarShift(NULL,0,trendTime2);
    selectedTime = CUtilites::GetTimeInFuture(
                     //iTime(NULL,PERIOD_CURRENT,0),
                     trendTime1,
                     (int)((bar1-bar2)*m_Free_Trend_Length_Coefficient),
                     COUNT_IN_BARS
                   );
    selectedPrice= ObjectGetValueByTime(0,trendName,selectedTime);
    ObjectSetInteger(0,trendName,OBJPROP_RAY,IsRay());
    ObjectSetInteger(0,trendName,OBJPROP_RAY_RIGHT,IsRay());
    ObjectMove(0,trendName,1,selectedTime,selectedPrice);
    //---
    m_Clicks_Count=0;
    ToggleFreeLineMode();
   }

  ObjectSetString(0,trendName,OBJPROP_TEXT,trendDescription);
  ChartRedraw();
 }
The function is quite lengthy, so I will probably split it into several smaller functions later. I hope that the highlighting and comments will assist in understanding how it works.
In this implementation, the function checks both signals: the event indicating that the drawing of the first point started and the notification that the second point is found, and its drawing started. The m_Clicks_Count variable was introduced to distinguish these events. According to the letter "m_" at the beginning it is clear that the variable is global for this class, and its lifetime is equal to the lifetime of the object instance.
If it is the first function call (i.e. a key was pressed), it is necessary to find the first point and to draw the marker.
If it is the second call, it is necessary to delete the marker, to find the second point and to draw a line. These were the main five blocks, while all others are needed for their implementation.
In the current implementation, the price in the future is determined using the straight line itself. Generally, it is not a very good idea, since at the moment of drawing, the terminal has to draw a ray first, then it moves the end of the line to the desired point and decides whether to draw the ray (depending on external settings). Usually, I do preliminary calculations using the famous function of Igor Kim (Kim IV), which is also included in the library. The pink part of the code has a commented call of this function. However, in this case, if the points are calculated by time, we may have an error related to the weekend, which I would like to avoid. Of course, the error could easily be avoided by calculating the line by bar numbers and then recalculating the numbers into real dates. However, the current implementation seems clearer to me.
So, in the code highlighted in pink, the basic extrema have already been found. What we need to do now is draw the line. First, we draw a line between two basic extreme points - here we should enable the "ray" property so that the line is drawn into the future (the TrendCreate function at the very beginning of this block).
Calculate the required future time based on the settings:
selectedTime = CUtilites::GetTimeInFuture(
                     //iTime(NULL,PERIOD_CURRENT,0),
                     trendTime1,
                     (int)((bar1-bar2)*m_Free_Trend_Length_Coefficient),
                     COUNT_IN_BARS
                   );
Then, get the necessary price using the standard function.
selectedPrice= ObjectGetValueByTime(0,trendName,selectedTime);
After that, we only need to move the second point of the line to the required coordinates and set the real ray property (by default, this property is switched using the R key, from "Ray").
Once the line is drawn, the click waiting state should be turned off - this is done in the following lines:
    m_Clicks_Count=0;
    ToggleFreeLineMode();
The code in other blocks of this function is a little more complicated. Here, I have added a couple of useful features to improve the usability of straight lines.
The first feature is related to the line shift effect on smaller timeframes. If you draw lines in a usual way, then something like this will appear when you switch between timeframes:


The left edge of the line which exactly coincides with an extremum at D1 is shifted to the left at H4 and thus it does not coincide with the extremum. This is an obvious effect because the extremum of a day does not have to fall on the day beginning. If you need higher accuracy, when drawing manually, you can plot the line approximately and then switch to lower timeframes in order to adjust the edges.
This solution can be utilized if you have one or two charts. What if you have 20 of them? Or even 100? This can be annoying.
Since the program has an automated drawing function, we can entrust this chore to the program when drawing every object.
Based on these ideas, I decided to create the DeepPointSearch function.
DeepPointSearch function
In the arbitrary line drawing function, the DeepPointSearch function is called twice, once for each point. The function is available in the utilities file. Its code is as follows:
//+------------------------------------------------------------------+
//| Search for a given point on lower timeframes                     |
//+------------------------------------------------------------------+
//| Parameters:                                                      |
//|   datetime _neededTime - start time on a higher timeframe        |
//|   bool _isUp - search by highs or by lows                        |
//|   ENUM_TIMEFRAMES _higher_TF - the highest period                |
//+------------------------------------------------------------------+
//| Return value:                                                    |
//|   More accurate date (on the lowest possible timeframe)          |
//+------------------------------------------------------------------+
datetime CUtilites::DeepPointSearch(
  datetime _neededTime,
  bool _isUp,
  ENUM_TIMEFRAMES _higher_TF=PERIOD_CURRENT
)
 {
//---
  //--- As a result it gets the most accurate time available
  datetime deepTime=0;
  //--- current timeframe
  ENUM_TIMEFRAMES currentTF;
  //--- The number of the highest timeframe in the list of all available periods
  int highTFIndex = GetTimeFrameIndexByPeriod(_higher_TF);
  //--- The higher period in seconds
  int highTFSeconds = PeriodSeconds(_higher_TF);
  //--- Current interval in seconds
  int currentTFSeconds;
  //--- Counter
  int i;
  //--- Bar number on a higher timeframe
  int highBar=iBarShift(NULL,_higher_TF,_neededTime);
  //--- Bar number on the current timeframe
  int currentBar;
  //--- The total number of bars on the current timeframe
  int tfBarsCount;
  //--- How many bars of a lower TF fit into one bar of a higher TF
  int lowerBarsInHigherPeriod;
  //--- Maximum allowed number of bars in the terminal
  int terminalMaxBars = TerminalInfoInteger(TERMINAL_MAXBARS);

//--- Loop sequentially through all timeframes
  for(i=0; i<highTFIndex; i++)
   {
    //--- Get a timeframe by a number in the list
    currentTF=GetTimeFrameByIndex(i);
//--- Check if this timeframe has the required time.
    tfBarsCount=iBars(NULL,currentTF);
    if(tfBarsCount>terminalMaxBars-1)
     {
      tfBarsCount=terminalMaxBars-1;
     }
    deepTime=iTime(NULL,currentTF,tfBarsCount-1);
//--- If it has, find it.
    if(deepTime>0 && deepTime<_neededTime)
     {
      currentTFSeconds=PeriodSeconds(currentTF);

      //--- Search for the required bar only within the higher TF candlestick
      lowerBarsInHigherPeriod=highTFSeconds/currentTFSeconds;
      currentBar = iBarShift(NULL,currentTF,_neededTime);

      if(_isUp)
       {
        currentBar = iHighest(
                       NULL,currentTF,MODE_HIGH,
                       lowerBarsInHigherPeriod+1,
                       currentBar-lowerBarsInHigherPeriod+1
                     );

       }
      else
       {
        currentBar = iLowest(
                       NULL,currentTF,MODE_LOW,
                       lowerBarsInHigherPeriod+1,
                       currentBar-lowerBarsInHigherPeriod+1
                     );
       }
      deepTime=iTime(NULL,currentTF,currentBar);
      //--- Once the required time is found, stop the search
      break;
     }
   }
//--- If reached the end of the loop
  if(i==highTFIndex)
   {
    //--- then the required time is only available on the higher timeframe.
    deepTime=_neededTime;
   }
//---
  return (deepTime);
 }
For me, the main difficulty was to understand how the main search fragment should work. Naturally, the first thing to do is to determine whether the required time exists in the history. As you may know, lower timeframes often do not contain some of the information available on higher timeframes. The standard iBars function calculates the number of bars in history. This is however not enough, as the terminal can only display a limited number of the bars. At the very beginning, we find out how many bars the terminal can display, using the following code
//--- Maximum allowed number of bars in the terminal
  int terminalMaxBars = TerminalInfoInteger(TERMINAL_MAXBARS);
If the history contains too many bars, limit them to the displayed ones.
Next, using the iTime function, define the time of the last bar in history. If this time is greater than the desired one, then there is no point in looking further, since the highest available date is the most recent one, so simply switch to the next, higher TF. If the last available candlestick in the terminal is earlier than the one we are looking for, then we have most likely found the deepest place where this point is still meaningful.
The routine begins after all the checks. The required point will be the most extreme one within the range of the higher TF candlestick. We only need to determine how many candlesticks should be analyzed. After that, standard functions assist in determining the most extreme extremum, based on which we can calculate the time and finish the work.
In the current implementation of the library, this function only applies to the lines that are called by the T and Q key. However, in the next version this feature will be available for all instruments. Furthermore, I plan to make it customizable for each instrument separately.
Time correction
The second specific feature of this implementation is the correction of the lines by time. The below animation explains the problem.
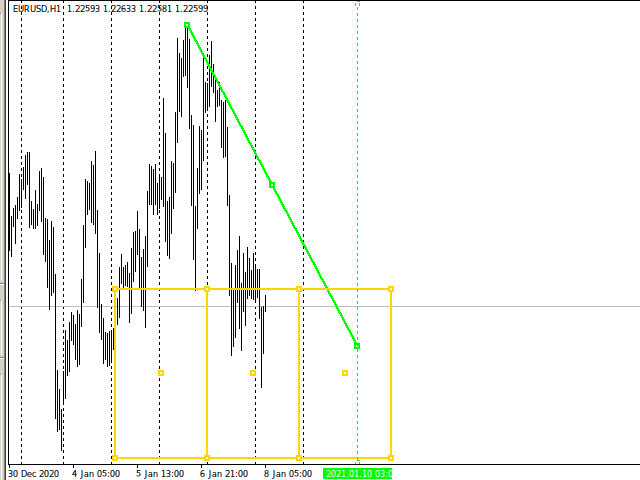
Pay attention to the contraction of the last rectangle. The end of the line which was at a distance of more than a day form the middle rectangle, has turned out to be very close to it. Accordingly, the above points also shifted (note the behavior of the straight line near the top). When the line contracts, new breakouts appear which may affect the trading strategy.
This may not be that crucial for the forex market, where the spikes can occur, say, once a week. But in the stock market such time gaps can occur every day, depending on the exchange, and this often happens within a day.
This is where the automation comes in handy!
To make the part work as desired, we should somehow save the "correct" coordinates and then adjust them as needed.
I have chosen the description of a straight line to save coordinates, since most traders do not use descriptions when creating automatic objects. Optionally, we can use files with a list of lines or terminal global variable if there are too many lines.
/* Graphics.mqh */

void CGraphics::DrawFreeLine(//...)
 {

//...
  string trendDescription="p2;";

//...
  trendDescription+=TimeToString(trendTime2)+";"+DoubleToString(trendPrice2,Digits());

//...
  ObjectSetString(0,trendName,OBJPROP_TEXT,trendDescription);
Next, apply the earlier described actions to the coordinates on the "physical" line. I think the below code is quite clear.
/* Utilites.mqh */

//+------------------------------------------------------------------+
//|  Adjusts the position of line end in the future in case of price |
//|   gaps                                                           |
//+------------------------------------------------------------------+
//| Parameters:                                                      |
//|   string _line_name - the name of the line to be corrected       |
//+------------------------------------------------------------------+
void CUtilites::CorrectTrendFutureEnd(string _line_name)
 {
//---
  if(ObjectFind(0,_line_name)<0)
   {
    PrintDebugMessage(__FUNCTION__+" _line_name="+_line_name+": Object does not exist");
    //--- If there is no object to search, there is nothing more to do.
    return;
   }
  //--- Get a description
  string line_text=ObjectGetString(0,_line_name,OBJPROP_TEXT);

  string point_components[]; // array for point description fragments
  string name_components[];  // array containing line name fragments
  string helpful_name="Helpful line"; // the name of the auxiliary line
  string vertical_name=""; // the name of the corresponding vertical from the crosshair

  //--- Get the point time and price in string form
  int point_components_count=StringSplit(line_text,StringGetCharacter(";",0),point_components);

  datetime time_of_base_point; // time of the basic point
  datetime time_first_point,time_second_point; // the time of the first and the second point
  datetime time_far_ideal; // estimated time in the future
  double price_of_base_point; // the price of the basic point
  double price_first_point,price_second_point; // the prices of the first and the second point
  int i; // counter

//--- Check if the line is needed
  if(line_text=="" || point_components_count<3 || point_components[0]!="p2")
   {
    PrintDebugMessage(__FUNCTION__+" Error: the line cannot be used");
    return;
   }
//--- Get the coordinates of the "basic" point from the line description
  time_of_base_point=StringToTime(point_components[1]);
  price_of_base_point=StringToDouble(point_components[2]);
  if(time_of_base_point==0 || price_of_base_point==0)
   {
    PrintDebugMessage(__FUNCTION__+" Error: Unusable description");
    return;
   }
//--- Get the real coordinates of the line
  time_first_point = (datetime)ObjectGetInteger(0,_line_name,OBJPROP_TIME,0);
  time_second_point = (datetime)ObjectGetInteger(0,_line_name,OBJPROP_TIME,1);
  price_first_point = ObjectGetDouble(0,_line_name,OBJPROP_PRICE,0);
  price_second_point = ObjectGetDouble(0,_line_name,OBJPROP_PRICE,1);

//--- Create an auxiliary line (from the starting point to the base one)
  MakeHelpfulLine(
    time_first_point,
    price_first_point,
    time_of_base_point,
    price_of_base_point
  );

//--- Calculate the correct time for the current situation
  time_far_ideal=ObjectGetTimeByValue(0,helpful_name,price_second_point);
//---
  if(time_second_point != time_far_ideal)
   {
    //--- move the free end of the trend line
    ObjectMove(0,_line_name,1,time_far_ideal,price_second_point);
    //--- and the corresponding vertical
    StringSplit(_line_name,StringGetCharacter("_",0),name_components);
    for(i=0; i<ObjectsTotal(0,-1,OBJ_VLINE); i++)
     {
      vertical_name = ObjectName(0,i,-1,OBJ_VLINE);
      if(name_components[0]==StringSubstr(vertical_name,0,StringFind(vertical_name,"_",0)))
       {
        if((datetime)ObjectGetInteger(0,vertical_name,OBJPROP_TIME,0)==time_second_point)
         {
          ObjectMove(0,vertical_name,0,time_far_ideal,price_second_point);
          break;
         }
       }
     }
   }
  // Delete the auxiliary line
  RemoveHelpfulLine();
 }
This code should be called at some intervals. I set it to the beginning of each new hour.
/* Shortcuts.mq5 */

int OnCalculate(/*...*/)
 {
   //...
   if(CUtilites::IsNewBar(First_Start_True,PERIOD_H1))
   {
    for(i=0; i<all_lines_count; i++)
     {
      line_name=ObjectName(0,i,-1,OBJ_TREND);
      CUtilites::CorrectTrendFutureEnd(line_name);
      ChartRedraw();
     }
   }
   //...
 }
Keys used in the current library implementation
| Action | Key | Means |
|---|---|---|
| Move timeframe up by main TFs (from the panel of TFs) | U | Up |
| Move timeframe down | D | Down |
| Change chart Z level (chart on top of all objects or not) | Z | Z order |
| Draw a sloping trend line based on two unidirectional extreme points closest to the mouse | T | Trend line |
| Switch ray mode for new lines | R key | Ray |
| Draw a simple vertical line | I(i) | [Only visual vertical] |
| Draw a simple horizontal line | H | Horizontal |
| Draw Andrews' pitchfork set | P | Pitchfork |
| Draw Fibonacci fan (VFun) | F key | Fun |
| Draw a short horizontal level | S | Short |
| Draw an extended horizontal level | L key | Long |
| Draw a vertical line with level marks | V | Vertical |
| Draw crosshairs | X | [Only visual cross] |
| Draw a line by arbitrary extreme points | Q | [No conformity... "L" and "T" is not free] |
| Draw a group of rectangles | B | Box |
Conclusion
I hope that this material will be helpful for you. If you have any comments or improvement ideas, please share them in comments to the article.
Further, I plan to implement the ability to draw lines not only at strict extreme points, but also at tangents.
Also, I'd like to implement something for channels. Now I only think about working with equidistant channels. However, if anyone leaves a comment or PMs me, suggesting the drawing of something else following the library principles, I will consider such suggestions.
As further improvement, later I will implement the saving of settings in a file (instead of or along with the indicator settings via input variable) and the addition of a graphical interface to allow changing the settings on the flow.