Indicator for Kagi Charting
Dmitriy Zabudskiy | 23 December, 2013
Introduction
The article "Indicator for Point and Figure Charting" has described one of the programming ways of creating Point and figure chart. This chart is known since the 19th century. However, this is not the only chart from the remote past. Another notable representative of the early types of the financial market representation is Kagi chart. This chart will be discussed in the present article.
The stock exchange – financial institution unfamiliar to the 19th-century Japan – has been established in May 1878. It is known as Tokyo Stock Exchange nowadays. This event played a vital role in creating and subsequent development of Kagi charts. Europe and USA came to know Kagi charts after the publication of Steve Nison's "Beyond Candlesticks: New Japanese Charting Techniques Revealed" in 1994.
The Japanese words "Kagi" means an L-shaped key that was in use at the time of the chart development. Also, there is a modified version of the name – "key chart". In Steve Nison's "Beyond Candlesticks", you can also find alternative names of the chart: price range chart, hook chart, delta or chain chart.
What is so special about this chart? Its main feature is that it ignores the time scale leaving only the price one (unlike Japanese candlesticks, bars and lines). Thus, the chart hides inconsiderable price fluctuations leaving only the most significant ones.
The chart represents a set of thick Yang and thin Yin lines replacing each other depending on the market situation. In case the market moves in the same direction, the line is extended reaching a new price range. However, if the market turns back and reaches a predefined amount, the Kagi line is drawn in the opposite direction in the new column. The predefined amount is set either in points (usually used for currency pairs), or in percentage value of the current price (usually used for stocks). The line thickness varies depending on the closest High or Low breakthrough.
1. Charting example
Let's use history data on EURUSD, H1 from October 8 to 11.
An example of standard imaging with a reverse threshold of 15 points is displayed in Fig. 1:
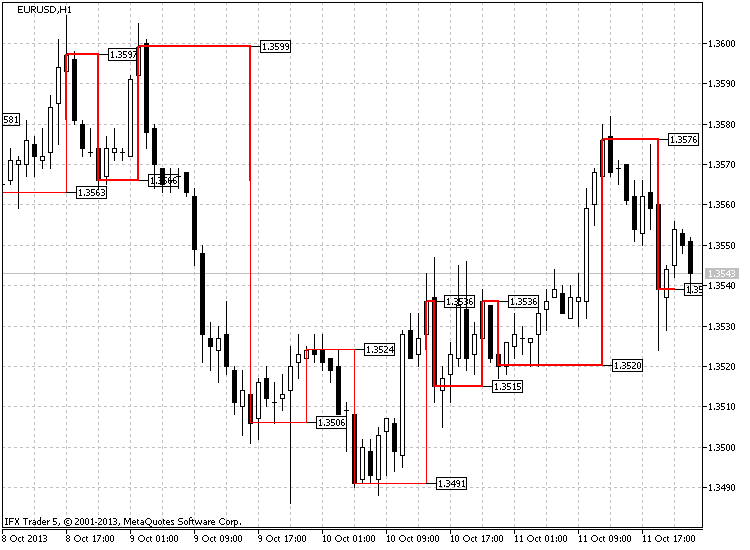
Fig. 1. Kagi chart, EURUSD H1
As we can see, the price started falling at 17:00. The downward movement continued till 21:00. At 22:00, the price moves upwards from 1.3566 and is closed at 1.3574. In other words, the price passes 11 points. This is not enough for a reversal, but the new Low has not been reached either. The next two hours the price goes flat and finally, at 01:00 (October 9), we see a strong upward movement, which is closed at 1.3591 comprising 25 points (1.3591-1.3566). This means that the price reversed up.
The uptrend continues the following hour. The price reaches 1.3599 reinforcing the thick Yang line. At 03:00, the price falls sharply closing at 1.3578, which is 21 points from the previous High (1.3599-1.3578). This is more than enough for the reversal. The line moves down but retains its form (thick Yang line).
Up to 16:00, the price moves down and finally it breaks through the nearest minimum and changes from thick Yang to thin Yin line. The previously mentioned Low value of 1.3566 had served as a breakthrough price here. The price continues moving as a Yin line and is changed to Yang at 14:00 on October 10 breaking through the nearest High of 1.3524 formed at 23:00 (October 9). This little example shows how Kagi chart is formed.
2. Kagi Indicator Charting Principle
In order to make the indicator independent from the current timeframe, it was decided to copy the data of the timeframe, at which the indicator was supposed to be formed, separately and then create the indicator using the obtained data.
This allows examining several timeframes simultaneously on a single chart expanding the boundaries of the technical analysis on Kagi charts. The indicator itself is located in a separate window, but it is also possible to display data on the main chart. In other words, basic formation (standard or modified look) is performed in the indicator window. The indicator is copied to the main chart, also price and time marks (depending on the settings) are drawn.
As mentioned earlier, the indicator draws the chart both in standard and modified version. The standard one has been described above. Now, let's consider the modified version.
I don't know if it is a new idea, but I have not heard of such version. The idea of the additional filter is that not only reverse points but each move of the chart is filtered now. In other words, the price should move some specified distance in order for the new High or Low (not to be confused with shoulder/waist) to be formed. Generally, wherever the price moves, it should first cover a specified distance. After that, it is defined if it was a trend continuation or a reversal.
Fig. 2 shows how the principle works. The modified chart look is shown in blue, while the standard one – in red. As we can see, the modified look responds to price movement changes more slowly filtering most of the minor signals.
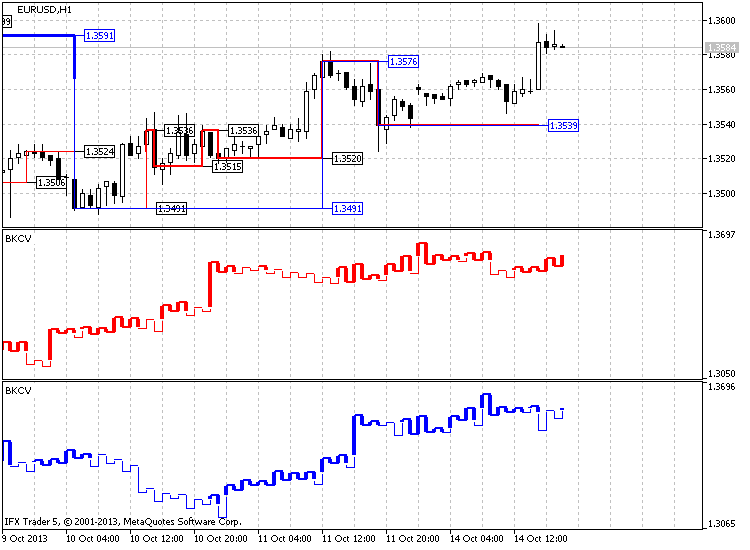
Fig. 2. Modified (blue line) and standard (red line) versions of creating Kagi chart
Apart from Kagi chart, the indicator provides some additional elements both in the indicator window and in the main chart.
Depending on the settings, the marks can be set in the indicator window. These marks provide data on reversal prices. The same function is implemented using price levels, which (depending on the settings) can distribute evenly along the window at the entire price range used for forming the indicator or at each chart reversal. The colors can be set in three versions: according to the reversal type (up - down), line type (Yin - Yang) or no color change.
Reversal price marks, including temporary ones, are provided on the main chart. These marks (depending on the settings) may be of a single color or change the color in accordance with Yin or Yang line colors.
The entire indicator code is implemented using the functions communicating with each other through global variables.
The code can be divided into three main functions and eleven additional ones. The main burden of calculations and buffer fillings of basic graphical constructions and additional buffer arrays rests on the function of Kagi chart formation in the indicator window. The other two functions are responsible for providing the data: the first one copies the time data, while the other one - data on the prices of each bar of the selected timeframe.
The remaining auxiliary functions are responsible for performing all the constructions, deleting the objects, unloading the indicator accompanied by deletion of all indicator objects, reversal parameter calculation, drawing marks on the main chart and indicator window, creating graphical objects of "Trend line" type, drawing Kagi on the main chart, as well as defining the arrival of the new bar to launch the indicator formation.
3. Indicator Code and Algorithm
Now, let's examine the indicator code and the algorithm of its formation in details. The code is quite large and it may be difficult enough for novice programmers to understand it. The functions communicating with each other via the global variables make the code quite confusing. In this part of the article, I will explain each function and part of the code separately. First, I will describe the indicator settings and then there will be clarifications concerning data copying initial functions, reversal parameter calculation, main function of the Kagi chart formation and calculation and other auxiliary functions.
3.1. Indicator Input Parameters
The code starts with the declaration of the indicator in a separate window, as well as of 12 buffers and 8 indicator graphical constructions. First of all, let's define why 8 graphical constructions, including two "histograms" and six "lines", have been used. Each "histogram" builds its own vertical line. One of the lines is responsible for Yin line, while the other one is for Yang line.
The case is somewhat more complicated with the "lines", as there are three of them for each line. This is done due to the fact that the line is drawn if there is another point being drawn near the first one. In other words, we need only two "line"-type graphical constructions to be rotated to draw two lines adjacent to each other. However, if we need these lines to skip necessary points, we need the third construction to be rotated with other two ones.
This is explained in Figure 3, where you can see what happens if only two "line"-type graphical constructions are used:
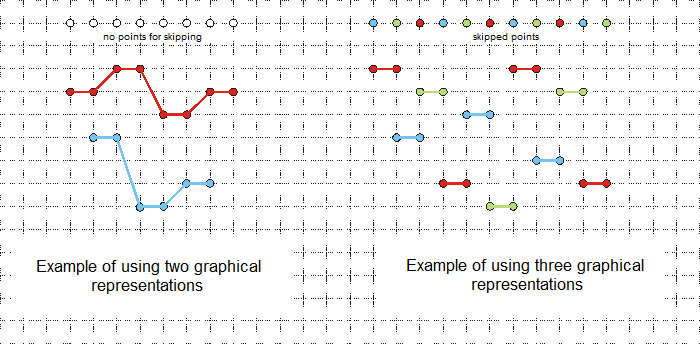
Fig. 3. Example of using two and three graphical "line"-type constructions to display shoulder and waist lines
Then, the settings menu is created. There are five enumerations here (let's examine them in the input parameters).
The first input parameter “period” is a period, at which construction is performed, it is followed by "period_to_redraw" - chart construction update period and the last time parameter is “start_data” - the time construction starts from.
These parameters are followed by chart construction and additional labeling ones:
- kagi_type – chart construction type defined by user, standard or modified;
- price_type – type of the price used for construction: Close, Open, High and Low;
- type_doorstep – used reversal type: point and percentage;
- doorstep – reversal value (specified in points or percentage value depending on the parameter above);
- color_yin – Yin line color in the indicator window;
- color_yang – Yang line color in the indicator window;
- width_yin – Yin line width in the indicator window;
- width_yang – Yang line width in the indicator window;
- levels_on_off – whether price levels should be drawn in the indicator window;
- levels_type – types of price levels in the indicator window. There are two values to choose from: at each reversal or evenly throughout the price range;
- levels_number – number of price levels in the indicator window;
- levels_change_color – allows changing the color of price level lines; the options are upper and lower reversals, Yin and Yang lines or no changes;
- levels_first_color – the first color of a price level;
- levels_second_color – the second color of a price level;
- label_1 – drawing chart reversal price labels in the indicator window;
- label_1_number – number of displayed labels in the indicator window;
- label_1_color – color of price labels in the indicator window;
- label_2 – drawing price labels on the main chart;
- label_2_color – label color on the main chart;
- time_line_draw – drawing reversal time lines on the main chart;
- time_separate_windows – drawing continuation of reversal time lines from the main chart;
- time_line_change_color – change the color of the time line depending on the reversal label at Yin or Yang line;
- time_first_color – the first color of the time line on the main chart;
- time_second_color – the second color of the time line on the main chart;
- kagi_main_chart – whether Kagi should be drawn on the main chart;
- color_yin_main – Yin line color on the main chart;
- color_yang_main – Yang line color on the main chart;
- width_yin_main – Yin line width on the main chart;
- width_yang_main – Yang line width on the main chart;
- magic_numb – magic number used for building objects and their deletion, as well as in the indicator name in order to launch several indicators on a single chart.
These parameters are in their turn followed by declarations of the indicator buffers, auxiliary buffers for storing price and time values, auxiliary variables (stop_data, bars_copied, bars_copied_time, copy_history, copy_time), arrays for storing data on what Yin or Yang line the change in the chart movement occurred, the time and price of that change, central price (if Yin is replaced by Yang on the bar or vice versa). Finally, one of the most used global variables containing data on the number of "а" chart movement changes is declared.
//+------------------------------------------------------------------+
//|                                                         BKCV.mq5 |
//|                                   Azotskiy Aktiniy ICQ:695710750 |
//|                          https://www.mql5.com/ru/users/Aktiniy |
//+------------------------------------------------------------------+
//--- Build Kagi Chart Variable
#property copyright "Azotskiy Aktiniy ICQ:695710750"
#property link      "https://www.mql5.com/en/users/Aktiniy"
#property version   "1.00"
#property description "Build Kagi Chart Variable"
#property description " "
#property description "This indicator makes drawing a chart Kagi as a matter of indicator window, and in the main chart window"
#property indicator_separate_window
#property indicator_buffers 12
#property indicator_plots   8
//--- plot Yin
#property indicator_label1  "Yin"
#property indicator_type1   DRAW_HISTOGRAM2
#property indicator_color1  clrRed
#property indicator_style1  STYLE_SOLID
#property indicator_width1  1
//--- plot Yin1
#property indicator_label2  "Yin1"
#property indicator_type2   DRAW_LINE
#property indicator_color2  clrRed
#property indicator_style2  STYLE_SOLID
#property indicator_width2  1
//--- plot Yin2
#property indicator_label3  "Yin2"
#property indicator_type3   DRAW_LINE
#property indicator_color3  clrRed
#property indicator_style3  STYLE_SOLID
#property indicator_width3  1
//--- plot Yin3
#property indicator_label4  "Yin3"
#property indicator_type4   DRAW_LINE
#property indicator_color4  clrRed
#property indicator_style4  STYLE_SOLID
#property indicator_width4  1
//--- plot Yang
#property indicator_label5  "Yang"
#property indicator_type5   DRAW_HISTOGRAM2
#property indicator_color5  clrRed
#property indicator_style5  STYLE_SOLID
#property indicator_width5  2
//--- plot Yang1
#property indicator_label6  "Yang1"
#property indicator_type6   DRAW_LINE
#property indicator_color6  clrRed
#property indicator_style6  STYLE_SOLID
#property indicator_width6  2
//--- plot Yang2
#property indicator_label7  "Yang2"
#property indicator_type7   DRAW_LINE
#property indicator_color7  clrRed
#property indicator_style7  STYLE_SOLID
#property indicator_width7  2
//--- plot Yang3
#property indicator_label8  "Yang3"
#property indicator_type8   DRAW_LINE
#property indicator_color8  clrRed
#property indicator_style8  STYLE_SOLID
#property indicator_width8  2
//--- Enumerations as input data (for more attractive setting)
//--- Kagi charting type
enum kagi_type_enum
  {
   classic=0,  // Classic
   modified=1, // Modified
  };
//--- Type of the price used for construction
enum price_type_enum
  {
   c=0, // Close
   o=1, // Open
   h=2, // High
   l=3, // Low
  };
//--- Type of the used reversal
enum type_doorstep_enum
  {
   point=0,   // Point
   procent=1, // Percent
  };
//--- Type of levels location
enum levels_type_enum
  {
   cor=0, // Cornering
   equ=1, // Equal distance
  };
//--- Level colors change type (works when "Type of levels location"="Cornering")
enum levels_change_color_enum
  {
   up_down=0,  // Up & Down
   yin_yang=1, // Yin & Yang
   no=2,       // Don't change
  };
//--- input parameters
input ENUM_TIMEFRAMES period=PERIOD_CURRENT;                // Calculation period to build the chart
input ENUM_TIMEFRAMES period_to_redraw=PERIOD_M1;           // Refresh period chart
input datetime start_data=D'2013.07.10 00:00:00';           // Start time to build the chart
input kagi_type_enum kagi_type=classic;                     // The type to build Kagi chart
input price_type_enum price_type=c;                         // Price used to build chart
input type_doorstep_enum type_doorstep=point;               // Type calculate doorstep
input double   doorstep=25;                                 // Doorstep reversal
input color    color_yin=clrRed;                            // Color Yin line (indicator window)
input color    color_yang=clrRed;                           // Color Yang line (indicator window)
input char     width_yin=1;                                 // Width Yin line (indicator window)
input char     width_yang=2;                                // Width Yang line (indicator window)
input bool     levels_on_off=false;                         // Draw level (indicator window)
input levels_type_enum levels_type=cor;                     // Type of drawing levels (indicator window)
input uint     levels_number=6;                             // Number of levels  (indicator window)
input levels_change_color_enum levels_change_color=up_down; // Type change color of levels (indicator window)
input color    levels_first_color=clrBeige;                 // The first color of level (indicator window)
input color    levels_second_color=clrCoral;                // The second color of level (indicator window)
input bool     label_1=true;                                // Draw price label on (indicator window)
input uint     label_1_number=10;                           // The number of labels (indicator window)
input color    label_1_color=clrGreenYellow;                // The color of labels (indicator window)
input bool     label_2=true;                                // Draw price label on (main chart)
input color    label_2_color=clrGreenYellow;                // The color of labels (main chart)
input bool     time_line_draw=true;                         // Draw a timeline reversal (main chart)
input bool     time_separate_windows=false;                 // Draw a timeline reversal on indicator window
input bool     time_line_change_color=true;                 // Different color timeline on the Yin and Yang lines (main chart)
input color    time_first_color=clrRed;                     // The first color of timeline (main chart)
input color    time_second_color=clrGreenYellow;            // The second color of timeline (main chart)
input bool     kagi_main_chart=true;                        // Draw Kagi on main chart (main chart)
input color    color_yin_main=clrRed;                       // Color Yin line (main chart)
input color    color_yang_main=clrRed;                      // Color Yang line (main chart)
input char     width_yin_main=1;                            // Width Yin line (main chart)
input char     width_yang_main=2;                           // Width Yang line (main chart)
input long     magic_numb=65758473787389;                   // The magic number for drawing objects
//--- indicator buffers
double         YinBuffer1[];
double         YinBuffer2[];
double         Yin1Buffer[];
double         Yin2Buffer[];
double         Yin3Buffer[];
double         YangBuffer1[];
double         YangBuffer2[];
double         Yang1Buffer[];
double         Yang2Buffer[];
double         Yang3Buffer[];
//--- additional variables
double Price[]; // Buffer for storing the copied price data
double Time[];  // Buffer for storing the copied time data
//---
datetime stop_data;      // Current time
int bars_copied=0;       // Number of the already copied bars from the initial date
int bars_copied_time;    // Number of the already copied bars having the initial date
bool copy_history=false; // Price history copying result
bool copy_time=false;    // Time history copying result
//---
datetime time_change[];      // Array for writing the time when the chart movement started changing (up or down)
char time_line[];            // Array for storing the data on what line (Yin=0 or Yang=1) direction has changed
double time_change_price[];  // Array for writing the chart movement change price
double time_central_price[]; // Array for writing the average price during the chart movement change

uint a=0; // Variable for building the chart, number of chart reversals is fixed
3.2. Indicator Initialization Function
The next one is the indicator initialization function. Indicator buffers and their indexing (mainly as time series; as Kagi chart is shorter than the main one, it is better to draw it backwards) are specified there. Also, the values that are not to be displayed on the screen are set (EMPTY_VALUE=-1).
Now, we assign the indicator name and display accuracy. As mentioned earlier, the magic number is added to the name. This is done to provide correct operation of ChartWindowFind() function. Otherwise, the graphical object drawn in the indicator window is displayed only at the first launched indicator (if several indicators on a single chart are used).
Next, we assign names to construction lines, prohibit display of the current numerical values in the indicator window, set the color and width of Yin and Yang lines, set the number of the price levels displayed in the indicator window.
//+------------------------------------------------------------------+
//| Custom indicator initialization function                         |
//+------------------------------------------------------------------+
int OnInit()
  {
//--- indicator buffers mapping
   SetIndexBuffer(0,YinBuffer1,INDICATOR_DATA);
   ArraySetAsSeries(YinBuffer1,true);
   SetIndexBuffer(1,YinBuffer2,INDICATOR_DATA);
   ArraySetAsSeries(YinBuffer2,true);
   SetIndexBuffer(2,Yin1Buffer,INDICATOR_DATA);
   ArraySetAsSeries(Yin1Buffer,true);
   SetIndexBuffer(3,Yin2Buffer,INDICATOR_DATA);
   ArraySetAsSeries(Yin2Buffer,true);
   SetIndexBuffer(4,Yin3Buffer,INDICATOR_DATA);
   ArraySetAsSeries(Yin3Buffer,true);
//---
   SetIndexBuffer(5,YangBuffer1,INDICATOR_DATA);
   ArraySetAsSeries(YangBuffer1,true);
   SetIndexBuffer(6,YangBuffer2,INDICATOR_DATA);
   ArraySetAsSeries(YangBuffer2,true);
   SetIndexBuffer(7,Yang1Buffer,INDICATOR_DATA);
   ArraySetAsSeries(Yang1Buffer,true);
   SetIndexBuffer(8,Yang2Buffer,INDICATOR_DATA);
   ArraySetAsSeries(Yang2Buffer,true);
   SetIndexBuffer(9,Yang3Buffer,INDICATOR_DATA);
   ArraySetAsSeries(Yang3Buffer,true);
//--- add the buffer for copying data on prices for calculation
   SetIndexBuffer(10,Price,INDICATOR_CALCULATIONS);
//--- add the buffer for copying data on bar open time for construction
   SetIndexBuffer(11,Time,INDICATOR_CALCULATIONS);

//--- set what values are not to be drawn
   for(char x=0; x<8; x++)
     {
      PlotIndexSetDouble(x,PLOT_EMPTY_VALUE,-1);
     }
//--- set the indicator's look
   IndicatorSetString(INDICATOR_SHORTNAME,"BKCV "+IntegerToString(magic_numb)); // Indicator name
   IndicatorSetInteger(INDICATOR_DIGITS,_Digits); // Display accuracy
//--- assign names to graphical constructions
   PlotIndexSetString(0,PLOT_LABEL,"Yin");
   PlotIndexSetString(1,PLOT_LABEL,"Yin");
   PlotIndexSetString(2,PLOT_LABEL,"Yin");
   PlotIndexSetString(3,PLOT_LABEL,"Yin");
   PlotIndexSetString(4,PLOT_LABEL,"Yang");
   PlotIndexSetString(5,PLOT_LABEL,"Yang");
   PlotIndexSetString(6,PLOT_LABEL,"Yang");
   PlotIndexSetString(7,PLOT_LABEL,"Yang");
//--- prohibit display of the results of the current values for graphical constructions
   PlotIndexSetInteger(0,PLOT_SHOW_DATA,false);
   PlotIndexSetInteger(1,PLOT_SHOW_DATA,false);
   PlotIndexSetInteger(2,PLOT_SHOW_DATA,false);
   PlotIndexSetInteger(3,PLOT_SHOW_DATA,false);
   PlotIndexSetInteger(4,PLOT_SHOW_DATA,false);
   PlotIndexSetInteger(5,PLOT_SHOW_DATA,false);
   PlotIndexSetInteger(6,PLOT_SHOW_DATA,false);
   PlotIndexSetInteger(7,PLOT_SHOW_DATA,false);
//--- set color for Yin line
   PlotIndexSetInteger(0,PLOT_LINE_COLOR,color_yin);
   PlotIndexSetInteger(1,PLOT_LINE_COLOR,color_yin);
   PlotIndexSetInteger(2,PLOT_LINE_COLOR,color_yin);
   PlotIndexSetInteger(3,PLOT_LINE_COLOR,color_yin);
//--- set color for Yang line
   PlotIndexSetInteger(4,PLOT_LINE_COLOR,color_yang);
   PlotIndexSetInteger(5,PLOT_LINE_COLOR,color_yang);
   PlotIndexSetInteger(6,PLOT_LINE_COLOR,color_yang);
   PlotIndexSetInteger(7,PLOT_LINE_COLOR,color_yang);
//--- set Yin line width
   PlotIndexSetInteger(0,PLOT_LINE_WIDTH,width_yin);
   PlotIndexSetInteger(1,PLOT_LINE_WIDTH,width_yin);
   PlotIndexSetInteger(2,PLOT_LINE_WIDTH,width_yin);
   PlotIndexSetInteger(3,PLOT_LINE_WIDTH,width_yin);
//--- set Yang line width
   PlotIndexSetInteger(4,PLOT_LINE_WIDTH,width_yang);
   PlotIndexSetInteger(5,PLOT_LINE_WIDTH,width_yang);
   PlotIndexSetInteger(6,PLOT_LINE_WIDTH,width_yang);
   PlotIndexSetInteger(7,PLOT_LINE_WIDTH,width_yang);
//--- set the number of levels in the indicator window
   IndicatorSetInteger(INDICATOR_LEVELS,levels_number);
//---
   return(INIT_SUCCEEDED);
  }
3.3. Data Copying Function
Now, let's examine data copying functions.
There are two of them here. The first one is for copying the prices, while the second one is for copying each bar's open time. Both functions retain their values in the previously declared indicator's calculation buffers.
First of all, let's consider the prices copying function. Function input parameters: array for storing data, data copying start and finish time (current time). The body of the function contains the variables for responding to the function, the number of data (bars) copied to the intermediate array, the intermediate dynamic array itself and the number of bars that should be copied to the intermediate array. The number of bars is calculated based on the total number of bars in the given time period and the number of bars (global variable) copied at the previous function call.
If it is not the first time the data has been copied, the data on the last copied bar should be updated. To do this, we reduce the number of copied bars by one and increase the number of newly copied bars by one. We also change the size of the intermediate array preparing it for copying the bars.
Depending on the settings, we copy the prices to the intermediate array. If copying is successful, the data is copied from the intermediate array to the end of the buffer array (function response array), assign the positive answer to the function and update the global variable storing the data on the number of copied bars. This type of copying allows copying only a few last bars reducing the copying time.
//+------------------------------------------------------------------+
//| Func Copy History                                                |
//+------------------------------------------------------------------+
bool func_copy_history(double &result_array[],
                       datetime data_start,
                       datetime data_stop)
  {
//---
   int x=false; // Variable for answer

   int result_copy=-1; // Number of copied data

   static double price_interim[]; // Temporary dynamic array for storing copied data
   static int bars_to_copy;       // Number of bars for copying

   bars_to_copy=Bars(_Symbol,period,data_start,data_stop); // Find out the current number of bars on the time interval
   bars_to_copy-=bars_copied; // Calculate the number of bars to be copied

   if(bars_copied!=0) // If it is not the first time the data has been copied
     {
      bars_copied--;
      bars_to_copy++;
     }

   ArrayResize(price_interim,bars_to_copy); // Change the size of the receiving array

   switch(price_type)
     {
      case 0:
         result_copy=CopyClose(_Symbol,period,0,bars_to_copy,price_interim);
         break;
      case 1:
         result_copy=CopyOpen(_Symbol,period,0,bars_to_copy,price_interim);
         break;
      case 2:
         result_copy=CopyHigh(_Symbol,period,0,bars_to_copy,price_interim);
         break;
      case 3:
         result_copy=CopyLow(_Symbol,period,0,bars_to_copy,price_interim);
         break;
     }

   if(result_copy!=-1) // If copying to the intermediate array is successful
     {
      ArrayCopy(result_array,price_interim,bars_copied,0,WHOLE_ARRAY); // Copy the data from the temporary array to the main one
      x=true; // assign the positive answer to the function
      bars_copied+=result_copy; // Increase the value of the processed data
     }
//---
   return(x);
  }
The next function is the one for copying the time data. It is different from the previous one in that it deals with another variable type - datetime (which is converted to double when copied to Time buffer array – function answer array). Another difference is that switch() statement is not used, as there is no need in selecting the copied data.
//+------------------------------------------------------------------+
//| Func Copy Time                                                   |
//+------------------------------------------------------------------+
bool func_copy_time(double &result_array[],
                    datetime data_start,
                    datetime data_stop)
  {
//---
   int x=false; // Variable for answer
   int result_copy=-1; // Number of copied data

   static datetime time_interim[]; // Temporary dynamic array for storing copied data
   static int bars_to_copy_time; // Number of bars for copying

   bars_to_copy_time=Bars(_Symbol,period,data_start,data_stop); // Find out the current number of bars on the time interval
   bars_to_copy_time-=bars_copied_time; // Calculate the number of bars to be copied

   if(bars_copied_time!=0) // If it is not the first time the data has been copied
     {
      bars_copied_time--;
      bars_to_copy_time++;
     }
   ArrayResize(time_interim,bars_to_copy_time); // Change the size of the receiving array
   result_copy=CopyTime(_Symbol,period,0,bars_to_copy_time,time_interim);

   if(result_copy!=-1) // If copying to the intermediate array is successful
     {
      ArrayCopy(result_array,time_interim,bars_copied_time,0,WHOLE_ARRAY); // Copy the data from the temporary array to the main one
      x=true; // assign the positive answer to the function
      bars_copied_time+=result_copy; // Increase the value of the processed data
     }
//---
   return(x);
  }
3.4. Reversal Parameter Calculation Function
Since the reversal parameter can be a point or a percentage one, we need the function that will calculate the reversal parameter depending on the indicator settings. The function has only one parameter – price for calculating the percentage reversal. The variable for the answer is first initialized by double type and after the calculations, it is indirectly converted to int type for response.
This is done because floating point numbers are used in the calculations, while the answer should be presented as integers. Selection is implemented in the function by if-else conditional statement. The comparison is performed directly with external input variable (indicator parameters). Calculation of points is performed by using a simple equation. First, the total number of points the price has passed is defined. Then, the specified percentage is calculated based on this number and assigned to the returned variable.
//+------------------------------------------------------------------+
//| Func Calculate Doorstep                                          |
//+------------------------------------------------------------------+
int func_calc_dorstep(double price)
  {
   double x=0; // Variable for answer
   if(type_doorstep==0) // If the calculation is to be performed in points
     {
      x=doorstep;
     }
   if(type_doorstep==1) // If the calculation is to be performed in percentage
     {
      x=price/_Point*doorstep/100;
     }
   return((int)x);
  }
3.5. The Main Function - Drawing Kagi Chart
We have already examined all the functions that are necessary for the operation of the main function - drawing Kagi chart in the indicator window (i.e., filling the indicator buffers). The function's input parameters consist of data arrays. Two of them are the calculation buffers described above (previously copied Price and Time), all the rest are the arrays of the indicator graphical construction buffers.
Variables necessary for storing the data on the chart construction are declared inside the function. Since the chart is constructed using for loop statement, we should have the data on the stage the previous pass ended at. This can be achieved by six variables: line_move - where the price moved at the previous pass, line_gauge - line caliber (line width) - Yin or Yang, price_1 and price_2 - previous and current price being considered, price_down and price_up - previous price of a shoulder and waist. As we can see, price_1 is immediately equated to the first element of the array of copied prices due to the fact that this variable is involved in calculations before comparison from the very beginning of the loop.
Since buffer arrays of the indicator graphical construction have AS_SERIES indexing flag, they should be filled in reverse order. To achieve this, time arrays having the appropriate size are implemented. Global variables for storing the data on time, line types, "shoulder" and "waist", as well as reversal prices are then converted the same way.
Then, all arrays should be filled with "empty" values (-1). This is done using two small loops. It is possible to join everything in a single loop. But using two ones makes all performed actions much clearer, while execution time is not changed much. In other words, graphical buffers and calculation time arrays are filled separately.
Now, all variables are declared, converted and filled, so that the main loop can be launched. It is pretty large (though calculation is performed fast enough) and includes scanning all previously copied bars.
The loop passes through all copied bars and fills necessary previously declared arrays to work with them further. First of all, let's define all arrays used in the loop:
- yin_int_1 - primary value of vertical Yin line price (if vertical Yin line is drawn and the chart moves downwards, this is the upper value of the price; if the chart moves upwards, we have the opposite case);
- yin_int_2 - secondary value of vertical Yin line price (if the upward line is drawn, this is the upper value; if the line is downward, we have the opposite case);
- yang_int_1 - primary value of vertical Yang line price;
- yang_int_2 - secondary value of vertical Yang line price;
- lin_yin - horizontal Yin line value (price of reversal at Yin line);
- lin_yang - horizontal Yang line value (price of reversal at Yang line);
- time_change - time of the chart reversal (construction of a shoulder or a waist);
- time_line - the line during the reversal Yin = 0 or Yang = 1;
- time_central_price - the value of the central price, the price at the moment when Yin line turns into Yang or vice versa;
- time_change_price - the value of reversal (shoulder or waist) price, the variable is a common one not depending on Yin or Yang line types.
The value of the current analyzed price from Price buffer is assigned to price_2 variable before each loop pass for further comparison in if-else conditional statements. After that, the buffer array of the copied data is analyzed step by step and the arrays mentioned above are filled. Each if-else conditional statement performs certain actions depending on the conditions: previous direction of chart lines (up or down) and previous look of the lines (Yin or Yang). Then the movement conditions (whether the price has passed a certain number of points) are checked depending on construction type (standard or modified).
If all is well, new variables (array elements) are reassigned or defined. The line type (Yin or Yang) is defined at the very beginning. Depending on the movement and previous actions, the further distribution is performed.
There are two possible price movements:
- Price moves up;
- Price moves down.
There also four types of previous actions in each direction:
- The previous line was Yin and it moved up;
- The previous line was Yang and it moved up;
- The previous line was Yin and it moved down;
- The previous line was Yang and it moved down.
Thus, we have eight cases apart from the first two definitions of the chart's initial movement (first line appearance).
After that, the main loop is over. Reassignment (reversal) and filling of the buffers are performed to build the chart in a smaller loop consisting of the number of Kagi chart reversals previously defined in the main loop and written in “a” variable. As for distribution of upper and lower price values and vertical lines, it is all quite simple: a simple reversal is performed. In other words, the previously obtained primary values (arrays having indices 0,1,2,3...) are assigned to the buffers' end values (element with “а” index, i.e., а,а-1,а-2,а-3... is used as an end value). To prevent reversal (horizontal) lines from sticking together, rotation using switch statement is performed as mentioned above.
At that, the work of the main function of Kagi chart construction is complete.
//+------------------------------------------------------------------+
//| Func Draw Kagi                                                   |
//+------------------------------------------------------------------+
void func_draw_kagi(double &array_input[],
                    double &arr_yin_1[],
                    double &arr_yin_2[],
                    double &arr_yin_lin1[],
                    double &arr_yin_lin2[],
                    double &arr_yin_lin3[],
                    double &arr_yang_1[],
                    double &arr_yang_2[],
                    double &arr_yang_lin1[],
                    double &arr_yang_lin2[],
                    double &arr_yang_lin3[],
                    double &arr_time[])
  {
//---
   a=0; // Variable for the chart construction fixing the number of chart reversals
   char line_move=0; // Previous price direction 1-up, -1-down
   char line_gauge=0; // Previous look of the line 1-thick yang, -1-thin yin
   double price_1=0,price_2=0; // Auxiliary variables for defining the price movement
   double price_down=-99999,price_up=99999; // Auxiliary variables for storing the reversal price values
   price_1=array_input[0];
//--- auxiliary arrays for the initial data storing before the reversal (transferring to the buffers)
   double yin_int_1[];
   double yin_int_2[];
   double lin_yin[];
   double yang_int_1[];
   double yang_int_2[];
   double lin_yang[];
//--- change the sizes of dynamic arrays
   ArrayResize(yin_int_1,bars_copied);
   ArrayResize(yin_int_2,bars_copied);
   ArrayResize(yang_int_1,bars_copied);
   ArrayResize(yang_int_2,bars_copied);
   ArrayResize(lin_yin,bars_copied);
   ArrayResize(lin_yang,bars_copied);
//--- time data storing arrays
   ArrayResize(time_change,bars_copied_time);
   ArrayResize(time_line,bars_copied_time); // Look of the line Yin = 0 or Yang = 1
   ArrayResize(time_change_price,bars_copied_time);
   ArrayResize(time_central_price,bars_copied_time);
//--- assign -1 (not displayed) value to the transferred buffers
   for(int z=0; z<bars_copied; z++)
     {
      arr_yin_1[z]=-1;
      arr_yin_2[z]=-1;
      arr_yin_lin1[z]=-1;
      arr_yin_lin2[z]=-1;
      arr_yin_lin3[z]=-1;
      arr_yang_1[z]=-1;
      arr_yang_2[z]=-1;
      arr_yang_lin1[z]=-1;
      arr_yang_lin2[z]=-1;
      arr_yang_lin3[z]=-1;
     }
//--- equate -1 (not displayed) value to the arrays
   for(int z=0; z<bars_copied; z++)
     {
      yin_int_1[z]=-1;
      yin_int_2[z]=-1;
      lin_yin[z]=-1;
      yang_int_1[z]=-1;
      yang_int_2[z]=-1;
      lin_yang[z]=-1;
      time_change[z]=-1;
      time_line[z]=-1;
      time_change_price[z]=-1;
      time_central_price[z]=-1;
     }
//--- function's main loop
   for(int z=0; z<bars_copied; z++)
     {
      price_2=array_input[z];
      //--- first, let's define the initial market direction
      //--- first THIN DESCENDING line
      if(((price_1-price_2)/_Point>func_calc_dorstep(price_2)) && line_move==0)
        {
         yin_int_1[a]=price_1;
         yin_int_2[a]=price_2;

         line_move=-1;
         line_gauge=-1;

         price_1=price_2;

         time_change[a]=(datetime)arr_time[z];
         time_line[a]=0;
        }
      //--- first THICK ASCENDING line
      if(((price_1-price_2)/_Point<-func_calc_dorstep(price_2)) && line_move==0)
        {
         yang_int_1[a]=price_1;
         yang_int_2[a]=price_2;

         line_move=1;
         line_gauge=1;

         price_1=price_2;

         time_change[a]=(datetime)arr_time[z];
         time_line[a]=1;
        }
      //--- price moves DOWN
      //--- if the price moved DOWN before that, the line is THIN
      if(line_move==-1 && line_gauge==-1)
        {
         if(((price_1-price_2)/_Point>func_calc_dorstep(price_2)) || (kagi_type==0 && (price_1-price_2)/_Point>0))
           {
            yin_int_2[a]=price_2;

            line_move=-1;
            line_gauge=-1;

            price_1=price_2;

            time_change[a]=(datetime)arr_time[z];
            time_line[a]=0;
           }
        }
      //--- if the price moved DOWN before that, the line is THICK
      if(line_move==-1 && line_gauge==1)
        {
         if(((price_1-price_2)/_Point>func_calc_dorstep(price_2)) || (kagi_type==0 && (price_1-price_2)/_Point>0))
           {
            if(price_2<price_down) // If the thick line crossed the lower shoulder when moving downwards
              {
               yin_int_1[a]=price_down;
               yin_int_2[a]=price_2;

               yang_int_2[a]=price_down;

               line_move=-1;
               line_gauge=-1;

               price_1=price_2;

               time_change[a]=(datetime)arr_time[z];
               time_central_price[a]=price_down;
               time_line[a]=0;
              }
            else //if(price_2>=price_down) // If the thick line has not crossed the lower shoulder when moving downwards
              {
               yang_int_2[a]=price_2;

               line_move=-1;
               line_gauge=1;

               price_1=price_2;

               time_change[a]=(datetime)arr_time[z];
               time_line[a]=1;
              }
           }
        }
      //--- if the price has moved UPWARDS before that, the line is THIN
      if(line_move==1 && line_gauge==-1)
        {
         if((price_1-price_2)/_Point>func_calc_dorstep(price_2))
           {
            a++;
            yin_int_1[a]=price_1;
            yin_int_2[a]=price_2;

            lin_yin[a]=price_1;

            line_move=-1;
            line_gauge=-1;

            price_up=price_1;

            price_1=price_2;

            time_change[a]=(datetime)arr_time[z];
            time_line[a]=0;
            time_change_price[a]=lin_yin[a];
           }
        }
      //--- if the price has moved UPWARDS before that, the line is THICK
      if(line_move==1 && line_gauge==1)
        {
         if((price_1-price_2)/_Point>func_calc_dorstep(price_2))
           {
            a++;
            if(price_2<price_down) // If the thick line has crossed the lower shoulder when moving downwards
              {
               yin_int_1[a]=price_down;
               yin_int_2[a]=price_2;

               yang_int_1[a]=price_1;
               yang_int_2[a]=price_down;

               lin_yang[a]=price_1;

               line_move=-1;
               line_gauge=-1;

               price_up=price_1;

               price_1=price_2;

               time_change[a]=(datetime)arr_time[z];
               time_line[a]=0;
               time_change_price[a]=lin_yang[a];
               time_central_price[a]=price_down;
              }
            else//if(price_2>=price_down) // If the thick line has not crossed the lower shoulder when moving downwards
              {
               yang_int_1[a]=price_1;
               yang_int_2[a]=price_2;

               lin_yang[a]=price_1;

               line_move=-1;
               line_gauge=1;

               price_up=price_1;

               price_1=price_2;

               time_change[a]=(datetime)arr_time[z];
               time_line[a]=1;
               time_change_price[a]=lin_yang[a];
              }
           }
        }
      //--- the price moves UP
      //--- if the price has moved UPWARDS before that, the line is THICK
      if(line_move==1 && line_gauge==1)
        {
         if(((price_1-price_2)/_Point<-func_calc_dorstep(price_2)) || (kagi_type==0 && (price_1-price_2)/_Point<0))
           {
            yang_int_2[a]=price_2;

            line_move=1;
            line_gauge=1;

            price_1=price_2;

            time_change[a]=(datetime)arr_time[z];
            time_line[a]=1;
           }
        }

      //--- if the price has moved UPWARDS before that, the line is THIN
      if(line_move==1 && line_gauge==-1)
        {
         if(((price_1-price_2)/_Point<-func_calc_dorstep(price_2)) || (kagi_type==0 && (price_1-price_2)/_Point<0))
           {
            if(price_2>price_up) // If the thin line has not crossed the upper shoulder when moving upwards
              {
               yin_int_2[a]=price_up;

               yang_int_1[a]=price_up;
               yang_int_2[a]=price_2;

               line_move=1;
               line_gauge=1;

               price_1=price_2;

               time_change[a]=(datetime)arr_time[z];
               time_central_price[a]=price_up;
               time_line[a]=1;
              }
            else//if(price_2<=price_up) // If the thin line has not crossed the upper shoulder when moving upwards
              {
               yin_int_2[a]=price_2;

               line_move=1;
               line_gauge=-1;

               price_1=price_2;

               time_change[a]=(datetime)arr_time[z];
               time_line[a]=0;
              }
           }
        }

      //--- if the price has moved DOWNWARDS before that, the line is THICK
      if(line_move==-1 && line_gauge==1)
        {
         if((price_1-price_2)/_Point<-func_calc_dorstep(price_2))
           {
            a++;

            yang_int_1[a]=price_1;
            yang_int_2[a]=price_2;

            lin_yang[a]=price_1;

            line_move=1;
            line_gauge=1;

            price_down=price_1;
            price_1=price_2;

            time_change[a]=(datetime)arr_time[z];
            time_line[a]=1;
            time_change_price[a]=lin_yang[a];
           }
        }

      //--- if the price has moved DOWNWARDS before that, the line is THIN
      if(line_move==-1 && line_gauge==-1)
        {
         if((price_1-price_2)/_Point<-func_calc_dorstep(price_2))
           {
            a++;
            if(price_2>price_up) // If the thin line has crossed the upper shoulder when moving upwards
              {
               yin_int_1[a]=price_1;
               yin_int_2[a]=price_up;

               yang_int_1[a]=price_up;
               yang_int_2[a]=price_2;

               lin_yin[a]=price_1;

               line_move=1;
               line_gauge=1;

               price_down=price_1;
               price_1=price_2;

               time_change[a]=(datetime)arr_time[z];
               time_line[a]=1;
               time_change_price[a]=lin_yin[a];
               time_central_price[a]=price_up;
              }
            else //if(price_2<=price_up) // If the thin line has not crossed the upper shoulder when moving upwards
              {
               yin_int_1[a]=price_1;
               yin_int_2[a]=price_2;

               lin_yin[a]=price_1;

               line_move=1;
               line_gauge=-1;

               price_down=price_1;
               price_1=price_2;

               time_change[a]=(datetime)arr_time[z];
               time_line[a]=0;
               time_change_price[a]=lin_yin[a];
              }
           }
        }

     }
//--- function's main loop
//--- assign actual values to drawing buffers
   uint y=a;
//--- auxiliary variables for storing data on filling the current buffer
   char yin=1;
   char yang=1;
   for(uint z=0; z<=a; z++)
     {
      arr_yin_1[z]=yin_int_1[y];
      arr_yin_2[z]=yin_int_2[y];

      switch(yin)
        {
         case 1:
           {
            arr_yin_lin1[z]=lin_yin[y];
            arr_yin_lin1[z+1]=lin_yin[y];
            yin++;
           }
         break;
         case 2:
           {
            arr_yin_lin2[z]=lin_yin[y];
            arr_yin_lin2[z+1]=lin_yin[y];
            yin++;
           }
         break;
         case 3:
           {
            arr_yin_lin3[z]=lin_yin[y];
            arr_yin_lin3[z+1]=lin_yin[y];
            yin=1;
           }
         break;
        }

      arr_yang_1[z]=yang_int_1[y];
      arr_yang_2[z]=yang_int_2[y];

      switch(yang)
        {
         case 1:
           {
            arr_yang_lin1[z]=lin_yang[y];
            arr_yang_lin1[z+1]=lin_yang[y];
            yang++;
           }
         break;
         case 2:
           {
            arr_yang_lin2[z]=lin_yang[y];
            arr_yang_lin2[z+1]=lin_yang[y];
            yang++;
           }
         break;
         case 3:
           {
            arr_yang_lin3[z]=lin_yang[y];
            arr_yang_lin3[z+1]=lin_yang[y];
            yang=1;
           }
         break;
        }
      y--;
     }
//---
  }
3.6. Function for Creating "Trend Line" Graphical Object
Now, let's examine the function for creating "trend line" graphical object. This function is needed in order to draw Kagi on the main chart.
The function is very simple. It contains the input parameters necessary for creating "trend line" graphical object: object name, first and second price and time points, as well as line width and color. The function body contains the graphical object creation function and six functions of changing the graphical object's properties.
//+------------------------------------------------------------------+
//| Func Object Create Trend Line                                    |
//+------------------------------------------------------------------+
void func_create_trend_line(string name,
                            double price1,
                            double price2,
                            datetime time1,
                            datetime time2,
                            int width,
                            color color_line)
  {
   ObjectCreate(0,name,OBJ_TREND,0,time1,price1,time2,price2);
//--- set the line color
   ObjectSetInteger(0,name,OBJPROP_COLOR,color_line);
//--- set the line display style
   ObjectSetInteger(0,name,OBJPROP_STYLE,STYLE_SOLID);
//--- set the line width
   ObjectSetInteger(0,name,OBJPROP_WIDTH,width);
//--- display in the foreground (false) or background (true)
   ObjectSetInteger(0,name,OBJPROP_BACK,false);
//--- enable (true) or disable (false) the mode of continuing the line display to the left
   ObjectSetInteger(0,name,OBJPROP_RAY_LEFT,false);
//--- enable (true) or disable (false) the mode of continuing the line display to the right
   ObjectSetInteger(0,name,OBJPROP_RAY_RIGHT,false);
  }
3.7. Drawing Kagi on the Main Chart
The next function that applies to the previous one multiple times is the function of Kagi construction on the main chart. The global variables filled in the previously examined main function of Kagi chart construction are used as input variables: the array of reversal prices ("shoulders" and "waists"), the array of change and central prices (the price, at which Yin line turns into Yang or vice versa), reversal time array (located in real time, [z-1] array index is used to mark the reversal start), the array of the type of the line, at which the reversal occurred (it is also one element forward, like the time array).
The function body consists of a loop. The loop is divided into two parts: drawing vertical and horizontal lines. The first one is also divided into two: drawing the verticals considering the line change (change central price) and the absence of change. Note the transferred parameters of the "trend line" object creation function.
Naming is performed repeatedly. The object name starts with a magic number (needed for deleting objects of a certain indicator), then its type is fixed and finally the index is assigned. The index is updated at each pass of the loop.
//+------------------------------------------------------------------+ //| Func Kagi Main Chart | //+------------------------------------------------------------------+ void func_kagi_main_chart(double &price[], // Shoulder prices array double ¢ral_price[], // Array of the prices of passing through the shoulders datetime &time[], // Current location time array ([-1] - start of shoulder) char &type_line_end[]) // Line type by the start of shoulder formation { //--- start of the loop for(uint z=1; z<=a; z++) { //--- check for the pass conditions (no pass) if(central_price[z]==-1) { if(type_line_end[z-1]==0 && price[z+1]!=-1) { func_create_trend_line(IntegerToString(magic_numb)+"_trend_yin_v"+IntegerToString(z), price[z],price[z+1],time[z],time[z],width_yin_main,color_yin_main); } if(type_line_end[z-1]==1 && price[z+1]!=-1) { func_create_trend_line(IntegerToString(magic_numb)+"_trend_yang_v"+IntegerToString(z), price[z],price[z+1],time[z],time[z],width_yang_main,color_yang_main); } } else //--- check for the pass conditions (pass is present) { if(type_line_end[z-1]==0 && price[z+1]!=-1) { func_create_trend_line(IntegerToString(magic_numb)+"_trend_yin_v"+IntegerToString(z), central_price[z],price[z],time[z],time[z],width_yin_main,color_yin_main); func_create_trend_line(IntegerToString(magic_numb)+"_trend_yang_v"+IntegerToString(z), central_price[z],price[z+1],time[z],time[z],width_yang_main,color_yang_main); } if(type_line_end[z-1]==1 && price[z+1]!=-1) { func_create_trend_line(IntegerToString(magic_numb)+"_trend_yin_v"+IntegerToString(z), central_price[z],price[z+1],time[z],time[z],width_yin_main,color_yin_main); func_create_trend_line(IntegerToString(magic_numb)+"_trend_yang_v"+IntegerToString(z), central_price[z],price[z],time[z],time[z],width_yang_main,color_yang_main); } } //--- check for the pass conditions (pass is present) //--- draw the horizontals if(type_line_end[z-1]==0) { func_create_trend_line(IntegerToString(magic_numb)+"_trend_h"+IntegerToString(z), price[z],price[z],time[z-1],time[z],width_yin_main,color_yin_main); } if(type_line_end[z-1]==1) { func_create_trend_line(IntegerToString(magic_numb)+"_trend_h"+IntegerToString(z), price[z],price[z],time[z-1],time[z],width_yang_main,color_yang_main); } //--- draw the horizontals } }
3.8. Implementing Additional Labels
As I have already mentioned above, the indicator implements additional labels. Let's examine the function providing these labels on the main chart. There are only two label types here: reversal price and reversal time labels shown via "price label" and "vertical label". The following parameters are passed as input ones: attribute of the reversal price label drawing and the label's color, attributes of the reversal time label drawing and of the label's color change, the first and second colors of the reversal time.
The entire function is divided into two parts: the first part is responsible for time labels, while the second one – for price labels. Both parts of the function consist of the loops limited by the number of charts reversals (“a” variable). if-else conditional statement is set before the loop. The statement checks the necessity of their drawing according to the indicator settings.
The first loop creates time labels, the object name definition is performed at the beginning of the loop (name generation principle has been described above). Then, the color is selected depending on the line from the globally declared line type array (if the parameter is set) and other parameters are applied to the line.
The second loop is responsible for creating reversal price labels. First, the object name is generated. Then, time array index selection is set depending on whether Kagi is to be constructed on the main chart or not. if this is not done, the labels will be located "in the air" and it will not be clear enough from what place the reversal has occurred. Then, the "price label" type object is created and configured.
//+------------------------------------------------------------------+
//| Func Label Main Chart                                            |
//+------------------------------------------------------------------+
void func_label_main_chart(bool label_print,
                           color label_color,
                           bool time_change_print,
                           bool time_change_color,
                           color time_color_first,
                           color time_color_second)
  {
   if(time_change_print==true)
     {
      for(uint z=1; z<=a; z++)
        {
         string name=IntegerToString(magic_numb)+"_time_2_"+IntegerToString(z);
         //--- create an object of a vertical line type
         ObjectCreate(0,name,OBJ_VLINE,0,time_change[z],0);
         //--- set the line color
         color color_line=clrBlack;
         if(time_change_color==true)
           {
            if(time_line[z]==0)color_line=time_color_first;
            if(time_line[z]==1)color_line=time_color_second;
           }
         else color_line=time_color_first;
         ObjectSetInteger(0,name,OBJPROP_COLOR,color_line);
         //--- set the line display style
         ObjectSetInteger(0,name,OBJPROP_STYLE,STYLE_SOLID);
         //--- set the line width
         ObjectSetInteger(0,name,OBJPROP_WIDTH,1);
         //--- display on the foreground (false) or background (true)
         ObjectSetInteger(0,name,OBJPROP_BACK,false);
         //--- enable (true) or disable (false) the line display mode in the chart subwindows
         ObjectSetInteger(0,name,OBJPROP_RAY,time_separate_windows);
        }
     }
   if(label_print==true)
     {
      for(uint z=1; z<=a; z++)
        {
         string name=IntegerToString(magic_numb)+"_label_2_"+IntegerToString(z);
         uint numb_time;
         if(kagi_main_chart==true)numb_time=z;
         else numb_time=z-1;
         //--- create a label type object
         ObjectCreate(0,name,OBJ_ARROW_RIGHT_PRICE,0,time_change[numb_time],time_change_price[z]);
         //--- set the label color
         ObjectSetInteger(0,name,OBJPROP_COLOR,label_color);
         //--- set the edging line style
         ObjectSetInteger(0,name,OBJPROP_STYLE,STYLE_SOLID);
         //--- set the label size
         ObjectSetInteger(0,name,OBJPROP_WIDTH,1);
         //--- display on the foreground (false) or background (true)
         ObjectSetInteger(0,name,OBJPROP_BACK,false);
        }
     }
  }
Now, let's see how we can set the labels in the indicator window.
All labels in the indicator window are mostly price ones, and there are only two types of them: reversal price labels and price levels. There are two types of drawing the price levels: on the chart reversals and at an equal distance of the entire chart price range. The first type can change the color of the levels in two ways: depending on the line type (Yin or Yang) and according to reversal (up or down).
Thus, the function itself is divided into two loops: the first one is responsible for creating reversal price labels, the second one deals with designation of the price levels. The latter is further divided into two types: label at each reversal or labels all over the price range on an equal level.
This function is different from the previous one in that it has limitations on the number of price labels and levels due to the fact that in great numbers they overload the chart complicating its understanding.
Because of this feature, both loops are limited by the number of passes specified in the indicator settings (number of price labels and levels). Such an approach is dangerous as the number of reversals may turn out to be much smaller than the number of set price labels in the settings. Due to this reason, reversal presence during each loop pass is checked for drawing a price label or level.
The only exception is drawing price levels along the entire price range on an equal distance. Generation of "Price label" type graphical objects is performed in the coordinates in reverse order, i.e., the labels are placed from the current date to the past. The same applies to price levels: the current price levels are generated first followed by earlier ones. The exceptions are price levels not dependent on the chart reversals.
Price level color changes are performed by using if-else conditional statements according to the settings.
//+------------------------------------------------------------------+
//| Func Label Indicator Window                                      |
//+------------------------------------------------------------------+
void func_label_indicator_window(bool label_print,         // Draw price labels
                                 bool levels_print,        // Draw levels
                                 char levels_type_draw,    // Type of drawing the levels by reversals or at an equal distance of the entire price range
                                 char levels_color_change) // Change line color
  {
   uint number=a;
   if(label_print==true)
     {
      for(uint z=0; z<=label_1_number; z++)
        {
         if(z<number)
           {
            string name=IntegerToString(magic_numb)+"_label_1_"+IntegerToString(z);
            //--- create label type object
            ObjectCreate(0,name,OBJ_ARROW_RIGHT_PRICE,ChartWindowFind(),(datetime)Time[(bars_copied_time-z-2)],time_change_price[number-z]);
            //--- set the label color
            ObjectSetInteger(0,name,OBJPROP_COLOR,label_1_color);
            //--- set the style of the edging line
            ObjectSetInteger(0,name,OBJPROP_STYLE,STYLE_SOLID);
            //--- set the label size
            ObjectSetInteger(0,name,OBJPROP_WIDTH,1);
            //--- display on the foreground (false) or background (true)
            ObjectSetInteger(0,name,OBJPROP_BACK,false);
           }
        }
     }
   if(levels_print==true)
     {
      if(levels_type_draw==0)
        {
         for(uint z=0; z<=levels_number; z++)
           {
            if(z<number)
              {
               IndicatorSetDouble(INDICATOR_LEVELVALUE,z,time_change_price[number-z]);
               if(levels_change_color==0)
                 {
                  double numb_even=z;
                  if(MathMod(numb_even,2)==0)
                    {
                     IndicatorSetInteger(INDICATOR_LEVELCOLOR,z,levels_first_color);
                    }
                  if(MathMod(numb_even,2)!=0)
                    {
                     IndicatorSetInteger(INDICATOR_LEVELCOLOR,z,levels_second_color);
                    }
                 }
               if(levels_change_color==1)
                 {
                  if(time_line[number-z]==0)IndicatorSetInteger(INDICATOR_LEVELCOLOR,z,levels_first_color);
                  if(time_line[number-z]==1)IndicatorSetInteger(INDICATOR_LEVELCOLOR,z,levels_second_color);
                 }
               if(levels_change_color==2)
                 {
                  IndicatorSetInteger(INDICATOR_LEVELCOLOR,z,levels_first_color);
                 }
              }
           }
        }
      if(levels_type_draw==1)
        {
         double max_price=Price[ArrayMaximum(Price)];
         double min_price=Price[ArrayMinimum(Price,1,ArrayMinimum(Price)-1)];
         double number_difference=(max_price-min_price)/levels_number;
         NormalizeDouble(number_difference,_Digits);
         for(uint z=0; z<=levels_number; z++)
           {
            IndicatorSetDouble(INDICATOR_LEVELVALUE,z,(min_price+(z*number_difference)));
            IndicatorSetInteger(INDICATOR_LEVELCOLOR,z,levels_first_color);
           }
        }
     }
  }
3.9. Deleting Previously Created Graphical Objects
We know already that this indicator is rich in graphical objects. It is time to think how we can delete them quickly and efficiently.
This task is executed by the function for deleting the graphical objects. The initial name and the number of objects are used as the function parameters. Like during creation, the object name should contain the magic number and the name of an object type. The function call in the program is limited by the number of objects exceeding their possible existence. However, this does not affect the indicator's functionality.
//+------------------------------------------------------------------+
//| Func Delete Objects                                              |
//+------------------------------------------------------------------+
void func_delete_objects(string name,
                         int number)
  {
   string name_del;
   for(int x=0; x<=number; x++)
     {
      name_del=name+IntegerToString(x);
      ObjectDelete(0,name_del);
     }
  }
3.10. Function for Launching the Chart Construction
Now, after we have examined all functions for calculation and construction of Kagi chart, as well as for creating and deleting objects, we should consider another small function for checking the new bar's arrival. The function is quite simple and has one input parameter - analyzed period. The function's answer is also very simple. It has bool type and contains the answer on whether a new bar is present or not. The basis of the function body is switch statement which passes control to its different statements depending on the period.
In the example, the function covers the entire period range, though only one period can also be used.
The function algorithm has been taken from IsNewBar code: the time of the last bar opening is compared with the previously defined time value. If the values are different, there is a new bar. The new value is assigned as previously defined one and the function's response is considered positive. If the last bar opening time coincides with the previously determined time value, then the new bar has not appeared yet and the function's response is negative.
//+------------------------------------------------------------------+
//| Func New Bar                                                     |
//+------------------------------------------------------------------+
bool func_new_bar(ENUM_TIMEFRAMES period_time)
  {
//----
   static datetime old_Times[22];// array for storing old values
   bool res=false;               // analysis result variable
   int  i=0;                     // old_Times[] array cell index
   datetime new_Time[1];         // new bar time

   switch(period_time)
     {
      case PERIOD_M1:  i= 0; break;
      case PERIOD_M2:  i= 1; break;
      case PERIOD_M3:  i= 2; break;
      case PERIOD_M4:  i= 3; break;
      case PERIOD_M5:  i= 4; break;
      case PERIOD_M6:  i= 5; break;
      case PERIOD_M10: i= 6; break;
      case PERIOD_M12: i= 7; break;
      case PERIOD_M15: i= 8; break;
      case PERIOD_M20: i= 9; break;
      case PERIOD_M30: i=10; break;
      case PERIOD_H1:  i=11; break;
      case PERIOD_H2:  i=12; break;
      case PERIOD_H3:  i=13; break;
      case PERIOD_H4:  i=14; break;
      case PERIOD_H6:  i=15; break;
      case PERIOD_H8:  i=16; break;
      case PERIOD_H12: i=17; break;
      case PERIOD_D1:  i=18; break;
      case PERIOD_W1:  i=19; break;
      case PERIOD_MN1: i=20; break;
      case PERIOD_CURRENT: i=21; break;
     }
   // copy the time of the last bar to new_Time[0] cell
   int copied=CopyTime(_Symbol,period_time,0,1,new_Time);

   if(copied>0) // all is well. Data has been copied
      {
      if(old_Times[i]!=new_Time[0])       // if the bar's old time is not equal to new one
         {
         if(old_Times[i]!=0) res=true;    // if it is not the first launch, true = new bar
         old_Times[i]=new_Time[0];        // store the bar's time
         }
      }
//----
   return(res);
  }
3.11. OnCalculate() and OnChartEvent() Functions
All the functions described above are consolidated in the function bearing the same name – Func Consolidation. This function is launched each time a new bar appears in OnCalculate() function and when "R" key is pressed from OnChartEvent() function.
Before the chart is generated or updated, the function for deleting all graphical objects is called in the consolidation function (Func Consolidation). Since there are quite a lot of objects and they are divided into main chart 's and indicator window's price labels, vertical lines indicating reversal time, as well as Yin and Yang vertical and horizontal trend lines, the general number of function calls is 7.
Then, the history data is copied by price and time. The main function for building Kagi chart is launched afterwards. After that, the function for placing all price labels on the main chart and the indicator window is called. Finally, Kagi is generated on the main chart and the function for redrawing the objects is launched.
//+------------------------------------------------------------------+
//| Func Consolidation                                               |
//+------------------------------------------------------------------+
void func_consolidation()
  {
//--- date of construction end
   stop_data=TimeCurrent();

//--- deleting all graphical objects belonging to the indicator
   func_delete_objects(IntegerToString(magic_numb)+"_label_2_",ObjectsTotal(0,-1,-1));
   func_delete_objects(IntegerToString(magic_numb)+"_label_1_",ObjectsTotal(0,-1,-1));
   func_delete_objects(IntegerToString(magic_numb)+"_time_2_",ObjectsTotal(0,-1,-1));
   func_delete_objects(IntegerToString(magic_numb)+"_trend_yin_v",ObjectsTotal(0,-1,-1));
   func_delete_objects(IntegerToString(magic_numb)+"_trend_yang_v",ObjectsTotal(0,-1,-1));
   func_delete_objects(IntegerToString(magic_numb)+"_trend_h",ObjectsTotal(0,-1,-1));
   func_delete_objects(IntegerToString(magic_numb)+"_trend_h",ObjectsTotal(0,-1,-1));

//--- copy price data to the main buffer
   copy_history=func_copy_history(Price,start_data,stop_data);

//--- display information about the error when copying price data
   if(copy_history==false)Alert("Error of copy history Price");

//--- copy time data to the main buffer
   copy_time=func_copy_time(Time,start_data,stop_data);

//--- display a notification of the error occurred while copying time data
   if(copy_time==false)Alert("Error of copy history Time");

//--- construct Kagi chart in the indicator window
   func_draw_kagi(Price,YinBuffer1,YinBuffer2,Yin1Buffer,Yin2Buffer,Yin3Buffer,
                  YangBuffer1,YangBuffer2,Yang1Buffer,Yang2Buffer,Yang3Buffer,Time);

//--- draw labels on the main chart
   func_label_main_chart(label_2,label_2_color,time_line_draw,time_line_change_color,time_first_color,time_second_color);

//--- draw labels on the indicator chart
   func_label_indicator_window(label_1,levels_on_off,levels_type,levels_change_color);

//--- construct Kagi chart in the main window
   if(kagi_main_chart==true)func_kagi_main_chart(time_change_price,time_central_price,time_change,time_line);

//--- redraw the chart
   ChartRedraw(0);
//---
  }
//+------------------------------------------------------------------+
//| Custom indicator iteration function                              |
//+------------------------------------------------------------------+
int OnCalculate(const int rates_total,
                const int prev_calculated,
                const int begin,
                const double &price[])
  {
//---
   if(func_new_bar(period_to_redraw)==true)
     {
      func_consolidation();
     }
//--- return value of prev_calculated for next call
   return(rates_total);
  }
//+------------------------------------------------------------------+
//| OnChartEvent                                                     |
//+------------------------------------------------------------------+
void OnChartEvent(const int id,         // event ID
                  const long& lparam,   // long type event parameter
                  const double& dparam, // double type event parameter
                  const string& sparam) // string type event parameter
  {
   if(id==CHARTEVENT_KEYDOWN) // Keyboard button pressing event
     {
      if(lparam==82) // "R" key has been pressed
        {
         func_consolidation();
        }
     }
  }
3.12. OnDeinit() Function
Deletion of all objects is performed in the indicator deinitialization function.
//+------------------------------------------------------------------+
//| OnDeinit                                                         |
//+------------------------------------------------------------------+
void OnDeinit(const int reason)
  {
//--- delete all graphical objects belonging to the indicator
   func_delete_objects(IntegerToString(magic_numb)+"_label_2_",ObjectsTotal(0,-1,-1));
   func_delete_objects(IntegerToString(magic_numb)+"_label_1_",ObjectsTotal(0,-1,-1));
   func_delete_objects(IntegerToString(magic_numb)+"_time_2_",ObjectsTotal(0,-1,-1));
   func_delete_objects(IntegerToString(magic_numb)+"_trend_yin_v",ObjectsTotal(0,-1,-1));
   func_delete_objects(IntegerToString(magic_numb)+"_trend_yang_v",ObjectsTotal(0,-1,-1));
   func_delete_objects(IntegerToString(magic_numb)+"_trend_h",ObjectsTotal(0,-1,-1));
   func_delete_objects(IntegerToString(magic_numb)+"_trend_h",ObjectsTotal(0,-1,-1));
//--- redraw the chart
   ChartRedraw(0);
  }
Now, let's pass to using the indicator in practice.
4. Using Kagi Chart in Practice
There are many trading strategies based on Kagi chart. We will examine some of them.
Let's start with the most popular strategy: sell when Yang changes to Yin and buy in the opposite case. This is shown in Fig. 4:
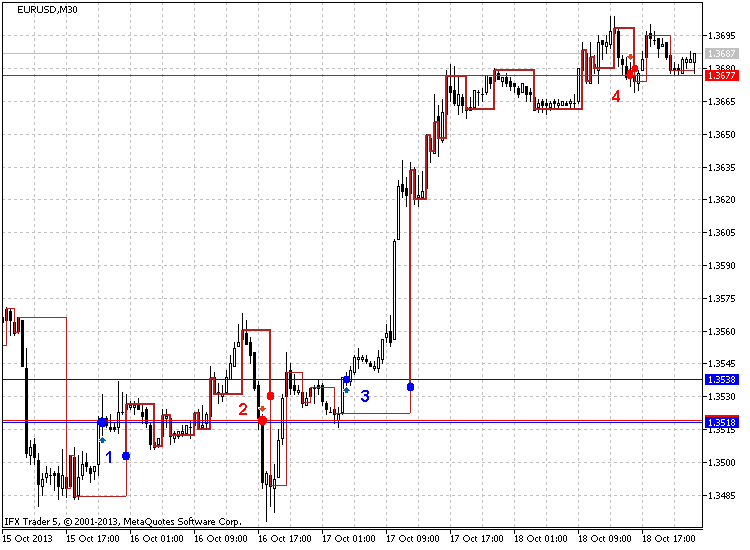
Fig. 4. Selling when Yang changes to Yin and buying in the opposite case
As can be seen in Fig. 4 (EURUSD M30, 5 points), this strategy shows good results. The figure displays 8 points for 4 signals, the first one (1) shows that the long position should be opened at 1.3518, which seems to be correct as the price then reaches about 1.3560 comprising 42 points per day. This is a good result.
The next point (2) recommends selling at 1.3519. As we can see, the price actually moves down crossing the level of 1.3485 (and covering 34 points) approximately for two hours.
Let's move to point (3). The long position is opened at 1.3538 and the price moves up reaching 1.3695. Thus, the profit comprises 157 points already for one day and a half. Of course, these are the highest possible profits but the result is still good enough.
The next trading strategy is rolling back from the trend line shown in Fig. 5 (EURUSD M30, 5 points), October 7-18:
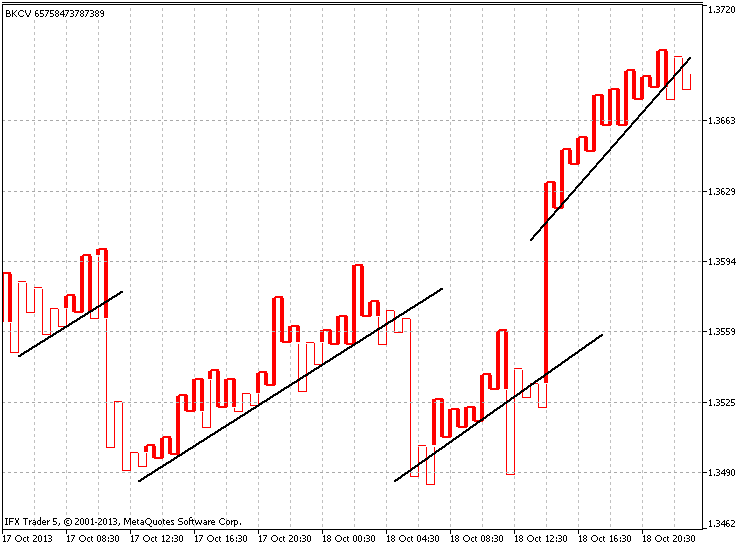
Fig. 5. Rolling back from the trend line
We can move further and trade following the channels. An example of searching for a channel can be examined on Fig. 6 (EURUSD H1, 5 points), roughly the same period:
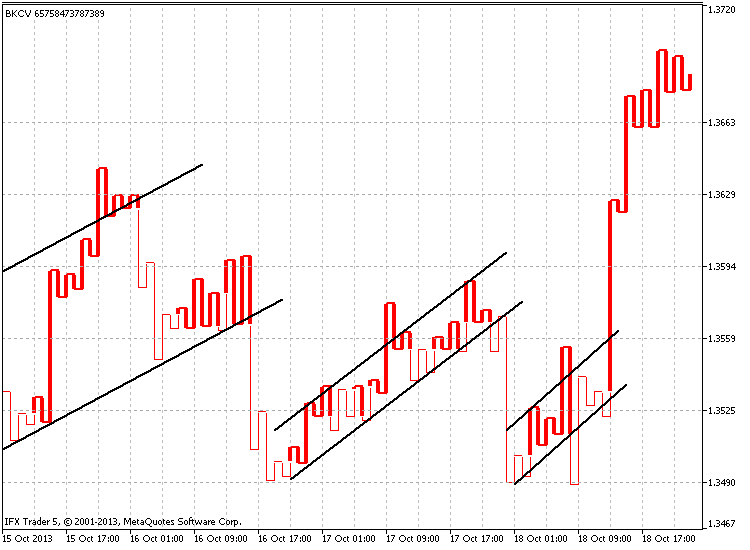
Fig. 6. Trading by channels
The less popular strategy based on the fact that after 7-10 successively increasing "shoulders" or decreasing "waists", there will certainly be a reversal (fall ot rise).
This is displayed in Figure 7 (GBPUSD H4, 25 points), July 10 - October 18:
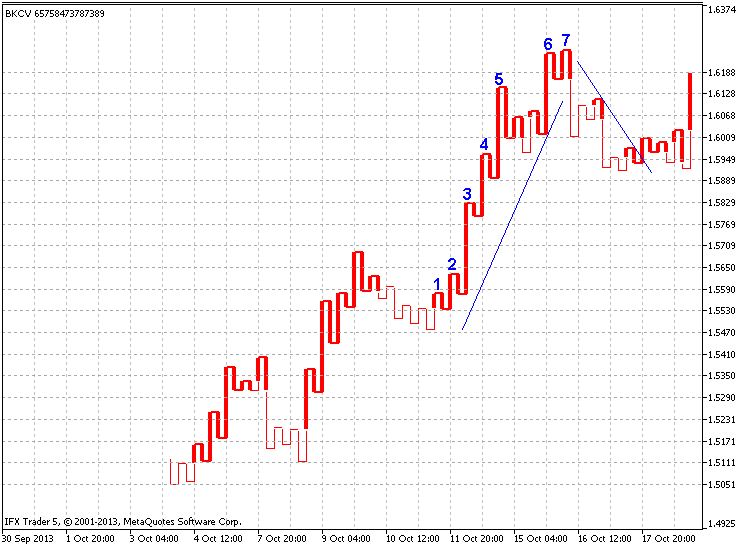
Fig. 7. 7-10 successively increasing "shoulders" or decreasing "waists"
As can be seen in the image, seven ascending shoulders are followed by quite a considerable fall roughly equal to the half of the previous rise (about 300 points).
Let's examine "Trading through a price label" strategy to show the necessity of using additional indicator parameters. The idea is to enter the market when the price exceeds (buy) or moves below (sell) the previous price label.
The strategy is shown in Fig. 8 (GBPUSD H4, 30 points, modified construction):
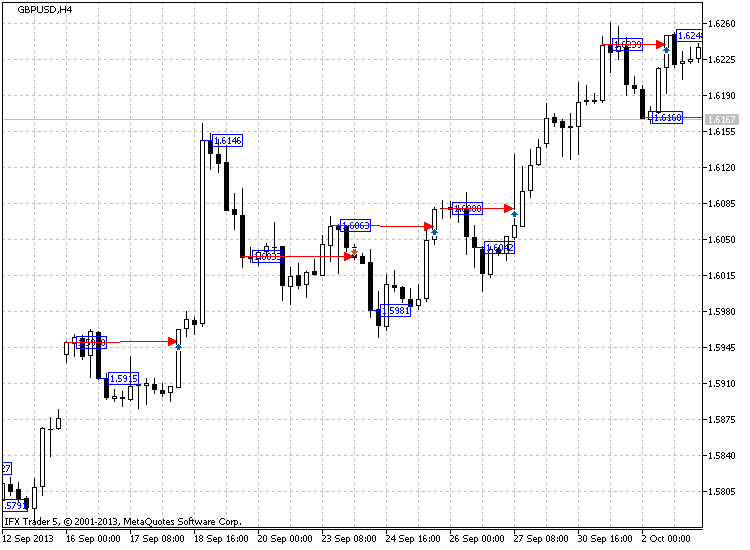
Fig. 8. Trading through a price label
Red arrows on Fig. 8 display when to buy or to sell. The arrows are moving from the previous price label displaying the locations the previous price labels were broken through.
Time labels serve mainly as trend direction pointers. Since the color of time labels can be changed relative to the line type, and Yin or Yang line type shows trend direction or reversal, the color may help us define the current market mood.
For example, let's take #IBM stock chart (H4, 1%, standard construction) shown in Fig. 9:
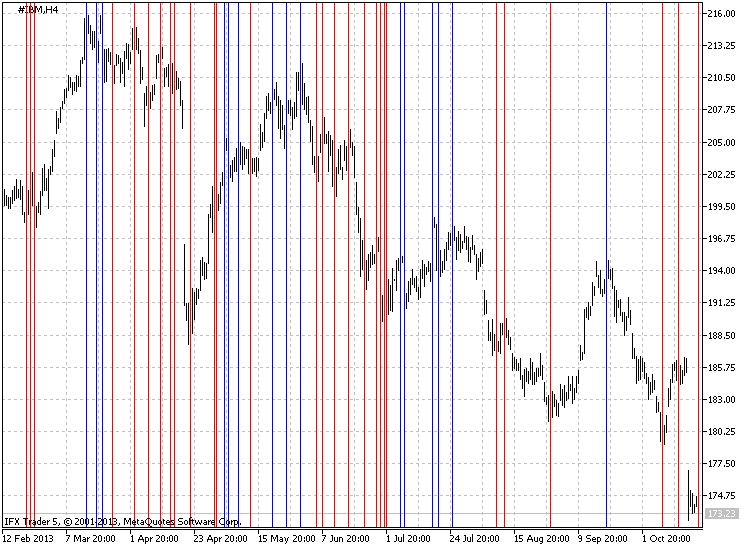
Fig. 9. Defining trend direction using time labels
The chart shows that blue lines are mainly located on the chart's tops, while red ones - at the bottoms.
Conclusion
The Kagi chart can be successfully used for market trading as a strategy basis or as an auxiliary tool for more precise analysis.
In this article, I have examined the code itself and some specificities of constructing the indicator. The main objective has been creation of the multi-functional indicator containing all necessary elements with some extra features that can be disabled.
I will be glad to consider new ideas and improvements for the indicator and, perhaps, implement them in the future. Also, please provide me with your feedback. I will be happy to answer your questions concerning the indicator.
This article continues the series devoted to developing indicators for constructing the charts from the past. The previous article can be found here. The series is to be continued and I hope to meet you again soon. Thank you for your interest! I wish you successful trading, as well as optimized and stable codes.