Continuous Walk-Forward Optimization (Part 6): Auto optimizer's logical part and structure
Andrey Azatskiy | 27 July, 2020
Introduction
We continue to describe the creation of an auto optimizer implementing the continuous walk-forward optimization. In the previous article, we analyzed the graphical interface of the resulting application, however we did not consider its logical part and internal structure. This is what will be described in this article. The previous articles within this series:
- Continuous Walk-Forward Optimization (Part 1): Working with optimization reports
- Continuous Walk-Forward Optimization (Part 2): Mechanism for creating an optimization report for any robot
- Continuous Walk-Forward Optimization (Part 3): Adapting a Robot to the Auto Optimizer
- Continuous Walk-Forward Optimization (Part 4): Optimization Manager (Auto Optimizer)
- Continuous Walk-Forward Optimization (Part 5): Auto optimizer project overview and creation of a GUI
We will use UML diagrams to describe the internal structure of the application and the calls performed by the application during operation. Please note that the purpose of the diagrams is to provide a schematic presentation of the main objects and relationships between them, but not to describe every existing object.
Internal application structure, its description and generation of key objects
As mentioned in the previous article, the main pattern used in the resulting program is MVVM. According to this pattern, the entire program logic is implemented in the data model class, which is connected with the graphics via a separate class implementing the ViewModel object role. The program logic is further split between a number of classes which are elementary entities. The main program entities describing its logic and the relationship between the login and the UI, are shown in the UML diagram of classes below.
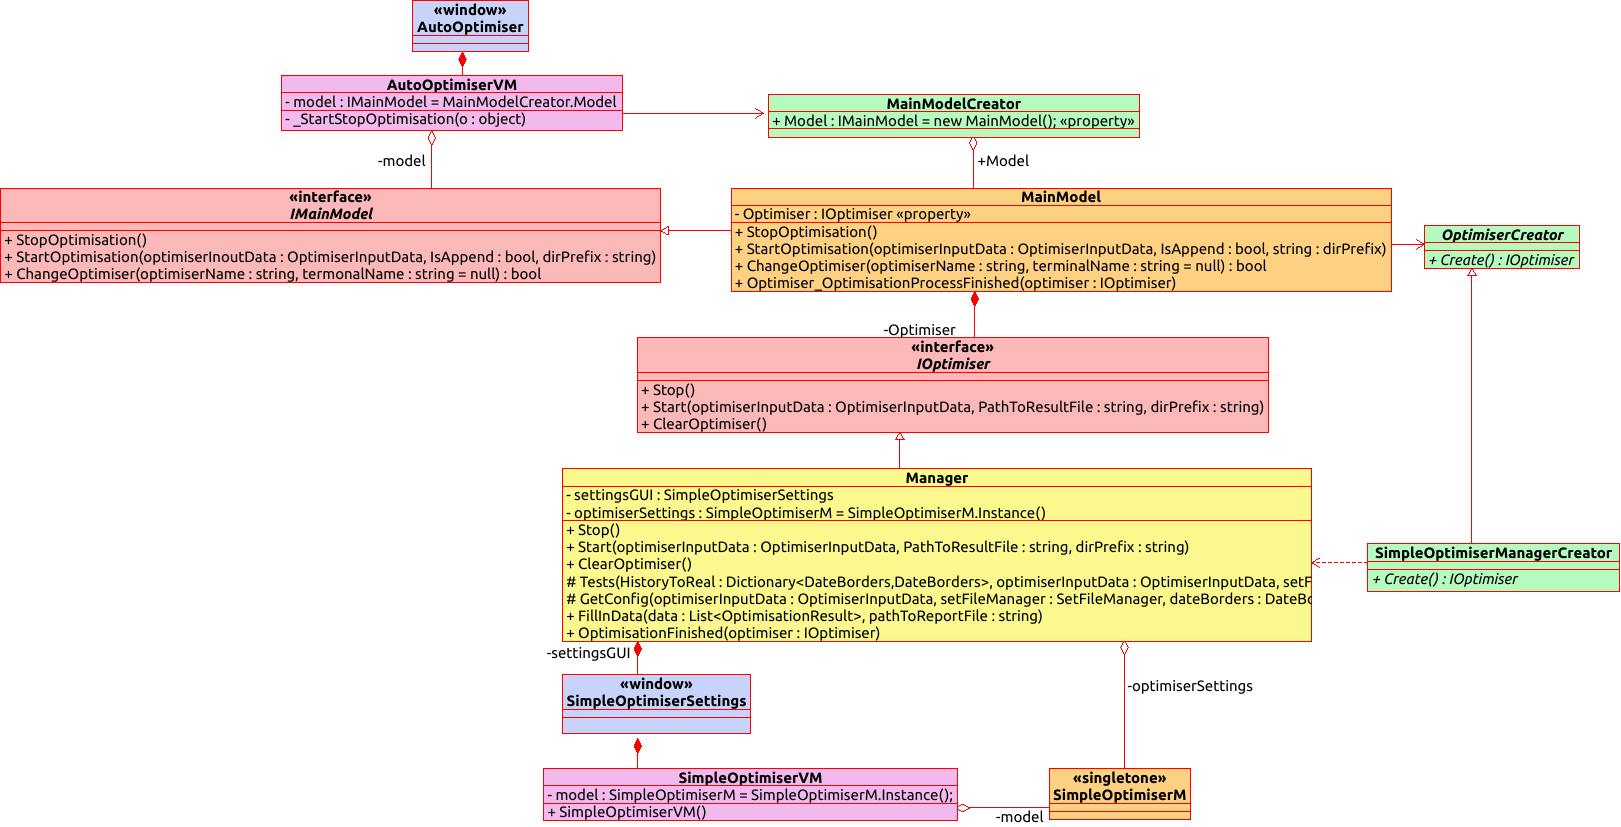
Before considering the diagram, let us view the color indication used for different object types. Blue is used for the graphic layer. These are the objects representing the XAML markup with all WPF mechanisms hidden inside, which are visible neither to the end user nor to the developer. Purple is used for the layer that connects the application graphics with its logic. In other words, it is the ViewModel layer from the used MVVM model. Pink is used to show the interfaces which are abstract representations of data hidden behind them.
The first of them (IMainModel) hides a specific implementation of the data model. According to the main idea of the MVVM pattern, the data model must be as independent as possible, while ViewModel should not depend on the specific implementation of this model. The second one (IOptimiser) is an interface of optimization logic, because according to one of the program ideas, there can be multiple optimizations running and selecting logics, and the user can change it by selecting the appropriate optimizer from the combo box.
Brown is used for the layer representing the data model in graphical interfaces. As you can see, there are two data models in the diagram: the first one refers to the auto-optimizer itself, and the second one refers to the graphical interface of the optimizer. Yellow is used for the only optimization manager that exists at the moment. However, there can be multiple optimization managers. You can also implement your own optimization logic (the method of implementing the mechanism will be considered in further articles). Green is used for auxiliary objects which serve as factories and which implement the creation of objects required at the current moment.
Further, let us consider the relationships between the objects and the process of their creation during application launch. Prior to this, we need to consider the graphic layer and its components:
- AutoOptimiser (main window),
- AutoOptimiserVM (view model),
- IMainModel (model interface),
- MainModel (Model),
- MainModelCreator (static factory creating the data model).
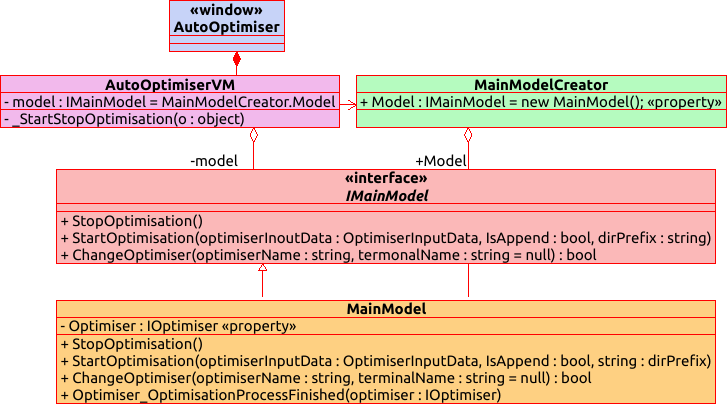
These are the first five objects shown in the diagram. The AutoOptimiser class is instantiated first during application launch. This class creates a graphical interface. The XAML markup of the graphical interface contains a reference to the AutoOptimiserVM object which acts as ViewModel. Therefore, during the creation of the graphical layer, the AutoOptimiserVM class is also created, while the graphical layer owns it completely. This object exists until it is destroyed after destroying the graphical interface. It is connected with the AutoOptimiser class (our window) via "Composition", which implies the full ownership and control of the object.
The ViewModel class must have access to the Model class, but the data model class must remain independent of ViewModel. In other words, it does not need to know which class provides the data model. Instead, the ViewModel class is aware of the model interface which contains a set of public methods, events and properties which our mediator can use. That is why this class is not directly connected to the MainModel class but is connected to its interface via the "Aggregation" relation, according to which the analyzed class belongs to the class that uses it.
However, one of the differences between Aggregation and Composition is that the analyzed class can belong to more than one objects at a time, and its lifetime process is not controlled by container objects. This statement is completely true for the MainModel class because it is created in its static constructor (the MainModelCreator class) and is stored both in it and in the AutoOptimiserVM class at the same time. The object is destroyed when the application completes its work. This is because it was originally implemented in a static property, which is cleared only when the application completes.
We have considered the relationship between three key objects: Model — View — ViewModel. The rest of the diagram is devoted to the main business logic of our application. It presents the relationship of objects responsible for the optimization process with the data model object. The objects responsible for the optimization control process serve as a kind of controller that launches the required processes and delegates their execution to individual program objects. One of them is the optimizer. The optimizer is also a manager that delegates the execution of tasks to task-oriented objects, such as terminal launch or generation of the configuration file required for terminal launch.
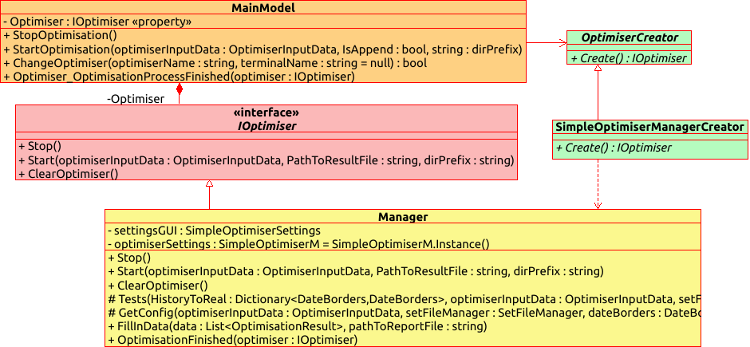
During the instantiation of the MainModel class, we also instantiate the optimizer class using the already familiar mechanism of static constructors. As can be seen from the diagram, the optimizer class should implement the IOptimiser interface and should have a constructor class derived from OptimiserCreator - it will create a specific instance of the optimizer. This is required for the implementation of dynamic substitution of optimizers in the program execution mode.
Each of the optimizers can have individual optimization logic. The logic of the current optimizer and the implementation of optimizers will be considered in detail in future articles. Now, let us get back to the architecture. The data model class is connected with the base class of all model constructors via the association relation, which means that the data model class uses the constructors of optimizers cast to its base class to create a certain optimizer instance.
The created optimizer is cast to its interface type and is saved in the appropriate field of the MainModel class. Thus, using abstraction during object creation (object constructors) and instance creation (optimizers), we provide for the possibility of dynamic substitution of optimizers during program execution process. The used approach is called "Abstract Factory". Its idea is that both the product (the class implementing the optimization logic) and its factories (classes creating the product) have their own abstraction. The user class does not need to know about the specific implementation of logic of both components, but it must be able to use their different implementations.
As an example from real life, we can use sparkling water, tea, coffee or similar products, as well as factories that produce them. A person does not need to know the specific production methodology of the drinks in order to drink them. Also, the person does not need to know a certain internal structure of factories producing the drinks or of the store where they are sold. In this example:
- A person is a user,
- Stores or factories from which the drinks are offered are factories,
- Drinks are the product.
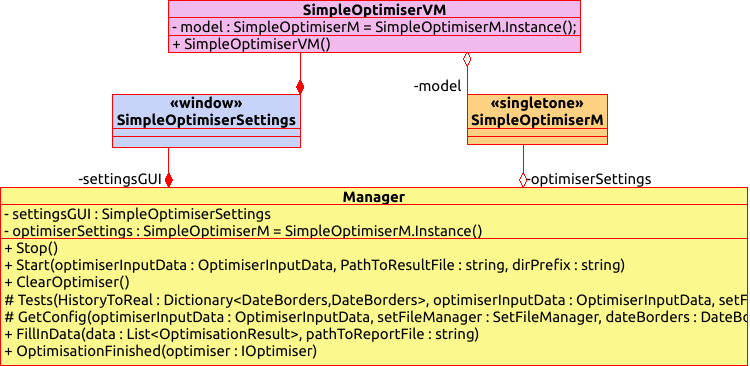
If you look at the default optimizer implementation, you will see that it also has a graphical interface with settings (which is called by a click on the "GUI" button next to ComboBox where all optimizers are enumerated). In the diagram of classes (and in the code), the graphical part of optimizer settings is called "SimpleOptimiserSettings", while ViewModel and View are called "SimpleOptimiserVM" and "SimpleOptimiserM", respectively. As can be seen from the class diagram, ViewModel of optimizer settings is fully owned by the graphical part and thus is connected via the "Composition" relation. The View part is fully owned by the optimizer and is connected with the Manager class via the "Composition" relation. Part of optimizer settings data model belongs both to optimizer and to ViewModel, that is why it has "Aggregation" relation with both of them. This is done intentionally to allow the optimizer to access the settings stored in the optimizer settings graphic data model.
To complete the chapter, I provide here a sequence diagram showing the instantiation process of the above considered objects.

The diagram should be read from top to bottom. The starting point of the displayed process is Instance that shows the application start moment with the instantiation of the graphics layer of the main optimizer window. During instantiation, the graphic interface instantiates the SimpleOptimiserVM class because it is declared as DataContext of the main window. During instantiation, SimpleOptimiserVM calls the MainModelCreator.Model static property which in turn generates the MainModel object and casts it to the IMainModel interface type.
At the time of MainModel class instantiation, a list of optimizer constructors is created. This is the list shown in ComboBox allowing to select the desired optimizer. After data model instantiation, the SimpleOptimiserVM class constructor is called, which calls the ChangeOptimiser method from the data model presented by the IMainModel interface type. The ChangeOptimiser method calls the Create() method on the selected constructor of optimizers. Since we are viewing the launch of the application, the selected optimizer constructor is the first form the specified list. By calling the Create method on the desired optimizer constructor, we delegate to the constructor the creation of the specific optimizer type. It creates the optimizer, returns the optimizer object cast to the interface type and passes it to the data model, where it is saved in the appropriate property. After that, the ChangeOptimiser method operation is complete, and we can get back to the SimpleOptimiserVM class constructor.
The Model class and the logical program part
We have considered the general structure of the resulting application and the process of creation of the main objects at the application launch time. Now, let us move on to considering its logic implementation details. All objects describing the logic of the created application are located in the "Model" directory. The directory root has the "MainModel.cs" file, which contains the data model class which is the starting point for launching the entire business logic of the application. Its implementation contains more than 1000 lines of code, therefore I will not provide the entire class code here, but only the implementations of individual methods. The class is inherited from the IMainModel interface. Here is the interface code demonstrating its structure.
/// <summary>
/// Data model interface of the main optimizer window
/// </summary>
interface IMainModel : INotifyPropertyChanged
{
    #region Getters
    /// <summary>
    /// Selected optimizer
    /// </summary>
    IOptimiser Optimiser { get; }
    /// <summary>
    /// The list of names of terminals installed on the computer
    /// </summary>
    IEnumerable<string> TerminalNames { get; }
    /// <summary>
    /// The list of names of optimizers available for usage
    /// </summary>
    IEnumerable<string> OptimisatorNames { get; }
    /// <summary>
    /// The list of names of directories with saved optimizations (Data/Reports/*)
    /// </summary>
    IEnumerable<string> SavedOptimisations { get; }
    /// <summary>
    /// Structure with all passes of optimization results
    /// </summary>
    ReportData AllOptimisationResults { get; }
    /// <summary>
    /// Forward tests
    /// </summary>
    List<OptimisationResult> ForwardOptimisations { get; }
    /// <summary>
    /// Historical tests
    /// </summary>
    List<OptimisationResult> HistoryOptimisations { get; }
    #endregion

    #region Events
    /// <summary>
    /// Event of exception throw form the data model
    /// </summary>
    event Action<string> ThrowException;
    /// <summary>
    /// Optimization stop error
    /// </summary>
    event Action OptimisationStoped;
    /// <summary>
    /// Event of progress bar update form the data model
    /// </summary>
    event Action<string, double> PBUpdate;
    #endregion

    #region Methods
    /// <summary>
    /// Method loading previously saved optimization results
    /// </summary>
    /// <param name="optimisationName">The name of the required report</param>
    void LoadSavedOptimisation(string optimisationName);
    /// <summary>
    /// Method changing the previously selected terminal
    /// </summary>
    /// <param name="terminalName">ID of the requested terminal</param>
    /// <returns></returns>
    bool ChangeTerminal(string terminalName);
    /// <summary>
    /// Optimizer change method
    /// </summary>
    /// <param name="optimiserName">Optimizer name</param>
    /// <param name="terminalName">Terminal name</param>
    /// <returns></returns>
    bool ChangeOptimiser(string optimiserName, string terminalName = null);
    /// <summary>
    /// Optimization start
    /// </summary>
    /// <param name="optimiserInputData">Input data to launch optimization</param>
    /// <param name="IsAppend">Flag showing whether to add to existing data (if any) or overwrite them</param>
    /// <param name="dirPrefix">Prefix of the directory with optimizations</param>
    void StartOptimisation(OptimiserInputData optimiserInputData, bool IsAppend, string dirPrefix);
    /// <summary>
    /// Optimization stop from outside (by user)
    /// </summary>
    void StopOptimisation();
    /// <summary>
    /// Get robot parameters
    /// </summary>
    /// <param name="botName">Expert name</param>
    /// <param name="isUpdate">Flag whether file needs to be updated before reading</param>
    /// <returns>List of parameters</returns>
    IEnumerable<ParamsItem> GetBotParams(string botName, bool isUpdate);
    /// <summary>
    /// Saving selected optimizations to the (* .csv) file
    /// </summary>
    /// <param name="pathToSavingFile">Path to the file to be saved</param>
    void SaveToCSVSelectedOptimisations(string pathToSavingFile);
    /// <summary>
    /// Saving optimizations for the transferred date to the (* csv) file
    /// </summary>
    /// <param name="dateBorders">Date range borders</param>
    /// <param name="pathToSavingFile">Path to the file to be saved</param>
    void SaveToCSVOptimisations(DateBorders dateBorders, string pathToSavingFile);
    /// <summary>
    /// Start the testing process
    /// </summary>
    /// <param name="optimiserInputData">List of tester setup parameters</param>
    void StartTest(OptimiserInputData optimiserInputData);
    /// <summary>
    /// Start the sorting process
    /// </summary>
    /// <param name="borders">Date range borders</param>
    /// <param name="sortingFlags">Array of parameter names for sorting</param>
    void SortResults(DateBorders borders, IEnumerable<SortBy> sortingFlags);
    /// <summary>
    /// Filtering optimization results
    /// </summary>
    /// <param name="borders">Date range borders</param>
    /// <param name="compareData">Data filtering flags</param>
    void FilterResults(DateBorders borders, IDictionary<SortBy, KeyValuePair<CompareType, double>> compareData);
    #endregion
}
The components of the interface are delimited by #region directives. Thus, the interface members are divided into typical components. As you can see, it has a number of properties that provide various information from the fields regulated by the data model to the graphical interface. However, these are just getters that restrict access to data allowing only to read them, without the ability to overwrite the object that is being read. This is done to prevent accidental damage of the data model the logic from the ViewModel. One of the interesting things about the interface properties is the lists of optimization results:
- AllOptimisationResults
- ForwardOptimisations
- HistoryOptimisations
These fields contain the list of optimizations which are shown in tables in the Results tab of out GUI. The list of all optimization passes is contained in a specially created structure "ReportData":
/// <summary>
/// Structure describing optimization results
/// </summary>
struct ReportData
{
    /// <summary>
    /// Dictionary with optimization passes
    /// key - date range
    /// value - list of optimization passes for the given range
    /// </summary>
    public Dictionary<DateBorders, List<OptimisationResult>> AllOptimisationResults;
    /// <summary>
    /// Expert and Currency
    /// </summary>
    public string Expert, Currency;
    /// <summary>
    /// Deposits
    /// </summary>
    public double Deposit;
    /// <summary>
    /// Leverage
    /// </summary>
    public int Laverage;
}
In addition to optimization data, the structure describes the main optimizer settings which is required for the launch of tests (by a double click on the selected optimization pass) and for comparing optimization results when adding new data to those optimized earlier.
Also, the data model contains the list of terminals installed on the computer, names of optimizers available for selection (creates from the constructors of these optimizers) and the list of previously saved optimizations (names of directories located at "Data/Reports"). Access to the optimizer itself is also provided.
The reverse exchange of information (from the model to the View model) is performed using the events that the ViewModel subscribes to after instantiating the data model. There are 4 such events, 3 of which are custom, and one is inherited from the INotifyPropertyChanged interface. Inheriting from the INotifyPropertyChanged interface is not required in the data model. But it looks convenient for me that is why inheritance is used in this program.
One of the events is ThrowException. Initially, it was created to send an error message to the application's graphical part and then to display it, because you should not control the graphics directly from the data model. However, now the event is also used to pass a number of text messages to graphics from the data model. These are not errors but are text alerts. So please mind that the event will further pass messages which are not errors.
To consider the methods of the data model, let us view the class implementing this program part.
The first thing the optimizer does when a new robot is selected is loading its parameters. This is done by the "GetBotParams" method which implements two possible logics. It can update the configuration file with the robot parameters and can simply read it. It can also be recursive.
/// <summary>
/// Get parameters for the selected EA
/// </summary>
/// <param name="botName">Expert name</param>
/// <param name="terminalName">Terminal name</param>
/// <returns>Expert parameters</returns>
public IEnumerable<ParamsItem> GetBotParams(string botName, bool isUpdate)
{
    if (botName == null)
        return null;

    FileInfo setFile = new FileInfo(Path.Combine(Optimiser
                                   .TerminalManager
                                   .TerminalChangeableDirectory
                                   .GetDirectory("MQL5")
                                   .GetDirectory("Profiles")
                                   .GetDirectory("Tester")
                                   .FullName, $"{Path.GetFileNameWithoutExtension(botName)}.set"));


    try
    {
        if (isUpdate)
        {
            if (Optimiser.TerminalManager.IsActive)
            {
                ThrowException("Wating for closing terminal");
                Optimiser.TerminalManager.WaitForStop();
            }
            if (setFile.Exists)
                setFile.Delete();

            FileInfo iniFile = terminalDirectory.Terminals
                                                .First(x => x.Name == Optimiser.TerminalManager.TerminalID)
                                                .GetDirectory("config")
                                                .GetFiles("common.ini").First();

            Config config = new Config(iniFile.FullName);

            config = config.DublicateFile(Path.Combine(workingDirectory.WDRoot.FullName, $"{Optimiser.TerminalManager.TerminalID}.ini"));

            config.Tester.Expert = botName;
            config.Tester.FromDate = DateTime.Now;
            config.Tester.ToDate = config.Tester.FromDate.Value.AddDays(-1);
            config.Tester.Optimization = ENUM_OptimisationMode.Disabled;
            config.Tester.Model = ENUM_Model.OHLC_1_minute;
            config.Tester.Period = ENUM_Timeframes.D1;
            config.Tester.ShutdownTerminal = true;
            config.Tester.UseCloud = false;
            config.Tester.Visual = false;

            Optimiser.TerminalManager.WindowStyle = System.Diagnostics.ProcessWindowStyle.Minimized;
            Optimiser.TerminalManager.Config = config;

            if (Optimiser.TerminalManager.Run())
                Optimiser.TerminalManager.WaitForStop();

            if (!File.Exists(setFile.FullName))
                return null;

            SetFileManager setFileManager = new SetFileManager(setFile.FullName, false);
            return setFileManager.Params;
        }
        else
        {
            if (!setFile.Exists)
                return GetBotParams(botName, true);

            SetFileManager setFileManager = new SetFileManager(setFile.FullName, false);
            if (setFileManager.Params.Count == 0)
                return GetBotParams(botName, true);

            return setFileManager.Params;
        }
    }
    catch (Exception e)
    {
        ThrowException(e.Message);
        return null;
    }
}
At the method beginning, we create an object-oriented representation of the file with robot parameters using the FileInfo class which is available in the C# standard library. According to standard terminal settings, the file is saved under the directory MQL5/Profiles/Tester/{selected robot name}.set. This is the path that is set at the time of creation of an object-oriented file representation. Further actions are wrapped into the try-catch construct because there is a risk of error being thrown during file operations. Now, one of possible logic branches is executed depending on the passed isUpdate parameter. If isUpdate = true, we must update the file with settings during which its values are reset to default and then read its parameters. This logic branch is executed when we click on "Update (*.set) file" in the application's graphical part. The most convenient way to update the file with expert settings is to re-generate it.
The file is generated by the strategy tester if it did not exist when a robot was selected in the tester. Therefore, all we need to do is to restart the tester after deleting the file, then to wait till the file is generated, to close the tester and to return its default value. First check if the terminal is running. If it is running, then display the corresponding message and wait for its completion. Then check if the file with parameters exists. If there is such a file, delete it.
Then, fill the configuration file for terminal launch, using the already familiar Config which was considered in previous articles. Pay attention to dates written to the configuration file. We launch the test in the terminal, but the test start date is specified as 1 day earlier than the end date. Due to this, the tester starts and generates a file with required settings. Then it fails to launch the test and completes its operation, after which we can read the file. Once the configuration file has been created and prepared, the TerminalManager class is used to launch the process of settings file generations (the process was considered earlier). Once the file generation has completed, we use the SetFileManager class to read the file with the settings and to return its contents.
If another logic branch is needed, according to which the explicit generation of a settings file is not required, use the second part of the condition. The method reads the file with the EA settings and returns its content, or the method is recursively launched with the parameter isUpdate = true and thus the earlier considered logic part is executed.
Another interesting method is "StartOptimisation":
/// <summary>
/// Start optimizations
/// </summary>
/// <param name="optimiserInputData">Input data for the optimizer</param>
/// <param name="isAppend">Flag whether data should be added to a file?</param>
/// <param name="dirPrefix">Directory prefix</param>
public async void StartOptimisation(OptimiserInputData optimiserInputData, bool isAppend, string dirPrefix)
{
    if (string.IsNullOrEmpty(optimiserInputData.Symb) ||
        string.IsNullOrWhiteSpace(optimiserInputData.Symb) ||
        (optimiserInputData.HistoryBorders.Count == 0 && optimiserInputData.ForwardBorders.Count == 0))
    {
        ThrowException("Fill in asset name and date borders");
        OnPropertyChanged("ResumeEnablingTogle");
        return;
    }

    if (Optimiser.TerminalManager.IsActive)
    {
        ThrowException("Terminal already running");
        return;
    }

    if (optimiserInputData.OptimisationMode == ENUM_OptimisationMode.Disabled)
    {
        StartTest(optimiserInputData);
        return;
    }

    if (!isAppend)
    {
        var dir = workingDirectory.GetOptimisationDirectory(optimiserInputData.Symb,
                                                  Path.GetFileNameWithoutExtension(optimiserInputData.RelativePathToBot),
                                                  dirPrefix, Optimiser.Name);
        List<FileInfo> data = dir.GetFiles().ToList();
        data.ForEach(x => x.Delete());
        List<DirectoryInfo> dirData = dir.GetDirectories().ToList();
        dirData.ForEach(x => x.Delete());
    }

    await Task.Run(() =>
    {
        try
        {
            DirectoryInfo cachDir = Optimiser.TerminalManager.TerminalChangeableDirectory
                                                     .GetDirectory("Tester")
                                                     .GetDirectory("cache", true);
            DirectoryInfo cacheCopy = workingDirectory.Tester.GetDirectory("cache", true);
            cacheCopy.GetFiles().ToList().ForEach(x => x.Delete());
            cachDir.GetFiles().ToList()
                   .ForEach(x => x.MoveTo(Path.Combine(cacheCopy.FullName, x.Name)));

            Optimiser.ClearOptimiser();
            Optimiser.Start(optimiserInputData,
                Path.Combine(terminalDirectory.Common.FullName,
                $"{Path.GetFileNameWithoutExtension(optimiserInputData.RelativePathToBot)}_Report.xml"), dirPrefix);
        }
        catch (Exception e)
        {
            Optimiser.Stop();
            ThrowException(e.Message);
        }
    });
}
This method is asynchronous, and it is written using async await technology, which provides for a simpler declaration of asynchronous methods. Firstly, check the passed symbol name and the optimization ranges. If any of them is missing, unlock the blocked GUI (some of GUI buttons are blocked when optimization starts) and display an error message, after which the function execution should complete. Do exactly the same if the terminal is already running. If a test mode was selected instead of optimization, redirect the execution of the process to the method that starts the test.
If Append mode is selected, delete all files in the directory with optimizations, as well as all subdirectories. Then proceed to run the optimization. The optimization process starts asynchronously and thus it does not block the GUI while this task is being performed. It is also wrapped into a try-catch construct in case of errors. Before process start, we copy all cache files of earlier performed optimizations to a temporary directory created in the Data working directory of the auto optimizer. This ensures that optimizations will be launched even if they have been launched earlier. Then, clear the optimizer if all data previously written to local variables of the optimizer and launch the optimization process. One of the optimization launching parameters is the path to the report file generated by the robot. As mentioned earlier in article 3, the report is generated with the name {robot name}_Report.xml. In the auto optimizer, this name is specified by the following line:
$"{Path.GetFileNameWithoutExtension(optimiserInputData.RelativePathToBot)}_Report.xml") It is done by string concatenation where the robot name is formed from the path to the robot specified as one of the parameters of the optimization file. The optimization stop process is completely transferred to the optimizer class. The method that implements it simply calls the StopOptimisation method at an instance of the optimizer class.
/// <summary>
/// Complete optimization from outside the optimizer
/// </summary>
public void StopOptimisation()
{
    Optimiser.Stop();
}
Tests are started using the method implemented in the data model class, not in the optimizer.
/// <summary>
/// Run tests
/// </summary>
/// <param name="optimiserInputData">Input data for the tester</param>
public async void StartTest(OptimiserInputData optimiserInputData)
{
    // Check if the terminal is running
    if (Optimiser.TerminalManager.IsActive)
    {
        ThrowException("Terminal already running");
        return;
    }

    // Set the date range
    #region From/Forward/To
    DateTime Forward = new DateTime();
    DateTime ToDate = Forward;
    DateTime FromDate = Forward;

    // Check the number of passed dates. Maximum one historical and one forward
    if (optimiserInputData.HistoryBorders.Count > 1 ||
        optimiserInputData.ForwardBorders.Count > 1)
    {
        ThrowException("For test there must be from 1 to 2 date borders");
        OnPropertyChanged("ResumeEnablingTogle");
        return;
    }

    // If both historical and forward dates are passed
    if (optimiserInputData.HistoryBorders.Count == 1 &&
        optimiserInputData.ForwardBorders.Count == 1)
    {
        // Test the correctness of the specified interval
        DateBorders _Forward = optimiserInputData.ForwardBorders[0];
        DateBorders _History = optimiserInputData.HistoryBorders[0];

        if (_History > _Forward)
        {
            ThrowException("History optimization must be less than Forward");
            OnPropertyChanged("ResumeEnablingTogle");
            return;
        }

        // Remember the dates
        Forward = _Forward.From;
        FromDate = _History.From;
        ToDate = (_History.Till < _Forward.Till ? _Forward.Till : _History.Till);
    }
    else // If only forward or only historical data is passed
    {
        // Save and consider it a historical date (even if forward was passed)
        if (optimiserInputData.HistoryBorders.Count > 0)
        {
            FromDate = optimiserInputData.HistoryBorders[0].From;
            ToDate = optimiserInputData.HistoryBorders[0].Till;
        }
        else
        {
            FromDate = optimiserInputData.ForwardBorders[0].From;
            ToDate = optimiserInputData.ForwardBorders[0].Till;
        }
    }
    #endregion

    PBUpdate("Start test", 100);

    // Run test in the secondary thread
    await Task.Run(() =>
    {
        try
        {
            // Create a file with EA settings
            #region Create (*.set) file
            FileInfo file = new FileInfo(Path.Combine(Optimiser
                                             .TerminalManager
                                             .TerminalChangeableDirectory
                                             .GetDirectory("MQL5")
                                             .GetDirectory("Profiles")
                                             .GetDirectory("Tester")
                                             .FullName, $"{Path.GetFileNameWithoutExtension(optimiserInputData.RelativePathToBot)}.set"));

            List<ParamsItem> botParams = new List<ParamsItem>(GetBotParams(optimiserInputData.RelativePathToBot, false));

            // Fill the expert settings with those that were specified in the graphical interface
            for (int i = 0; i < optimiserInputData.BotParams.Count; i++)
            {
                var item = optimiserInputData.BotParams[i];

                int ind = botParams.FindIndex(x => x.Variable == item.Variable);
                if (ind != -1)
                {
                    var param = botParams[ind];
                    param.Value = item.Value;
                    botParams[ind] = param;
                }
            }

            // Save settings to a file
            SetFileManager setFile = new SetFileManager(file.FullName, false)
            {
                Params = botParams
            };
            setFile.SaveParams();
            #endregion

            // Create terminal config
            #region Create config file
            Config config = new Config(Optimiser.TerminalManager
                                                .TerminalChangeableDirectory
                                                .GetDirectory("config")
                                                .GetFiles("common.ini")
                                                .First().FullName);
            config = config.DublicateFile(Path.Combine(workingDirectory.WDRoot.FullName, $"{Optimiser.TerminalManager.TerminalID}.ini"));

            config.Tester.Currency = optimiserInputData.Currency;
            config.Tester.Deposit = optimiserInputData.Balance;
            config.Tester.ExecutionMode = optimiserInputData.ExecutionDelay;
            config.Tester.Expert = optimiserInputData.RelativePathToBot;
            config.Tester.ExpertParameters = setFile.FileInfo.Name;
            config.Tester.ForwardMode = (Forward == new DateTime() ? ENUM_ForvardMode.Disabled : ENUM_ForvardMode.Custom);
            if (config.Tester.ForwardMode == ENUM_ForvardMode.Custom)
                config.Tester.ForwardDate = Forward;OnPropertyChanged("StopTest");
            else
                config.DeleteKey(ENUM_SectionType.Tester, "ForwardDate");
            config.Tester.FromDate = FromDate;
            config.Tester.ToDate = ToDate;
            config.Tester.Leverage = $"1:{optimiserInputData.Laverage}";
            config.Tester.Model = optimiserInputData.Model;
            config.Tester.Optimization = ENUM_OptimisationMode.Disabled;
            config.Tester.Period = optimiserInputData.TF;
            config.Tester.ShutdownTerminal = false;
            config.Tester.Symbol = optimiserInputData.Symb;
            config.Tester.Visual = false;
            #endregion

            // Configure the terminal and launch it
            Optimiser.TerminalManager.WindowStyle = System.Diagnostics.ProcessWindowStyle.Normal;
            Optimiser.TerminalManager.Config = config;
            Optimiser.TerminalManager.Run();

            // Wait for the terminal to close
            Optimiser.TerminalManager.WaitForStop();
        }
        catch (Exception e)
        {
            ThrowException(e.Message);
        }

        OnPropertyChanged("StopTest");
    });
}
After the familiar check of whether the terminal is running, proceed to setting the dates for historical and forward tests. You can set either one historical range or both a historical range and a forward one. If only a forward interval is specified in settings, it will be treated as a historical one. First of all, we declare the variables that store test dates (forward, last test date, test start date). Then check the method — if more than one historical range borders or more than one forward test borders are passed, show an error message. Then, set borders — the idea of this condition is to set the four passed dates (or two if only the historical period should be set) between three declared variables.
- FromDate — is the smallest of the passed dates
- ToDate — is the highest of the passed dates
- Forward — is the lowest of forward dates.
Test start is also wrapped in a try-catch construct. Firstly, a file with the robot parameters is generated and is filled with the passed robot parameters. This is done by using the earlier considered SetFileManager object. Then a config file is created according to the instruction, and the test process is launched. Then, wait for the terminal to close. Once the method operation is complete, notify the graphics that the test is complete. This must be done through an event because this method is asynchronous and the program operation continues after its call, without waiting for called method to complete.
As for the optimization process, the optimizer also notifies the data model about the ended optimization process via the optimization process completion event. This will be considered in more detail in the final article.
Conclusion
In previous articles, we analyzed in detail the process of combining algorithms with the created auto-optimizer and some of its parts. We have already considered the logic of optimization reports and have seen its application in trading algorithms. In the previous article, we considered the graphical interface (the View part of the program) and the structure of project files.
We also analyzed the internal structure of the project, the interaction between classes and the launch of the optimization process from the point of view of the program. Since the program supports multiple optimization logics, we have not considered in detail the implemented logic — it is better to describe the logic in a separate article as an example of optimizer implementation. We will have two more articles, in which we will analyze the connection of the logical part with the graphics, as well as will discuss the optimizer implementation algorithm and will consider an example of optimizer implementation.
The attachment contains the auto optimizer project with a trading robot analyzed in article 4. To use the project, please compile the auto optimizer project file and the testing robot file. Then copy ReportManager.dll (described in the first article) to the MQL5/Libraries directory, and you can begin to test the EA. Please refer to articles 3 and 4 within this series for details on how to connect the auto optimizer to your Expert Advisors.
Here is the description of the compilation process for all those who have not worked with Visual Studio. The project can be compiled in VisualStudio in different ways, here are three of them:
- The easiest is to press CTRL+SHIFT+B.
- A more visual method is to click on the green array in the editor — this will launch the application in the code debug mode and will perform the compilation (if the Debug compilation mode is selected).
- Another option is to use the Build command from the menu.
The compiled program will then depend in the folder MetaTrader Auto Optimiser/bin/Debug (or MetaTrader Auto Optimiser/bin/Release — depending on the selected compilation method).