Creating a Multi-Currency Multi-System Expert Advisor
Maxim Khrolenko | 5 December, 2013
Introduction
I believe there are quite a few traders who trade more than one trading symbol and use multiple strategies. This approach does not only allow you to potentially increase your profit but to also minimize the risk of substantial drawdown upon efficient money management. When creating an Expert Advisor, the first natural step in checking the efficiency of the program strategy is optimization in order to determine the best input parameters.
With parameter values identified, Expert Advisors would technically be ready for trading. However that would leave one important question unanswered. What would testing results be like if a trader could put all his strategies together in a single Expert Advisor? The realization that drawdown on several symbols or strategies might at some point overlap and result in a ghastly total drawdown or even a margin call may sometimes come as a nasty surprise.
This article introduces a concept of creating a multi-currency multi-system Expert Advisor that will allow us to find an answer to this important question.
1. Structure of the Expert Advisor
In general terms, the structure of the Expert Advisor is as follows:
Fig. 1. Structure of the multi-currency multi-system Expert Advisor
As you can see, the program is based on a for loop. Each strategy is arranged in a loop where each iteration is responsible for trading each symbol separately. Here, you can arrange in loops unlimited number of strategies. Important is for your computer to have sufficient resources to "process" such a program.
You should keep in mind that there may only be one position for each traded symbol in MetaTrader 5. Such position represents the sum of lots of previously executed Buys and Sells. Therefore, the result of multi-strategy testing for one symbol will not be identical to the sum of separate testing results of the same strategies for the same symbol.
For a closer consideration of the structure of the Expert Advisor we will take 2 strategies each of which trades two symbols:
Strategy A:
- Buy: Ask price reaches the lower band of the Bollinger Bands indicator calculated based on Low price.
Closing: Bid price reaches the lower band of the Bollinger Bands indicator calculated based on High price. - Sell: Bid price reaches the upper band of the Bollinger Bands indicator calculated based on High price.
Closing: Ask price reaches the upper band of the Bollinger Bands indicator calculated based on Low price. - Restriction: only one deal can be executed on any given bar.
Strategy В:
- Buy: the previous bar is bearish (close < open) and Ask price reaches the previous bar's high.
Closing: by Stop Loss or Take Profit. - Sell: the previous bar is bullish (close > open) and Bid price reaches the previous bar's low.
Closing: by Stop Loss or Take Profit. - Restriction: only one deal can be executed on any given bar.
To be independent from the new ticks for a symbol on which the Expert Advisor will be tested or which it will trade, it is advisable to use the OnTimer() function for trading in multi-currency mode.
For this purpose, when initializing the Expert Advisor we specify the frequency of generating an event for program calculation call using the EventSetTimer() function, and upon deinitialization we use the EventKillTimer() function to tell the terminal to stop generation of events:
// Include standard libraries
// Create external parameters
// Create arrays, variables, indicator handles, etc.

//--- Initialization of the Expert Advisor
int OnInit()
  {
   //--- Set event generation frequency
   EventSetTimer(1); // 1 second
   // ...
   return(0);
  }
void OnTimer()
  {
   // ...
  }
//--- Deinitialization of the Expert Advisor
void OnDeinit(const int reason)
  {
   //--- Stop event generation
   EventKillTimer();
   // ...
  }
Instead of EventSetTimer(), you can also use EventSetMillisecondTimer(), where frequency is set accurate to millisecond but you should not misuse it by too frequent program calculation calls.
For access to account, position and symbol settings, as well as trading functions, we will use CAccountInfo, CPositionInfo, CSymbolInfo and CTrade classes, respectively. Let's include them in the Expert Advisor:
//--- Include standard libraries
#include <Trade\AccountInfo.mqh>
#include <Trade\PositionInfo.mqh>
#include <Trade\SymbolInfo.mqh>
#include <Trade\Trade.mqh>
Since the Expert Advisor is based on for loops, we will need to create arrays for its external parameters. Let's first create constants equal to the number of symbols for each strategy:
//--- Number of traded symbols for each strategy
#define Strategy_A 2
#define Strategy_B 2
We then create external parameters. Using constants, we determine sizes of arrays to which they will be copied. Further, we create indicator handles and other global variables.
An example for one symbol of strategy А is provided below:
//------------------- External parameters of strategy A
input string          Data_for_Strategy_A="Strategy A -----------------------";
//--- Symbol 0
input string          Symbol_A0      = "EURUSD";   // Symbol
input bool            IsTrade_A0     = true;       // Permission for trading
//--- Bollinger Bands (BB) parameters
input ENUM_TIMEFRAMES Period_A0      = PERIOD_H1;  // ВВ period
input uint            BBPeriod_A0    = 20;         // Period for calculation of the moving average of BB
input int             BBShift_A0     = 0;          // Horizontal shift of ВВ
input double          BBDeviation_A0 = 2.0;        // Number of standard deviations of BB
//...
//--- General parameters of strategy A
input double          DealOfFreeMargin_A = 1.0;    // Percent of free margin for a deal
input uint            MagicNumber_A      = 555;    // Magic number
input uint            Slippage_A         = 100;    // Permissible slippage for a deal
//...
//------------- Set variables of strategy A -----
//--- Arrays for external parameters
string          Symbol_A[Strategy_A];
bool            IsTrade_A[Strategy_A];
ENUM_TIMEFRAMES Period_A[Strategy_A];
int             BBPeriod_A[Strategy_A];
int             BBShift_A[Strategy_A];
double          BBDeviation_A[Strategy_A];
//--- Arrays for global variables
double          MinLot_A[Strategy_A],MaxLot_A[Strategy_A];
double          Point_A[Strategy_A],ContractSize_A[Strategy_A];
uint            DealNumber_A[Strategy_A];
datetime        Locked_bar_time_A[Strategy_A],time_arr_A[];
//--- Indicator handles
int             BB_handle_high_A[Strategy_A];
int             BB_handle_low_A[Strategy_A];
//--- Arrays for indicator values
double          BB_upper_band_high[],BB_lower_band_high[];
double          BB_upper_band_low[],BB_lower_band_low[];
//--- Class
CTrade          Trade_A;
//...
//--- Set global variables for all strategies
long            Leverage;
//--- Classes
CAccountInfo    AccountInfo;
CPositionInfo   PositionInfo;
CSymbolInfo     SymbolInfo;
To have the possibility to disable trading for a certain symbol, we have created a Boolean variable IsTrade_A0 that will be placed at the very beginning of for loops.
2. Initialization of the Expert Advisor
First, let's get the values required for all strategies, e.g. leverage. Since leverage is applied to the trading account and has nothing to do with a strategy or a symbol, there is no need to copy its value to the arrays:
//--- Get the leverage for the account
   Leverage=AccountInfo.Leverage();
We then copy external variables to arrays.
//--- Copy external variables to arrays
   Symbol_A[0]     =Symbol_A0;
   IsTrade_A[0]    =IsTrade_A0;
   Period_A[0]     =Period_A0;
   BBPeriod_A[0]   =(int)BBPeriod_A0;
   BBShift_A[0]    =BBShift_A0;
   BBDeviation_A[0]=BBDeviation_A0;
If any external parameter is defined by the type that will require conversion to another one, this can be done in a more convenient way when copying to arrays.
In this case, we can see that BBPeriod_A0 was created as uint to prevent the user from setting a negative value. Here, we convert it to int and copy it to the array which was also created as int. Otherwise, the compiler will give a warning if you try to insert uint type parameter in the indicator handle.
Let's further see whether the traded symbol is available in the Market Watch and whether it has been used more than once within one strategy:
//--- Check for the symbol in the Market Watch
   for(int i=0; i<Strategy_A; i++)
     {
      if(IsTrade_A[i]==false) continue;
      if(IsSymbolInMarketWatch(Symbol_A[i])==false)
        {
         Print(Symbol_A[i]," could not be found on the server!");
         ExpertRemove();
        }
     }

//--- Check whether the symbol is used more than once
   if(Strategy_A>1)
     {
      for(int i=0; i<Strategy_A-1; i++)
        {
         if(IsTrade_A[i]==false) continue;
         for(int j=i+1; j<Strategy_A; j++)
           {
            if(IsTrade_A[j]==false) continue;
            if(Symbol_A[i]==Symbol_A[j])
              {
               Print(Symbol_A[i]," is used more than once!");
               ExpertRemove();
              }
           }
        }
     }
//--- The IsSymbolInMarketWatch() function
bool IsSymbolInMarketWatch(string f_Symbol)
  {
   for(int s=0; s<SymbolsTotal(false); s++)
     {
      if(f_Symbol==SymbolName(s,false))
         return(true);
     }
   return(false);
  }
If the symbols were selected correctly, check for errors in input parameters for each of them, create indicator handles, get the data required for the lot calculation and, if necessary, do other things as defined by the given strategy.
We will implement the above mentioned actions inside a for loop.
//--- General actions
   for(int i=0; i<Strategy_A; i++)
     {
      if(IsTrade_A[i]==false) continue;
      //--- Check for errors in input parameters
      //...
      //--- Set indicator handles
      BB_handle_high_A[i]=iBands(Symbol_A[i],Period_A[i],BBPeriod_A[i],BBShift_A[i],BBDeviation_A[i],
                                 PRICE_HIGH);
      if(BB_handle_high_A[i]<0)
        {
         Print("Failed to create a handle for Bollinger Bands based on High prices for ",Symbol_A[i]," . Handle=",INVALID_HANDLE,
               "\n Error=",GetLastError());
         ExpertRemove();
        }
      //...
      //--- Calculate data for the Lot
      //--- set the name of the symbol for which the information will be obtained
      SymbolInfo.Name(Symbol_A[i]);
      //--- minimum and maximum volume size in trading operations
      MinLot_A[i]=SymbolInfo.LotsMin();
      MaxLot_A[i]=SymbolInfo.LotsMax();
      //--- point value
      Point_A[i]=SymbolInfo.Point();
      //--- contract size
      ContractSize_A[i]=SymbolInfo.ContractSize();

      //--- Set some additional parameters
     }
Then, we set the parameters for trading operations of strategy A using the Trade_A object of the CTrade class.
//--- Set parameters for trading operations
//--- set the magic number
   Trade_A.SetExpertMagicNumber(MagicNumber_A);
//--- set the permissible slippage in points upon deal execution
   Trade_A.SetDeviationInPoints(Slippage_A);
//--- order filling mode, use the mode that is allowed by the server
   Trade_A.SetTypeFilling(ORDER_FILLING_RETURN);
//--- logging mode, it is advisable not to call this method as the class will set the optimal mode by itself
   Trade_A.LogLevel(1);
//--- the function to be used for trading: true - OrderSendAsync(), false - OrderSend().
   Trade_A.SetAsyncMode(true);
The same procedure is repeated for each strategy, i.e.
- Copy external variables to arrays;
- Check whether symbols are selected correctly;
- Check errors, set indicator handles, calculate data for the lot and for everything that is required for a given strategy;
- Set parameters for trading operations.
Finally, it would be good to check if one and the same symbol is used in several strategies (an example for two strategies is provided below):
//--- Check whether one and the same symbol is used in several strategies
   for(int i=0; i<Strategy_A; i++)
     {
      if(IsTrade_A[i]==false) continue;
      for(int j=0; j<Strategy_B; j++)
        {
         if(IsTrade_B[j]==false) continue;
         if(Symbol_A[i]==Symbol_B[j])
           {
            Print(Symbol_A[i]," is used in several strategies!");
            ExpertRemove();
           }
        }
     }
3. Trading "For" Loops
The framework of for loops inside the OnTimer() function is as follows:
void OnTimer()
  {
//--- Check if the terminal is connected to the trade server
   if(TerminalInfoInteger(TERMINAL_CONNECTED)==false) return;

//--- Section A: Main loop of the FOR operator for strategy A -----------
   for(int A=0; A<Strategy_A; A++)
     {
      //--- A.1: Check whether the symbol is allowed to be traded
      if(IsTrade_A[A]==false)
         continue; // terminate the current FOR iteration

     }

//--- Section В: Main loop of the FOR operator for strategy В -----------
   for(int B=0; B<Strategy_B; B++)
     {
      //--- B.1: Check whether the symbol is allowed to be traded
      if(IsTrade_B[B]==false)
         continue; // terminate the current FOR iteration

     }
  }
If a single-symbol Expert Advisor based on a single strategy has a condition whereby all subsequent calculations need to be ceased, we use the return operator. In our case, we just need to terminate the current iteration and proceed to the next symbol iteration. For this purpose, it is best to use the continue operator.
If you want to enhance your multi-strategy Expert Advisor by adding a strategy with a for loop that contains a condition for termination of all subsequent calculations, you can use the following pattern:
//--- Section N: Main loop of the FOR operator for strategy N -----------
for(int N=0; N<Strategy_N; N++)
  {

   //...
   bool IsInterrupt=false;
   for(int i=0; i<Number; i++)
     {
      if(...) // terminate all calculations
        {
         IsInterrupt=true;
         break;
        }
     }
   if(IsInterrupt=true)
      continue; // terminate the current FOR iteration
   //...

  }
After creating the framework of the for loops, we simply insert in it codes from other EAs and then replace some variables with array elements.
For example, we change the predefined variable _Symbol to Symbol_A[i] or _Point to Point_A[i]. Values of these variables are typical of the given symbol and were therefore copied to arrays upon initialization.
For instance, let's find the indicator value:
 //--- A.3: Lower band of BB calculated based on High prices
 if(CopyBuffer(BB_handle_high_A[A],LOWER_BAND,BBShift_A[A],1,BB_lower_band_high)<=0)
    continue; // terminate the current FOR iteration
 ArraySetAsSeries(BB_lower_band_high,true);
To implement closing of a buy position, we will write the following code:
 //--- A.7.1: Calculate the current Ask and Bid prices
 SymbolInfo.Name(Symbol_A[A]);
 SymbolInfo.RefreshRates();
 double Ask_price=SymbolInfo.Ask();
 double Bid_price=SymbolInfo.Bid();

 if(PositionSelect(Symbol_A[A]))
   {
    //--- A.7.2: Closing a BUY position
    if(PositionInfo.PositionType()==POSITION_TYPE_BUY)
      {
       if(Bid_price>=BB_lower_band_high[0] || DealNumber_A[A]==0)
         {
          if(!Trade_A.PositionClose(Symbol_A[A]))
            {
             Print("Failed to close the Buy ",Symbol_A[A]," position. Code=",Trade_A.ResultRetcode(),
                   " (",Trade_A.ResultRetcodeDescription(),")");
             continue; // terminate the current FOR iteration
            }
          else
            {
             Print("The Buy ",Symbol_A[A]," position closed successfully. Code=",Trade_A.ResultRetcode(),
                   " (",Trade_A.ResultRetcodeDescription(),")");
             continue; // terminate the current FOR iteration
            }
         }
      }

    //...
   }
Opening a Buy position:
 //--- A.9.1: for a Buy
 if(Ask_price<=BB_lower_band_low[0])
   {
    //...

    //--- A.9.1.3: Execute a deal
    if(!Trade_A.Buy(OrderLot,Symbol_A[A]))
      {
       Print("The Buy ",Symbol_A[A]," has been unsuccessful. Code=",Trade_A.ResultRetcode(),
             " (",Trade_A.ResultRetcodeDescription(),")");
       continue; // terminate the current FOR iteration
      }
    else
      {
       Print("The Buy ",Symbol_A[A]," has been successful. Code=",Trade_A.ResultRetcode(),
             " (",Trade_A.ResultRetcodeDescription(),")");
       continue; // terminate the current FOR iteration
      }
   }
Remember to terminate timer event generation and delete the indicator handles at deinitialization.
4. Test Results
When the Expert Advisor is ready, we test each strategy and each symbol separately and compare the test results with the ones obtained in the test mode when trading all strategies and symbols simultaneously.
It is assumed that the user has already identified the optimal values of input parameters.
Below are the settings of the Strategy Tester:

Fig. 2. Strategy Tester settings
Results for strategy A, EURUSD:
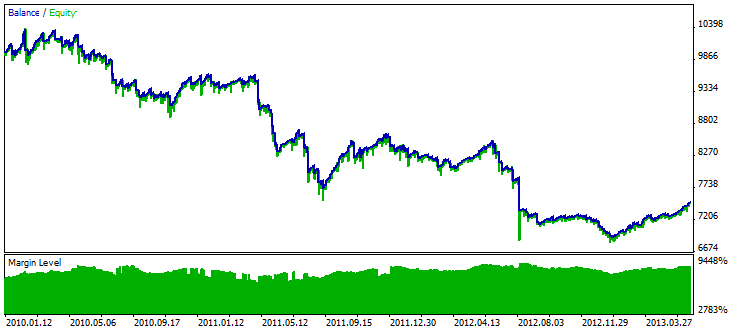
Fig. 3. Test results for strategy A, EURUSD
Results for strategy A, GBPUSD:
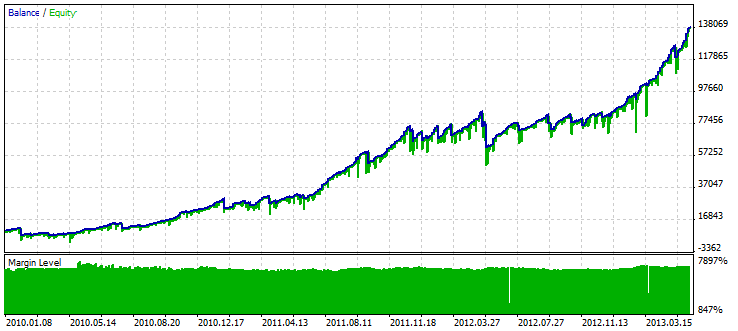
Fig. 4. Test results for strategy A, GBPUSD
Results for strategy B, AUDUSD:
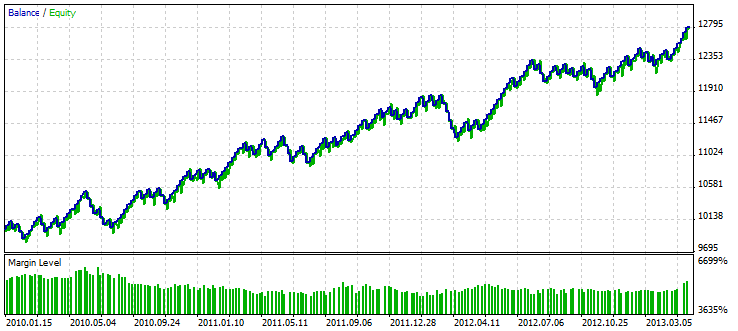
Fig. 5. Test results for strategy В, AUDUSD
Results for strategy B, EURJPY:
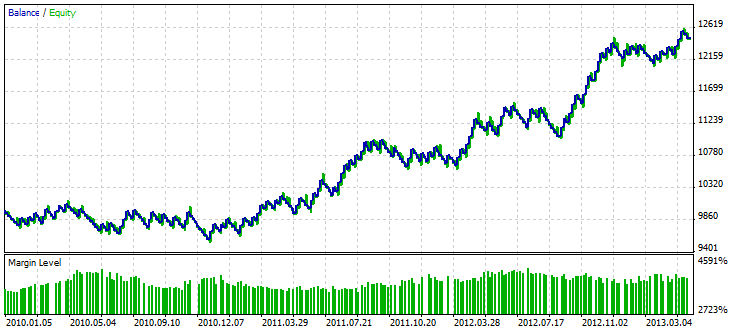
Fig. 6. Test results for strategy В, EURJPY
Test results for all strategies and symbols:
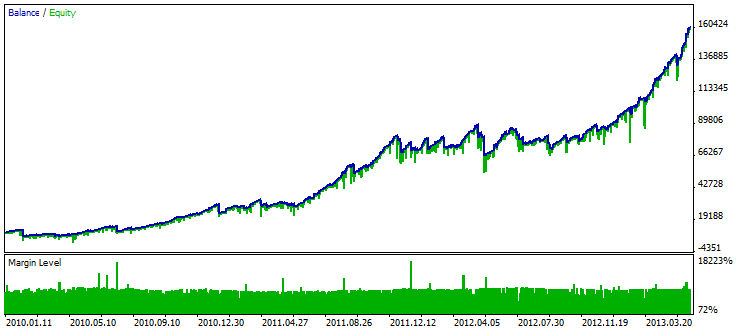
Fig. 7. Test results for all strategies and symbols
Conclusion
As a result, we have a convenient and simple structure of the multi-currency multi-system Expert Advisor in which you can place virtually any of your strategies.
Such an Expert Advisor allows you to better assess the efficiency of trading using all your strategies. It may also prove useful in case only one Expert Advisor is allowed to work on a given account. The source code of the Expert Advisor is attached to the article to facilitate studying the above information.