Multicurrency monitoring of trading signals (Part 4): Enhancing functionality and improving the signal search system
Alexander Fedosov | 10 July, 2020
Contents
- Introduction
- Custom indicator for generating a trading signal
- Expand the system of trading signal search rules
- Convert the list of symbols to a tabular form
- Quick editing of search rules from the monitor
- Application localization
- Additional features
- Conclusion
Introduction
In the third part, we have created a basic system for searching signals, which however was based on a small set of indicators and a simple set of search rules. Also, I received suggestions for usability improvements which could be made in the visual part of the trade monitor. This is what we are going to implement in this part.
Custom indicator for generating a trading signal
A logical addition to the creation and editing of trading signals is the expansion of the set of available indicators. Previously, we could only work with indicators from the standard MetaTrader 5 set. Now, we can add the possibility to use the calculation part of custom indicators. Let us use the project from the previous part as the basis. It can be downloaded from the article attachment. In this part, we will have to change operating algorithms of base class methods which we considered in Part 3. All amendments and additions will be provided with appropriate explanations.
Let us begin with the possibility to select a custom indicator in the signal adding and editing window. This window implementation is provided in the SetWindow.mqh file of our project. Open this file and find the CreateIndicatorType() method. Changes should be implemented exactly in this file.
//+------------------------------------------------------------------+
//| Creates a drop-down menu with indicator types                    |
//+------------------------------------------------------------------+
bool CProgram::CreateIndicatorType(const int x_gap,const int y_gap)
{
//--- Pass the object to the panel
   m_indicator_type.MainPointer(m_set_window);
//---
#define SIZE 10
//--- Array of the item values in the list view
   string pattern_names[SIZE]=
   {
      "ATR","CCI","DeMarker","Force Ind","WPR","RSI","Momentum","ADX","ADX Wilder","Custom"
   };
//--- Set up properties before creation
   m_indicator_type.XSize(200);
   m_indicator_type.YSize(26);
   m_indicator_type.LabelYGap(4);
   m_indicator_type.ItemsTotal(SIZE);
   m_indicator_type.Font(m_base_font);
   m_indicator_type.FontSize(m_base_font_size);
   m_indicator_type.BackColor(m_background);
   m_indicator_type.GetButtonPointer().Font(m_base_font);
   m_indicator_type.GetButtonPointer().FontSize(m_base_font_size);
   m_indicator_type.GetButtonPointer().BackColor(clrWhite);
   m_indicator_type.GetButtonPointer().XGap(100);
   m_indicator_type.GetButtonPointer().XSize(100);
   m_indicator_type.GetListViewPointer().Font(m_base_font);
   m_indicator_type.GetListViewPointer().FontSize(m_base_font_size);
   m_indicator_type.GetListViewPointer().ItemYSize(25);
   m_indicator_type.GetListViewPointer().YSize(200);
//--- Save the item values in the combobox list view
   for(int i=0; i<SIZE; i++)
      m_indicator_type.SetValue(i,pattern_names[i]);
//--- Get the list view pointer
   CListView *lv=m_indicator_type.GetListViewPointer();
//--- Set the list view properties
   lv.LightsHover(true);
   m_indicator_type.SelectItem(1);
//--- Create the control
   if(!m_indicator_type.CreateComboBox("Indicator Type",x_gap,y_gap))
      return(false);
//--- Add the object to the common array of the object groups
   CWndContainer::AddToElementsArray(1,m_indicator_type);
   return(true);
}
Now consider what has changed in comparison with the previous version. First, we have added SIZE macro substitution which will mean the number of elements in the drop-down list. Thus, we can change the list length from a single place, without the need to make replacements in all code parts. Then add a new list item at the end: Custom. The changes are shown in Figure 1 below.
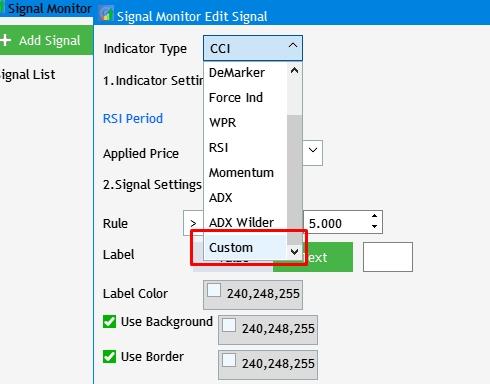
Fig.1 Adding an item for selecting a custom indicator.
Now, let us add new interface elements for setting up and using the indicator. We need to make changes in accordance with the iCustom() function arguments, to use the calculated part of your own indicator. These include the symbol name, the period, path to the compiled *.ex5 indicator file and a comma separated list of indicator parameters.
int  iCustom(
   string           symbol,     // symbol name
   ENUM_TIMEFRAMES  period,     // period
   string           name        // folder/custom indicator_name
   ...                          // the list of indicator input parameters
   );
The symbol name and the timeframe will be substituted from the values selected in the first two steps of the initial application setup. However, the users will have to set the indicator path and the list of parameters themselves. For this purpose, two additional fields need to be added. Add two new variables and a method to the CProgram base class:
   CTextEdit         m_custom_path;
   CTextEdit         m_custom_param;

   bool              CreateCustomEdit(CTextEdit &text_edit,const int x_gap,const int y_gap,const string default_text);
Since the method is applied in the trading signal creation/editing window, implement it in the SetWindow.mqh file:
//+------------------------------------------------------------------+
//| Input field for a custom indicator                               |
//+------------------------------------------------------------------+
bool CProgram::CreateCustomEdit(CTextEdit &text_edit,const int x_gap,const int y_gap,const string default_text)
{
//--- Save the pointer to the main control
   text_edit.MainPointer(m_set_window);
//--- Properties
   text_edit.XSize(100);
   text_edit.YSize(24);
   text_edit.Font(m_base_font);
   text_edit.FontSize(m_base_font_size);
   text_edit.GetTextBoxPointer().AutoSelectionMode(true);
   text_edit.GetTextBoxPointer().XGap(1);
   text_edit.GetTextBoxPointer().XSize(325);
   text_edit.GetTextBoxPointer().DefaultTextColor(clrSilver);
   text_edit.GetTextBoxPointer().DefaultText(default_text);
   text_edit.GetTextBoxPointer().BorderColor(clrBlack);
//--- Create the control
   if(!text_edit.CreateTextEdit("",x_gap,y_gap))
      return(false);
   text_edit.IsLocked(true);
//--- Add the object to the common array of the object groups
   CWndContainer::AddToElementsArray(1,text_edit);
   return(true);
}
Create two input fields using the CreateCustomEdit() method. In the same file, in the CreateSetWindow() method body, find the Selected indicator settings section and add the following code to it:
   if(!CreateCustomEdit(m_custom_path,240,22+10+2*(25+10),"Enter the indicator path"))
      return(false);
   if(!CreateCustomEdit(m_custom_param,240,22+10+3*(25+10),"Enter indicator parameters separated by commas"))
      return(false);
As a result, two input fields will appear in the settings window, as is shown in figure 2.
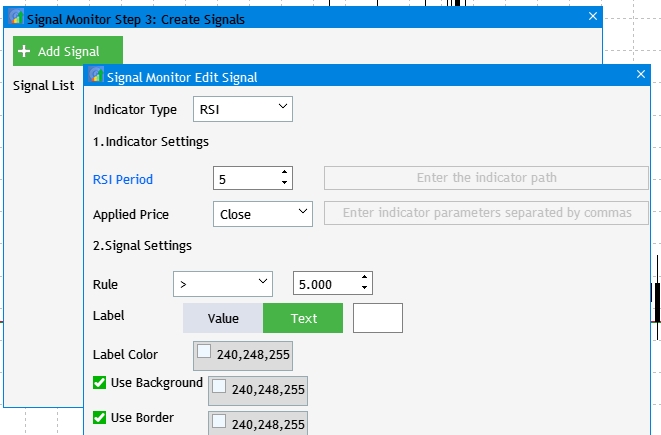
Fig. 2 Adding input fields for custom indicator settings.
They are inactive at this development stage. This is because their availability is strictly subject to the selected Indicator type, i.e. it will only be available if Custom is selected in the drop-down list. To implement this task, let us revise the RebuildParameters() method. But first, go to the section Drop down list item selection event in the OnEvent() method and add a check for the event of the desired list with the selection of indicator type.
//--- Selecting an item in the combobox drop-down list
   if(id==CHARTEVENT_CUSTOM+ON_CLICK_COMBOBOX_ITEM)
   {
      //--- Indicator type
      if(lparam==m_indicator_type.Id())
         RebuildParameters(m_indicator_type.GetListViewPointer().SelectedItemIndex());
   }
Now change the RebuildParameters() method so that when each of the available indicators is selected, its relevant settings would be displayed. Furthermore, for the custom indicator this would make path and parameters input fields active.
//+------------------------------------------------------------------+
//|                                                                  |
//+------------------------------------------------------------------+
void CProgram::RebuildParameters(int index)
{
   switch(index)
   {
   case  0:
      m_period_edit.LabelText("ATR Period");
      m_applied_price.Hide();
      m_custom_param.IsLocked(true);
      m_custom_path.IsLocked(true);
      break;
   case  1:
      m_period_edit.LabelText("CCI Period");
      m_applied_price.Show();
      m_custom_param.IsLocked(true);
      m_custom_path.IsLocked(true);
      break;
   case  2:
      m_period_edit.LabelText("DeMarker Period");
      m_applied_price.Hide();
      m_custom_param.IsLocked(true);
      m_custom_path.IsLocked(true);
      break;
   case  3:
      m_period_edit.LabelText("Force Index Period");
      m_applied_price.Hide();
      m_custom_param.IsLocked(true);
      m_custom_path.IsLocked(true);
      break;
   case  4:
      m_period_edit.LabelText("WPR Period");
      m_applied_price.Hide();
      m_custom_param.IsLocked(true);
      m_custom_path.IsLocked(true);
      break;
   case  5:
      m_period_edit.LabelText("RSI Period");
      m_applied_price.Show();
      m_custom_param.IsLocked(true);
      m_custom_path.IsLocked(true);
      break;
   case  6:
      m_period_edit.LabelText("Momentum Period");
      m_custom_param.IsLocked(true);
      m_custom_path.IsLocked(true);
      break;
   case  7:
      m_period_edit.LabelText("ADX Period");
      m_applied_price.Hide();
      m_custom_param.IsLocked(true);
      m_custom_path.IsLocked(true);
      break;
   case  8:
      m_period_edit.LabelText("ADXW Period");
      m_applied_price.Hide();
      m_custom_param.IsLocked(true);
      m_custom_path.IsLocked(true);
      break;
   case  9:
      m_period_edit.LabelText("Buffer Number");
      m_applied_price.Hide();
      m_custom_param.IsLocked(false);
      m_custom_path.IsLocked(false);
      break;
   default:
      m_period_edit.LabelText("Ind Period");
      m_applied_price.Hide();
      m_custom_param.IsLocked(true);
      m_custom_path.IsLocked(true);
      break;
   }
   m_period_edit.Update(true);
}
Now, project compilation should produce the following result:
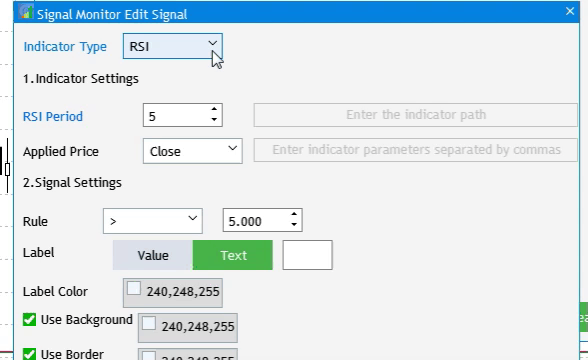
Fig. 3 Adding input fields for the custom indicator.
The next step is to supplement the Event of Add Signal button click. When pressed, set the indicator selection and settings to default.
      //--- Add Signal button click event
      if(lparam==m_add_signal.Id())
      {
         if(m_total_signals>4)
         {
            MessageBox("Maximum number of signals is 5","Signal Monitor");
            return;
         }
         m_set_window.OpenWindow();
         RebuildParameters(1);
         m_number_signal=-1;
         RebuildTimeframes();
         m_new_signal.LabelText("Add");
         m_new_signal.Update(true);
         m_indicator_type.SelectItem(1);
         m_indicator_type.GetButtonPointer().Update(true);
      }
Before adapting new controls (input fields) to an existing algorithm saving a set of signal settings, let us expand the system of trading signal search rules. This will cause the addition of new interface elements. However, it is not practical to change the set saving algorithm every time when we expand the system of settings. A more logical solution is to add all new setup and control elements and then to amend the method saving the set of parameters for signal searching.
Expand the system of trading signal search rules
At the moment, the trading monitor can create signals based on inequality. It means a condition of greater than, less than or equal to a certain number. However, such a choice does not always accurately reflect the desired signals. For example, oscillator indicators sometimes are more appropriate for use with a specific value range. That's what we will implement now. First, it is necessary to add a switch between the previous rule setup system and the new one. A new drop-down list with two rule setup types should be added: Compare and Interval.
Go to the CProgram base class and add a new variable, an instance of the CСombobox class, and create the method implementing the UI element:
CComboBox         m_rule_interval;

bool              CreateRuleInterval(const int x_gap,const int y_gap);
The method implementation should be added to the SetWindow.mqh file, because this drop-down list belongs to the settings window.
//+------------------------------------------------------------------+
//|                                                                  |
//+------------------------------------------------------------------+
bool CProgram::CreateRuleInterval(const int x_gap,const int y_gap)
{
//--- Pass the object to the panel
   m_rule_interval.MainPointer(m_set_window);
//--- Array of the item values in the list view
   string pattern_names[2]=
   {
      "Compare","Interval",
   };
//--- Set up properties before creation
   m_rule_interval.XSize(160);
   m_rule_interval.YSize(26);
   m_rule_interval.LabelYGap(4);
   m_rule_interval.ItemsTotal(2);
   m_rule_interval.Font(m_base_font);
   m_rule_interval.FontSize(m_base_font_size);
   m_rule_interval.BackColor(m_background);
   m_rule_interval.GetButtonPointer().Font(m_base_font);
   m_rule_interval.GetButtonPointer().FontSize(m_base_font_size);
   m_rule_interval.GetButtonPointer().BackColor(clrWhite);
   m_rule_interval.GetButtonPointer().XGap(90);
   m_rule_interval.GetButtonPointer().XSize(80);
   m_rule_interval.GetListViewPointer().Font(m_base_font);
   m_rule_interval.GetListViewPointer().FontSize(m_base_font_size);
   m_rule_interval.GetListViewPointer().ItemYSize(26);
//--- Save the item values in the combobox list view
   for(int i=0; i<2; i++)
      m_rule_interval.SetValue(i,pattern_names[i]);
//--- Get the list view pointer
   CListView *lv=m_rule_interval.GetListViewPointer();
//--- Set the list view properties
   lv.LightsHover(true);
   m_rule_interval.SelectItem(0);
//--- Create the control
   if(!m_rule_interval.CreateComboBox("Rule",x_gap,y_gap))
      return(false);
//--- Add the object to the common array of the object groups
   CWndContainer::AddToElementsArray(1,m_rule_interval);
   return(true);
}
The new Interval rule should have a lower and upper limit, so add an extra field for entering a numerical value. The previous one will be used for the upper limit value, the new field will be used for the lower one. It is also necessary to provide for the possibility to specify negative values for indicators like for example WPR. In this case, the upper and lower limits will be switched. To avoid the necessity to create a separate method for the implementation of an entry field for a lower period, simply modify the current variable responsible for the existing input field and the CreateRule() method. The variable will become an array:
CTextEdit m_rule_value[2]; In the method, add a new argument receiving a reference to the CTextEdit class instance.
bool CreateRuleValue(CTextEdit &text_edit,const int x_gap,const int y_gap);
Change the method implementation accordingly.
//+------------------------------------------------------------------+
//|                                                                  |
//+------------------------------------------------------------------+
bool CProgram::CreateRuleValue(CTextEdit &text_edit,const int x_gap,const int y_gap)
{
//--- Save the pointer to the main control
   text_edit.MainPointer(m_set_window);
//--- Properties
   text_edit.XSize(80);
   text_edit.YSize(24);
   text_edit.GetTextBoxPointer().XGap(1);
   text_edit.LabelColor(C'0,100,255');
   text_edit.Font(m_base_font);
   text_edit.FontSize(m_base_font_size);
   text_edit.MaxValue(999);
   text_edit.StepValue(0.1);
   text_edit.MinValue(-999);
   text_edit.SetDigits(3);
   text_edit.SpinEditMode(true);
//--- Create the control
   if(!text_edit.CreateTextEdit("",x_gap,y_gap))
      return(false);
   text_edit.SetValue(string(5));
   text_edit.GetTextBoxPointer().AutoSelectionMode(true);
//--- Add the object to the common array of the object groups
   CWndContainer::AddToElementsArray(1,text_edit);
   return(true);
}
Also, change some of the values of the existing CreateRule() method:
//+------------------------------------------------------------------+
//|                                                                  |
//+------------------------------------------------------------------+
bool CProgram::CreateRule(const int x_gap,const int y_gap)
{
//--- Pass the object to the panel
   m_rule_type.MainPointer(m_set_window);
//--- Array of the item values in the list view
   string pattern_names[5]=
   {
      ">",">=","==","<","<="
   };
//--- Set up properties before creation
   m_rule_type.XSize(80);
   m_rule_type.YSize(26);
   m_rule_type.LabelYGap(4);
   m_rule_type.ItemsTotal(5);
   m_rule_type.Font(m_base_font);
   m_rule_type.FontSize(m_base_font_size);
   m_rule_type.BackColor(m_background);
   m_rule_type.GetButtonPointer().Font(m_base_font);
   m_rule_type.GetButtonPointer().FontSize(m_base_font_size);
   m_rule_type.GetButtonPointer().BackColor(clrWhite);
   m_rule_type.GetButtonPointer().XGap(1);
   m_rule_type.GetButtonPointer().XSize(80);
   m_rule_type.GetListViewPointer().Font(m_base_font);
   m_rule_type.GetListViewPointer().FontSize(m_base_font_size);
   m_rule_type.GetListViewPointer().ItemYSize(26);
//--- Save the item values in the combobox list view
   for(int i=0; i<5; i++)
      m_rule_type.SetValue(i,pattern_names[i]);
//--- Get the list view pointer
   CListView *lv=m_rule_type.GetListViewPointer();
//--- Set the list view properties
   lv.LightsHover(true);
   m_rule_type.SelectItem(0);
//--- Create the control
   if(!m_rule_type.CreateComboBox("",x_gap,y_gap))
      return(false);
//--- Add the object to the common array of the object groups
   CWndContainer::AddToElementsArray(1,m_rule_type);
   return(true);
}
Now, find Condition Settings section in the CreateSetWindow() method, and change the code as follows:
//--- Condition settings
   if(!CreateRuleValue(m_rule_value[0],200,22+10+5*(25+10)))
      return(false);
   if(!CreateRuleValue(m_rule_value[1],300,22+10+5*(25+10)))
      return(false);
   if(!CreateRule(200,22+10+5*(25+10)))
      return(false);
   if(!CreateRuleInterval(10,22+10+5*(25+10)))
      return(false);
This change will allow you to reconfigure the position of existing interface elements and to add new ones. The result should be as is shown in Fig. 4. However, nothing is working as for now, if you try to switch the rule mode from Compare to Interval. Let us fix it.

Fig. 4 Adding mode selection for signal search rules.
To do this, open the OnEvent() method and find the section responsible for an item selection event in the drop-down list and add a code allowing to display correct interface elements depending on the selected mode.
//--- Selecting an item in the combobox drop-down list
   if(id==CHARTEVENT_CUSTOM+ON_CLICK_COMBOBOX_ITEM)
   {
      ...
      //--- Rule type
      if(lparam==m_rule_interval.Id())
      {
         switch(m_rule_interval.GetListViewPointer().SelectedItemIndex())
         {
         case  0:
            m_rule_value[0].Hide();
            m_rule_type.Show();
            break;
         case  1:
            m_rule_value[0].Show();
            m_rule_type.Hide();
            break;
         default:
            break;
         }
      }
   }
Next, let us move some of the events related to interface loading to a separate section of the OnEvent() method. To do this, create Interface creation completion event and move to it code from the CreateGUI() method. The following code will be left in CreateGUI:
//+------------------------------------------------------------------+
//| Creates the graphical interface of the program                   |
//+------------------------------------------------------------------+
bool CProgram::CreateGUI(void)
{
//--- Loading the language
   ChangeLanguage();
//--- Step 1-3. Symbol selection window.
   if(!CreateStepWindow(m_lang[0]))
      return(false);
//---
   if(!CreateSetWindow(m_lang[17]))
      return(false);
//--- Creating form 2 for the color picker
   if(!CreateColorWindow("Color Picker"))
      return(false);
//--- Finishing the creation of GUI
   CWndEvents::CompletedGUI();
   return(true);
}
The new section will look as follows:
// --- GUI creation completion
   if(id==CHARTEVENT_CUSTOM+ON_END_CREATE_GUI)
   {
      m_back_button.Hide();
      m_add_signal.Hide();
      m_signal_header.Hide();
      m_label_button[1].IsPressed(true);
      m_label_button[1].Update(true);
      for(int i=0; i<5; i++)
         m_signal_editor[i].Hide();
      m_rule_value[0].Hide();
   }
Pay attention to the new action in the application loading — hiding the newly created field for inputting the lower interval limit.
After creating the new UI elements and parameters, we can proceed with the modification of the loading algorithm and saving of sets of trading signal settings. Go to the SaveSignalSet() method body and adjust it to the latest changes.
//+------------------------------------------------------------------+
//|                                                                  |
//+------------------------------------------------------------------+
bool CProgram::SaveSignalSet(int index)
{
//---
   int h=FileOpen("Signal Monitor\\signal_"+string(index)+".bin",FILE_WRITE|FILE_BIN);
   if(h==INVALID_HANDLE)
   {
      if(TerminalInfoString(TERMINAL_LANGUAGE)=="Russian")
         MessageBox("Не удалось создать файл конфигурации","Монитор сигналов");
      else
         MessageBox("Failed to create configuration file","Signal Monitor");
      return(false);
   }
   if(index>4)
   {
      if(TerminalInfoString(TERMINAL_LANGUAGE)=="Russian")
         MessageBox("Максимальное число сигналов не должно быть больше 5","Монитор сигналов");
      else
         MessageBox("Maximum number of signals is 5","Signal Monitor");
      return(false);
   }
//--- Save the selection
//--- Indicator type
   m_signal_set[index].ind_type=m_indicator_type.GetListViewPointer().SelectedItemIndex();
//--- Indicator period
   if(m_signal_set[index].ind_type!=9)
   {
      m_signal_set[index].ind_period=(int)m_period_edit.GetValue();
      //--- Type of applied price
      m_signal_set[index].app_price=m_applied_price.GetListViewPointer().SelectedItemIndex();
   }
   else
   {
      string path=m_custom_path.GetValue();
      string param=m_custom_param.GetValue();
      if(path=="")
      {
         if(TerminalInfoString(TERMINAL_LANGUAGE)=="Russian")
            MessageBox("Введите путь к индикатору","Монитор сигналов");
         else
            MessageBox("Enter the indicator path","Signal Monitor");
         FileClose(h);
         return(false);
      }
      if(param=="")
      {
         if(TerminalInfoString(TERMINAL_LANGUAGE)=="Russian")
            MessageBox("Введите параметры индикатора через запятую","Монитор сигналов");
         else
            MessageBox("Enter indicator parameters separated by commas","Signal Monitor");
         FileClose(h);
         return(false);
      }
      StringToCharArray(path,m_signal_set[index].custom_path);
      StringToCharArray(param,m_signal_set[index].custom_val);
      m_signal_set[index].ind_period=(int)m_period_edit.GetValue();
   }
//--- Rule type
   m_signal_set[index].rule_int=m_rule_interval.GetListViewPointer().SelectedItemIndex();
//--- Comparison type
   m_signal_set[index].rule_type=m_rule_type.GetListViewPointer().SelectedItemIndex();
//--- Rule value
   m_signal_set[index].rule_value1=(double)m_rule_value[0].GetValue();
   m_signal_set[index].rule_value2=(double)m_rule_value[1].GetValue();
//--- Text label display type
   m_signal_set[index].label_type=m_label_button[0].IsPressed()?0:1;
//--- Save the value of the text field for the second type
   if(m_label_button[1].IsPressed())
      StringToCharArray(StringSubstr(m_text_box.GetValue(),0,3),m_signal_set[index].label_value);
//--- Color of the text label
   m_signal_set[index].label_color=m_color_button[0].CurrentColor();
//--- Background color
   if(m_set_param[0].IsPressed())
      m_signal_set[index].back_color=m_color_button[1].CurrentColor();
   else
      m_signal_set[index].back_color=clrNONE;
//--- Border color
   if(m_set_param[1].IsPressed())
      m_signal_set[index].border_color=m_color_button[2].CurrentColor();
   else
      m_signal_set[index].border_color=clrNONE;
//--- Tooltip value
   m_signal_set[index].tooltip=m_set_param[2].IsPressed();
   if(m_signal_set[index].tooltip)
      StringToCharArray(m_tooltip_text.GetValue(),m_signal_set[index].tooltip_text);
//--- Selected image
   m_signal_set[index].image=m_set_param[3].IsPressed();
   if(m_signal_set[index].image)
      m_signal_set[index].img_index=m_pictures_slider.GetRadioButtonsPointer().SelectedButtonIndex();
//--- Selected timegrames
   int tf=0;
   for(int i=0; i<21; i++)
   {
      if(!m_tf_button[i].IsLocked() && m_tf_button[i].IsPressed())
      {
         m_signal_set[index].timeframes[i]=true;
         StringToCharArray(m_tf_button[i].LabelText(),m_signal_set[index].tf_name[i].tf);
         tf++;
      }
      else
         m_signal_set[index].timeframes[i]=false;
   }
//---
   if(tf<1)
   {
      if(TerminalInfoString(TERMINAL_LANGUAGE)=="Russian")
         MessageBox("Не выбран ни один таймфрейм","Монитор сигналов");
      else
         MessageBox("No timeframes selected","Signal Monitor");
      FileClose(h);
      return(false);
   }
//---
   FileWriteStruct(h,m_signal_set[index]);
   FileClose(h);
   Print("Configuration signal_"+string(index)+" has been successfully saved");
//---
   return(true);
}
The above code contains a lot of changes. Let us consider in detail the main changes. The first one is the check of whether a standard or a custom indicator is selected. When a custom indicator is selected, add the indicator path saving algorithm and its parameters, as well as a value from the period input field - for a custom indicator, this field allows obtaining the indicator buffer number.
We have changed the number of saved parameters. Accordingly, we need change the SIGNAL structure via which everything is saved to a binary file. Add new variables to it:
struct SIGNAL
{
   int               ind_type;
   int               ind_period;
   int               app_price;
   int               rule_int;
   int               rule_type;
   double            rule_value1;
   double            rule_value2;
   int               label_type;
   uchar             label_value[10];
   color             label_color;
   color             back_color;
   color             border_color;
   bool              tooltip;
   uchar             tooltip_text[100];
   bool              image;
   int               img_index;
   bool              timeframes[21];
   TFNAME            tf_name[21];
   uchar             custom_path[100];
   uchar             custom_val[100];
};
The threshold value entry field is now changed to rule_value for Comparison, and it is changed to rule_value 1 and rule_value 2 for upper and lower limits in the Interval mode. The custom_path and custom_val variables have been added for storing data about the custom indicator path and its parameters. Also, change the method loading the set of trading signal parameters from a file: LoadSignalSet():
//+------------------------------------------------------------------+
//|                                                                  |
//+------------------------------------------------------------------+
bool CProgram::LoadSignalSet(int index)
{
   int h=FileOpen("Signal Monitor\\signal_"+string(index)+".bin",FILE_READ|FILE_BIN);
   if(h==INVALID_HANDLE)
   {
      MessageBox("Configuration not found","Signal Monitor");
      return(false);
   }
   ZeroMemory(m_signal_set[index]);
   FileReadStruct(h,m_signal_set[index]);
//--- Loading indicator type
   m_indicator_type.SelectItem(m_signal_set[index].ind_type);
   RebuildParameters(m_signal_set[index].ind_type);
   m_indicator_type.GetButtonPointer().Update(true);
   if(m_signal_set[index].ind_type!=9)
   {
      //--- Loading indicator period
      m_period_edit.SetValue((string)m_signal_set[index].ind_period);
      m_period_edit.GetTextBoxPointer().Update(true);
      //--- Loading applied price
      if(!m_applied_price.IsLocked())
      {
         m_applied_price.SelectItem(m_signal_set[index].app_price);
         m_applied_price.GetButtonPointer().Update(true);
      }
   }
   else
   {
      m_period_edit.SetValue((string)m_signal_set[index].ind_period);
      m_custom_path.SetValue(CharArrayToString(m_signal_set[index].custom_path));
      m_custom_param.SetValue(CharArrayToString(m_signal_set[index].custom_val));
      m_custom_path.GetTextBoxPointer().Update(true);
      m_custom_param.GetTextBoxPointer().Update(true);
   }
//--- Loading signal rule
   m_rule_interval.SelectItem(m_signal_set[index].rule_int);
   m_rule_interval.GetButtonPointer().Update(true);
   m_rule_type.SelectItem(m_signal_set[index].rule_type);
   m_rule_type.GetButtonPointer().Update(true);
   m_rule_value[0].SetValue((string)m_signal_set[index].rule_value1);
   m_rule_value[0].GetTextBoxPointer().Update(true);
   m_rule_value[1].SetValue((string)m_signal_set[index].rule_value2);
   m_rule_value[1].GetTextBoxPointer().Update(true);
//--- Loading a text label
   if(m_signal_set[index].label_type==0)
   {
      m_label_button[0].IsPressed(true);
      m_label_button[0].Update(true);
      m_label_button[1].IsPressed(false);
      m_label_button[1].Update(true);
      m_text_box.IsLocked(true);
   }
   else
   {
      m_label_button[0].IsPressed(false);
      m_label_button[0].Update(true);
      m_label_button[1].IsPressed(true);
      m_label_button[1].Update(true);
      m_text_box.IsLocked(false);
      m_text_box.ClearTextBox();
      m_text_box.AddText(0,CharArrayToString(m_signal_set[index].label_value));
      m_text_box.Update(true);
   }
//--- Loading the color of the text label
   m_color_button[0].CurrentColor(m_signal_set[index].label_color);
   m_color_button[0].Update(true);
//--- Loading the background color
   if(m_signal_set[index].back_color==clrNONE)
   {
      m_set_param[0].IsPressed(false);
      m_set_param[0].Update(true);
      m_color_button[1].IsLocked(true);
      m_color_button[1].GetButtonPointer().Update(true);
   }
   else
   {
      m_set_param[0].IsPressed(true);
      m_set_param[0].Update(true);
      m_color_button[1].IsLocked(false);
      m_color_button[1].CurrentColor(m_signal_set[index].back_color);
      m_color_button[1].GetButtonPointer().Update(true);
   }
//--- Loading the border color
   if(m_signal_set[index].border_color==clrNONE)
   {
      m_set_param[1].IsPressed(false);
      m_set_param[1].Update(true);
      m_color_button[2].IsLocked(true);
      m_color_button[2].GetButtonPointer().Update(true);
   }
   else
   {
      m_set_param[1].IsPressed(true);
      m_set_param[1].Update(true);
      m_color_button[2].IsLocked(false);
      m_color_button[2].CurrentColor(m_signal_set[index].border_color);
      m_color_button[2].GetButtonPointer().Update(true);
   }
//--- Loading the tooltip value
   if(!m_signal_set[index].tooltip)
   {
      m_set_param[2].IsPressed(false);
      m_set_param[2].Update(true);
      m_tooltip_text.IsLocked(true);
      m_tooltip_text.Update(true);
   }
   else
   {
      m_set_param[2].IsPressed(true);
      m_set_param[2].Update(true);
      m_tooltip_text.IsLocked(false);
      m_tooltip_text.ClearTextBox();
      m_tooltip_text.AddText(0,CharArrayToString(m_signal_set[index].tooltip_text));
      m_tooltip_text.Update(true);
   }
//--- Loading the image
   if(!m_signal_set[index].image)
   {
      m_set_param[3].IsPressed(false);
      m_set_param[3].Update(true);
      m_pictures_slider.IsLocked(true);
      m_pictures_slider.GetRadioButtonsPointer().Update(true);
   }
   else
   {
      m_set_param[3].IsPressed(true);
      m_set_param[3].Update(true);
      m_pictures_slider.IsLocked(false);
      m_pictures_slider.GetRadioButtonsPointer().SelectButton(m_signal_set[index].img_index);
      m_pictures_slider.GetRadioButtonsPointer().Update(true);
   }
//--- Loading selected timeframes
   for(int i=0; i<21; i++)
   {
      if(!m_tf_button[i].IsLocked())
      {
         m_tf_button[i].IsPressed(m_signal_set[index].timeframes[i]);
         m_tf_button[i].Update(true);
      }
   }
//---
   FileClose(h);
   return(true);
}
A check is implemented of whether a standard indicator from a file was selected or a custom indicator is used. Accordingly, the required data are loaded to the settings window interface for further editing.
Saving and loading of a set of trading signal parameters are ready. Now, refine the signal search algorithm. Open the GetSignal() method and find the Check for conditions section. Replace is as follows:
//--- Check the condition
   int s=0;
   if(signal_set.rule_int==0)
   {
      double r_value=signal_set.rule_value2;
      double c_value=val[0];
      m_ind_value=c_value;
      switch(signal_set.rule_type)
      {
      case  0:
         if(c_value>r_value)
            s=1;
         break;
      case  1:
         if(c_value>=r_value)
            s=1;
         break;
      case  2:
         if(c_value==r_value)
            s=1;
         break;
      case  3:
         if(c_value<r_value)
            s=1;
         break;
      case  4:
         if(c_value<=r_value)
            s=1;
         break;
      default:
         s=0;
         break;
      }
   }
   else if(signal_set.rule_int==1)
   {
      double r_value_min=signal_set.rule_value1;
      double r_value_max=signal_set.rule_value2;
      double c_value=val[0];
      m_ind_value=c_value;
      if(c_value>=r_value_min && c_value<=r_value_max)
         s=1;
   }
Also, include the added indicators to the section Getting the handle of the selected indicator:
//--- Get the handle of the selected indicator
   string str[],name;
   double arr[];
   switch(signal_set.ind_type)
   {
   case  0:
      h=iATR(sy,tf,signal_set.ind_period);
      break;
   case  1:
      h=iCCI(sy,tf,signal_set.ind_period,app_price);
      break;
   case  2:
      h=iDeMarker(sy,tf,signal_set.ind_period);
      break;
   case  3:
      h=iForce(sy,tf,signal_set.ind_period,MODE_SMA,VOLUME_TICK);
      break;
   case  4:
      h=iWPR(sy,tf,signal_set.ind_period);
      break;
   case  5:
      h=iRSI(sy,tf,signal_set.ind_period,app_price);
      break;
   case  6:
      h=iMomentum(sy,tf,signal_set.ind_period,app_price);
      break;
   case  7:
      h=iADX(sy,tf,signal_set.ind_period);
      break;
   case  8:
      h=iADXWilder(sy,tf,signal_set.ind_period);
      break;
   case  9:
      StringSplit(m_custom_param.GetValue(),StringGetCharacter(",",0),str);
      ArrayResize(arr,ArraySize(str));
      for(int i=0; i<ArraySize(str); i++)
         arr[i]=StringToDouble(str[i]);
      name=m_custom_path.GetValue();
      h=GetCustomValue(tf,name,arr);
      break;
   default:
      break;
   }
This block now includes check for the search mode, Comparison or Interval. Check of conditions is applied accordingly.
Convert the list of symbols to a tabular form
If there are not many symbols on a trading account, the possibility to select them implemented as a name and a checkbox next to it can be quite enough. But when working with hundreds of symbols, the application window height increases greatly (as it is scaled in accordance with the number of rows with symbols). That is why this view was replaced with a tabular form. Furthermore, if there are too many symbols, some of them will be hidden and a scroll bar will be added on the right. However, we still need checkboxes for selecting working timeframes. Therefore, we need to solve several problems:
- Create a table to display the same symbol names with checkboxes.
- Simplify existing checkboxes to only select working timeframes.
- Adapt all UI changes to fit the existing algorithm selecting symbols and working timeframes for further search for trading signals.
Firstly, let us remove the display of old checkboxes. To do this, hide them in the GUI creation completion event. Now we can know that the number of checkboxes is constant: 21, which is equal to the total number if possible timeframes in the terminal. Therefore, turn the dynamic m_checkbox[] array into a static array with a size of 21.
      //--- Hide timeframe checkboxes
      for(int i=0; i<21; i++)
         m_checkbox[i].Hide();
Also, the checkbox creation method needs to be adjusted due to their clear purpose. Go to CreateStepWindow() method body and replace the Checkboxes section as follows:
//--- Checkboxes
   int k=0;
   string timeframe_names[21]=
   {
      "M1","M2","M3","M4","M5","M6","M10","M12","M15","M20","M30",
      "H1","H2","H3","H4","H6","H8","H12","D1","W1","MN"
   };
   for(int j=0; j<=3; j++)
   {
      for(int i=0; i<7; i++)
      {
         if(k<21)
            if(!CreateCheckBox(m_checkbox[k],10+80*i,m_step_window.CaptionHeight()+70+j*25,timeframe_names[k]))
               return(false);
         k++;
      }
   }
Also remove the window height calculation window (it was needed to calculate the height in accordance with the number of symbols in the Market Watch).
m_step_window.ChangeWindowHeight(m_checkbox[m_all_symbols-1].YGap()+30+30);
Make the window height static:
m_step_window.YSize(500); Now we need to create the basic object of a table which will then be filled with data from the Market Watch. Create the CTable class instance and the table implementation method.
//--- Rendered table
   CTable            m_table;

   bool              CreateTable(const int x_gap,const int y_gap);
Implement it in StepWindow.mqh, main window file:
//+------------------------------------------------------------------+
//|                                                                  |
//+------------------------------------------------------------------+
bool CProgram::CreateTable(const int x_gap,const int y_gap)
{
#define COLUMNS1_TOTAL 7
#define ROWS1_TOTAL int(MathCeil(m_all_symbols/7))
//--- Save the pointer to the main control
   m_table.MainPointer(m_step_window);
//--- Array of column widths
   int width[COLUMNS1_TOTAL];
   ::ArrayInitialize(width,80);
//--- Array of text offset along the X axis in the columns
   int text_x_offset[COLUMNS1_TOTAL];
   ::ArrayInitialize(text_x_offset,25);
//--- Array of text alignment in columns
   ENUM_ALIGN_MODE align[COLUMNS1_TOTAL];
   ::ArrayInitialize(align,ALIGN_LEFT);
//--- Array of column image offsets along the X axis
   int image_x_offset[COLUMNS1_TOTAL];
   ::ArrayInitialize(image_x_offset,5);
//--- Array of column image offsets along the Y axis
   int image_y_offset[COLUMNS1_TOTAL];
   ::ArrayInitialize(image_y_offset,4);
//--- Properties
   m_table.XSize(560);
   m_table.YSize(190);
   m_table.Font(m_base_font);
   m_table.FontSize(m_base_font_size);
   m_table.CellYSize(20);
   m_table.TableSize(COLUMNS1_TOTAL,ROWS1_TOTAL);
   m_table.TextAlign(align);
   m_table.ColumnsWidth(width);
   m_table.TextXOffset(text_x_offset);
   m_table.ImageXOffset(image_x_offset);
   m_table.ImageYOffset(image_y_offset);
   m_table.LabelXGap(5);
   m_table.LabelYGap(4);
   m_table.IconXGap(7);
   m_table.IconYGap(4);
   m_table.MinColumnWidth(0);
   m_table.LightsHover(true);
   m_table.SelectableRow(false);
   m_table.IsWithoutDeselect(false);
   m_table.ColumnResizeMode(true);
   m_table.IsZebraFormatRows(clrWhiteSmoke);
   m_table.AutoXResizeMode(true);
   m_table.AutoXResizeRightOffset(10);
   m_table.AutoYResizeMode(true);
   m_table.AutoYResizeBottomOffset(50);
//--- Populate the table with data
   InitializingTable();
//--- Create the control
   if(!m_table.CreateTable(x_gap,y_gap))
      return(false);
//--- Add the object to the common array of the object groups
   CWndContainer::AddToElementsArray(0,m_table);
   return(true);
}
Prior to using this method for creating a table, it should be filled with the following data: the list of all symbols form the Market Watch for the current trading account. This will be done by the InitializingTable() method: add it to the private section of the base class:
//+------------------------------------------------------------------+
//| Initialize the table                                             |
//+------------------------------------------------------------------+
void CProgram::InitializingTable(void)
{
//--- Array of icons 1
   string image_array1[2]=
   {
      "Images\\EasyAndFastGUI\\Controls\\checkbox_off.bmp",
      "Images\\EasyAndFastGUI\\Controls\\checkbox_on_g.bmp"
   };
//---
   int k=0;
   for(int c=0; c<COLUMNS1_TOTAL; c++)
   {
      //---
      for(int r=0; r<ROWS1_TOTAL; r++)
      {
         if(k<m_all_symbols)
         {
            //--- Set the cell type to Checkbox
            m_table.CellType(c,r,CELL_CHECKBOX);
            m_table.SetImages(c,r,image_array1);
            //--- Set the text
            m_table.SetValue(c,r,SymbolName(k,false));
         }
         k++;
      }
   }
}
Now, use the above preparations in the CreateStepWindow() method body to create and to fill the table. As a result, we will obtain a list of all symbols from the Market Watch (Fig.5), which is also based on the checkbox selection type, but is now presented in a tabular form.
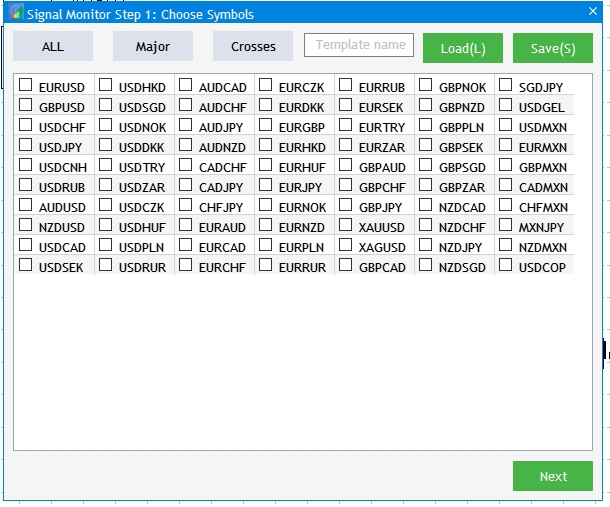
Fig. 5 Result of conversion of the list of symbols to a tabular form.
The next step is to link the newly created table with the interactions that were available for the previous set of checkboxes. The following possibilities should be provided:
- Select predefined sets: ALL, Major and Crosses.
- Save and load templates of a custom set of symbols.
To implement the first possibility, replace sections with template names in OnEvent() with the following code:
//--- All
         if(lparam==m_currency_set[0].Id() && m_currency_set[0].IsPressed())
         {
            m_currency_set[1].IsPressed(false);
            m_currency_set[2].IsPressed(false);
            m_currency_set[1].Update(true);
            m_currency_set[2].Update(true);
            //---
            int k=0;
            for(int c=0; c<7; c++)
            {
               //---
               for(int r=0; r<MathCeil(m_all_symbols/7); r++)
               {
                  if(k<m_all_symbols)
                     m_table.ChangeImage(c,r,1);
                  k++;
               }
            }
            m_table.Update(true);
         }
         //--- Majors
         else if(lparam==m_currency_set[1].Id() && m_currency_set[1].IsPressed())
         {
            m_currency_set[0].IsPressed(false);
            m_currency_set[2].IsPressed(false);
            m_currency_set[0].Update(true);
            m_currency_set[2].Update(true);
            //---
            string pairs[4]= {"EURUSD","GBPUSD","USDCHF","USDJPY"};
            //--- Clear the selection
            int k=0;
            for(int c=0; c<7; c++)
            {
               //---
               for(int r=0; r<MathCeil(m_all_symbols/7); r++)
               {
                  if(k<m_all_symbols)
                     m_table.ChangeImage(c,r,0);
                  k++;
               }
            }
            //---
            k=0;
            for(int c=0; c<7; c++)
            {
               //---
               for(int r=0; r<MathCeil(m_all_symbols/7); r++)
               {
                  if(k<m_all_symbols)
                  {
                     for(int j=0; j<4; j++)
                     {
                        if(m_table.GetValue(c,r)==pairs[j])
                           m_table.ChangeImage(c,r,1);
                     }
                  }
                  k++;
               }
            }
            m_table.Update(true);
         }
         //--- Crosses
         else if(lparam==m_currency_set[2].Id() && m_currency_set[2].IsPressed())
         {
            m_currency_set[0].IsPressed(false);
            m_currency_set[1].IsPressed(false);
            m_currency_set[0].Update(true);
            m_currency_set[1].Update(true);
            //---
            string pairs[20]=
            {
               "EURUSD","GBPUSD","USDCHF","USDJPY","USDCAD","AUDUSD","AUDNZD","AUDCAD","AUDCHF","AUDJPY",
               "CHFJPY","EURGBP","EURAUD","EURCHF","EURJPY","EURCAD","EURNZD","GBPCHF","GBPJPY","CADCHF"
            };
            //--- Clear the selection
            int k=0;
            for(int c=0; c<7; c++)
            {
               //---
               for(int r=0; r<MathCeil(m_all_symbols/7); r++)
               {
                  if(k<m_all_symbols)
                     m_table.ChangeImage(c,r,0);
                  k++;
               }
            }
            //---
            k=0;
            for(int c=0; c<7; c++)
            {
               //---
               for(int r=0; r<MathCeil(m_all_symbols/7); r++)
               {
                  if(k<m_all_symbols)
                  {
                     for(int j=0; j<20; j++)
                     {
                        if(m_table.GetValue(c,r)==pairs[j])
                           m_table.ChangeImage(c,r,1);
                     }
                  }
                  k++;
               }
            }
            m_table.Update(true);
         }
         //---
         if((lparam==m_currency_set[0].Id() && !m_currency_set[0].IsPressed())      ||
               (lparam==m_currency_set[1].Id() && !m_currency_set[1].IsPressed())   ||
               (lparam==m_currency_set[2].Id() && !m_currency_set[2].IsPressed())
           )
         {
            //--- Clear the selection
            int k=0;
            for(int c=0; c<7; c++)
            {
               //---
               for(int r=0; r<MathCeil(m_all_symbols/7); r++)
               {
                  if(k<m_all_symbols)
                     m_table.ChangeImage(c,r,0);
                  k++;
               }
            }
            m_table.Update(true);
         }
Saving and loading of selected symbol sets were performed using methods were used We used the SaveSymbolSet() and LoadSymbolSet() methods to save and load the selected symbol sets, respectively. Here, we need to change the code part in which data are taken from a check box, as the data should be taken from a newly created table. Accordingly, data should be loaded to the same table.
//+------------------------------------------------------------------+
//| Save template to a file                                          |
//+------------------------------------------------------------------+
bool CProgram::SaveSymbolSet(string file_name)
{
   if(file_name=="")
   {
      if(TerminalInfoString(TERMINAL_LANGUAGE)=="Russian")
         MessageBox("Выберите имя шаблона для записи","Монитор сигналов");
      else
         MessageBox("Choose a name for the template to save","Signal Monitor");
      return(false);
   }
   int h=FileOpen("Signal Monitor\\"+file_name+".bin",FILE_WRITE|FILE_BIN);
   if(h==INVALID_HANDLE)
   {
      if(TerminalInfoString(TERMINAL_LANGUAGE)=="Russian")
         MessageBox("Не удалось создать файл конфигурации","Монитор сигналов");
      else
         MessageBox("Failed to create configuration file","Signal Mo
nitor");
      return(false);
   }
   else
      MessageBox("The "+file_name+" configuration has been successfully saved","Signal Monitor");
//--- Save symbol selection
   int k=0;
   for(int c=0; c<7; c++)
   {
      //---
      for(int r=0; r<MathCeil(m_all_symbols/7); r++)
      {
         if(k<m_all_symbols)
            m_save.tf[k]=m_table.SelectedImageIndex(c,r)>0?true:false;
         k++;
      }
   }
//---
   FileWriteStruct(h,m_save);
   FileClose(h);
//---
   return(true);
}
//+------------------------------------------------------------------+
//| Load data to a panel                                             |
//+------------------------------------------------------------------+
bool CProgram::LoadSymbolSet(string file_name)
{
   if(file_name=="")
   {
      if(TerminalInfoString(TERMINAL_LANGUAGE)=="Russian")
         MessageBox("Выберите имя шаблона для загрузки","Монитор сигналов");
      else
         MessageBox("Choose a name for the template to load","Signal Monitor");
      return(false);
   }
   int h=FileOpen("Signal Monitor\\"+file_name+".bin",FILE_READ|FILE_BIN);
   if(h==INVALID_HANDLE)
   {
      MessageBox("Configuration "+file_name+" not found","Signal Monitor");
      return(false);
   }
   ZeroMemory(m_save);
   FileReadStruct(h,m_save);
//--- Load symbol selection
   int k=0;
   for(int c=0; c<7; c++)
   {
      //---
      for(int r=0; r<MathCeil(m_all_symbols/7); r++)
      {
         if(k<m_all_symbols)
         {
            if(m_save.tf[k])
               m_table.ChangeImage(c,r,1);
            else
               m_table.ChangeImage(c,r,0);
         }
         k++;
      }
   }
   m_table.Update(true);
//---
   FileClose(h);
//---
   return(true);
}
Now, let us mark the block in which data is collected and remembered to a structure which will be saved to a file. In addition, here data is loaded from a file into a structure and data from it is added into the table.
The visual result of all changes and additions is shown in figure 6, but the main purpose was to enable convenient operation with a large number of symbols, which did not fit into the window.
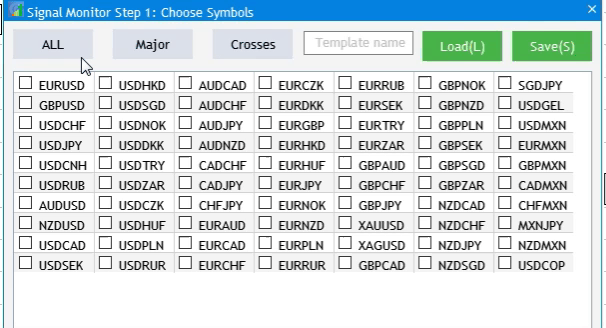
Fig.6 The result of addition of a table and its interaction with the UI elements.
Further, we need to edit methods of transitions between Step 1 and Step 2, because we have changed the way we obtain information about selected symbols. Transitions between configuration steps are performed via two methods, which need to be changed. The To_Step1() should be modified as follows: when we jump from Step 2 to Step 1, the possibility to select timeframes should be hidden, and the table should be shown.
//+------------------------------------------------------------------+
//| Go to Step 1                                                     |
//+------------------------------------------------------------------+
void CProgram::ToStep_1(void)
{
//--- Change header
   m_step_window.LabelText("Signal Monitor Step 1: Choose Symbols");
   m_step_window.Update(true);
//--- Hide the Back button
   m_back_button.Hide();
//--- Show the table
   m_table.Show();
//--- Hide timeframes
   for(int i=0; i<21; i++)
      m_checkbox[i].Hide();
   string names[3]= {"All","Majors","Crosses"};
//--- Change names of selection buttons
   for(int i=0; i<3; i++)
   {
      m_currency_set[i].IsPressed(false);
      m_currency_set[i].LabelText(names[i]);
      m_currency_set[i].Update(true);
   }
//--- Show block for working with templates
   m_text_edit.Show();
   m_load_button.Show();
   m_save_button.Show();
//--- Set the current setup step
   m_current_step=1;
}
In To_Step2() method, hide the table, display timeframe selection and remember the symbols selected in the first step.
//+------------------------------------------------------------------+
//|                                                                  |
//+------------------------------------------------------------------+
void CProgram::ToStep_2(void)
{
//--- Check whether at least one symbol is selected
   int cnt=0;
//---
   for(int c=0; c<7; c++)
   {
      for(int r=0; r<MathCeil(m_all_symbols/7); r++)
      {
         if(m_table.SelectedImageIndex(c,r)>0)
            cnt++;
      }
   }
//---
   if(cnt<1)
   {
      if(TerminalInfoString(TERMINAL_LANGUAGE)=="Russian")
         MessageBox("Не выбран ни один символ!","Внимание");
      else
         MessageBox("No symbols selected!","Warning");
      return;
   }
//--- Hide the table
   m_table.Hide();
//--- Display timeframes
   for(int i=0; i<21; i++)
      m_checkbox[i].Show();
//--- Count the number of selected symbols
   ArrayResize(m_symbols,cnt);
   cnt=0;
//--- Remember the selected symbols in the array
   for(int c=0; c<7; c++)
   {
      for(int r=0; r<MathCeil(m_all_symbols/7); r++)
      {
         if(m_table.SelectedImageIndex(c,r)>0)
         {
            m_symbols[cnt]=m_table.GetValue(c,r);
            cnt++;
         }
      }
   }
//--- Set selected symbols in Market Watch
   for(int c=0; c<7; c++)
   {
      for(int r=0; r<MathCeil(m_all_symbols/7); r++)
      {
         if(m_table.SelectedImageIndex(c,r)>0)
            SymbolSelect(m_table.GetValue(c,r),true);
         else
            SymbolSelect(m_table.GetValue(c,r),false);
      }
   }
//---
   if(m_current_step==3)
   {
      m_add_signal.Hide();
      m_signal_header.Hide();
      m_next_button.LabelText("Next");
      m_next_button.Update(true);
      for(int i=0; i<5; i++)
         m_signal_editor[i].Hide();
      ClearSaves();
   }
//--- Change header
   m_step_window.LabelText("Signal Monitor Step 2: Choose Timeframes");
   m_step_window.Update(true);
   string names[3]= {"All","Junior","Senior"};
//--- Change names of selection buttons
   for(int i=0; i<3; i++)
   {
      m_currency_set[i].LabelText(names[i]);
      m_currency_set[i].IsPressed(false);
      if(m_current_step==3)
         m_currency_set[i].Show();
      m_currency_set[i].Update(true);
   }
//--- Hide block for working with templates
   m_text_edit.Hide();
   m_load_button.Hide();
   m_save_button.Hide();
//--- Show Back button
   m_back_button.Show();
//---
   m_current_step=2;
}
Now, we need to adjust the interaction of buttons selecting preset timeframe sets with the list of checkboxes. Since the list is constant now, appropriate changes should be made in the code:
//--- All
         if(lparam==m_currency_set[0].Id() && m_currency_set[0].IsPressed())
         {
            m_currency_set[1].IsPressed(false);
            m_currency_set[2].IsPressed(false);
            m_currency_set[1].Update(true);
            m_currency_set[2].Update(true);
            //---
            for(int i=0; i<21; i++)
            {
               m_checkbox[i].IsPressed(true);
               m_checkbox[i].Update(true);
            }
         }
         //--- Junior Timeframes
         else if(lparam==m_currency_set[1].Id() && m_currency_set[1].IsPressed())
         {
            m_currency_set[0].IsPressed(false);
            m_currency_set[2].IsPressed(false);
            m_currency_set[0].Update(true);
            m_currency_set[2].Update(true);
            //---
            string pairs[11]=
            {
               "M1","M2","M3","M4","M5","M6","M10","M12","M15","M20","M30"
            };
            //--- Clear the selection
            for(int i=0; i<21; i++)
            {
               m_checkbox[i].IsPressed(false);
               m_checkbox[i].Update(true);
            }
            //---
            for(int i=0; i<21; i++)
            {
               for(int j=0; j<11; j++)
                  if(m_checkbox[i].LabelText()==pairs[j])
                  {
                     m_checkbox[i].IsPressed(true);
                     m_checkbox[i].Update(true);
                  }
            }
         }
         //--- Senior Timeframes
         else if(lparam==m_currency_set[2].Id() && m_currency_set[2].IsPressed())
         {
            m_currency_set[0].IsPressed(false);
            m_currency_set[1].IsPressed(false);
            m_currency_set[0].Update(true);
            m_currency_set[1].Update(true);
            //---
            string pairs[10]=
            {
               "H1","H2","H3","H4","H6","H8","H12","D1","W1","MN"
            };
            //--- Clear the selection
            for(int i=0; i<21; i++)
            {
               m_checkbox[i].IsPressed(false);
               m_checkbox[i].Update(true);
            }
            //---
            for(int i=0; i<21; i++)
            {
               for(int j=0; j<10; j++)
                  if(m_checkbox[i].LabelText()==pairs[j])
                  {
                     m_checkbox[i].IsPressed(true);
                     m_checkbox[i].Update(true);
                  }
            }
         }
         //---
         if((lparam==m_currency_set[0].Id() && !m_currency_set[0].IsPressed())      ||
               (lparam==m_currency_set[1].Id() && !m_currency_set[1].IsPressed())   ||
               (lparam==m_currency_set[2].Id() && !m_currency_set[2].IsPressed())
           )
         {
            //--- Clear the selection
            for(int i=0; i<21; i++)
            {
               m_checkbox[i].IsPressed(false);
               m_checkbox[i].Update(true);
            }
         }
Quick editing of search rules from the monitor
During signal monitoring, the user may need to change conditions of a previously created trading signal. Currently, this can be done by restarting the application and re-configuring every signal of the monitor in addition to the required one. This solution is not convenient. Therefore, let us provide for the possibility to edit ready trading signals from the monitor itself. Let us add a button to the monitor interface, allowing to open a small dialog box as shown in figure 7. The box will contain a list of all created trading signals. A click on a signal will open it for editing.
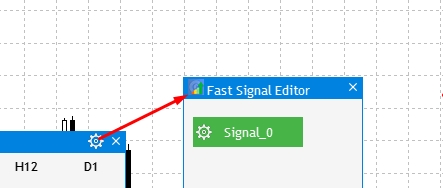
Fig. 7 Editing an earlier created signal from the monitor.
Let us proceed with the implementation. To display the button opening the window with the list of trading signals, add the following property in the CreateStepWindow() method body:
m_step_window.TooltipsButtonIsUsed(true); And then disable it in the GUI creation completion event - thus the button will not be displayed at the initial application setup step and will only be shown after all signals have been created and the monitor has been launched:
// --- GUI creation completion
   if(id==CHARTEVENT_CUSTOM+ON_END_CREATE_GUI)
   {
      ...
      m_step_window.GetTooltipButtonPointer().Hide();
   }
Enable it when loading the monitor.
//+------------------------------------------------------------------+
//|                                                                  |
//+------------------------------------------------------------------+
void CProgram::AutoResize(const int x_size,const int y_size)
{
   ...
   m_step_window.GetTooltipButtonPointer().Show();
}
Now, create a new dialog box in which the list of created signals will be displayed. Create a CWindow class instance variable and the CreateFastEdit() method which implements the window creation, as well as the CreateFastEditor() method for creating buttons (signal editing will be performed by clicking on these buttons).
   CWindow           m_fast_edit;

   bool              CreateFastEdit(const string caption_text);
   bool              CreateFastEditor(CButton &button,string text,const int x_gap,const int y_gap);
Implementation of these methods:
//+------------------------------------------------------------------+
//| Creates a window for creating and editing trading signals        |
//+------------------------------------------------------------------+
bool CProgram::CreateFastEdit(const string caption_text)
{
//--- Add the window pointer to the window array
   CWndContainer::AddWindow(m_fast_edit);
//--- Properties
   m_fast_edit.XSize(180);
   m_fast_edit.YSize(280);
//--- Coordinates
   int x=m_step_window.XGap()+m_step_window.XSize()+10;
   int y=m_step_window.YGap();
//---
   m_fast_edit.CaptionHeight(22);
   m_fast_edit.IsMovable(true);
   m_fast_edit.CaptionColor(m_caption);
   m_fast_edit.CaptionColorLocked(m_caption);
   m_fast_edit.CaptionColorHover(m_caption);
   m_fast_edit.BackColor(m_background);
   m_fast_edit.FontSize(m_base_font_size);
   m_fast_edit.Font(m_base_font);
   m_fast_edit.WindowType(W_DIALOG);
//--- Creating the form
   if(!m_fast_edit.CreateWindow(m_chart_id,m_subwin,caption_text,x,y))
      return(false);
//---
   for(int i=0; i<5; i++)
   {
      if(!CreateFastEditor(m_fast_editor[i],"Signal_"+string(i),10,40*i+40))
         return(false);
   }
   return(true);
}
//+------------------------------------------------------------------+
//| Creates a button with an image                                   |
//+------------------------------------------------------------------+
#resource "\\Images\\EasyAndFastGUI\\Icons\\bmp16\\settings_light.bmp"
bool CProgram::CreateFastEditor(CButton &button,string text,const int x_gap,const int y_gap)
{
//---
   color baseclr=C'70,180,70';
   color pressed=C'70,170,70';
//--- Save the window pointer
   button.MainPointer(m_fast_edit);
//--- Set up properties before creation
   button.XSize(110);
   button.YSize(30);
   button.Font(m_base_font);
   button.FontSize(m_base_font_size);
   button.IconXGap(3);
   button.IconYGap(7);
   button.IconFile("Images\\EasyAndFastGUI\\Icons\\bmp16\\settings_light.bmp");
   button.BackColor(baseclr);
   button.BackColorHover(baseclr);
   button.BackColorPressed(pressed);
   button.BorderColor(baseclr);
   button.BorderColorHover(baseclr);
   button.BorderColorPressed(pressed);
   button.LabelColor(clrWhite);
   button.LabelColorPressed(clrWhite);
   button.LabelColorHover(clrWhite);
   button.IsCenterText(true);
//--- Create the control
   if(!button.CreateButton(text,x_gap,y_gap))
      return(false);
//--- Add the element pointer to the base
   CWndContainer::AddToElementsArray(3,button);
   return(true);
}
Call the CreateFastEdit()method in the CreateGUI() method body.
//+------------------------------------------------------------------+
//| Creates the graphical interface of the program                   |
//+------------------------------------------------------------------+
bool CProgram::CreateGUI(void)
{
//--- Step 1-3. Symbol selection window.
   if(!CreateStepWindow("Signal Monitor Step 1: Choose Symbols"))
      return(false);
//---
   if(!CreateSetWindow("Signal Monitor Edit Signal"))
      return(false);
//--- Creating form 2 for the color picker
   if(!CreateColorWindow("Color Picker"))
      return(false);
//--- Creating a quick edit form
   if(!CreateFastEdit("Fast Signal Editor"))
      return(false);
//--- Finishing the creation of GUI
   CWndEvents::CompletedGUI();
   return(true);
}
Now, a click on the Settings button in the monitor should open the dialog box with the signals. To do this, add the following code in the Button click event section of the OnEvent() method:
      //--- OPEN THE SETTING WINDOW
      if(lparam==m_step_window.GetTooltipButtonPointer().Id())
      {
         //--- Coordinates
         int x=m_step_window.X()+m_step_window.XSize()+10;
         int y=m_step_window.Y();
         m_fast_edit.X(x);
         m_fast_edit.Y(y);
         m_fast_edit.OpenWindow();
      }
The following result will be obtained if you compile the project now:
Fig. 8 Adding a window for quick editing of trading signals.
Now the box features all signal editing buttons, but the idea is to show only the created signals. So, let's add a check for the current number of available signals. This can be done by the Dialog box opening event:
//--- Opening a dialog window
   if(id==CHARTEVENT_CUSTOM+ON_OPEN_DIALOG_BOX)
   {
      if(m_current_step<4)
         return;
      for(int i=0; i<5; i++)
      {
         if(!FileIsExist("Signal Monitor\\signal_"+string(i)+".bin"))
            m_fast_editor[i].Hide();
      }
   }
A check is performed here of whether files with trading signal exists. This, only the earlier created signals will be displayed. Now, a click on the button with the created signal should open the editing window for that signal. This is done in the Button click event section.
      //--- Trading signal editing
      for(int i=0; i<5; i++)
      {
         if(lparam==m_fast_editor[i].Id())
         {
            m_fast_edit.CloseDialogBox();
            LoadSignalSet(i);
            m_new_signal.LabelText("Save");
            m_new_signal.Update(true);
            RebuildParameters(m_indicator_type.GetListViewPointer().SelectedItemIndex());
            m_set_window.OpenWindow();
            m_number_signal=i;
         }
      }
A click on one of the signals in the quick edit window will open the Settings window and load the previously saved data of this trading signal. Then, once the required data is changed, new settings should be written to a file. In this case, we don't need to complete the entire monitor setup procedure.
Application localization
To solve the localization task, it is necessary to determine all the GUI elements that can be translated, while some of them should be left as is as their names are generally accepted. We will use a simple mechanism: we will create a string array with data that will be used for substitution in UI elements depending on the selected language. We will have two languages: Russian and English. Firstly, let us create in the SignalMonitor.mq5 file an enumeration, which will allow us to select the desired UI language at startup. Names for some of the elements will be set according to English standards.
//+------------------------------------------------------------------+
//|                                                                  |
//+------------------------------------------------------------------+
enum UPDATE
{
   MINUTE,        // 1 minute
   MINUTE_15,     // 15 minutes
   MINUTE_30,     // 30 minutes
   HOUR,          // 1 hour
   HOUR_4         // 4 hour
};
enum LANG
{
   RUSSIAN,       // Russian
   ENGLISH        // English
};
//+------------------------------------------------------------------+
//| Expert Advisor input parameters                                  |
//+------------------------------------------------------------------+
input int                  Inp_BaseFont      =  10;                  // Base Font
input color                Caption           =  C'0,130,225';        // Caption Color
input color                Background        =  clrWhiteSmoke;       // Back color
input LANG                 Language          =  ENGLISH;             // Interface language
input UPDATE               Update            =  MINUTE;              // Update interval
To pass information about the selected language to the interface, create a variable in the public section of the CProgram base class.
   //---
   int               m_language;
The index of the selected language will be assigned to the variable during application initialization.
program.m_language=Language;
Then create an array in the private section of the base class, which will serve as a receiver of data to be substituted in the interface according to the selected language. Also create a method that will load data to the interface.
   string            m_lang[];

   void              ChangeLanguage(void);
Now, implement the declared method in the Program.mqh file and set the language values to appropriate fields of each GUI element.
//+------------------------------------------------------------------+
//| Changing the interface language                                  |
//+------------------------------------------------------------------+
void CProgram::ChangeLanguage(void)
{
//---
#define ITEMS 40
   ArrayResize(m_lang,ITEMS);
   string rus[ITEMS]=
   {
      "Монитор Сигналов Шаг 1: Выбор Символов","Все","Мажоры","Кроссы",
      "Назад","Далее","Загрузка(L)","Сохранить(S)","Имя шаблона","Монитор сигналов Шаг 2: Выбор таймфреймов",
      "Все","Младшие","Старшие",
      "Монитор Сигналов Шаг 3: Создание торговых сигналов","Создать","Добавить сигнал","Список сигналов",
      "Редактор торговых сигналов","Тип индикатора","1.Настройки индикатора","Примен. цена",
      "Введите путь индикатора","Введите параметры индикатора через запятую",
      "2.Настройка сигнала","Правило","Метка","Значение","Текст","Цвет метки","Фон","Кант","Подсказка",
      "Изображение","Таймфреймы","Добавить","Отмена","Монитор торговых сигналов","Номер буфера","Сохранить"
   };
   string eng[ITEMS]=
   {
      "Signal Monitor Step 1: Choose Symbols","ALL","Major","Crosses",
      "Back","Next","Load(L)","Save(S)","Template name","Signal Monitor Step 2: Choose Timeframes",
      "ALL","Junior","Senior",
      "Signal Monitor Step 3: Creating Trading Signals","Create","Add Signal","Signal List",
      "Signal Monitor Edit Signal","Indicator Type","1.Indicator Settings","Applied Price",
      "Enter the indicator path","Enter indicator parameters separated by commas",
      "2.Signal Settings","Rule","Label","Value","Text","Label Color","Use Background","Use Border","Use Tooltip",
      "Use Image","Timeframes","Add","Cancel","Signal Monitor","Buffer number","Save"
   };
//--- Russian
   if(m_language==0)
      ArrayCopy(m_lang,rus);
//--- English
   else
      ArrayCopy(m_lang,eng);
}
Thus, we have additionally implemented the Russian language (fig.9). You can similarly add your preferred language
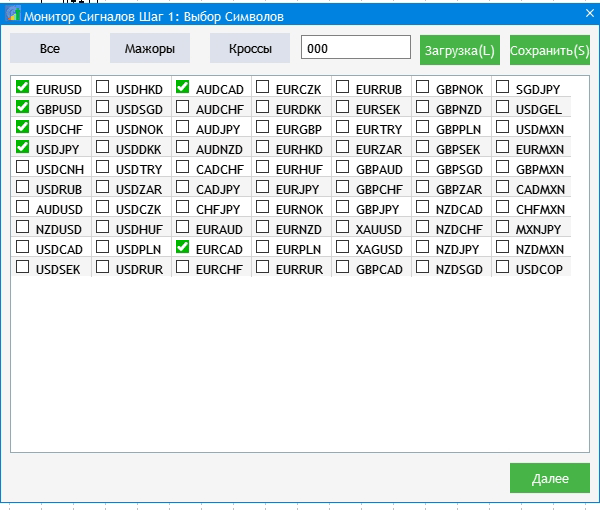
Fig. 9 GUI localization result.
Additional features
A few additional features will improve the visual part of the monitor and it will enable the possibility to quickly switch to the symbol chart in which a signal has emerged. The visual part is the extension of the signal block, because the currently used form seems small. Find the CreateSignalButton() method and increase the size of signal blocks, as well as adjust the position of elements inside these blocks and the arrangement of blocks relative to each other in the To_Monitor() method.
   button.XSize(60);
   button.YSize(30);
   button.IconXGap(2);
   button.IconYGap(11);
   button.LabelXGap(19);
   button.LabelYGap(10);
//--- Symbols
   int sy=ArraySize(m_symbols);
   ArrayResize(m_symbol_label,sy);
   for(int i=0; i<sy; i++)
   {
      if(!CreateSymbolLabel(m_symbol_label[i],5,m_step_window.CaptionHeight()+40+i*35,m_symbols[i]))
         return;
      m_symbol_label[i].Update(true);
   }
//--- Timeframes
   int tf=ArraySize(m_timeframes);
   ArrayResize(m_timeframe_label,tf);
//---
   for(int i=0; i<tf; i++)
   {
      if(!CreateTimeframeLabel(m_timeframe_label[i],110+65*i,m_step_window.CaptionHeight()+3,m_timeframes[i]))
         return;
      m_timeframe_label[i].Update(true);
   }
//-- Signal blocks
   int k=0;
   ArrayResize(m_signal_button,sy*tf);
   for(int j=0; j<sy; j++)
   {
      for(int i=0; i<tf; i++)
      {
         if(!CreateSignalButton(m_signal_button[k],m_timeframe_label[i].XGap()+m_timeframe_label[i].XSize()/2,m_step_window.CaptionHeight()+35+j*35))
            return;
         m_signal_button[k].Update(true);
         k++;
      }
   }
//---
   m_current_step=4;
//--- Resize window
   AutoResize(m_timeframe_label[tf-1].XGap()+m_timeframe_label[tf-1].XSize()+15,m_symbol_label[sy-1].YGap()+m_symbol_label[sy-1].YSize()+10);
This monitor implementation is much more convenient for tracking.
Fig. 10 Resizing signal blocks and adjusting the monitor interface.
Now, let us implement the opening of a chart for the symbol and timeframe in which the signal was found. The chart should be opened by a click on the corresponding block. Add the following in the OnEvent() method, in the Button click event section (because signal blocks are buttons):
      //--- CLICKING ON THE SIGNAL BLOCK
      for(int i=0; i<ArraySize(m_signal_button); i++)
      {
         if(lparam==m_signal_button[i].Id())
            ChartOpen(GetSymbol(i),GetTimeframe(i));
      }
Everything is quite simple. At this point, the current development phase is complete. In the next part we will continue to improve the signal search system, we will introduce the concept of a Composite Signal and will expand the monitor control capabilities.
Conclusion
The archive attached below contains all described files properly arranged into folders. For a correct operation, you should save the MQL5 folder to the terminal's root directory. To open the terminal root directory, in which the MQL5 folder is located, press the Ctrl+Shift+D key combination in the MetaTrader 5 terminal or use the context menu as shown in Fig. 11 below.
Fig. 11. Opening the MQL5 folder in the MetaTrader 5 terminal root