
Multicurrency monitoring of trading signals (Part 3): Introducing search algorithms

Contents
- Introduction
- Symbol set saving system
- Adding and editing a trading signal
- Trading signal search algorithms
- Conclusion
Introduction
In previous articles, we created the structure of the application for the monitoring of trading signals. We also implemented the application interface with basic interacting capabilities. Now it is time to fill the visual part of the algorithm for configuring and searching symbols. We will use the project from the previous article as the basis and will continue adding new functionality to it step by step.
Symbol set saving system
Last time, in the first application setup step, we created tools for selecting symbols from the Market Watch. Symbols could be selected in three different ways:
- Manual. Mark the required symbols and click Next.
- A predefined set. A click on All, Major or Crosses automatically selected a specific predefined set of symbols.
- Saved set. A previously prepared set of symbols configured using the first two methods and saved to a file under a specific name.
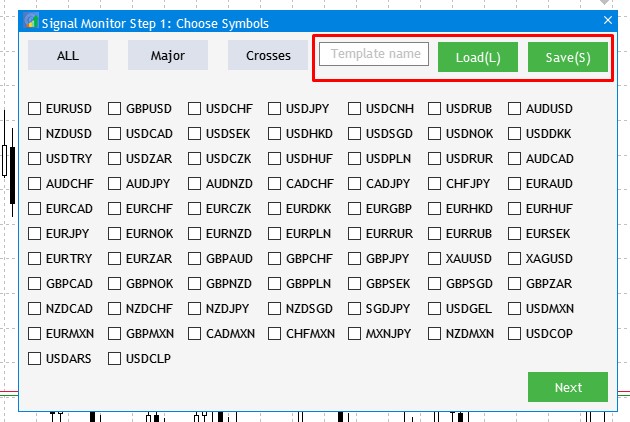
Fig.1 Application setup step 1 and settings of the Saved Set.
The first two ways are quite simple, and they have been created earlier. The third way needs to be created. Now let us define more precisely what we are going to do. We will go deeper into the interaction of elements in the red frame in Fig.1, which implies the following:
- The desired symbols are marked with checkmarks, the user enters the name in the 'Template name' field and then clicks Save or presses the S hot key. If saved successfully, an appropriate message is displayed.
- For access to a previously configured and saved template, the template name should be typed in the field and Load or the L hot key should be pressed.
Open the project, find the CProgram base class, and add two methods in its private section. The methods will be responsible for loading and saving the symbols template.
   bool              SaveSymbolSet(string file_name);
   bool              LoadSymbolSet(string file_name);
Below is how these methods are implemented.
//+------------------------------------------------------------------+
//| Save template to a file                                          |
//+------------------------------------------------------------------+
bool CProgram::SaveSymbolSet(string file_name)
{
   if(file_name=="")
   {
      MessageBox("Select the template name to record","Signal Monitor");
      return(false);
   }
   int h=FileOpen("Signal Monitor\\"+file_name+".bin",FILE_WRITE|FILE_BIN);
   if(h==INVALID_HANDLE)
   {
      MessageBox("Failed to create a configuration file","Signal Monitor");
      return(false);
   }
   else
      MessageBox("The "+file_name+" configuration has been successfully saved","Signal Monitor");
//--- Save the selection of timeframes and patterns
   for(int i=0; i<m_all_symbols; i++)
      m_save.tf[i]=m_checkbox[i].IsPressed();
//---
   FileWriteStruct(h,m_save);
   FileClose(h);
//---
   return(true);
}
//+------------------------------------------------------------------+
//| Load data to a panel                                             |
//+------------------------------------------------------------------+
bool CProgram::LoadSymbolSet(string file_name)
{
   if(file_name=="")
   {
      MessageBox("Select the template name to load","Signal Monitor");
      return(false);
   }
   int h=FileOpen("Signal Monitor\\"+file_name+".bin",FILE_READ|FILE_BIN);
   if(h==INVALID_HANDLE)
   {
      MessageBox("Configuration "+file_name+" not found","Signal Monitor");
      return(false);
   }
   ZeroMemory(m_save);
   FileReadStruct(h,m_save);
//--- Loading timeframes
   for(int i=0; i<m_all_symbols; i++)
   {
      m_checkbox[i].IsPressed(m_save.tf[i]);
      m_checkbox[i].Update(true);
   }
//---
   FileClose(h);
//---
   return(true);
}
However, if you try to compile the project now, this will trigger an error connected with the m_save variable. This structure has one bool type parameter named tf. It remembers the user's choice to a file. So, create this structure in the application class and add its instance to the base class.
//+------------------------------------------------------------------+
//| Class for creating the application                               |
//+------------------------------------------------------------------+
struct SAVE
{
   bool     tf[100];
};
class CProgram : public CWndEvents
{
...
        SAVE            m_save;
Go to OnEvent(), enter the section related to the Button Click Event and add the following code in the Step 1 condition:
         //--- Save the template
         if(lparam==m_save_button.Id())
         {
            SaveSymbolSet(m_text_edit.GetValue());
         }
         //--- Load the template
         if(lparam==m_load_button.Id())
         {
            LoadSymbolSet(m_text_edit.GetValue());
         }
Also, implement the usage of hot keys for the above buttons. In the same method, add a check for the Key Press Event and add code for the used keys.
//--- Key press
   if(id==CHARTEVENT_KEYDOWN)
   {
      if(m_current_step==1)
      {
         short sym=TranslateKey((int)lparam);
         //--- if the entered character is successfully converted to Unicode
         if(sym>0)
         {
            if(ShortToString(sym)=="l" || ShortToString(sym)=="д")
               LoadSymbolSet(m_text_edit.GetValue());
            if(ShortToString(sym)=="s" || ShortToString(sym)=="ы")
               SaveSymbolSet(m_text_edit.GetValue());
         }
      }
   }
Compile the project. Successful compilation will produce the following result.
Fig.2 Save and load a user template
Adding and editing a trading signal
Now, move on to the main application part which is responsible for the creation and editing of trading signals, as well as for their further tracking in the monitor. Here is how the signal creation and editing looks like.
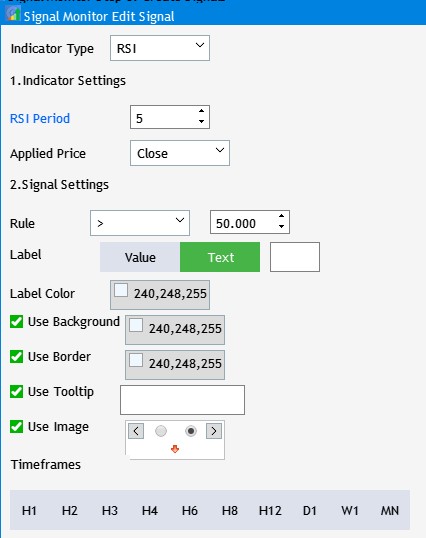
Fig.3 Signal creation and editing window.
At the current stage, the window appears as a set of GUI element that control various parameters. However, these settings are not used anywhere. Start with the addition of two buttons to the interface. They add/save a trading signal. Another button cancels creation/editing. Open Program.mqh and add implementation method for these two buttons to the base class:
bool CreateButton3(CButton &button,string text,const int x_gap,const int y_gap);
Two CButton button instances:
   CButton           m_new_signal;
   CButton           m_cancel_button;
Now go to SetWindow.mqh and implement this method.
//+------------------------------------------------------------------+
//|                                                                  |
//+------------------------------------------------------------------+
bool CProgram::CreateButton3(CButton &button,string text,const int x_gap,const int y_gap)
{
//---
   color baseclr=C'70,180,70';
   color pressed=C'70,170,70';
//--- Save the window pointer
   button.MainPointer(m_set_window);
//--- Set up properties before creation
   button.XSize(60);
   button.YSize(30);
   button.Font(m_base_font);
   button.FontSize(m_base_font_size);
   button.BackColor(baseclr);
   button.BackColorHover(baseclr);
   button.BackColorPressed(pressed);
   button.BorderColor(baseclr);
   button.BorderColorHover(baseclr);
   button.BorderColorPressed(pressed);
   button.LabelColor(clrWhite);
   button.LabelColorPressed(clrWhite);
   button.LabelColorHover(clrWhite);
   button.IsCenterText(true);
//--- Create the control
   if(!button.CreateButton(text,x_gap,y_gap))
      return(false);
//--- Add the element pointer to the base
   CWndContainer::AddToElementsArray(1,button);
   return(true);
}
To make these two buttons appear in the interface of the trading window adding signal, insert the following lines at the end of the CreateSetWindow() method body:
//--- Add/Cancel Buttons
   if(!CreateButton3(m_new_signal,"Add",m_set_window.XSize()-2*(60+10),m_set_window.YSize()-(30+10)))
      return(false);
   if(!CreateButton3(m_cancel_button,"Cancel",m_set_window.XSize()-(60+10),m_set_window.YSize()-(30+10)))
      return(false);
After project compilation, two buttons will appear at the bottom of the trading signal creation window.
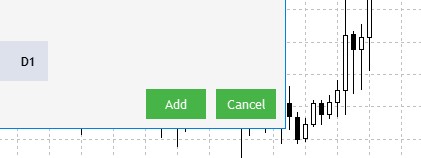
Fig.4 Adding Signal creation and canceling buttons.
Now, we need to add the events that will happen upon button clicks. The effect of the Cancel button is obvious: it does not save any actions and settings in the given window and it closes the window without adding a signal. Let us consider the Add button in more detail.
First, let us determine the sequence of actions to be performed when Add is clicked.
- A click on the button saves the parameters selected using the UI elements in the trading signal creation window.
- After successful saving, the window is closed and the first record with the signal name appears in the list of signals in the main window.
- Upon a click on the record, the earlier saved set is applied to the signal setup UI elements and the Add button is converted to Save.
To enable saving of settings to a file, we need to create a universal set of settings which will be used for the visual display in the editing window as well as for subsequent signal search. Therefore, let us create a structure and call it SIGNAL. Configuration of settings in the creation and editing window will be written to this structure.
struct SIGNAL
{
   int      ind_type;
   int      ind_period;
   int      app_price;
   int      rule_type;
   double   rule_value;
   int      label_type;
   uchar    label_value[10];
   color    label_color;
   color    back_color;
   color    border_color;
   bool     tooltip;
   uchar    tooltip_text[100];
   bool     image;
   int      img_index;
   bool     timeframes[21];
   TFNAME   tf_name[21];
};
Let us view each of the elements in the structure:
- ind_type — contains the type of the indicator which was selected as the signal search basis. It is displayed as Indicator Type in the interface.
- ind_period — the period of the selected indicator.
- app_price — price used for indicator calculation. This value is not available for all indicates and thus it is only written when applicable. For example, it is used for RSI but is not used for WPR.
- rule_type — sets the type of the rule to be used when searching for a trading signal. It appears in the interface as a drop-down menu containing characters like ==,>=,<= and others.
- rule_value — a threshold value of the selected indicator to which the search rule shall apply.
- label_type — this element will store the text label display type. It is either the current indicator value or a custom label up to 3 characters long.
- label_value — if the second text label display type is selected, this parameter will store the custom label text specified by the user.
- label_color — stores the color of the text label.
- back_color — stores the background color of the signal block in the monitor if this option is selected.
- border_color — stores the border color of the signal block in the monitor if this option is selected.
- tooltip — contains an indication of whether a tooltip is used.
- tooltip_text — if the tooltip is used, this parameter contains the text.
- image — an indication of image usage.
- img_index — saves the sequence number of the image if used.
- timeframes — array containing information about the working timeframe settings selected in the second step.
- tf_name — saves the timeframes at which the trading signal will be searched.
Now, declare in the base class an array of structures for saving the settings of created signals.
SIGNAL m_signal_set[5]; Also, create two methods in the private area of the CProgram class to save a set of parameters to a file and to load one from the file into the structure.
   bool              SaveSignalSet(int index);
   bool              LoadSignalSet(int index);
Here is the implementation:
//+------------------------------------------------------------------+
//|                                                                  |
//+------------------------------------------------------------------+
bool CProgram::SaveSignalSet(int index)
{
//---
   int h=FileOpen("Signal Monitor\\signal_"+string(index)+".bin",FILE_WRITE|FILE_BIN);
   if(h==INVALID_HANDLE)
   {
      MessageBox("Failed to create a configuration file","Signal Monitor");
      return(false);
   }
//--- Save the selection
   //--- Indicator type
   m_signal_set[index].ind_type=m_indicator_type.GetListViewPointer().SelectedItemIndex();
   //--- Indicator period
   m_signal_set[index].ind_period=(int)m_period_edit.GetValue();
   //--- Type of applied price
   m_signal_set[index].app_price=m_applied_price.GetListViewPointer().SelectedItemIndex();
   //--- Rule type
   m_signal_set[index].rule_type=m_rule_type.GetListViewPointer().SelectedItemIndex();
   //--- Rule value
   m_signal_set[index].rule_value=(double)m_rule_value.GetValue();
   //--- Text label display type
   m_signal_set[index].label_type=m_label_button[0].IsPressed()?0:1;
   //--- Save the value of the text field for the second type
   if(m_label_button[1].IsPressed())
      StringToCharArray(StringSubstr(m_text_box.GetValue(),0,3),m_signal_set[index].label_value);
   //--- Color of the text label
   m_signal_set[index].label_color=m_color_button[0].CurrentColor();
   //--- Background color
   if(m_set_param[0].IsPressed())
      m_signal_set[index].back_color=m_color_button[1].CurrentColor();
   else
      m_signal_set[index].back_color=clrNONE;
   //--- Border color
   if(m_set_param[1].IsPressed())
      m_signal_set[index].border_color=m_color_button[2].CurrentColor();
   else
      m_signal_set[index].border_color=clrNONE;
   //--- Tooltip value
   m_signal_set[index].tooltip=m_set_param[2].IsPressed();
   if(m_signal_set[index].tooltip)
      StringToCharArray(m_tooltip_text.GetValue(),m_signal_set[index].tooltip_text);
   //--- Selected image
   m_signal_set[index].image=m_set_param[3].IsPressed();
   if(m_signal_set[index].image)
      m_signal_set[index].img_index=m_pictures_slider.GetRadioButtonsPointer().SelectedButtonIndex();
   //--- Selected timegrames
   int tf=0;
   for(int i=0; i<21; i++)
   {
      if(!m_tf_button[i].IsLocked() && m_tf_button[i].IsPressed())
      {
         m_signal_set[index].timeframes[i]=true;
         StringToCharArray(m_tf_button[i].LabelText(),m_signal_set[index].tf_name[i].tf);
         tf++;
      }
      else
         m_signal_set[index].timeframes[i]=false;
   }
   //---
   if(tf<1)
   {
      MessageBox("No timeframes selected","Signal Monitor");
      FileClose(h);
      return(false);
   }
//---
   FileWriteStruct(h,m_signal_set[index]);
   FileClose(h);
   Print("Configuration signal_"+string(index)+" has been successfully saved");
//---
   return(true);
}
//+------------------------------------------------------------------+
//|                                                                  |
//+------------------------------------------------------------------+
bool CProgram::LoadSignalSet(int index)
{
   int h=FileOpen("Signal Monitor\\signal_"+string(index)+".bin",FILE_READ|FILE_BIN);
   if(h==INVALID_HANDLE)
   {
      MessageBox("Configuration not found","Signal Monitor");
      return(false);
   }
   ZeroMemory(m_signal_set[index]);
   FileReadStruct(h,m_signal_set[index]);
//--- Loading indicator type
   m_indicator_type.SelectItem(m_signal_set[index].ind_type);
   RebuildParameters(m_signal_set[index].ind_type);
   m_indicator_type.GetButtonPointer().Update(true);
//--- Loading indicator period
   m_period_edit.SetValue((string)m_signal_set[index].ind_period);
   m_period_edit.GetTextBoxPointer().Update(true);
//--- Loading applied price
   if(!m_applied_price.IsLocked())
   {
      m_applied_price.SelectItem(m_signal_set[index].app_price);
      m_applied_price.GetButtonPointer().Update(true);
   }
//--- Loading signal rule
   m_rule_type.SelectItem(m_signal_set[index].rule_type);
   m_rule_type.GetButtonPointer().Update(true);
   m_rule_value.SetValue((string)m_signal_set[index].rule_value);
   m_rule_value.GetTextBoxPointer().Update(true);
//--- Loading a text label
   if(m_signal_set[index].label_type==0)
   {
      m_label_button[0].IsPressed(true);
      m_label_button[0].Update(true);
      m_label_button[1].IsPressed(false);
      m_label_button[1].Update(true);
      m_text_box.IsLocked(true);
   }
   else
   {
      m_label_button[0].IsPressed(false);
      m_label_button[0].Update(true);
      m_label_button[1].IsPressed(true);
      m_label_button[1].Update(true);
      m_text_box.IsLocked(false);
      m_text_box.ClearTextBox();
      m_text_box.AddText(0,CharArrayToString(m_signal_set[index].label_value));
      m_text_box.Update(true);
   }
//--- Loading the color of the text label
   m_color_button[0].CurrentColor(m_signal_set[index].label_color);
   m_color_button[0].Update(true);
//--- Loading the background color
   if(m_signal_set[index].back_color==clrNONE)
   {
      m_set_param[0].IsPressed(false);
      m_set_param[0].Update(true);
      m_color_button[1].IsLocked(true);
      m_color_button[1].GetButtonPointer().Update(true);
   }
   else
   {
      m_set_param[0].IsPressed(true);
      m_set_param[0].Update(true);
      m_color_button[1].IsLocked(false);
      m_color_button[1].CurrentColor(m_signal_set[index].back_color);
      m_color_button[1].GetButtonPointer().Update(true);
   }
//--- Loading the border color
   if(m_signal_set[index].border_color==clrNONE)
   {
      m_set_param[1].IsPressed(false);
      m_set_param[1].Update(true);
      m_color_button[2].IsLocked(true);
      m_color_button[2].GetButtonPointer().Update(true);
   }
   else
   {
      m_set_param[1].IsPressed(true);
      m_set_param[1].Update(true);
      m_color_button[2].IsLocked(false);
      m_color_button[2].CurrentColor(m_signal_set[index].border_color);
      m_color_button[2].GetButtonPointer().Update(true);
   }
//--- Loading the tooltip value
   if(!m_signal_set[index].tooltip)
   {
      m_set_param[2].IsPressed(false);
      m_set_param[2].Update(true);
      m_tooltip_text.IsLocked(true);
      m_tooltip_text.Update(true);
   }
   else
   {
      m_set_param[2].IsPressed(true);
      m_set_param[2].Update(true);
      m_tooltip_text.IsLocked(false);
      m_tooltip_text.ClearTextBox();
      m_tooltip_text.AddText(0,CharArrayToString(m_signal_set[index].tooltip_text));
      m_tooltip_text.Update(true);
   }
//--- Loading the image
   if(!m_signal_set[index].image)
   {
      m_set_param[3].IsPressed(false);
      m_set_param[3].Update(true);
      m_pictures_slider.IsLocked(true);
      m_pictures_slider.GetRadioButtonsPointer().Update(true);
   }
   else
   {
      m_set_param[3].IsPressed(true);
      m_set_param[3].Update(true);
      m_pictures_slider.IsLocked(false);
      m_pictures_slider.GetRadioButtonsPointer().SelectButton(m_signal_set[index].img_index);
      m_pictures_slider.GetRadioButtonsPointer().Update(true);
   }
//--- Loading selected timeframes
   for(int i=0; i<21; i++)
   {
      if(!m_tf_button[i].IsLocked())
      {
         m_tf_button[i].IsPressed(m_signal_set[index].timeframes[i]);
         m_tf_button[i].Update(true);
      }
   }
//---
   FileClose(h);
   return(true);
}
Thus, the first action with the saving/loading algorithm is completed. Now, we need to create the object that will serve as records of created signals. By clicking on these objects, we will be able to edit the parameters of the earlier ]created trading signal. To implement these objects, create an array of CButton class instances.
CButton m_signal_editor[5]; Also, add a method creating the objects.
bool CreateSignalEditor(CButton &button,string text,const int x_gap,const int y_gap);
Implement this method in the StepWindow.mqh file, as these objects belong to the main window.
//+------------------------------------------------------------------+
//| Creates a button with an image                                   |
//+------------------------------------------------------------------+
#resource "\\Images\\EasyAndFastGUI\\Icons\\bmp16\\settings_light.bmp"

bool CProgram::CreateSignalEditor(CButton &button,string text,const int x_gap,const int y_gap)
{
//---
   color baseclr=C'70,180,70';
   color pressed=C'70,170,70';
//--- Save the window pointer
   button.MainPointer(m_step_window);
//--- Set up properties before creation
   button.XSize(110);
   button.YSize(30);
   button.Font(m_base_font);
   button.FontSize(m_base_font_size);
   button.IconXGap(3);
   button.IconYGap(7);
   button.IconFile("Images\\EasyAndFastGUI\\Icons\\bmp16\\settings_light.bmp");
   button.BackColor(baseclr);
   button.BackColorHover(baseclr);
   button.BackColorPressed(pressed);
   button.BorderColor(baseclr);
   button.BorderColorHover(baseclr);
   button.BorderColorPressed(pressed);
   button.LabelColor(clrWhite);
   button.LabelColorPressed(clrWhite);
   button.LabelColorHover(clrWhite);
   button.IsCenterText(true);
//--- Create the control
   if(!button.CreateButton(text,x_gap,y_gap))
      return(false);
//--- Add the element pointer to the base
   CWndContainer::AddToElementsArray(0,button);
   return(true);
}
Using this method, add five objects to the CreateStepWindow() body, which will be the objects in the list of signals.
//---
   for(int i=0; i<5; i++)
   {
      if(!CreateSignalEditor(m_signal_editor[i],"Signal_"+string(i),10,40*i+90))
         return(false);
   }
To disable the display of these elements after application launch, hide them in the CreateGUI() method.
//+------------------------------------------------------------------+
//| Creates the graphical interface of the program                   |
//+------------------------------------------------------------------+
bool CProgram::CreateGUI(void)
{
//--- Step 1-3. Symbol selection window.
   if(!CreateStepWindow("Signal Monitor Step 1: Choose Symbols"))
      return(false);
//---
   if(!CreateSetWindow("Signal Monitor Edit Signal"))
      return(false);
//--- Creating form 2 for the color picker
   if(!CreateColorWindow("Color Picker"))
      return(false);
//--- Finishing the creation of GUI
   CWndEvents::CompletedGUI();
   m_back_button.Hide();
   m_add_signal.Hide();
   m_signal_header.Hide();
   m_label_button[1].IsPressed(true);
   m_label_button[1].Update(true);
   for(int i=0; i<5; i++)
      m_signal_editor[i].Hide();
   return(true);
}
The next thing to do before project compilation is to create a method that will delete all previously saved data during the initial setup. To do this, create the ClearSaves() method and call it in the CProgram class constructor.
//+------------------------------------------------------------------+
//|                                                                  |
//+------------------------------------------------------------------+
bool CProgram::ClearSaves(void)
{
   for(int i=0; i<5; i++)
      FileDelete("Signal Monitor\\signal_"+string(i)+".bin");
   m_total_signals=0;
   return(true);
}
Now, add the following to Add Signal button click event:
//--- Add Signal button click event
      if(lparam==m_add_signal.Id())
      {
         m_set_window.OpenWindow();
         m_number_signal=-1;
         RebuildTimeframes();
         m_new_signal.LabelText("Add");
         m_new_signal.Update(true);
      }
The mechanism for adding a new trading signal is ready after project compilation. The next step is the implementation of editing of an earlier created signal.
Fig.5 Adding a new trading signal.
Let us sum everything up. As is shown in figure 5, we have implemented the possibility to add signals upon a click on the Add Signal button. Also, a button with the new signal name is added to the Signal List. Currently, it is a preset value without the possibility to edit it. However, nothing happens upon a click on Signal_0, so let us fix this. Let us enable reopening of the settings window with the loading to the interface of exactly those settings that were earlier saved for the selected signal. Another idea is to implement the possibility to edit the loaded settings and to save them.
Open the OnEvent() method body in the CProgram base class and find the part with the button click event. Add the following code to it:
//---
      for(int i=0; i<5; i++)
      {
         if(lparam==m_signal_editor[i].Id())
         {
            LoadSignalSet(i);
            m_new_signal.LabelText("Save");
            m_new_signal.Update(true);
            m_set_window.OpenWindow();
            m_number_signal=i;
         }
      }
Here determine which created signal button was pressed. Knowing this, load the previously saved data to the settings window interface using the LoadSignalSet() method, change the button name from Add to Save and open the settings window.
Trading signal search algorithms
Now that the tools for creating and editing trading signals is ready, it is time to link it to the application part responsible for signals search and display. We have already created a basis for signal monitoring. It has a tabular view with the names of rows (symbols selected at the first setup step) and columns (timeframes selected at the second setup step).
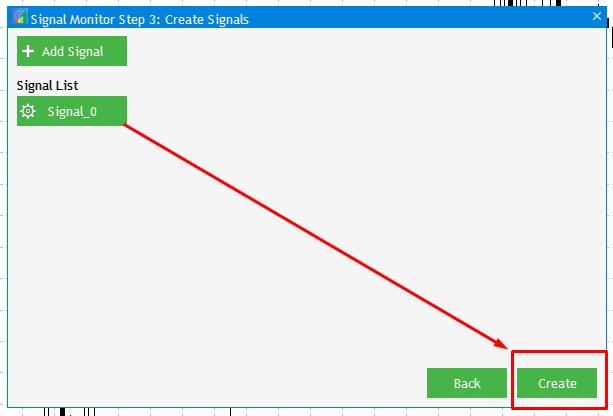
Fig.6 Button creating a trading signals monitor.
The sequence of actions after at least one trading signal is created, is simple. A click on Create triggers the formation of a trading signals monitor based on the entire array of setting that have been previously set. Before proceeding with the programming of this system, we need to supplement the ToMonitor() method which is called after pressing Create.
//--- Hide Step 3
   m_add_signal.Hide();

   m_signal_header.Hide();
   m_back_button.Hide();
   m_next_button.Hide();
   for(int i=0; i<5; i++)
      m_signal_editor[i].Hide();
Since we have button objects allowing to display and edit currently created trading signals, these buttons should also be hidden when jumping to the monitor window, similarly to all controls from the previous Step 3.
In the first article, when we developed the application structure, one of the monitor elements was the indication block shown in figure 5 of the first article. Its purpose is to display in real time the presence of one of the earlier created trading signals. Therefore, the first step is to create an object that will be used as an indication block. This can be done by implementing the CreateSignalButton() method in the CProgram class.
bool CreateSignalButton(CButton &button,const int x_gap,const int y_gap);
Also, add an array of CButton class instances required for the creation of the full set of indication blocks.
CButton m_signal_button[];
Now open StepWindow.mqh and add the implementation of the created method to the file end:
//+------------------------------------------------------------------+
//| Creates an indication block                                      |
//+------------------------------------------------------------------+
bool CProgram::CreateSignalButton(CButton &button,const int x_gap,const int y_gap)
{
//---
   color baseclr=C'220,225,235';
//--- Save the window pointer
   button.MainPointer(m_step_window);
//--- Set up properties before creation
   button.TwoState(false);
   button.XSize(40);
   button.YSize(20);
   button.IconXGap(2);
   button.IconYGap(button.YSize()/2-8);
   button.LabelXGap(19);
   button.LabelYGap(2);
   button.FontSize(m_base_font_size);
   button.BackColor(baseclr);
   button.BackColorHover(baseclr);
   button.BackColorPressed(baseclr);
   button.BorderColor(baseclr);
   button.BorderColorHover(baseclr);
   button.BorderColorPressed(baseclr);
   button.LabelColor(clrBlack);
   button.LabelColorPressed(clrSlateGray);
   button.IconFile("");
   button.IconFileLocked("");
   button.IsDoubleBorder(true);
//--- Create the control
   if(!button.CreateButton("",x_gap-button.XSize()/2,y_gap))
      return(false);
//--- Add the element pointer to the base
   CWndContainer::AddToElementsArray(0,button);
   return(true);
}
Now apply it in the ToMonitor() creation method. To do this, find the Timeframes section in the method body and add code to the method as shown below:
//--- Timeframes
   int tf=ArraySize(m_timeframes);
   ArrayResize(m_timeframe_label,tf);
//---
   for(int i=0; i<tf; i++)
   {
      if(!CreateTimeframeLabel(m_timeframe_label[i],110+50*i,m_step_window.CaptionHeight()+3,m_timeframes[i]))
         return;
      m_timeframe_label[i].Update(true);
   }
//-- Signal blocks
   int k=0;
   ArrayResize(m_signal_button,sy*tf);
   for(int j=0; j<sy; j++)
   {
      for(int i=0; i<tf; i++)
      {
         if(!CreateSignalButton(m_signal_button[k],m_timeframe_label[i].XGap()+m_timeframe_label[i].XSize()/2,m_step_window.CaptionHeight()+25+j*25))
            return;
         m_signal_button[k].Update(true);
         k++;
      }
   }
//--- Resize window
   AutoResize(m_timeframe_label[tf-1].XGap()+m_timeframe_label[tf-1].XSize()+5,m_symbol_label[sy-1].YGap()+m_symbol_label[sy-1].YSize()+5);
Compile the project and obtain a ready-made layout for the future display of trading signals.

Fig.7 A ready layout of trading signals.
Now recall which elements of the indication block can be configured to display certain signals.
- Background color.
- The presence and color of the indication block border.
- The color and value of the text label.
- Presence of an icon.
- Presence of a tooltip.
To manage these properties, set the following methods in the private section of our CProgram base class:
   void              SetBorderColor(int index, color clr);
   void              SetLabel(int index, string text,color clr=clrBlack);
   void              SetIcon(int index,int number);
   void              SetBackground(int index,color clr);
   void              SetTooltip(int index,string text="\n");
Their implementation:
//+------------------------------------------------------------------+
//| Set the border color                                             |
//+------------------------------------------------------------------+
void CProgram::SetBorderColor(int index, color clr)
{
   m_signal_button[index].BorderColor(clr);
   m_signal_button[index].BorderColorHover(clr);
   m_signal_button[index].BorderColorPressed(clr);
   m_signal_button[index].Update(true);
}
//+------------------------------------------------------------------+
//| Set the label text                                               |
//+------------------------------------------------------------------+
void CProgram::SetLabel(int index, string text,color clr=clrBlack)
{
   m_signal_button[index].LabelColor(clr);
   m_signal_button[index].LabelColorHover(clr);
   m_signal_button[index].LabelColorPressed(clr);
   m_signal_button[index].LabelText(text);
   m_signal_button[index].Update(true);
}
//+------------------------------------------------------------------+
//| Set the background                                               |
//+------------------------------------------------------------------+
void CProgram::SetBackground(int index,color clr)
{
   m_signal_button[index].BackColor(clr);
   m_signal_button[index].BackColorHover(clr);
   m_signal_button[index].Update(true);
}
//+------------------------------------------------------------------+
//| Set the icon                                                     |
//+------------------------------------------------------------------+
void CProgram::SetIcon(int index,int number)
{
   //---
   string image[]=
   {
      "Images\\EasyAndFastGUI\\Icons\\bmp16\\arrow_up.bmp",
      "Images\\EasyAndFastGUI\\Icons\\bmp16\\arrow_down.bmp"
   };
   string path=(number>=0)?image[number]:"";
   if(number<0)
      m_signal_button[index].IsCenterText(true);
   else
      m_signal_button[index].IsCenterText(false);
   m_signal_button[index].IconFile(path);
   m_signal_button[index].IconFilePressed(path);
   m_signal_button[index].Update(true);
}
//+------------------------------------------------------------------+
//| Set the tooltip                                                  |
//+------------------------------------------------------------------+
void CProgram::SetTooltip(int index,string text="\n")
{
   m_signal_button[index].Tooltip(text);
   m_signal_button[index].ShowTooltip(true);
}
Then we need to create a few auxiliary methods necessary for further calculations, correct display and, most importantly, for the correspondence of each of the created indication blocks to a specific row (selected symbol) and column (timeframe). Firstly, create methods for determining the row and the column of the indication block based on the index in the table.
   int               GetRow(int index,int row_size);
   int               GetCol(int index,int row_size);
//+------------------------------------------------------------------+
//| Determining a row by the index                                   |
//+------------------------------------------------------------------+
int CProgram::GetRow(int index,int row_size)
{
   return(int(MathFloor(index/row_size)+1));
}
//+------------------------------------------------------------------+
//| Determining a column by the index                                |
//+------------------------------------------------------------------+
int CProgram::GetCol(int index,int row_size)
{
   return(int(MathMod(index,row_size)+1));
}
We also need to be able to obtain the required data from the interface. Namely, we need to convert the text display of timeframes to the timeframe enumeration type. We also need to be able to find out based on the indication block index, to which symbol and timeframe it corresponds in the table.
//+------------------------------------------------------------------+
//| Return timeframe by row                                          |
//+------------------------------------------------------------------+
ENUM_TIMEFRAMES CProgram::StringToTimeframe(const string timeframe)
{
   if(timeframe=="M1")  return(PERIOD_M1);
   if(timeframe=="M2")  return(PERIOD_M2);
   if(timeframe=="M3")  return(PERIOD_M3);
   if(timeframe=="M4")  return(PERIOD_M4);
   if(timeframe=="M5")  return(PERIOD_M5);
   if(timeframe=="M6")  return(PERIOD_M6);
   if(timeframe=="M10") return(PERIOD_M10);
   if(timeframe=="M12") return(PERIOD_M12);
   if(timeframe=="M15") return(PERIOD_M15);
   if(timeframe=="M20") return(PERIOD_M20);
   if(timeframe=="M30") return(PERIOD_M30);
   if(timeframe=="H1")  return(PERIOD_H1);
   if(timeframe=="H2")  return(PERIOD_H2);
   if(timeframe=="H3")  return(PERIOD_H3);
   if(timeframe=="H4")  return(PERIOD_H4);
   if(timeframe=="H6")  return(PERIOD_H6);
   if(timeframe=="H8")  return(PERIOD_H8);
   if(timeframe=="H12") return(PERIOD_H12);
   if(timeframe=="D1")  return(PERIOD_D1);
   if(timeframe=="W1")  return(PERIOD_W1);
   if(timeframe=="MN")  return(PERIOD_MN1);
//--- The default value
   return(::Period());
}
//+------------------------------------------------------------------+
//| Determine the timeframe                                          |
//+------------------------------------------------------------------+
ENUM_TIMEFRAMES CProgram::GetTimeframe(int index)
{
   int tf=ArraySize(m_timeframes);
   return(StringToTimeframe((m_timeframe_label[GetCol(index,tf)-1].LabelText())));
}
//+------------------------------------------------------------------+
//| Determine the symbol                                             |
//+------------------------------------------------------------------+
string CProgram::GetSymbol(int index)
{
   int tf=ArraySize(m_timeframes);
   return(m_symbol_label[GetRow(index,tf)-1].LabelText());
}
The next method is directly related to the signal search algorithm: it searches for the set of parameters of the earlier created signals on the specified symbol and timeframe.
bool GetSignal(string sy,ENUM_TIMEFRAMES tf,SIGNAL &signal_set);
Settings are passed by the SIGNAL structure from a set of parameters.
//+------------------------------------------------------------------+
//|                                                                  |
//+------------------------------------------------------------------+
bool CProgram::GetSignal(string sy,ENUM_TIMEFRAMES tf,SIGNAL &signal_set)
{
//--- Getting the indicator handle
   int h=INVALID_HANDLE;
   ENUM_APPLIED_PRICE app_price;
   switch(signal_set.app_price)
   {
   case  0:
      app_price=PRICE_CLOSE;
      break;
   case  1:
      app_price=PRICE_OPEN;
      break;
   case  2:
      app_price=PRICE_HIGH;
      break;
   case  3:
      app_price=PRICE_LOW;
      break;
   case  4:
      app_price=PRICE_MEDIAN;
      break;
   case  5:
      app_price=PRICE_TYPICAL;
      break;
   case  6:
      app_price=PRICE_WEIGHTED;
      break;
   default:
      app_price=PRICE_CLOSE;
      break;
   }
//---
   switch(signal_set.ind_type)
   {
   case  0:
      h=iATR(sy,tf,signal_set.ind_period);
      break;
   case  1:
      h=iCCI(sy,tf,signal_set.ind_period,app_price);
      break;
   case  2:
      h=iDeMarker(sy,tf,signal_set.ind_period);
      break;
   case  3:
      h=iForce(sy,tf,signal_set.ind_period,MODE_SMA,VOLUME_TICK);
      break;
   case  4:
      h=iWPR(sy,tf,signal_set.ind_period);
      break;
   case  5:
      h=iRSI(sy,tf,signal_set.ind_period,app_price);
      break;
   case  6:
      h=iMomentum(sy,tf,signal_set.ind_period,app_price);
      break;
   default:
      break;
   }
   if(h==INVALID_HANDLE)
   {
      Print(sy+". Failed to get handle");
      Print("Handle = ",h,"  error = ",GetLastError());
      return(false);
   }
   //---
   double arr[1];
   if(CopyBuffer(h,0,
    0,1,arr)!=1)
   {
      Print("sy= ",sy,"tf= ",EnumToString(tf)," Failed to get handle data ",GetLastError());
      return(false);
   }
   IndicatorRelease(h);
//--- Check the condition
   double r_value=signal_set.rule_value;
   double c_value=arr[0];
   m_ind_value=c_value;
   int s=0;
   switch(signal_set.rule_type)
   {
   case  0:
      if(c_value>r_value)
         s=1;
      break;
   case  1:
      if(c_value>=r_value)
         s=1;
      break;
   case  2:
      if(c_value==r_value)
         s=1;
      break;
   case  3:
      if(c_value<r_value)
         s=1;
      break;
   case  4:
      if(c_value<=r_value)
         s=1;
      break;
   default:
      s=0;
      break;
   }
//---
   if(s>0)
      return(true);
   return(false);
}
The GetSignal() method receives from the SIGNAL structure the information on which of the available indicators was selected for generating trading signals, which settings were selected for the indicator and which search rule was set. Do not forget that filtering by timeframes can be performed twice for each signal. First time it is performed in the second setup step, and then we can filter selected values in the trading signal creation window, as it is shown in figure 8 below.
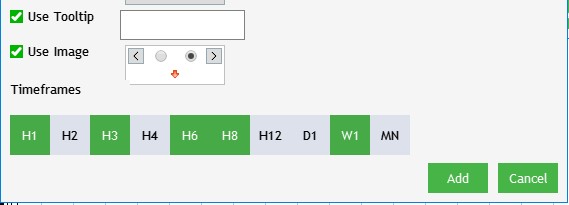
Fig.8 Selecting timeframes for the created signal.
For our algorithm to consider this filter and not to look for signals outside the given timeframes, the specification of timeframes should be checked for each of the created trading signals. So, create the CheckTimeframe() method in the base class. The method will serve as a filter.
//+------------------------------------------------------------------+
//|                                                                  |
//+------------------------------------------------------------------+
bool CProgram::CheckTimeframe(ENUM_TIMEFRAMES tf,SIGNAL &signal_set)
{
   for(int i=0; i<21; i++)
   {
      if(StringToTimeframe(CharArrayToString(signal_set.tf_name[i].tf))==tf)
         return(true);
   }
   return(false);
}
Now, it is time to create the trading signal search mechanism. To do this, add a method to the public section of the CProgram class: SearchSignal().
bool SearchSignals(void);
Let us analyze its step-by-step implementation in more detail and see the purpose of earlier created auxiliary methods.
//+------------------------------------------------------------------+
//|                                                                  |
//+------------------------------------------------------------------+
bool CProgram::SearchSignals(void)
{
//--- Search for set signals
   SIGNAL signal_set[];
   int cnt=0;
   for(int i=0; i<5; i++)
   {
      if(FileIsExist("Signal Monitor\\signal_"+string(i)+".bin"))
         cnt++;
   }
//---
   ArrayResize(signal_set,cnt);
   ZeroMemory(signal_set);
//---
   for(int i=0; i<cnt; i++)
   {
      int h=FileOpen("Signal Monitor\\signal_"+string(i)+".bin",FILE_READ|FILE_BIN);
      if(h==INVALID_HANDLE)
      {
         MessageBox("Configuration not found","Signal Monitor");
         return(false);
      }
      FileReadStruct(h,signal_set[i]);
      FileClose(h);
      for(int j=0; j<ArraySize(m_signal_button); j++)
      {
         //---
         string sy=GetSymbol(j);
         ENUM_TIMEFRAMES tf=GetTimeframe(j);
         //---
         if(!CheckTimeframe(tf,signal_set[i]))
            continue;
         //---
         if(GetSignal(sy,tf,signal_set[i]))
         {
            //---
            if(signal_set[i].label_type==1)
               SetLabel(j,CharArrayToString(signal_set[i].label_value),signal_set[i].label_color);
            else
               SetLabel(j,DoubleToString(m_ind_value,3),signal_set[i].label_color);
            //---
            if(signal_set[i].back_color!=clrNONE)
               SetBackground(j,signal_set[i].back_color);
            //---
            if(signal_set[i].border_color!=clrNONE)
               SetBorderColor(j,signal_set[i].border_color);
            else
               SetBorderColor(j,signal_set[i].back_color);
            //---
            if(signal_set[i].tooltip)
               SetTooltip(j,CharArrayToString(signal_set[i].tooltip_text));
            //---
            if(signal_set[i].image)
               SetIcon(j,signal_set[i].img_index);
            else
               SetIcon(j,-1);
         }
      }
   }
   return(true);
}
In the first operation step, the search method collects data on the total number of created and configured trading signals. Then the method loops though files connecting information about signal settings and reads this data to a structure. The mechanism determines for each indication block the appropriate symbol and timeframe to which the block corresponds in the tabular form. Based on this data, check if a trading signal needs to be searched on the selected timeframe. If the timeframe matches, search for a signal. If a signal is found, color the indication block according to the signal configuration. Now, the created method can be applied. The method should be called at the end of the ToMonitor() method body.
...
//--- Resize window
   AutoResize(m_timeframe_label[tf-1].XGap()+m_timeframe_label[tf-1].XSize()+5,m_symbol_label[sy-1].YGap()+m_symbol_label[sy-1].YSize()+5);
//---
   SearchSignals();
}
Now, let us try to enable a repeated search after a certain time interval. Open the SignalMonitor.mq5 file and create an enumeration at the beginning of the file:
//+------------------------------------------------------------------+
//|                                                                  |
//+------------------------------------------------------------------+
enum UPDATE
{
   MINUTE,        // 1 Minute
   MINUTE_15,     // 15 Minutes
   MINUTE_30,     // 30 Minutes
   HOUR,          // 1 Hour
   HOUR_4         // 4 Hours
};
A new setting can now be easily added to inputs:
input UPDATE Update = HOUR; // Update interval
Create two9 variables for calculations.
int cnts=0;
datetime update;
Add the following lines in the expert initialization:
//---
   switch(Update)
   {
   case MINUTE:
      cnts=60;
      break;
   case MINUTE_15:
      cnts=60*15;
      break;
   case MINUTE_30:
      cnts=60*30;
      break;
   case HOUR:
      cnts=3600;
      break;
   case HOUR_4:
      cnts=3600*4;
      break;
   default:
      cnts=1;
      break;
   }
   update=TimeLocal()+cnts;
Thus, we have determined the update interval and set the next update time. In the OnTick() function body, add time check: if the specified time interval has passed, search for trading signals again.
//+------------------------------------------------------------------+
//| Expert tick function                                             |
//+------------------------------------------------------------------+
void OnTick()
{
   if(TimeLocal()>update)
   {
      program.SearchSignals();
      update=TimeLocal()+cnts;
   }
}
Compile the project and create a set of your own symbols. We can add one signal to demonstrate the monitor operation.
In the next part of this series of articles, we will proceed to expanding the current functionality towards a more flexible setup of trading signals, and we will also improve some if the existing features.
Conclusion
The archive attached below contains all described files properly arranged into folders. For a correct operation, you should save the MQL5 folder to the terminal's root directory. To open the terminal root directory, in which the MQL5 folder is located, press the Ctrl+Shift+D key combination in the MetaTrader 5 terminal or use the context menu as shown in Fig. 9 below.
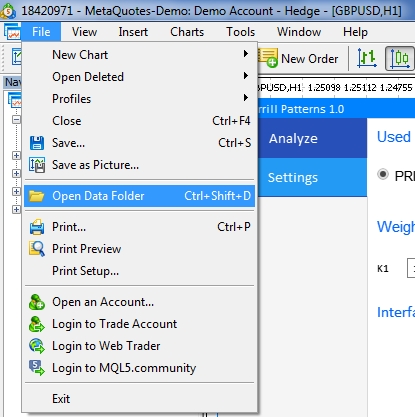
Fig. 9. Opening the MQL5 folder in the MetaTrader 5 terminal root
Translated from Russian by MetaQuotes Ltd.
Original article: https://www.mql5.com/ru/articles/7600
 Applying OLAP in trading (part 4): Quantitative and visual analysis of tester reports
- Free trading apps
- Over 8,000 signals for copying
- Economic news for exploring financial markets
You agree to website policy and terms of use