Multicurrency monitoring of trading signals (Part 2): Implementation of the visual part of the application
Alexander Fedosov | 19 May, 2020
Table of Contents
- Introduction
- Setup Step 1: Symbols
- Setup Step 2: Timeframes
- Setup Step 3: Add signals
- Trading signal creation and editing window
- Trading signals monitor
- Conclusion
Introduction
At the previous stage, we developed the general structure of the Multicurrency trading signals monitor. In this part we will sequentially implement the step-by-step stages related to the initial application configuration and will create the basic interaction of elements that make up the interface.
Setup Step 1: Symbols
According to the application structure, the first application setup step during the first launch implies the creation of an interface for selecting symbols which will be further used to search for created trading signals. At the end of the previous article, we created an application framework, based on which we continue to work. Let's proceed to the application development. First, we will define the main groups of elements required for the implementation of this application part:
- Application window.
- Quick selection of symbols.
- Group input field.
- Save and Load buttons for symbol groups.
- The full list of all available symbols as checkbox with a text label for the symbol name.
- The Next button for switching to the second setup step: Timeframe selection.
The earlier created file structure should look like this:
Fig. 1 Application file structure.
Firstly, open the SignalMonitor.mq5 application file and add input parameters to it. You will be able to set up the parameters when running the application directly in the MetaTrader 5 terminal. Also, declare the instance of the previously created CProgram class and initialize some of the variables. Edit the file as follows:
//+------------------------------------------------------------------+
//|                                                SignalMonitor.mq5 |
//|                                Copyright 2019, Alexander Fedosov |
//|                           https://www.mql5.com/en/users/alex2356 |
//+------------------------------------------------------------------+
#property copyright "Copyright 2019, Alexander Fedosov"
#property link      "https://www.mql5.com/en/users/alex2356"
#property version   "1.00"
//--- Include application class
#include "Program.mqh"
//+------------------------------------------------------------------+
//| Expert Advisor input parameters                                  |
//+------------------------------------------------------------------+
input int                  Inp_BaseFont      =  10;                  // Basic font
input color                Caption           =  C'0,130,225';        // Caption color
input color                Background        =  clrWhiteSmoke;       // Background color
//---
CProgram program;
ulong tick_counter;
//+------------------------------------------------------------------+
//| Expert initialization function                                   |
//+------------------------------------------------------------------+
int OnInit(void)
{
//---
   tick_counter=GetTickCount();
//--- Initialize class variables
   program.OnInitEvent();
   program.m_base_font_size=Inp_BaseFont;
   program.m_background=Background;
   program.m_caption=Caption;
//--- Set up the trading panel
   if(!program.CreateGUI())
   {
      Print(__FUNCTION__," > Failed to create graphical interface!");
      return(INIT_FAILED);
   }
//--- Initialization completed successfully
   return(INIT_SUCCEEDED);
}
//+------------------------------------------------------------------+
//| Expert deinitialization function                                 |
//+------------------------------------------------------------------+
void OnDeinit(const int reason)
{
   program.OnDeinitEvent(reason);
}
//+------------------------------------------------------------------+
//| Timer function                                                   |
//+------------------------------------------------------------------+
void OnTimer(void)
{
   program.OnTimerEvent();
}
//+------------------------------------------------------------------+
//| ChartEvent function                                              |
//+------------------------------------------------------------------+
void OnChartEvent(const int    id,
                  const long   &lparam,
                  const double &dparam,
                  const string &sparam)
{
   program.ChartEvent(id,lparam,dparam,sparam);
   //---
   if(id==CHARTEVENT_CUSTOM+ON_END_CREATE_GUI)
   {
      Print("End in ",GetTickCount()-tick_counter," ms");
   }
}
//+------------------------------------------------------------------+
As can be seen from the code, three input parameters have been added:
- Font size.
- The header color for the application windows.
- The background color for the application windows and elements.
Next, declare the CProgram class instance named program and the tick_counter variable (it is only needed for displaying information on the application launch time). Further, in the OnInit() method we initialize class instance variables by assigning them the values of the application input parameters. Also call the CreateGUI() basic method which will launch the app.
However, if you try to compile the opened file now, you will receive compilation errors, stating that variables m_base_font_size, m_background, m_caption and the CreateGUI() method were not found in the CProgram class. Therefore, open the Program.mqh file to implement the CProgram class. First of all, add the above mentioned variables and the method, as well as other methods required for the correct initial operation of the application. The CProgram will look like this after we add the required elements:
//+------------------------------------------------------------------+
//| Class for creating an application                                |
//+------------------------------------------------------------------+
class CProgram : public CWndEvents
{
public:
//---
   int               m_base_font_size;
//---
   string            m_base_font;
//---
   color             m_background;
   color             m_caption;
public:
   CProgram(void);
   ~CProgram(void);
   //--- Initialization/deinitialization
   void              OnInitEvent(void);
   void              OnDeinitEvent(const int reason);
   //--- Timer
   void              OnTimerEvent(void);
   //--- Chart event handler
   virtual void      OnEvent(const int id,const long &lparam,const double &dparam,const string &sparam);
   //--- Create the graphical interface of the program
   bool              CreateGUI(void);
};
The implementation of the method creating the interface is still empty:
//+------------------------------------------------------------------+
//| Creates the graphical interface of the program                   |
//+------------------------------------------------------------------+
bool CProgram::CreateGUI(void)
{
//---

//--- Finish the creation of GUI
   CWndEvents::CompletedGUI();
   return(true);
}
//+------------------------------------------------------------------+
Pay attention that we have also added the m_base_font string variable which is responsible for the font name in the application. It is initialized in our class constructor:
//+------------------------------------------------------------------+
//| Constructor                                                      |
//+------------------------------------------------------------------+
CProgram::CProgram(void)
{
   m_base_font="Trebuchet MS";
}
Now let us proceed to creating the first window of the application. For this purpose, declare in the class the new m_step_window variable which is an instance of the CWindow class. Also declare a method which will create the first window and name it CreateStepWindow(). This is how it looks in the class code:
class CProgram : public CWndEvents
{
public:
//--- Application windows
   CWindow           m_step_window;
...
protected:
   //--- forms
   bool              CreateStepWindow(const string caption_text);
We have determined earlier that the implementation of the interface part responsible for the step-by-step configuration of the initial launch will be located in the StepWindow.mqh include file. So, open it and start implementing the CreateStepWindow() method:
#include "Program.mqh"
//+------------------------------------------------------------------+
//| Creates a form for the selection of symbols                      |
//+------------------------------------------------------------------+
bool CProgram::CreateStepWindow(const string text)
{
//--- Add the pointer to the window array
   CWndContainer::AddWindow(m_step_window);
//--- Properties
   m_step_window.XSize(600);
   m_step_window.YSize(200);
//--- Coordinates
   int x=int(ChartGetInteger(m_chart_id,CHART_WIDTH_IN_PIXELS)-m_step_window.XSize())/2;
   int y=10;
   m_step_window.CaptionHeight(22);
   m_step_window.IsMovable(true);
   m_step_window.CaptionColor(m_caption);
   m_step_window.CaptionColorLocked(m_caption);
   m_step_window.CaptionColorHover(m_caption);
   m_step_window.BackColor(m_background);
   m_step_window.FontSize(m_base_font_size);
   m_step_window.Font(m_base_font);
//--- Creating a form
   if(!m_step_window.CreateWindow(m_chart_id,m_subwin,text,x,y))
      return(false);
   //---
   return(true);
}
//+------------------------------------------------------------------+
Do not forget to add the following in the CreateGUI() method:
//+------------------------------------------------------------------+
//| Creates the graphical interface of the program                   |
//+------------------------------------------------------------------+
bool CProgram::CreateGUI(void)
{
//--- Step 1-3
   if(!CreateStepWindow("Signal Monitor Step 1: Choose Symbols"))
      return(false);
//--- Finish the creation of GUI
   CWndEvents::CompletedGUI();
   return(true);
}
//+------------------------------------------------------------------+
If the sequence of actions is correct, you will see the newly created form after compiling the SignalMonitor.mq5 file and launching it in the terminal:
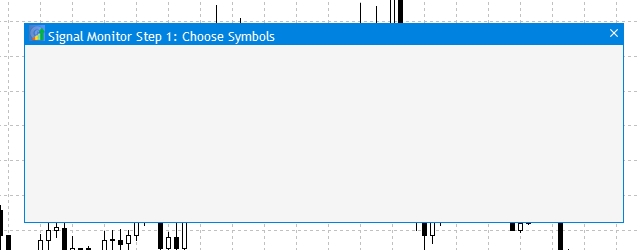
Fig. 2 The first window of the application
The first elements of the created window include a group of buttons which enable the quick selection of predefined symbol sets from the terminal: forex.all, forex.crosses, forex.major. In the Program.mqh file, add an array of CButton class instances with the dimension of three, as well as a universal CreateSymbolSet() method to create buttons:
//+------------------------------------------------------------------+
//| Class for creating an application                                |
//+------------------------------------------------------------------+
class CProgram : public CWndEvents
{
public:
//--- Application windows
   CWindow           m_step_window;
//--- Simple buttons
   CButton           m_currency_set[3];
...
   //--- Buttons
   bool              CreateSymbolSet(CButton &button,string text,const int x_gap,const int y_gap);
Now open the StepWindow.mqh file and add the above method implementation to it.
//+------------------------------------------------------------------+
//|                                                                  |
//+------------------------------------------------------------------+
bool CProgram::CreateSymbolSet(CButton &button,string text,const int x_gap,const int y_gap)
{
//---
   color baseclr=C'220,225,235';
   color pressed=C'55,160,250';
//--- Save the window pointer
   button.MainPointer(m_step_window);
//--- Set properties before creation
   button.TwoState(true);
   button.XSize(80);
   button.YSize(30);
   button.LabelXGap(19);
   button.LabelYGap(2);
   button.Font(m_base_font);
   button.FontSize(m_base_font_size);
   button.BackColor(baseclr);
   button.BackColorHover(baseclr);
   button.BackColorPressed(pressed);
   button.BorderColor(baseclr);
   button.BorderColorHover(baseclr);
   button.BorderColorPressed(pressed);
   button.LabelColor(clrBlack);
   button.LabelColorPressed(clrWhite);
   button.IsCenterText(true);
//--- Create a control
   if(!button.CreateButton(text,x_gap,y_gap))
      return(false);
//--- Add a pointer to element to the base
   CWndContainer::AddToElementsArray(0,button);
   return(true);
}
//+------------------------------------------------------------------+
Now we only need to add three buttons using this method with different values of coordinates and text labels in the basic method CreateStepWindow() of the window after creating the form:
...
//--- Creating a form
   if(!m_step_window.CreateWindow(m_chart_id,m_subwin,text,x,y))
      return(false);
//---
   if(!CreateSymbolSet(m_currency_set[0],"ALL",10,30))
      return(false);
   if(!CreateSymbolSet(m_currency_set[1],"Major",10+100,30))
      return(false);
   if(!CreateSymbolSet(m_currency_set[2],"Crosses",10+2*(100),30))
      return(false);
...
After compilation the result will be as follows:
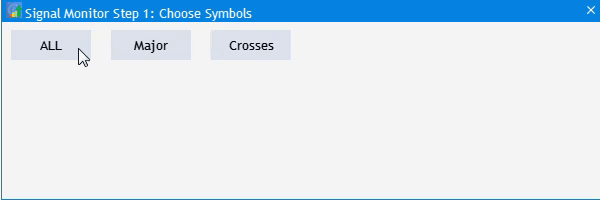
Fig. 3 Adding buttons for quick selection of symbol groups.
Next, add an input field for the name of the selected symbols group, which can be saved and loaded using two buttons: Save and Load. To do this add a class instance for creating the CTextEdit input field and two more class instances for creating buttons CButton. Since the save and load buttons only differ in their names, create the universal CreateButton1() method, and for the input field add CreateEditValue() to the CProgram class:
//+------------------------------------------------------------------+
//| Class for creating an application                                |
//+------------------------------------------------------------------+
class CProgram : public CWndEvents
{
public:
//--- Application windows
   CWindow           m_step_window;
//--- Simple buttons
   CButton           m_currency_set[3];
   CButton           m_load_button;
   CButton           m_save_button;
   //--- Input fields
   CTextEdit         m_text_edit;
...
   bool              CreateButton1(CButton &button,string text,const int x_gap,const int y_gap);
   //--- Input field
   bool              CreateEditValue(CTextEdit &text_edit,const int x_gap,const int y_gap);
Go back to the StepWindow.mqh file and add the implementation of the created methods at the end of the file.
//+------------------------------------------------------------------+
//|                                                                  |
//+------------------------------------------------------------------+
bool CProgram::CreateEditValue(CTextEdit &text_edit,const int x_gap,const int y_gap)
{
//--- Store the pointer to the main control
   text_edit.MainPointer(m_step_window);
//--- Properties
   text_edit.XSize(110);
   text_edit.YSize(24);
   text_edit.Font(m_base_font);
   text_edit.FontSize(m_base_font_size);
   text_edit.GetTextBoxPointer().XGap(1);
   text_edit.GetTextBoxPointer().XSize(110);
   text_edit.GetTextBoxPointer().DefaultTextColor(clrSilver);
   text_edit.GetTextBoxPointer().DefaultText("Template name");
//--- Create a control
   if(!text_edit.CreateTextEdit("",x_gap,y_gap))
      return(false);
//--- Add an object to the common array of object groups
   CWndContainer::AddToElementsArray(0,text_edit);
   return(true);
}
//+------------------------------------------------------------------+
//|                                                                  |
//+------------------------------------------------------------------+
bool CProgram::CreateButton1(CButton &button,string text,const int x_gap,const int y_gap)
{
//---
   color baseclr=C'70,180,70';
   color pressed=C'70,170,70';
//--- Save the window pointer
   button.MainPointer(m_step_window);
//--- Set properties before creation
   button.XSize(80);
   button.YSize(30);
   button.Font(m_base_font);
   button.FontSize(m_base_font_size);
   button.BackColor(baseclr);
   button.BackColorHover(baseclr);
   button.BackColorPressed(pressed);
   button.BorderColor(baseclr);
   button.BorderColorHover(baseclr);
   button.BorderColorPressed(pressed);
   button.LabelColor(clrWhite);
   button.LabelColorPressed(clrWhite);
   button.LabelColorHover(clrWhite);
   button.IsCenterText(true);
//--- Create a control
   if(!button.CreateButton(text,x_gap,y_gap))
      return(false);
//--- Add a pointer to element to the base
   CWndContainer::AddToElementsArray(0,button);
   return(true);
}
Then get back to the CreateStepWindow() class to add two button and an input field in the application window.
//---
   if(!CreateEditValue(m_text_edit,300,m_step_window.CaptionHeight()+10))
      return(false);
//---
   if(!CreateButton1(m_load_button,"Load(L)",m_step_window.XSize()-2*(80+10),m_step_window.CaptionHeight()+10))
      return(false);
   if(!CreateButton1(m_save_button,"Save(S)",m_step_window.XSize()-(80+10),m_step_window.CaptionHeight()+10))
      return(false);
Again compile the SignalMonitor.mq5 file. Here is the result:
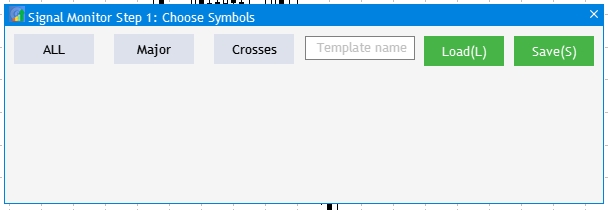
Fig.4 Add an input field for symbol groups and Save/Load buttons.
Now, let's proceed to visualization and the ability to select all symbols available to the selected account in the MetaTrader 5 terminal. Note that if you display all available symbols, the application window height will not be enough. A good solution is to enable automatic adjustment of the window height depending on the data. Adding the total number of symbols is similar: add an array of class instances for creating checkboxes CCheckBox and universal methods creating them (as they will only differ in the name).
...
   //--- Checkboxes
   CCheckBox         m_checkbox[];
...
   //--- Checkboxes
   bool              CreateCheckBox(CCheckBox &checkbox,const int x_gap,const int y_gap,const string text);
The dimension of the m_checkbox[] array is not specified because it is not known in advance how many symbols are present on the selected account in the terminal. Therefore let's create two variables in the private section of the CProgram class and assign to them the total number of available symbols and the number of currently selected symbols in Market Watch.
private:
//---
   int               m_symbol_total;
   int               m_all_symbols;
In the class constructor, assign them the required values and set the appropriate dimension to the m_checkbox[] array:
//+------------------------------------------------------------------+
//| Constructor                                                      |
//+------------------------------------------------------------------+
CProgram::CProgram(void)
{
   m_base_font="Trebuchet MS";
   m_symbol_total=SymbolsTotal(true);
   m_all_symbols=SymbolsTotal(false);
   ArrayResize(m_checkbox,m_all_symbols);
}
Add this method implementation to the end of the StepWindow.mqh file:
//+------------------------------------------------------------------+
//|                                                                  |
//+------------------------------------------------------------------+
bool CProgram::CreateCheckBox(CCheckBox &checkbox,const int x_gap,const int y_gap,const string text)
{
//--- Store the pointer to the main control
   checkbox.MainPointer(m_step_window);
//--- Properties
   checkbox.GreenCheckBox(true);
   checkbox.IsPressed(false);
   checkbox.Font(m_base_font);
   checkbox.FontSize(m_base_font_size);
   checkbox.BackColor(m_background);
   checkbox.LabelColorHover(C'55,160,250');
//--- Create a control
   if(!checkbox.CreateCheckBox(text,x_gap,y_gap))
      return(false);
//--- Add a pointer to element to the base
   CWndContainer::AddToElementsArray(0,checkbox);
   return(true);
}
Add checkboxes in the CreateStepWindow() method. In the below code, the entire list of available symbols has 7 columns. Additionally, the window height is changed in accordance with the number of received rows.
   //--- Checkboxes
   int k=0;
   for(int j=0; j<=MathCeil(m_all_symbols/7); j++)
   {
      for(int i=0; i<7; i++)
      {
         if(k<m_all_symbols)
            if(!CreateCheckBox(m_checkbox[k],10+80*i,m_step_window.CaptionHeight()+70+j*25,SymbolName(k,false)))
               return(false);
         k++;
      }
   }
   m_step_window.ChangeWindowHeight(m_checkbox[m_all_symbols-1].YGap()+30+30);
Copy the resulting additions:

Fig.5 Add checkboxes with all available symbols.
The last element of this application part includes navigation buttons to switch between setup steps. They can be easily added: add two instances of the CButton class named m_next_button and m_back_button, use creation method from the earlier created CreateButton1(). Add the following in the CreateStepWindow() window creation method:
//---
   if(!CreateButton1(m_back_button,"Back",m_step_window.XSize()-2*(80+10),m_step_window.YSize()-(30+10)))
      return(false);
   if(!CreateButton1(m_next_button,"Next",m_step_window.XSize()-(80+10),m_step_window.YSize()-(30+10)))
      return(false);
Now we only need to configure the operation of buttons using which predefined symbol sets can be selected. Go to the Program.mqh file, find the OnEvent() and add to it the following code:
//+------------------------------------------------------------------+
//| Chart event handler                                              |
//+------------------------------------------------------------------+
void CProgram::OnEvent(const int id,const long &lparam,const double &dparam,const string &sparam)
{
//--- Pressing the button event
   if(id==CHARTEVENT_CUSTOM+ON_CLICK_BUTTON)
   {
      //--- All
      if(lparam==m_currency_set[0].Id() && m_currency_set[0].IsPressed())
      {
         m_currency_set[1].IsPressed(false);
         m_currency_set[2].IsPressed(false);
         m_currency_set[1].Update(true);
         m_currency_set[2].Update(true);
         //---
         for(int i=0; i<m_all_symbols; i++)
         {
            m_checkbox[i].IsPressed(true);
            m_checkbox[i].Update(true);
         }
      }
      //--- Majors
      else if(lparam==m_currency_set[1].Id() && m_currency_set[1].IsPressed())
      {
         m_currency_set[0].IsPressed(false);
         m_currency_set[2].IsPressed(false);
         m_currency_set[0].Update(true);
         m_currency_set[2].Update(true);
         //---
         string pairs[4]= {"EURUSD","GBPUSD","USDCHF","USDJPY"};
         //--- Clear the selection
         for(int i=0; i<m_all_symbols; i++)
         {
            m_checkbox[i].IsPressed(false);
            m_checkbox[i].Update(true);
         }
         //---
         for(int i=0; i<m_all_symbols; i++)
         {
            for(int j=0; j<4; j++)
               if(m_checkbox[i].LabelText()==pairs[j])
               {
                  m_checkbox[i].IsPressed(true);
                  m_checkbox[i].Update(true);
               }
         }
      }
      //--- Crosses
      else if(lparam==m_currency_set[2].Id() && m_currency_set[2].IsPressed())
      {
         m_currency_set[0].IsPressed(false);
         m_currency_set[1].IsPressed(false);
         m_currency_set[0].Update(true);
         m_currency_set[1].Update(true);
         //---
         string pairs[20]=
         {
            "EURUSD","GBPUSD","USDCHF","USDJPY","USDCAD","AUDUSD","AUDNZD","AUDCAD","AUDCHF","AUDJPY",
            "CHFJPY","EURGBP","EURAUD","EURCHF","EURJPY","EURCAD","EURNZD","GBPCHF","GBPJPY","CADCHF"
         };
         //--- Clear the selection
         for(int i=0; i<m_all_symbols; i++)
         {
            m_checkbox[i].IsPressed(false);
            m_checkbox[i].Update(true);
         }
         //---
         for(int i=0; i<m_all_symbols; i++)
         {
            for(int j=0; j<20; j++)
               if(m_checkbox[i].LabelText()==pairs[j])
               {
                  m_checkbox[i].IsPressed(true);
                  m_checkbox[i].Update(true);
               }
         }
      }
      //---
      if((lparam==m_currency_set[0].Id() && !m_currency_set[0].IsPressed())      ||
            (lparam==m_currency_set[1].Id() && !m_currency_set[1].IsPressed())   ||
            (lparam==m_currency_set[2].Id() && !m_currency_set[2].IsPressed())
        )
      {
         //--- Clear the selection
         for(int i=0; i<m_all_symbols; i++)
         {
            m_checkbox[i].IsPressed(false);
            m_checkbox[i].Update(true);
         }
      }
   }
}
The idea of this implementation is as follows:
- A click on ALL selects all symbols.
- A click on Major removes the previous selection and sets a set of symbols corresponding to forex.major in terminals.
- A click on Crosses removes the previous selection and sets a set of symbols corresponding to crosses.major in terminals.
- When all the three buttons are unpressed, any selection is canceled.
This is how it looks like:
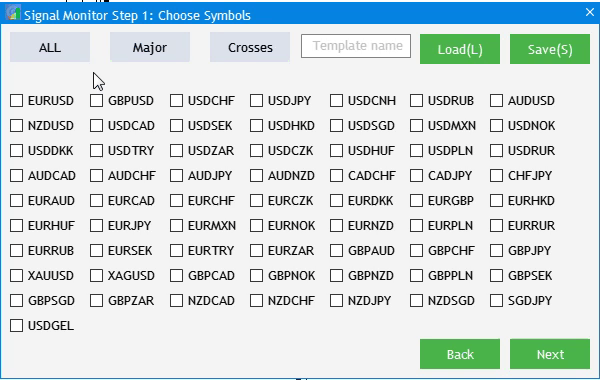
Fig.6 Implementation of the basic interaction of elements.
Two small additions are required to complete the visual implementation. You can see in figure 5 that the window contains the previously created Back button. But this is step 1, so there should not be such a button. It should be hidden and only shown in steps 2 and 3. Add the following line into the CreateGUI() method:
bool CProgram::CreateGUI(void)
{
//--- Step 1-3
   if(!CreateStepWindow("Signal Monitor Step 1: Choose Symbols"))
      return(false);
//--- Finish the creation of GUI
   CWndEvents::CompletedGUI();
   m_back_button.Hide();
   return(true);
}
Also, we need to monitor the user's selection. Switch to step 2 should not be allowed if the user has not selected at least one symbol. Switching between steps is performed using the Back and Next buttons. So, to solve the task, add three new methods to the private section of the CProgram class. The methods will process information selected during each of the three steps and thus perform the initial setup of the application. Also, add the m_current_step variable: when Back/Next is clicked, the app will know at which step we currently are.
private:
//---
   int               m_symbol_total;
   int               m_all_symbols;
   int               m_current_step;
   //---
   void              ToStep_1(void);
   void              ToStep_2(void);
   void              ToStep_3(void);
After that, in the class constructor set the value of the first step for the created variable, i.e. 1. To set up navigation between the three configuration steps, add the below code in the button click event in OnEvent():
      //--- Navigation
      if(lparam==m_back_button.Id())
      {
         //--- Return to Step 1
         if(m_current_step==2)
            ToStep_1();
         //--- Return to Step 2
         else if(m_current_step==3)
            ToStep_2();
      }
      //--- Go to Step 2
      if(lparam==m_next_button.Id())
      {
         //--- Go to Step 2
         if(m_current_step==1)
            ToStep_2();
         //--- Go to Step 3
         else if(m_current_step==2)
            ToStep_3();
      }
If you try to compile the project at this step, the compiler will return an error that the three methods have been created, are used but do not have implementation:
function 'CProgram::ToStep_1' must have a body Program.mqh 60 22
To fix it, create the implementation of these classes in the Program.mqh file. However, leave it blank for now for the ToStep_1() and ToStep_3() methods. They will be filled later. Now we are interested in the method switching to the second step ToStep_2(). Add a check of whether at least one symbol is selected:
//+------------------------------------------------------------------+
//| Go to Step 1                                                     |
//+------------------------------------------------------------------+
void CProgram::ToStep_1(void)
{
//---
}
//+------------------------------------------------------------------+
//| Go to Step 2                                                 |
//+------------------------------------------------------------------+
void CProgram::ToStep_2(void)
{
//--- Check whether at least one symbol is selected
   int cnt=0;
   for(int i=0; i<m_all_symbols; i++)
   {
      if(m_checkbox[i].IsPressed())
         cnt++;
   }
   if(cnt<1)
   {
      MessageBox("No symbols selected!","Warning");
      return;
   }
}
//+------------------------------------------------------------------+
//| Move to Step 3 3                                                 |
//+------------------------------------------------------------------+
void CProgram::ToStep_3(void)
{
//---
}
If the user accidentally presses Next without selecting a symbol, a warning will be shown that at least one symbol should be selected.
Setup Step 2: Timeframes
In the second application setup step the user should select timeframes at which trading signals will be searched. We mentioned the required UI elements in the first article:
- A group of buttons for quick selection of timeframes.
- List of timeframes in the form of checkboxes.
- The Back button for returning to Step 1.
Let's use existing objects from the visual implementation of Step 1 and adjust it for the selection of timeframes. Go to the body of the ToStep_2() method which we have been editing recently and add additional functionality to it. Firstly, remember the selection of symbols in Step 1 and show them in Market Watch in the MetaTrader 5:
//--- Set selected symbols in Market Watch
   for(int i=0; i<m_all_symbols; i++)
   {
      if(m_checkbox[i].IsPressed())
         SymbolSelect(m_checkbox[i].LabelText(),true);
      else
         SymbolSelect(m_checkbox[i].LabelText(),false);
   }
Then transform the interface of Step 1 into the second one:
//--- Change header
   m_step_window.LabelText("Signal Monitor Step 2: Choose Timeframes");
   m_step_window.Update(true);
//--- Hide elements of Step 1
   for(int i=0; i<m_all_symbols; i++)
   {
      m_checkbox[i].IsLocked(false);
      m_checkbox[i].IsPressed(false);
      m_checkbox[i].Hide();
   }
   string names[3]= {"All","Junior","Senior"};
//--- Change names of selection buttons
   for(int i=0; i<3; i++)
   {
      m_currency_set[i].LabelText(names[i]);
      m_currency_set[i].IsPressed(false);
      if(m_current_step==3)
         m_currency_set[i].Show();
      m_currency_set[i].Update(true);
   }
//--- Hide block for working with templates
   m_text_edit.Hide();
   m_load_button.Hide();
   m_save_button.Hide();
//--- Show all timeframes
   string timeframe_names[21]=
   {
      "M1","M2","M3","M4","M5","M6","M10","M12","M15","M20","M30",
      "H1","H2","H3","H4","H6","H8","H12","D1","W1","MN"
   };
   for(int i=0; i<21; i++)
   {
      m_checkbox[i].LabelText(timeframe_names[i]);
      m_checkbox[i].Show();
      m_checkbox[i].Update(true);
   }
//--- Show Back button
   m_back_button.Show();
//---
   m_current_step=2;
The implementation is quite simple. At the end, assign value 2 to the m_current_step variable (Step 2). Now, we need to provide the correct display of the selected timeframe sets All, Junior, Senior by the changed interface. Open Program.mqh and amend code in the OnEvent() method. The modification is required in the "button click" event section. From the point of view of the object, quick selection buttons in steps 1 and 2 are similar. That is why, it is necessary to define the current setup step in the button click event:
 //--- Step 1
      if(m_current_step==1)
      {
       ...
      }
      //--- Step 2
      else if(m_current_step==2)
      {
         //--- All
         if(lparam==m_currency_set[0].Id() && m_currency_set[0].IsPressed())
         {
            m_currency_set[1].IsPressed(false);
            m_currency_set[2].IsPressed(false);
            m_currency_set[1].Update(true);
            m_currency_set[2].Update(true);
            //---
            for(int i=0; i<21; i++)
            {
               m_checkbox[i].IsPressed(true);
               m_checkbox[i].Update(true);
            }
         }
         //--- Junior Timeframes
         else if(lparam==m_currency_set[1].Id() && m_currency_set[1].IsPressed())
         {
            m_currency_set[0].IsPressed(false);
            m_currency_set[2].IsPressed(false);
            m_currency_set[0].Update(true);
            m_currency_set[2].Update(true);
            //---
            string pairs[11]=
            {
               "M1","M2","M3","M4","M5","M6","M10","M12","M15","M20","M30"
            };
            //--- Clear the selection
            for(int i=0; i<21; i++)
            {
               m_checkbox[i].IsPressed(false);
               m_checkbox[i].Update(true);
            }
            //---
            for(int i=0; i<21; i++)
            {
               for(int j=0; j<11; j++)
                  if(m_checkbox[i].LabelText()==pairs[j])
                  {
                     m_checkbox[i].IsPressed(true);
                     m_checkbox[i].Update(true);
                  }
            }
         }
         //--- Senior Timeframes
         else if(lparam==m_currency_set[2].Id() && m_currency_set[2].IsPressed())
         {
            m_currency_set[0].IsPressed(false);
            m_currency_set[1].IsPressed(false);
            m_currency_set[0].Update(true);
            m_currency_set[1].Update(true);
            //---
            string pairs[10]=
            {
               "H1","H2","H3","H4","H6","H8","H12","D1","W1","MN"
            };
            //--- Clear the selection
            for(int i=0; i<m_all_symbols; i++)
            {
               m_checkbox[i].IsPressed(false);
               m_checkbox[i].Update(true);
            }
            //---
            for(int i=0; i<m_all_symbols; i++)
            {
               for(int j=0; j<10; j++)
                  if(m_checkbox[i].LabelText()==pairs[j])
                  {
                     m_checkbox[i].IsPressed(true);
                     m_checkbox[i].Update(true);
                  }
            }
         }
The last UI element to be implemented within the second setup step is the Back button which returns to Step 1. This is done by the created but yet empty step ToStep_1(). Return the previous interface and set the previous wrapper for processing the selection button click events.
//+------------------------------------------------------------------+
//|                                                                  |
//+------------------------------------------------------------------+
void CProgram::ToStep_1(void)
{
//--- Change header
   m_step_window.LabelText("Signal Monitor Step 1: Choose Symbols");
   m_step_window.Update(true);
//--- Hide the Back button
   m_back_button.Hide();
//--- Clear selection
   for(int i=0; i<21; i++)
   {
      m_checkbox[i].IsPressed(false);
      m_checkbox[i].Update(true);
   }
//--- Show elements of Step 1
   for(int i=0; i<m_all_symbols; i++)
   {
      m_checkbox[i].Show();
      m_checkbox[i].LabelText(SymbolName(i,false));
      m_checkbox[i].Update(true);
   }
   string names[3]= {"All","Majors","Crosses"};
//--- Change names of selection buttons
   for(int i=0; i<3; i++)
   {
      m_currency_set[i].IsPressed(false);
      m_currency_set[i].LabelText(names[i]);
      m_currency_set[i].Update(true);
   }
//--- Show block for working with templates
   m_text_edit.Show();
   m_load_button.Show();
   m_save_button.Show();
//--- Set the current setup step
   m_current_step=1;
}
Now compile the project. If everything is added correctly, the result will be like in Fig.7.
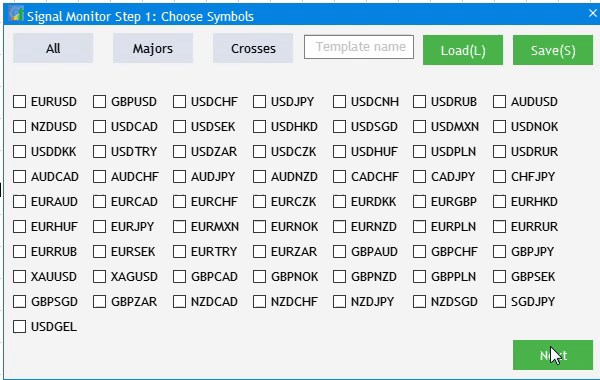
Fig.7 Implementation of Step 2 of application setup.
Setup Step 3: Add signals
The next stage is Step 3: Signals adding interface. It is quite simple and consists of a signal adding button and a header for the list of added signals. Open Program.mqh and declare two new variables in СProgram:
   CButton           m_add_signal;
   //---
   CTextLabel        m_signal_header;
Methods implementing the variables:
   bool              CreateIconButton(CButton &button,string text,const int x_gap,const int y_gap);
   //--- Text label
   bool              CreateLabel(CTextLabel &text_label,const int x_gap,const int y_gap,string label_text);
Add their implementation at the end of the StepWindow.mqh file.
//+------------------------------------------------------------------+
//| Creates a button with an image                                   |
//+------------------------------------------------------------------+
#resource "\\Images\\EasyAndFastGUI\\Icons\\bmp16\\plus.bmp"
bool CProgram::CreateIconButton(CButton &button,string text,const int x_gap,const int y_gap)
{
//---
   color baseclr=C'70,180,70';
   color pressed=C'70,170,70';
//--- Save the window pointer
   button.MainPointer(m_step_window);
//--- Set properties before creation
   button.XSize(110);
   button.YSize(30);
   button.Font(m_base_font);
   button.FontSize(m_base_font_size);
   button.IconXGap(3);
   button.IconYGap(7);
   button.IconFile("Images\\EasyAndFastGUI\\Icons\\bmp16\\plus.bmp");
   button.BackColor(baseclr);
   button.BackColorHover(baseclr);
   button.BackColorPressed(pressed);
   button.BorderColor(baseclr);
   button.BorderColorHover(baseclr);
   button.BorderColorPressed(pressed);
   button.LabelColor(clrWhite);
   button.LabelColorPressed(clrWhite);
   button.LabelColorHover(clrWhite);
   button.IsCenterText(true);
//--- Create a control
   if(!button.CreateButton(text,x_gap,y_gap))
      return(false);
//--- Add a pointer to element to the base
   CWndContainer::AddToElementsArray(0,button);
   return(true);
}
//+------------------------------------------------------------------+
//| Creates the text label                                           |
//+------------------------------------------------------------------+
bool CProgram::CreateLabel(CTextLabel &text_label,const int x_gap,const int y_gap,string label_text)
{
//--- Save the window pointer
   text_label.MainPointer(m_step_window);
//---
   text_label.Font(m_base_font);
   text_label.FontSize(m_base_font_size);
   text_label.XSize(120);
   text_label.BackColor(m_background);
//--- Create the button
   if(!text_label.CreateTextLabel(label_text,x_gap,y_gap))
      return(false);
//--- Add a pointer to element to the base
   CWndContainer::AddToElementsArray(0,text_label);
   return(true);
}
//+------------------------------------------------------------------+
Add the following to the CreateStepWindow() window so as to have them created at the application launch.
//---
   if(!CreateIconButton(m_add_signal,"Add Signal",10,30))
      return(false);
   if(!CreateLabel(m_signal_header,10,30+30+10,"Signal List"))
      return(false);
Now, to disable their display at launch, i.e. at the first step, immediately after interface creation by the call of CreateGUI(), add two lines hiding the elements at the end of the method body.
//+------------------------------------------------------------------+
//| Creates the graphical interface of the program                   |
//+------------------------------------------------------------------+
bool CProgram::CreateGUI(void)
{
//--- Step 1-3
   if(!CreateStepWindow("Signal Monitor Step 1: Choose Symbols"))
      return(false);
//--- Finish the creation of GUI
   CWndEvents::CompletedGUI();
   m_back_button.Hide();
   m_add_signal.Hide();
   m_signal_header.Hide();
   return(true);
}
Now, implement the previously added ToStep_3() method, which will clear the visualization in the previous step and will display the elements we created:
//+------------------------------------------------------------------+
//|                                                                  |
//+------------------------------------------------------------------+
void CProgram::ToStep_3(void)
{
//--- Check whether at least one timeframe is selected
   int cnt=0;
   for(int i=0; i<21; i++)
   {
      if(m_checkbox[i].IsPressed())
         cnt++;
   }
   if(cnt<1)
   {
      MessageBox("No timeframes selected!","Warning");
      return;
   }
//---
   m_step_window.LabelText("Signal Monitor Step 3: Create Signals");
   m_step_window.Update(true);
   m_next_button.LabelText("Create");
   m_next_button.Update(true);
//--- Hide elements of Step 2
   for(int i=0; i<21; i++)
   {
      if(i<3)
         m_currency_set[i].Hide();
      m_checkbox[i].Hide();
   }
//---
   m_add_signal.Show();
   m_signal_header.Show();
//---
   m_current_step=3;
}
Again compile the project and go to Step 3 by a double click on the Next button. Do not forget to select elements in the first two steps, otherwise the application will not let us go to the third step.
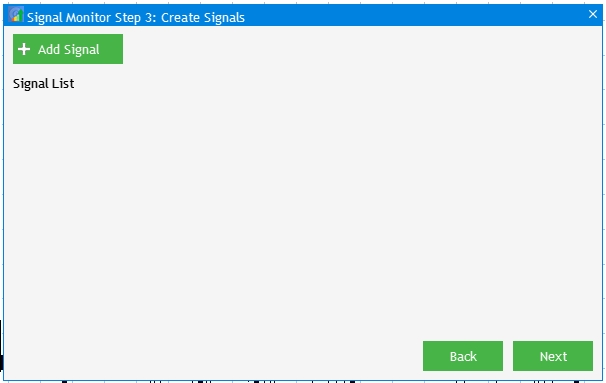
Fig.8 Implementation of Step 3 of application setup.
Trading signal creation and editing window
The visual component related to work with trading signals will be located in the SetWindow.mqh file, so open it. Now it only has the include file Program.mqh which is connected via the #include command line. Firstly, create a separate window, which will be basic for all other creation and setup elements. Open Program.mqh and declare in the class the m_set_window variable which is an instance of the CWindow class. Also add the CreateSetWindow() method for creating the window:
   CWindow           m_set_window;

   bool              CreateSetWindow(const string caption_text);
After that get back to SetWindow.mqh and implement the created method.
//+------------------------------------------------------------------+
//| Creates a window for creating and editing trading signals        |
//+------------------------------------------------------------------+
bool CProgram::CreateSetWindow(const string text)
{
//--- Add the pointer to the window array
   CWndContainer::AddWindow(m_set_window);
//--- Properties
   m_set_window.XSize(568);
   m_set_window.YSize(555);
//--- Coordinates
   int x=int(ChartGetInteger(m_chart_id,CHART_WIDTH_IN_PIXELS)-m_set_window.XSize())/2;
   int y=30;
//---
   m_set_window.CaptionHeight(22);
   m_set_window.IsMovable(true);
   m_set_window.CaptionColor(m_caption);
   m_set_window.CaptionColorLocked(m_caption);
   m_set_window.CaptionColorHover(m_caption);
   m_set_window.BackColor(m_background);
   m_set_window.FontSize(m_base_font_size);
   m_set_window.Font(m_base_font);
   m_set_window.WindowType(W_DIALOG);
//--- Creating a form
   if(!m_set_window.CreateWindow(m_chart_id,m_subwin,text,x,y))
      return(false);
   return(true);
}
//+------------------------------------------------------------------+
Now let's bind the newly created window with already available elements. Firstly, add the method call in the CreateGUI() interface creation. The window should open upon a click on the "Add Signal" button in step 3.
//+------------------------------------------------------------------+
//| Creates the graphical interface of the program                   |
//+------------------------------------------------------------------+
bool CProgram::CreateGUI(void)
{
//--- Step 1-3
   if(!CreateStepWindow("Signal Monitor Step 1: Choose Symbols"))
      return(false);
//--- Creation and editing window
   if(!CreateSetWindow("Signal Monitor Edit Signal"))
      return(false);
//--- Finish the creation of GUI
   CWndEvents::CompletedGUI();
   m_back_button.Hide();
   m_add_signal.Hide();
   m_signal_header.Hide();
   return(true);
}
In the click event in OnEvent():
      //--- Click on the "Add Signal" button
      if(lparam==m_add_signal.Id())
      {
         m_set_window.OpenWindow();
      }
Compile the project and check the result: upon a clock on "Add Signal" in step 3 an additional creation and editing window is opened.
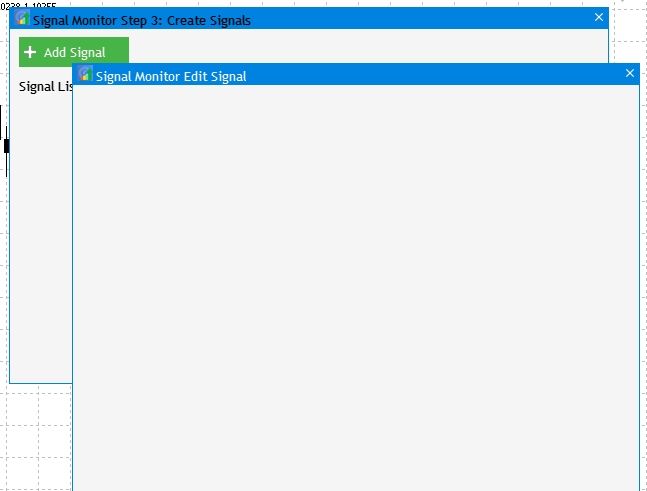
Fig. 9 Implementation of the trading signal creation and editing window.
The first window element is selection of the type of indicator which will be used in the generation of a trading signal. The element adding procedure is the same: create a class instance and create a method implementing the instance.
   //--- Drop-down menu
   CComboBox         m_indicator_type;
   //--- Creates a drop-down method
   bool              CreateIndicatorType(const int x_gap,const int y_gap);
The method implementation will be located in the same file where the previously created window is created.
//+------------------------------------------------------------------+
//| Creates a drop-down menu with indicator types                    |
//+------------------------------------------------------------------+
bool CProgram::CreateIndicatorType(const int x_gap,const int y_gap)
{
//--- Pass the object to the panel
   m_indicator_type.MainPointer(m_set_window);
//--- Array of the item values in the list view
   string pattern_names[7]=
   {
      "ATR","CCI","DeMarker","Force Ind","WPR","RSI","Momentum"
   };
//--- Set properties before creation
   m_indicator_type.XSize(200);
   m_indicator_type.YSize(26);
   m_indicator_type.LabelYGap(4);
   m_indicator_type.ItemsTotal(7);
   m_indicator_type.Font(m_base_font);
   m_indicator_type.FontSize(m_base_font_size);
   m_indicator_type.BackColor(m_background);
   m_indicator_type.GetButtonPointer().Font(m_base_font);
   m_indicator_type.GetButtonPointer().FontSize(m_base_font_size);
   m_indicator_type.GetButtonPointer().BackColor(clrWhite);
   m_indicator_type.GetButtonPointer().XGap(100);
   m_indicator_type.GetButtonPointer().XSize(100);
   m_indicator_type.GetListViewPointer().Font(m_base_font);
   m_indicator_type.GetListViewPointer().FontSize(m_base_font_size);
   m_indicator_type.GetListViewPointer().ItemYSize(26);
//--- Store the item values in the combo box list view
   for(int i=0; i<7; i++)
      m_indicator_type.SetValue(i,pattern_names[i]);
//--- Get the list pointer
   CListView *lv=m_indicator_type.GetListViewPointer();
//--- Set the list view properties
   lv.LightsHover(true);
   m_indicator_type.SelectItem(5);
//--- Create a control
   if(!m_indicator_type.CreateComboBox("Indicator Type",x_gap,y_gap))
      return(false);
//--- Add an object to the common array of object groups
   CWndContainer::AddToElementsArray(1,m_indicator_type);
   return(true);
}
The only addition here is that at the end of the CreateSetWindow() method body we call a method for creating indicator type selection option CreateIndicatorType().
...
//--- Creating a form
   if(!m_set_window.CreateWindow(m_chart_id,m_subwin,text,x,y))
      return(false);
//--- Indicator type
   if(!CreateIndicatorType(10,22+10))
      return(false);
The result is the UI element which allows selecting from 7 standard indicators of the oscillator type.
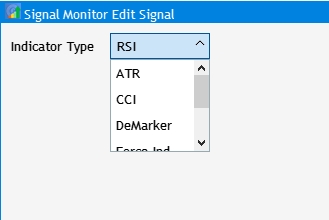
Fig. 10 Element for selecting the indicator type.
Next, let's consider sets of elements grouped in two sections: Indicator Settings and Signal Settings. All selected indicators from the standard set have common settings, such as Period and Applied Price. Therefore, the following is needed for the first section: a text label, period input field and a drop-down menu for selecting the price used for the indicator calculation. Add the required variable and their creation methods in the CProgram class.
//--- Text label
   CTextLabel        m_set_header[5];
//--- Input fields
   CTextEdit         m_period_edit;
//--- Drop-down menu
   CComboBox         m_applied_price;
...
   bool              CreateSetLabel(CTextLabel &text_label,const int x_gap,const int y_gap,string label_text);
   bool              CreatePeriodEdit(const int x_gap,const int y_gap);
   bool              CreateAppliedPrice(const int x_gap,const int y_gap);
Implement the added methods and call them at the end of the CreateSetWindow() method body. Now let's add a mechanism due to which the created elements will change the set of available settings depending on the selected indicator type. To do this, add in OnEvent() a section with an event of clicking on the drop-down menu item and set up the individual set of settings for each of the indicators:
//--- Item selection in the combobox list
   if(id==CHARTEVENT_CUSTOM+ON_CLICK_COMBOBOX_ITEM)
   {
      int index=m_indicator_type.GetListViewPointer().SelectedItemIndex();
      switch(index)
      {
      case  0:
         m_period_edit.LabelText("ATR Period");
         m_applied_price.Hide();
         break;
      case  1:
         m_period_edit.LabelText("CCI Period");
         m_applied_price.Show();
         break;
      case  2:
         m_period_edit.LabelText("DeMarker Period");
         m_applied_price.Hide();
         break;
      case  3:
         m_period_edit.LabelText("Force Index Period");
         m_applied_price.Show();
         break;
      case  4:
         m_period_edit.LabelText("WPR Period");
         m_applied_price.Hide();
         break;
      case  5:
         m_period_edit.LabelText("RSI Period");
         m_applied_price.Show();
         break;
      case  6:
         m_period_edit.LabelText("Momentum Period");
         m_applied_price.Hide();
         break;
      default:
         m_period_edit.LabelText("RSI Period");
         m_applied_price.Hide();
         break;
      }
      m_period_edit.Update(true);
   }
Compile the project and view the result:
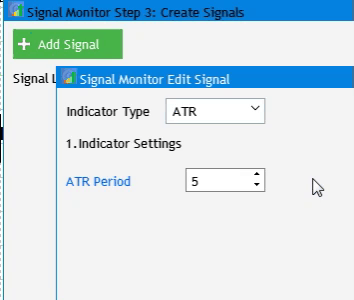
Fig. 11 Implementation of indicator settings.
Next, move on to the second section of signal editing. It consists of the header and eight settings:
- Signal rule.
- Text label value in the signal block.
- Text label color.
- Background usage and color.
- Edging usage and color.
- Usage, color and value of a tooltip above the signal block.
- The use of graphic labels and its appearance in the signal block.
- Selection of available timeframes to search for a given signal.
To add a header for this section, add the following code at the end of the CreateSetWindow() body (we previously created a method for visualizing the header, which can be used again with different argument values):
//--- Signal settings
   if(!CreateSetLabel(m_set_header[1],10,22+10+4*(25+10),"2.Signal Settings"))
      return(false);
The signal rule consists of two elements: a drop-down menu and an input field for a numerical value. Add class instances and implementing methods to the CProgram class:
CTextEdit         m_rule_value;
CComboBox         m_rule_type;
...
bool              CreateRuleValue(const int x_gap,const int y_gap);
bool              CreateRule(const int x_gap,const int y_gap);
Add their implementation to SetWindow.mqh and call them in the CreateSetWindow() method body.
   //--- Condition settings
   if(!CreateRuleValue(130,22+10+5*(25+10)))
      return(false);
   if(!CreateRule(10,22+10+5*(25+10)))
      return(false);
Further, add each of the settings in the same way. Here is how the full implementation of the CreateSetWindow () method looks like:
//+------------------------------------------------------------------+
//| Creates a window for creating and editing trading signals        |
//+------------------------------------------------------------------+
bool CProgram::CreateSetWindow(const string text)
{
//--- Add the pointer to the window array
   CWndContainer::AddWindow(m_set_window);
//--- Properties
   m_set_window.XSize(568);
   m_set_window.YSize(575);
//--- Coordinates
   int x=int(ChartGetInteger(m_chart_id,CHART_WIDTH_IN_PIXELS)-m_set_window.XSize())/2;
   int y=30;
//---
   m_set_window.CaptionHeight(22);
   m_set_window.IsMovable(true);
   m_set_window.CaptionColor(m_caption);
   m_set_window.CaptionColorLocked(m_caption);
   m_set_window.CaptionColorHover(m_caption);
   m_set_window.BackColor(m_background);
   m_set_window.FontSize(m_base_font_size);
   m_set_window.Font(m_base_font);
   m_set_window.WindowType(W_DIALOG);
//--- Creating a form
   if(!m_set_window.CreateWindow(m_chart_id,m_subwin,text,x,y))
      return(false);
//--- Indicator type
   if(!CreateIndicatorType(10,22+10))
      return(false);
//--- Settings of the selected indicator
   if(!CreateSetLabel(m_set_header[0],10,22+10+26+10,"1.Indicator Settings"))
      return(false);
   if(!CreatePeriodEdit(10,22+10+2*(25+10)))
      return(false);
   if(!CreateAppliedPrice(10,22+10+3*(25+10)))
      return(false);
//--- Signal settings
   if(!CreateSetLabel(m_set_header[1],10,22+10+4*(25+10),"2.Signal Settings"))
      return(false);
//--- Condition settings
   if(!CreateRuleValue(130,22+10+5*(25+10)))
      return(false);
   if(!CreateRule(10,22+10+5*(25+10)))
      return(false);
//--- Label display settings
   if(!CreateSetLabel(m_set_header[2],10,22+10+6*(25+10),"Label"))
      return(false);
   if(!CreateButton2(m_label_button[0],"Value",100,22+7+6*(25+10)))
      return(false);
   if(!CreateButton2(m_label_button[1],"Text",100+80,22+7+6*(25+10)))
      return(false);
//--- Label color display settings
   if(!CreateColorButton(m_color_button[0],10,22+10+7*(25+10),"Label Color"))
      return(false);
   if(!CreateTextBox(180+80+10,22+7+6*(25+10)))
      return(false);
//---
   if(!CreateColorButton(m_color_button[1],25,22+10+8*(25+10),""))
      return(false);
   if(!CreateSetCheckBox(m_set_param[0],10,22+10+8*(25+10),"Use Background"))
      return(false);
   if(!CreateColorButton(m_color_button[2],25,22+10+9*(25+10),""))
      return(false);
   if(!CreateSetCheckBox(m_set_param[1],10,22+10+9*(25+10),"Use Border"))
      return(false);
   if(!CreateColorButton(m_color_button[3],25,22+10+10*(25+10),""))
      return(false);
   if(!CreateSetCheckBox(m_set_param[2],10,22+10+10*(25+10),"Use Tooltip"))
      return(false);
   if(!CreateTooltipText(240,22+10+10*(25+10)))
      return(false);
   if(!CreateSetCheckBox(m_set_param[3],10,22+10+11*(25+10),"Use Image"))
      return(false);
   if(!CreateImageSlider(125,22+10+11*(25+10)))
      return(false);
//--- Timeframe selection
   if(!CreateSetLabel(m_set_header[4],10,22+10+12*(25+10),"Timeframes"))
      return(false);
//---
   y=22+10+13*(25+10);
   int k=0;
   for(int i=0; i<21; i++)
   {
      if(i==11)
      {
         y=22+20+14*(25+10);
         k=0;
      }
      if(!CreateTfButton(m_tf_button[i],40*k+10,y))
         return(false);
      k++;
   }
   return(true);
}
The full list of additions and their implementation are available in the attachments below. After adding all required parts, the creation and editing window looks like this:
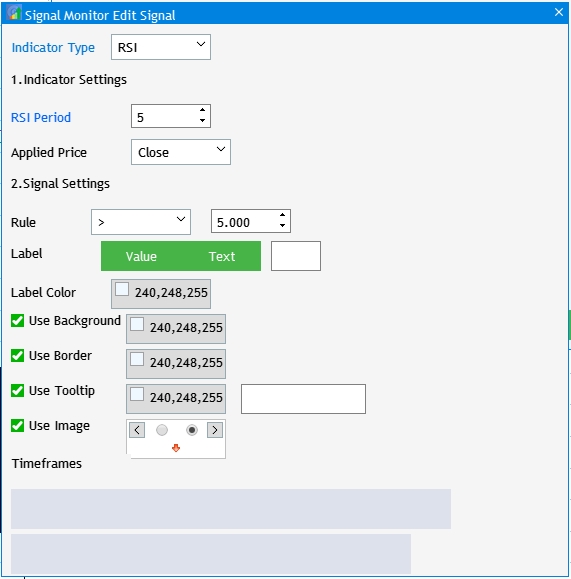
Fig. 12 Implementation of UI elements of the signal editing window.
As you can see in the figure, the timeframe selection buttons are empty. We also need to configure the basic interactions of the elements:
- Timeframe buttons should only show the number selected in Step 2.
- When the Value button is selected, the Text button should become unpressed and the text label input field should be hidden.
- A click on the color selection button should open a window with the color palette.
- When unchecked, palette selection, tooltip input field and graphic label selection should become inactive.
To implement the output of selected timeframes, let's create the RebulidTimeframes() method in the private section of the basic class, and implement this method:
//+------------------------------------------------------------------+
//|                                                                  |
//+------------------------------------------------------------------+
void CProgram::RebuildTimeframes(void)
{
//--- Count the number of selected timeframes
   int cnt=0;
   for(int i=0; i<21; i++)
   {
      if(m_checkbox[i].IsPressed())
         cnt++;
   }
   ArrayResize(m_timeframes,cnt);
   cnt=0;
//--- Remember the selected timeframe to the array
   for(int i=0; i<21; i++)
   {
      if(m_checkbox[i].IsPressed())
      {
         m_timeframes[cnt]=m_checkbox[i].LabelText();
         cnt++;
      }
   }
//---
   for(int i=0; i<cnt; i++)
      m_tf_button[i].IsLocked(false);
//---
   for(int i=0; i<cnt; i++)
   {
      m_tf_button[i].LabelText(m_timeframes[i]);
      m_tf_button[i].Update(true);
   }
   //---
   for(int i=cnt; i<21; i++)
      m_tf_button[i].IsLocked(true);
}
Now add the following to the code calling the editing window upon a click on Add Signal.
      //--- Click on the "Add Signal" button
      if(lparam==m_add_signal.Id())
      {
         m_set_window.OpenWindow();
         if(m_set_window.IsAvailable())
            RebuildTimeframes();
      }
Let's move on to the next moment related to the setup of interaction of the Value and Text buttons. Add the following code in OnEvent():
//---
      if(lparam==m_label_button[0].Id())
      {
         if(m_label_button[0].IsPressed())
         {
            m_label_button[1].IsPressed(false);
            m_label_button[1].Update(true);
         }
         m_text_box.Hide();
      }
      if(lparam==m_label_button[1].Id())
      {
         if(m_label_button[1].IsPressed())
         {
            m_label_button[0].IsPressed(false);
            m_label_button[0].Update(true);
         }
         m_text_box.Show();
      }
The following condition is fulfilled here: if one of the buttons is pressed, the other one should be unpressed. If Text is unpressed, hide the edit field. Color palette button clicks are also implemented here. We have four buttons, an array of four elements has been declared therefore access to them can be written in a loop.
      //---
      for(int i=0; i<4; i++)
      {
         if(lparam==m_color_button[i].Id())
         {
            m_color_picker.ColorButtonPointer(m_color_button[i]);
            return;
         }
      }
And the last interaction is to block elements when checkboxes are unpressed. Add tracking of checkbox clicks in OnEvent() and implement the interactions.
//--- Click on the checkbox
   if(id==CHARTEVENT_CUSTOM+ON_CLICK_CHECKBOX)
   {
      //---
      for(int i=0; i<3; i++)
      {
         if(lparam==m_set_param[i].Id())
         {
            m_color_button[i+1].IsLocked(!m_set_param[i].IsPressed());
            if(m_set_param[2].IsPressed())
               m_tooltip_text.Show();
            else
               m_tooltip_text.Hide();
         }
      }
      //---
      if(lparam==m_set_param[3].Id())
         m_pictures_slider.IsLocked(!m_set_param[3].IsPressed());
   }
Compile the project again and view the result.
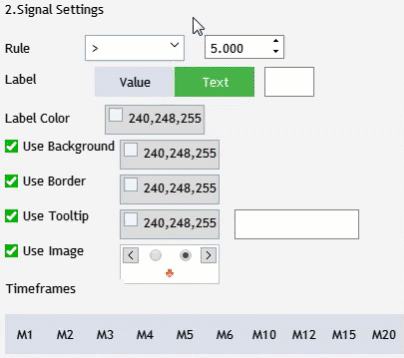
Fig. 13 Implementations of interaction of UI elements of the signal editing window.
Trading signals monitor
The last step within this development phase is to create a window for the future trading signals monitor. We should also take into account those basic settings that are already implemented in the current version. Before creating, let's set some tasks so that the reader understands for what purpose the elements are created:
- Create lines with text labels of signals selected in the first step.
- Create heading columns with text labels of timeframes selected in the second step.
- Resize the window in accordance with the rows and columns of the created elements. A kind of auto-sizing.
To enable creation of the text labels of timeframes and symbols, create two arrays of CTextLabel class instances and add two implementing methods in the CProgram class.
   CTextLabel        m_timeframe_label[];
   CTextLabel        m_symbol_label[];
   bool              CreateTimeframeLabel(CTextLabel &text_label,const int x_gap,const int y_gap,string label_text);
   bool              CreateSymbolLabel(CTextLabel &text_label,const int x_gap,const int y_gap,string label_text);
Now implement the created methods in the MainWindow.mqh file:
//+------------------------------------------------------------------+
//| Creates the text label                                           |
//+------------------------------------------------------------------+
bool CProgram::CreateTimeframeLabel(CTextLabel &text_label,const int x_gap,const int y_gap,string label_text)
{
//--- Save the window pointer
   text_label.MainPointer(m_step_window);
//---
   text_label.Font(m_base_font);
   text_label.FontSize(m_base_font_size);
   text_label.XSize(40);
   text_label.BackColor(m_background);
//--- Create the button
   if(!text_label.CreateTextLabel(label_text,x_gap,y_gap))
      return(false);
//--- Add a pointer to element to the base
   CWndContainer::AddToElementsArray(0,text_label);
   return(true);
}
//+------------------------------------------------------------------+
//| Creates the text label                                           |
//+------------------------------------------------------------------+
bool CProgram::CreateSymbolLabel(CTextLabel &text_label,const int x_gap,const int y_gap,string label_text)
{
//--- Save the window pointer
   text_label.MainPointer(m_step_window);
//---
   text_label.Font(m_base_font);
   text_label.FontSize(m_base_font_size);
   text_label.XSize(100);
   text_label.BackColor(m_background);
//--- Create the button
   if(!text_label.CreateTextLabel(label_text,x_gap,y_gap))
      return(false);
//--- Add a pointer to element to the base
   CWndContainer::AddToElementsArray(0,text_label);
   return(true);
}
Before proceeding with the window interface visualization, we need to create two important variables in the private section, as well as two methods:
   int               m_total_signals;
   string            m_symbols[];
   void              ToMonitor(void);
   void              AutoResize(const int x_size,const int y_size);
The m_total_signals variable is needed for checking if at least one trading signal was created. This check is performed before creating the monitor window. The m_symbols[] array will contain a selection of symbols from the first setup step. The ToMonitor() method will implement the creation of the monitor interface, while AutoResize() will adjust the size window in accordance with the created elements. Here is the implementation of the declared methods:
//+------------------------------------------------------------------+
//|                                                                  |
//+------------------------------------------------------------------+
void CProgram::ToMonitor(void)
{
//--- Check if there is at least one signal
   if(m_total_signals<1)
   {
      MessageBox("No signals created!","Warning");
      return;
   }
//--- Hide Step 3
   m_add_signal.Hide();
   m_signal_header.Hide();
   m_back_button.Hide();
   m_next_button.Hide();
//--- Change window header
   m_step_window.LabelText("Signal Monitor");
   m_step_window.Update(true);
//--- Symbols
   int sy=ArraySize(m_symbols);
   ArrayResize(m_symbol_label,sy);
   for(int i=0; i<sy; i++)
   {
      if(!CreateSymbolLabel(m_symbol_label[i],5,m_step_window.CaptionHeight()+25+i*25,m_symbols[i]))
         return;
      m_symbol_label[i].Update(true);
   }
//--- Timeframes
   int tf=ArraySize(m_timeframes);
   ArrayResize(m_timeframe_label,tf);
//---
   for(int i=0; i<tf; i++)
   {
      if(!CreateTimeframeLabel(m_timeframe_label[i],110+50*i,m_step_window.CaptionHeight()+3,m_timeframes[i]))
         return;
      m_timeframe_label[i].Update(true);
   }
//--- Resize window
   AutoResize(m_timeframe_label[tf-1].XGap()+m_timeframe_label[tf-1].XSize()+5,m_symbol_label[sy-1].YGap()+m_symbol_label[sy-1].YSize()+5);
}
As can be seen from the above code, data from m_symbols are used in the Symbols section. But this data is not collected or prepared. Let's fix it. Go to the ToStep_2() method and after checking whether at least one symbol has been selected, remember the symbols selected in the first step onto our array:
//--- Count the number of selected symbols
   ArrayResize(m_symbols,cnt);
   cnt=0;
//--- Remember the selected timeframe to the array
   for(int i=0; i<m_all_symbols; i++)
   {
      if(m_checkbox[i].IsPressed())
      {
         m_symbols[cnt]=m_checkbox[i].LabelText();
         cnt++;
      }
   }
Now, create the auto-sizing method.
//+------------------------------------------------------------------+
//|                                                                  |
//+------------------------------------------------------------------+
void CProgram::AutoResize(const int x_size,const int y_size)
{
   m_step_window.ChangeWindowWidth(x_size);
   m_step_window.ChangeWindowHeight(y_size);
}
Before checking the project, set the m_total_signals variable to zero in the constructor of CProgram. Another important point is the addition in the OnEvent() method, in the button click event.
      //--- Navigation
      if(lparam==m_back_button.Id())
      {
         //--- Go back
         if(m_current_step==2)
            ToStep_1();
         //--- Return to Step 2
         else if(m_current_step==3)
            ToStep_2();
      }
      //--- Go forward
      if(lparam==m_next_button.Id())
      {
         //--- Go to Step 2
         if(m_current_step==1)
            ToStep_2();
         //--- Go to Step 3
         else if(m_current_step==2)
            ToStep_3();
         //--- Go to Monitor
         else if(m_current_step==3)
            ToMonitor();
      }
Here, add call of the created ToMonitor() method upon a click on the button which jumps to the next step. This button is called "Create" in Step 3. Now compile the project and launch the application:
- Select Crosses in the first step.
- In the second step, select Senior.
- In the third step click Add Signal.
- After that close the signal creation window and click Create.
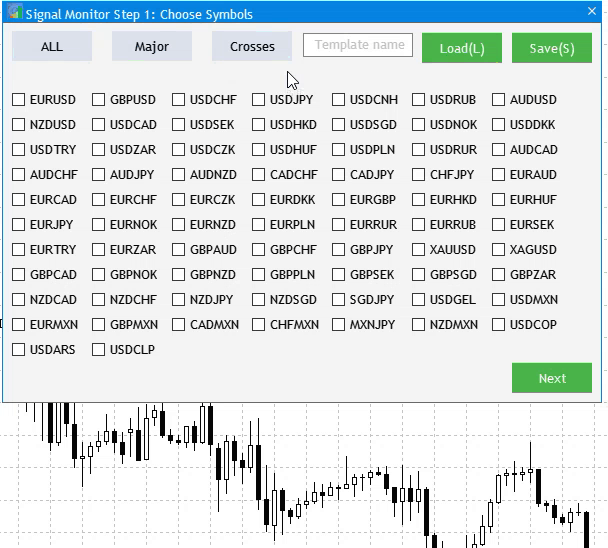
Fig. 14 Basic monitor setup
In the next article, we will consider the implementation of an algorithm which will search for the configured trading signals in the working conditions created during the initial launch.
Conclusion
The attached archive contains all the listed files, which are located in the appropriate folders. For their proper operation, you only need to save the MQL5 folder into the terminal folder. To open the terminal root directory, in which the MQL5 folder is located, press the Ctrl+Shift+D key combination in the MetaTrader 5 terminal or use the context menu as shown in Fig. 15 below.
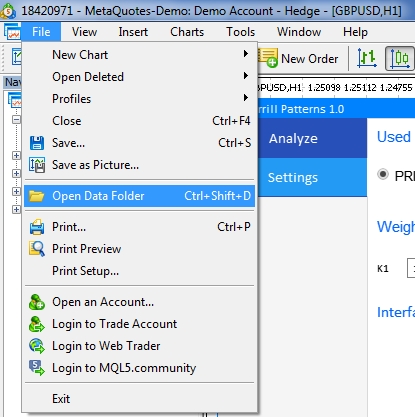
Fig. 15. Opening the MQL5 folder in the MetaTrader 5 terminal root