Multicurrency monitoring of trading signals (Part 1): Developing the application structure
Alexander Fedosov | 7 April, 2020
Table of Contents
- Introduction
- The basic structure of the application
- Initial application launch
- Secondary application launch
- Creating the application framework
- Conclusion
Introduction
As the Meta Trader 5 platform develops further, more and more opportunities emerge along with the appearance of new tools for working with foreign exchange markets, stock exchanges, etc. One of the actively developing aspects is algo trading: newly created automated trading systems accurately implement various sophisticated trading ideas. Nevertheless, part of market participants still prefer manual trading. They create trading systems based on signals which follow specific rules and algorithms and in which the final market entry decision is performed by human. This approach has a disadvantage as compared to an automated trading system: even with strictly and clearly defined rules, there is a factor of human subjectivity. Although, many manual trading systems show positive results.
Even during manual trading, the trader follows a certain operation algorithm and a sequence of actions, which can be presented as five main tasks:
- Define a trading signal.
- Define market entry rules and entry type.
- Manage open positions.
- Define market exit signals.
- Define market exit rules.
In manual trading, each of these tasks implies trader interaction both with the terminal (opening, closing and managing positions) and with the trading system (finding signals in the relevant markets using certain technical means). All these actions may take much time, and they also require from the trader to be attentive, focused and disciplined. The purpose of this series of articles is to relieve load on traders who execute operations manually. Let us create step-by-step a convenient flexible multicurrency application which will enable the generation of trading signals and which will assist traders in finding the desired signals.
The basic structure of the application
Before proceeding to application implementation, let's determine its main blocks along with their internal structure, as well as the sequence of interactions between them. As with the most modern applications, there are two key points:
- Initial launch. During the initial launch, the application gets acquainted with the trading environment, receives the required data for operation and enables the user to set required parameters and remember all preferences selected in the interface.
- Secondary launch. This is the launch of an already configured application. As a rule, the application at this stage is directly working according to the previously specified settings. However, the application can be partially reconfigured or the user can get back to the initial launch.
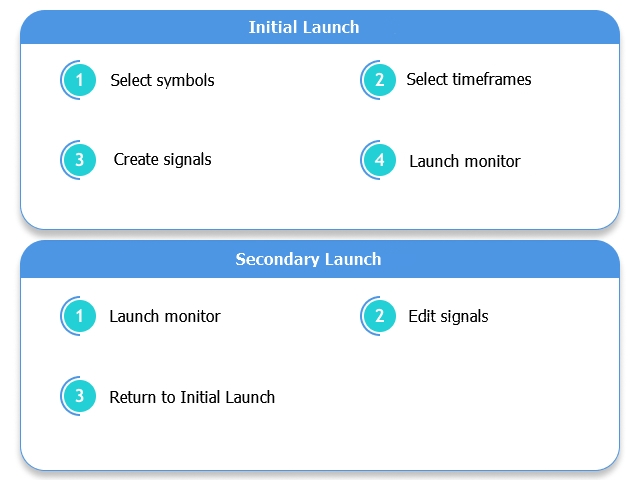
Fig.1 The basic structure of the application.
As can be seen from the figure, the Initial and Secondary launch order differs only in the sequence of steps. Now, let's look at what the Initial and the Secondary launch should include.
Initial application launch
The above tasks are primary for the initial launch. However, depending on the broker and the account type, hundreds on trading instruments can be present in the Market Watch of the MetaTrader 5 terminal. This is a large data set, and it is unlikely that an application is so universal that it will need all the presented data. Moreover, most of systems are tailored for a specific market, specific currency pairs or even one specific exchange stock on a specific timeframe.
Thus, we need a tool for filtering and selecting all trading instruments which will be used for finding signals and for trading, as well as tools for selecting required timeframes.
Therefore, the Initial Launch structure consists of three consecutive steps:
- Select symbols for operation.
- Select timeframes for operation.
- Create a trading signal.
Step 1. Now let's create relevant layouts to be used for the implementation of the appropriate functionality in the future monitor.
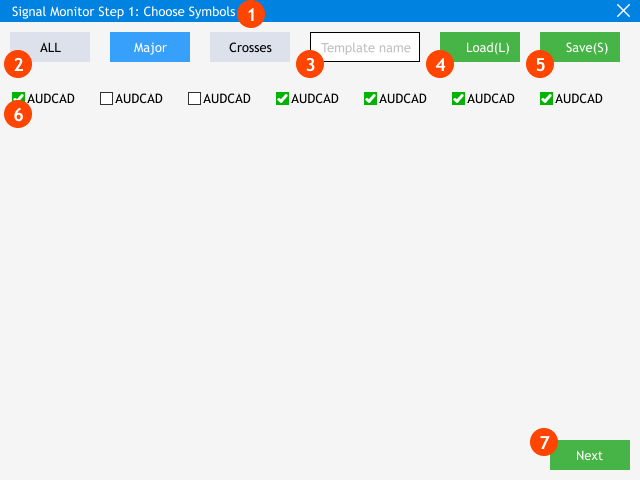
Fig.2 Step 1: Select symbols for operation.
Let's consider in more detail the interface elements and the features included in the first step of the Initial Launch:
- The header with the application name and with information on the step number and its name. In this case it will be as follows: Step 1: Select symbol.
- A group of buttons for a quick selection of frequently used groups, such as All, Majors, Crosses. Buttons are implemented as switches, which can be seen from the Majors button: the symbol group is selected if the button is active (blue) and it is unselected when the button state is inactive (gray).
- Editable field for entering a custom name for the selected symbols set. It is needed when you create an individual set of symbols. For example, it can be used when utilizing several different settings or strategy variations in the monitor.
- The Load button loads the previously created set of selected symbols with the name from the entry field (point 3). The action is performed using the L hot key.
- The Save button saves the previously created set of selected symbols with the name from the entry field (point 3). The action is performed using the S hot key.
- A set of checkboxes with symbol names. It contains the full list of symbols form the Market Watch available for this trading account.
- Button for moving to the next step of the initial application setup.
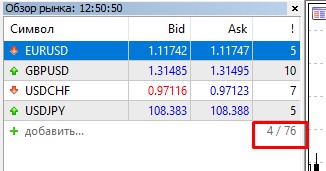
Fig.3 Active and total numbers of available symbols.
In the program implementation of this step, it should be remembered that the total number of symbols (Fig.3) can exceed the height of the application. Therefore it is necessary to enable automatic height adjustment.
Step 2. Now let's move on to the next step: Select Timeframe. Since the number of timeframes in MetaTrader 5 is constant, the creation of a layout for the second step is easier.
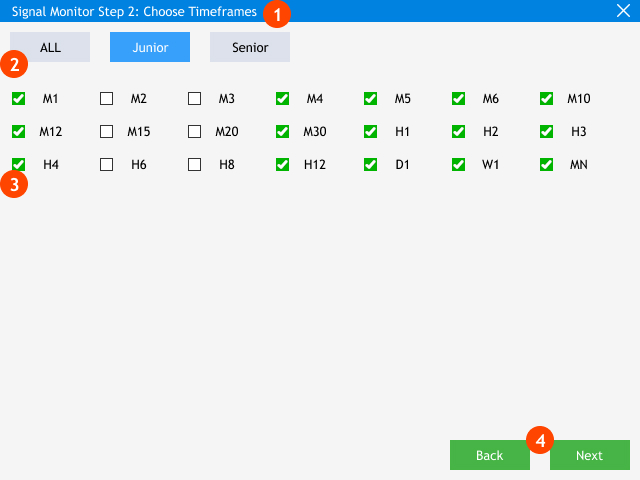
Fig.4 Step 2: Select timeframes for operation.
Here is what the second step consists of:
- The header with the application name and the current setup step. In this case it is Step 2: Select Timeframes.
- A group of preset buttons has the same purpose as in the first step: quick selection of frequently used groups. In this case, you can either select all timeframes (ALL), or higher timeframes (Senior) or lower timeframes (Junior).
- A set of checkboxes with the names of all available timeframes.
- Buttons to navigate to Step 1 (Back) or to the next step (Next).
Step 3. Before creating a signal creation layout, we need to determine the format of the multicurrency monitor, as well as the set of graphical tools which will be used for the display and indication of trading signals.
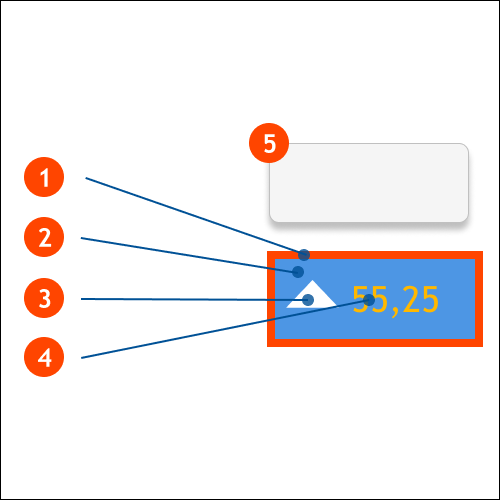
Fig.5 Display unit scheme.
Fig. 5 shows the standard signal display unit and the main five of its components. Let's consider them in more detail:
- Border. The borders of the display unit have one property, the color.
- Background. The background also has one property for the color.
- Image. The graphic element is a bmp image.
- Label. The text element has the following properties: color, size and value.
- Tooltip. The tooltip It has a text value.
As you can guess, various combinations of properties of the above described elements can be configured for specific tasks, indicators, signals, their sets and types. Now let's have a look at the third step of the Initial Setup.
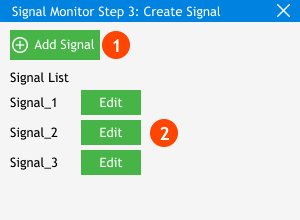
Fig. 6 Step 3: Create trading signals.
Pay attention to two main elements: a button adding a signal to the list of signals (Signal List) and the list of signals with the name and an Edit option (via the Edit button). A click on the Edit button will open an additional window with signal settings. As for now, let's implement the standard set of settings. The available settings will further be expanded.
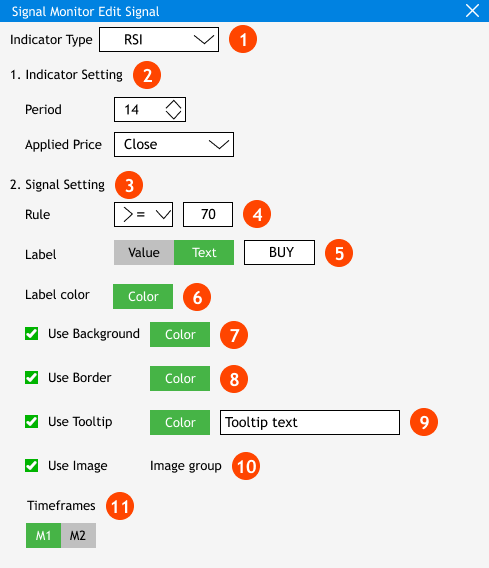
Fig.7 Prototype for the trading signal creation and editing window.
Consider a prototype of operation with a new and a previously created signal:
- A click on Add Signal will open a signal editing window. In the first point, select the type of the indicator based on which the trading signal will be created.
- Depending on the indicator selected in the Indicator Settings section, relevant settings will be shown for that indicator.
- In the next section, you will be offered to specify signal emergence conditions. This setup also depends on the selected ed indicator.
- In this prototype, the emergence of a signal (Rule) is shown at using the example of the RSI indicator. In this case, it is the RSI value 70 or above.
- An option in the Label section allows specifying how a text label shall be used in the indicator block. You can choose either to show the indicator value or to add your own text label.
- The color of the specified text label can be set in the 'Label color' section.
- Toggle option. 'Use Background' allows setting the background color for the signals block.
- Toggle option. 'Use Border' allows setting the border color for the signals block.
- Toggle option. 'Use Tooltip' allow adding a pop-up comment for the current signal.
- Toggle option. 'Use Image' allows adding to the signals block a graphic element form a given list.
- 'Timeframes' allows configuring the list of timeframes in which the configured signal will be searched.
Once the required signals have been added and configure, you go to the trading signals monitor. Thus, the Initial setup is complete. Further steps concern the main part of the application.
Secondary application launch
When the application is launched for the second time, restarted on another chart or on a new chart of the open terminal, the data collected during the Initial Launch is accessed. That is why the symbol and timeframe selection windows are skipped and you jump to the running monitor. However, as it seen in Fig.1, you can always get back to the Initial Launch stage, as well as edit the existing trading signals or add new ones.
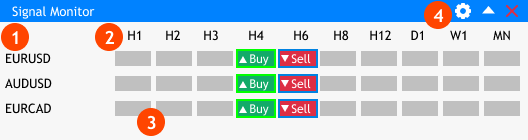
Fig.8 Main window of the trading signals monitor.
The main monitor window opens during the secondary launch. Let's consider the main groups of elements displayed here and the previous settings which affected them.
- The vertical list of symbols selected in Step 1 of Initial Launch. These are the main symbols which coincide with those selected in Market Watch in the terminal.
- Working timeframes selected in Step 2 of the Initial Launch.
- A set of signal blocks which correspond to the selected timeframes and symbols.
- Control buttons in the window header, from left to right: Setting, Minimize the window, Close the application.
Pay attention to the Settings button. During a secondary launch, it allows switching the trading signal creation/editing (Fig.6), as well as switching to the Initial Setup mode.
Creating the application framework
Now that we have determined the main structure of our future application, let's create a folder in which all files of the monitor will be located. Under the <Data Folder>\MQL5\Experts directory, create a folder entitled Signal Monitor. Then create the following files in this folder:
- Signal Monitor.mq5 — the main application file.
- Program.mqh — this file will contain the main application class CProgram; a graphic library will be connected to it.
- MainWindow.mqh — an include file containing an implementation of methods required for the creation of the main application window.
- SetWindow.mqh — an include files with the methods implementing the visual and logical components of the settings window (Fig.6-7).
- StepWindow.mqh — an include file with the methods implementing the step-by-step setup interface during the Initial Launch.
If everything is done correctly, you will have the following file structure as is shown in Fig.9:
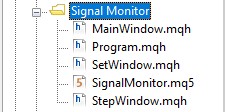
Fig.9 File structure of the application.
Now we only need to connect the graphic library and to combine all the files into one system. First, open files Signal Monitor, MainWindow, SetWindow, StepWindow and connect to them the file with the main application class Program.
//--- Include application class
#include "Program.mqh"
Now, open Program.mqh and connect the graphic library, as well as files with the main interface elements.
#include <EasyAndFastGUI\WndEvents.mqh>
//+------------------------------------------------------------------+
//| Class for creating an application                                |
//+------------------------------------------------------------------+
class CProgram
{
public:
   CProgram(void);
   ~CProgram(void);
};
//+------------------------------------------------------------------+
//| Add Controls                                                     |
//+------------------------------------------------------------------+
#include "MainWindow.mqh"
#include "SetWindow.mqh"
#include "StepWindow.mqh"
//+------------------------------------------------------------------+
//| Constructor                                                      |
//+------------------------------------------------------------------+
CProgram::CProgram(void)
{
}
//+------------------------------------------------------------------+
//| Destructor                                                       |
//+------------------------------------------------------------------+
CProgram::~CProgram(void)
{
}
//+------------------------------------------------------------------+
This completes the initial application setup. In the next article, we will create the main interface windows, will configure their interaction, and will fill them with the controls described in this article.
Conclusion
The attached archive contains all the listed files, which are located in the appropriate folders. For correct operation, place the MQL5 folder to the terminal's root directory. To open the terminal root directory, in which the MQL5 folder is located, press the Ctrl+Shift+D key combination in the MetaTrader 5 terminal or use the context menu as shown in Fig. 10 below.
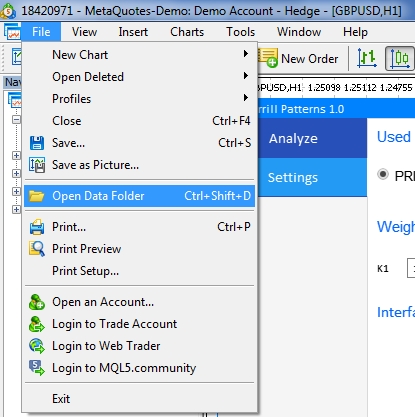
Fig.10 Opening the MQL5 folder in the MetaTrader 5 terminal root