Studying candlestick analysis techniques (Part II): Auto search for new patterns
Alexander Fedosov | 27 March, 2019
Table of contents
- Introduction
- Determining the task
- Update of the interface prototype
- Implementation of tools
- Demonstration
- Conclusions
Introduction
Existing candlestick analysis methods were analyzed in the previous article. We found out that they are not universal and are not suitable for all conditions. On the contrary, before using them, you should perform additional verification for the specific financial instrument, timeframe etc. I.e. for the conditions in which the patterns will be used.
The specifically designed approach also enables the individual analysis of each pattern for a selected financial instrument or a set of instruments. It also allows finding possible correlations between predefined parameters, including the timeframe or sample range, as well as specially entered metrics, such as frequency of occurrence, probability of movement in a certain direction after the pattern formation.
The analyzing method only concerned 14 patterns selected from a large variety of existing candlestick formations. It is impossible to analyze all the patterns one by one, therefore another solution was found. The key feature of all the patterns examined earlier was their basis, i.e. what they consist of. Four of the analyzed candlestick patterns consisted of one candlestick and ten of them consisted of two candles. The analyzed candlestick patterns consisted of different sets or sequences of six candlestick types.
The main issue with the patterns is that they appeared long time ago, while market properties, behavior and dynamics are constantly changing. In order to keep with the market analysis trend, some amendments should be made in the pattern analysis. In this article, we consider a system for searching and testing new candlestick patterns based on known candlestick types.
Determining the task
In order to develop the new candlestick pattern generation algorithm, we need to define the key rules:
- New patterns will consist of one, two or three simple candlestick types.
- The simple candlestick types are: long candlestick, short candlestick, spinning top, doji, marubozu and hammer.
- Candlestick types will be divided based on the direction: bullish and bearish. The exception is the doji candlestick.
- Simple candlestick types can be repeated. Example: a pattern of two bearish long candlesticks.
The general scheme of new pattern creation is shown in Figure 1.
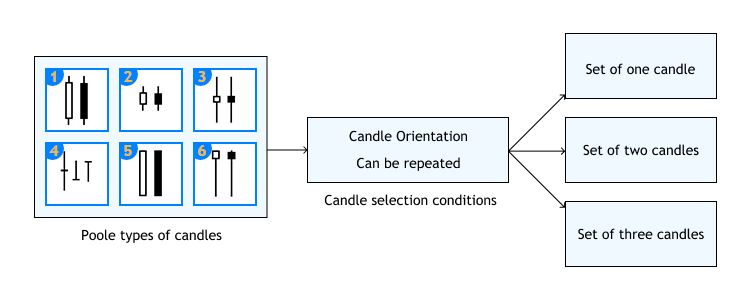
Fig.1 New pattern creation algorithms.
Thus we have a certain pool of candlesticks, of which new patterns will be formed. These new patterns will contain 1-3 candlesticks with or without repetitions. The pool will totally contain 11 basic candlesticks. Generated candlestick patterns will be analyzed according the same principle, which was discussed in the first article.
Update of the interface prototype
A separate tab will be available for working with the generated patterns. The tab will contain similar elements, which are available in the existing tab Analyze. The only difference is that the first column is named Set and the table size will not be fixed.
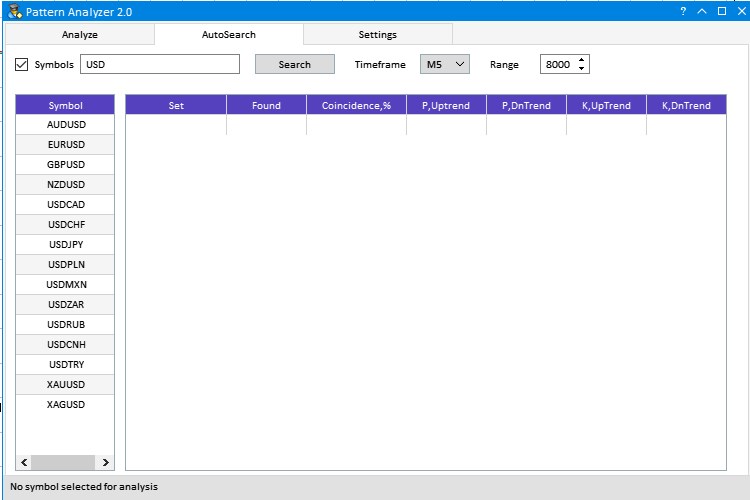
Fig.2 Tab for working with generated patterns.
The third tab Settings was substantially revised. Proper configuration of parameters in this tab is essential, that is why we will consider it in more detail.
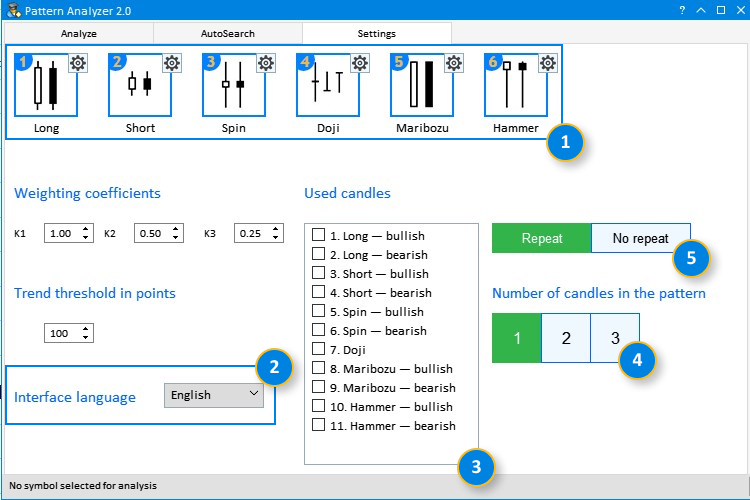
Fig.3 The updated Settings tab.
- Added numbering of simple candlestick types and their names. Thus we can easily match the visual representation with the 'Used candles' list.
- Added option for selecting the interface language. Russian or English.
- The list of 'Used candles' which participate in pattern formation. Checkboxes allow selection of required types for testing.
- A group of switchable buttons. Only one position can be selected. This way we avoid overloading of the generated patterns list in the AutoSearch tab.
- Two switchable buttons. 'Repeat' (with repetitions) means that there can be only one candlestick type in the pattern. An example is a pattern consisting of three bearish Marubozu candlesticks. At the same time, the Spinning Top - Marubozu - Marubozu pattern can also exist.
Implementation of tools
We have determined the key additions which need to be implemented in the existing application. Now let us proceed to the implementation itself. First of all, we need to add an additional tab. Indexing of tabs will change. The AutoSearch tab will have the index of 1, which was earlier used for the Settings tab. 2 will be used for Settings. This must be considered when linking child elements. Therefore, we need to change the index for all child elements of the Settings tab from 1 to 2.
//+------------------------------------------------------------------+
//| Create a group with tabs                                         |
//+------------------------------------------------------------------+
bool CProgram::CreateTabs(const int x_gap,const int y_gap)
  {
#define TABS1_TOTAL 3
//--- Store the pointer to the main control
   m_tabs1.MainPointer(m_window1);
//--- Properties
   m_tabs1.IsCenterText(true);
   m_tabs1.PositionMode(TABS_TOP);
   m_tabs1.AutoXResizeMode(true);
   m_tabs1.AutoYResizeMode(true);
   m_tabs1.AutoXResizeRightOffset(3);
   m_tabs1.AutoYResizeBottomOffset(25);

//--- Add tabs with the specified properties
   string tabs_names[TABS1_TOTAL]={"Analysis","Auto search","Settings"};
   for(int i=0; i<TABS1_TOTAL; i++)
      m_tabs1.AddTab(tabs_names[i],150);
//--- Creating a control
   if(!m_tabs1.CreateTabs(x_gap,y_gap))
      return(false);
//--- Add the object to the common array of object groups
   CWndContainer::AddToElementsArray(0,m_tabs1);
   return(true);
  }
Child elements of the AutoSearch tab are similar to those of Analyze. The only difference is the name of the first column and the color scheme. This allows to visually distinguish interface elements of these tabs.
//+------------------------------------------------------------------+
//| Creates a form for controls                                      |
//+------------------------------------------------------------------+
bool CProgram::CreateWindow(const string caption_text)
  {
//--- Add the pointer to the window array
   CWndContainer::AddWindow(m_window1);
//--- Properties
   m_window1.XSize(750);
   m_window1.YSize(500);
   m_window1.FontSize(9);
   m_window1.IsMovable(true);
   m_window1.CloseButtonIsUsed(true);
   m_window1.CollapseButtonIsUsed(true);
   m_window1.FullscreenButtonIsUsed(true);
   m_window1.TooltipsButtonIsUsed(true);
//--- Creating the form
   if(!m_window1.CreateWindow(m_chart_id,m_subwin,caption_text,5,5))
      return(false);
//--- Tabs
   if(!CreateTabs(3,43))
      return(false);
//--- The Analyze tab
//--- Edit fields
   if(!CreateSymbolsFilter(m_symb_filter1,10,10,"Symbols",0))
      return(false);
   if(!CreateRequest(m_request1,250,10,"Search",0))
      return(false);
   if(!CreateRange(m_range1,485,10,"Range",0))
      return(false);
//--- Comboboxes
   if(!CreateComboBoxTF(m_timeframes1,350,10,"Timeframe",0))
      return(false);
//--- Creating a table of symbols
   if(!CreateSymbTable(m_symb_table1,10,50,0))
      return(false);
//--- Creating a table of results
   if(!CreateTable1(m_table1,120,50,0))
      return(false);

//--- The AutoSearch tab
//--- Edit fields
   if(!CreateSymbolsFilter(m_symb_filter2,10,10,"Symbols",1))
      return(false);
   if(!CreateRequest(m_request2,250,10,"Search",1))
      return(false);
   if(!CreateRange(m_range2,485,10,"Range",1))
      return(false);
//--- Comboboxes
   if(!CreateComboBoxTF(m_timeframes2,350,10,"Timeframe",1))
      return(false);
//--- Creating a table of symbols
   if(!CreateSymbTable(m_symb_table2,10,50,1))
      return(false);
//--- Creating a table of results
   if(!CreateTable2(m_table2,120,50,1))
      return(false);
As can be seen from the above code, the difference only concerns two methods CreateTable1() and CreateTable2(). Now, let us proceed to the Settings tab. Here the very first change concerns graphic resources. Also candlestick parameter setup element has been added to the creation element. This is done using the CreateNameCandle() method.
//+------------------------------------------------------------------+
//| Creates a candlestick setup element                              |
//+------------------------------------------------------------------+
#resource "\\Images\\EasyAndFastGUI\\Icons\\bmp16\\settings_dark.bmp"
#resource "\\Images\\EasyAndFastGUI\\Candles\\long.bmp"
#resource "\\Images\\EasyAndFastGUI\\Candles\\short.bmp"
#resource "\\Images\\EasyAndFastGUI\\Candles\\doji.bmp"
#resource "\\Images\\EasyAndFastGUI\\Candles\\spin.bmp"
#resource "\\Images\\EasyAndFastGUI\\Candles\\maribozu.bmp"
#resource "\\Images\\EasyAndFastGUI\\Candles\\hammer.bmp"
//---
bool CProgram::CreateCandle(CPicture &pic,CButton &button,CTextLabel &candlelabel,const string candlename,const int x_gap,const int y_gap,string path)
  {
//--- Store the pointer to the main control
   pic.MainPointer(m_tabs1);
//--- Attach to tab
   m_tabs1.AddToElementsArray(2,pic);
//--- Properties
   pic.XSize(64);
   pic.YSize(64);
   pic.IconFile(path);
//--- Creation of a button
   if(!pic.CreatePicture(x_gap,y_gap))
      return(false);
//--- Adding a pointer to element to the base
   CWndContainer::AddToElementsArray(0,pic);
   CreateButtonPic(pic,button,"Images\\EasyAndFastGUI\\Icons\\bmp16\\settings_dark.bmp");
   CreateNameCandle(candlelabel,x_gap,y_gap+pic.YSize(),candlename);
   return(true);
  }
That is all about the changes concerning already created controls. Now let us proceed to the new ones. One of them is the interface language selection option. The application supports two languages: Russian and English. Language selection is shown in Figure 4.
Fig.4 Interface language selection.
The language change is performed through the ChangeLanguage() method. According to its logic, text components are replaced. The method code is very simple. Here is its application in the event handler:
//--- Selection of item in a combo box
   if(id==CHARTEVENT_CUSTOM+ON_CLICK_COMBOBOX_ITEM)
     {
      //--- Timeframe change
      if(ChangePeriod1(lparam))
         Update(true);
      //--- Changing the interface language
      if(ChangeLanguage(lparam))
         Update(true);
     }
As can be seen from the code, when an item in a combo box is selected, the language change method determines which of the items in the drop-down menu is selected and sets the appropriate language index:
//+------------------------------------------------------------------+
//| Changing the interface language                                  |
//+------------------------------------------------------------------+
bool CProgram::ChangeLanguage(const long id)
  {
//--- Check the element ID
   if(id!=m_lang_setting.Id())
      return(false);
   m_lang_index=m_lang_setting.GetListViewPointer().SelectedItemIndex();
//---
   if(m_lang_index==0)
     ....
The next section is responsible for the selection of simple candlestick types, of which the patterns for testing will be generated. There are 11 types. The control is implemented as a list of names of used candlestick types and checkboxes, which reflect the selection. The CreateListView() method was used for implementation:
//+------------------------------------------------------------------+
//| Create list                                                      |
//+------------------------------------------------------------------+
bool CProgram::CreateListView(const int x_gap,const int y_gap)
  {
//--- Size of the list view
#define CANDLE_TOTAL 11
//--- Store the pointer to the main control
   m_listview1.MainPointer(m_tabs1);
//--- Attach to tab
   m_tabs1.AddToElementsArray(2,m_listview1);
//--- Properties
   m_listview1.XSize(175);
   m_listview1.YSize(250);
   m_listview1.ItemYSize(19);
   m_listview1.LabelXGap(25);
   m_listview1.LightsHover(true);
   m_listview1.CheckBoxMode(true);
   m_listview1.ListSize(CANDLE_TOTAL);
   m_listview1.AutoYResizeMode(true);
   m_listview1.AutoYResizeBottomOffset(10);
   m_listview1.FontSize(10);
//--- Filling the list view with data
   string cand_name[CANDLE_TOTAL]=
     {
      "Long — bullish",
      "Long — bearish",
      "Short — bullish",
      "Short — bearish",
      "Spinning Top — bullish",
      "Spinning Top — bearish",
      "Doji",
      "Marubozu — bullish",
      "Marubozu — bearish",
      "Hammer — bullish",
      "Hammer — bearish"
     };
   for(int r=0; r<CANDLE_TOTAL; r++)
     {
      m_listview1.SetValue(r,(string)(r+1)+". "+cand_name[r]);
     }
//--- Create the list view
   if(!m_listview1.CreateListView(x_gap,y_gap))
      return(false);
//--- Adding a pointer to element to the base
   CWndContainer::AddToElementsArray(0,m_listview1);
   return(true);
  }
The next two controls are directly related to the list of simple candlestick types. The first one is a switch, which enables or disables repetitions. As already mentioned in the task defining section, the repetition is related to the pattern consisting of only one candlestick type, regardless of its size.

Fig.5 Selection of the analyzed candlestick type and the Repeat mode.
The method responsible for the creation of the Repeat switch is called CreateDualButton():
//+------------------------------------------------------------------+
//| Creation of the Repeat switch                                    |
//+------------------------------------------------------------------+
bool CProgram::CreateDualButton(CButton &lbutton,CButton &rbutton,const int x_gap,const int y_gap,const string ltext,const string rtext)
  {
   CreateButton(lbutton,x_gap,y_gap,ltext);
   CreateButton(rbutton,x_gap+99,y_gap,rtext);
   return(true);
  }
//+------------------------------------------------------------------+
//|                                                                  |
//+------------------------------------------------------------------+
bool CProgram::CreateButton(CButton &button,const int x_gap,const int y_gap,const string text)
  {
//--- Save the pointer to the main control
   button.MainPointer(m_tabs1);
//--- Attach to tab
   m_tabs1.AddToElementsArray(2,button);
//--- Properties
   button.XSize(100);
   button.YSize(30);
   button.Font("Trebuchet");
   button.FontSize(10);
   button.IsCenterText(true);
   button.BorderColor(C'0,100,255');
   button.BackColor(clrAliceBlue);
   button.BackColorLocked(C'50,180,75');
   button.BorderColorLocked(C'50,180,75');
   button.LabelColorLocked(clrWhite);
//--- Creating a control
   if(!button.CreateButton(text,x_gap,y_gap))
      return(false);
//--- Adding a pointer to element to the base
   CWndContainer::AddToElementsArray(0,button);
   return(true);
  }
Control operation setting is tracked in the left-click event:
   if(id==CHARTEVENT_CUSTOM+ON_CLICK_BUTTON)
     {
      ....
      //--- If the button is pressed
      if(lparam==m_button7.Id())
        {
         m_button7.IsLocked(true);
         m_button8.IsLocked(false);
        }
      else if(lparam==m_button8.Id())
        {
         m_button7.IsLocked(false);
         m_button8.IsLocked(true);
        }
Having analyzed the visual part of the application, let us now proceed to the calculation part. First, we need to determine the minimum settings, the sequence of actions and processing methods for these actions:
Step 1. Setting input data.
Before getting started with the application, we need to select simple candlestick types, from which patterns for the analysis will be generated. Then select if the Repeat mode is enabled. The Repeat mode implies the use of only one candlestick type in the creation of a pattern of any size. Then, select the number of candlesticks in one pattern. This may include patterns of one, two or three candlesticks. Note that at least two simple candlesticks must be selected for the generation of two- or three-candlestick patterns. If you try to generate patterns with less candlesticks, the application will return an error, as it is shown in Figure 6.
Fig.6 Error: only one candlestick type is selected for the two-candlestick patterns.
Step 2. Working with the AutoSearch tab.
After setting proper input parameters, switch to the AutoSearch and select a symbol for testing. Let us view in detail the capabilities of instruments presented in this tab.
- Select and search for the currency symbols under analysis. In the entry field, you can type part of a symbol or specified desired ones separated by commas and click the Search button. You may also use the predefined phrase Major, which shows major currency pairs. To view all symbols available in the Market Watch window, you should uncheck the box in the upper left corner. This will disable filtering in the search window.
- Then select the desired timferame from the drop-down list and the sample range as the number of candlesticks of the selected timeframe.
- After selecting the required instrument or list, click on the current one to start the analysis. After that the application will generate patterns configured in step 1, perform appropriate calculations and display data in a table. After receiving data in a table, you can change the timeframe and data will be recalculated in real time.
Let us view in detail the resulting data table. This will help in understanding the calculation and operation principle of the algorithms which we will consider further.
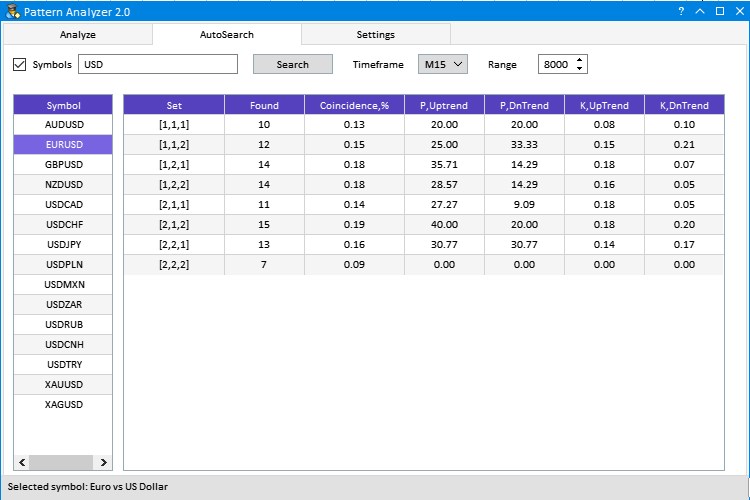
Fig.7 Example of data calculation for the EURUSD pair.
As can be seen from Figure 7, a row with the analyzed currency pair is selected in the Symbol table. The M15 timeframe and the sample range of 8000 15-minute candlesticks are shown at the top of the right part. The results table features six columns. Here we will only consider the first one, while the rest columns were described in the first article, in section Developing the interface prototype.
The first column is Set. In below rows, the values are displayed in the format of [1,1,2]. Three numbers in square brackets mean that a pattern of three candlesticks is used. The pattern consists of simple candlesticks 1 and 2 in exactly the order specified in square brackets. The numbers of used candlesticks can be found in the tab Settings in section Used candles.
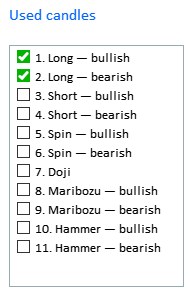
Fig.8 The list and numbers of candlesticks used in pattern generation.
Now we know how to configure and start the application, so we can proceed to considering the internal operation logic. After setting the input data, we click on the currency instrument in the Symbol table. Handling of the click on the table item calls the ChangeSymbol2() method:
//--- Event of pressing on the item of a list or table
   if(id==CHARTEVENT_CUSTOM+ON_CLICK_LIST_ITEM)
     {
      //--- Symbol change
      if(ChangeSymbol1(lparam))
         Update(true);
      if(ChangeSymbol2(lparam))
         m_table2.Update(true);
     }
In this method, in addition to setting the information values in the status bar, there are two more methods.
//+------------------------------------------------------------------+
//| Symbol change                                                    |
//+------------------------------------------------------------------+
bool CProgram::ChangeSymbol2(const long id)
  {
//--- Check the element ID
   if(id!=m_symb_table2.Id())
      return(false);
//--- Exit if the line is not highlighted
   if(m_symb_table2.SelectedItem()==WRONG_VALUE)
     {
      //--- Show the full symbol description in the status bar
      m_status_bar.SetValue(0,"No symbol selected for analysis");
      m_status_bar.GetItemPointer(0).Update(true);
      return(false);
     }
//--- Get a symbol
   string symbol=m_symb_table2.GetValue(0,m_symb_table2.SelectedItem());
//--- Show the full symbol description in the status bar
   string val=(m_lang_index==0)?"Выбранный символ: ":"Selected symbol: ";
   m_status_bar.SetValue(0,val+::SymbolInfoString(symbol,SYMBOL_DESCRIPTION));
   m_status_bar.GetItemPointer(0).Update(true);
   if(!BuildingAutoSearchTable())
      return(false);
   GetPatternType(symbol,m_total_combination);
   return(true);
  }
The first method is BuildingAutoSearchTable(). It creates patterns from the list of simple candlesticks selected in the Settings tab, in section Used candles (Fig.8) and displays them in the first column of the results table.
//+------------------------------------------------------------------+
//| Rebuilds the pattern auto search table                           |
//+------------------------------------------------------------------+
bool CProgram::BuildingAutoSearchTable(void)
  {
//---
   if(!GetCandleCombitaion())
     {
      if(m_lang_index==0)
         MessageBox("Число выбранных свечей меньше размера исследуемого паттерна!","Ошибка");
      else if(m_lang_index==1)
         MessageBox("The number of selected candles is less than the size of the studied pattern!","Error");
      return(false);
     }
//--- Delete all rows
   m_table2.DeleteAllRows();
//--- Set the number of rows by the number of symbols
   for(int i=0; i<ArraySize(m_total_combination); i++)
     {
      m_table2.AddRow(i);
      m_table2.SetValue(0,i,m_total_combination[i]);
     }
   m_table2.DeleteRow(ArraySize(m_total_combination));
//--- Update the table
   m_table2.Update(true);
   m_table2.GetScrollVPointer().Update(true);
   m_table2.GetScrollHPointer().Update(true);
   return(true);
  }
//+------------------------------------------------------------------+
//| Generating patterns based on simple candlesticks                 |
//+------------------------------------------------------------------+
bool CProgram::GetCandleCombitaion(void)
  {
   string candlenumber[];
   int selected_candles=0,n;
   ArrayResize(candlenumber,m_total_candles);
//---
   for(int i=0;i<m_total_candles;i++)
     {
      if(m_listview1.GetState(i))
        {
         candlenumber[selected_candles]=(string)(i+1);
         selected_candles++;
        }
     }

   if((m_pattern_size==2 && selected_candles<2) || (m_pattern_size==3 && selected_candles<2) || selected_candles<1)
      return(false);
//--- Calculation of the number of combinations
   if(m_pattern_size>1)
      n=(m_button7.IsLocked())?(int)MathPow(selected_candles,m_pattern_size):(int)MathPow(selected_candles,m_pattern_size)-selected_candles;
   else
      n=selected_candles;
   ArrayResize(m_total_combination,n);

   n=0;
//--- A set of one candlestick
   if(m_pattern_size==1)
     {
      for(int i=0;i<selected_candles;i++)
         m_total_combination[i]="["+candlenumber[i]+"]";
     }
//--- A set of two candlesticks
   else if(m_pattern_size==2)
     {
      //--- Repeat mode enabled
      if(m_button7.IsLocked())
        {
         for(int i=0;i<selected_candles;i++)
           {
            for(int j=0;j<selected_candles;j++)
              {
               m_total_combination[n]="["+candlenumber[i]+","+candlenumber[j]+"]";
               n++;
              }
           }
        }
      //--- Repeat mode disabled
      else if(m_button8.IsLocked())
        {
         for(int i=0;i<selected_candles;i++)
           {
            for(int j=0;j<selected_candles;j++)
              {
               if(j!=i)
                 {
                  m_total_combination[n]="["+candlenumber[i]+","+candlenumber[j]+"]";
                  n++;
                 }
              }
           }
        }
     }
//--- Set of three candlesticks
   else if(m_pattern_size==3)
     {
      //--- Repeat mode enabled
      if(m_button7.IsLocked())
        {
         for(int i=0;i<selected_candles;i++)
           {
            for(int j=0;j<selected_candles;j++)
              {
               for(int k=0;k<selected_candles;k++)
                 {
                  m_total_combination[n]="["+candlenumber[i]+","+candlenumber[j]+","+candlenumber[k]+"]";
                  n++;
                 }
              }
           }
        }
      //--- Repeat mode disabled
      else if(m_button8.IsLocked())
        {
         for(int i=0;i<selected_candles;i++)
           {
            for(int j=0;j<selected_candles;j++)
               for(int k=0;k<selected_candles;k++)
                 {
                  if(i==j && i==k)
                     continue;
                  m_total_combination[n]="["+candlenumber[i]+","+candlenumber[j]+","+candlenumber[k]+"]";
                  n++;
                 }
           }
        }
     }
   return(true);
  }
Creation of patterns based on a candlestick set is performed by the GetCandleCombination() method. The purpose of the method is to display all possible combinations of simple candlesticks based on the sequence numbers of the selected candlesticks, with or without repetitions and taking into account the size selected in the the Number of candlestick in the pattern section.
All combinations are written to the string array m_total_combitaion[], and the data is added to the results table in the BuildingAutoSearchTable() method.
The second method, which is called after BuildingAutoSearchTable(), is responsible for the calculation and display of other data base on the resulting list of generated patterns. Let us consider the GetPatternType() method in more detailed - it was used in the first article for the calculation of predefined patterns, but it has been simplified. The purpose of this task is to recognize preset patterns on a chart and to analyze them. Since this method is used to search for already existing patterns as well as generated ones, the method overloading was implemented:
   //--- Recognizing patterns
   bool              GetPatternType(const string symbol);
   bool              GetPatternType(const string symbol,string &total_combination[]);
In the second variant, we use the earlier created string data array with generated patterns. The purpose of the method is to identify any of our generated patterns on the chart, to evaluate it and calculate its efficiency. The description of the idea and algorithms is provided in the task defining section of the first article. Therefore we will not dwell on this now.
The found pattern efficiency was earlier evaluated using an array, to which we added category estimates A, B and C for the uptrend and the downtrend. In this article we convert the array into a structure. This allowed shortening of the resulting code. The structure is as follows:
struct RATING_SET
  {
   int               a_uptrend;
   int               b_uptrend;
   int               c_uptrend;
   int               a_dntrend;
   int               b_dntrend;
   int               c_dntrend;
  };
For our task, we need this set of estimates for each of the generated patterns. Therefore, the RATING_SET array of structures is declared at the beginning of the method. The array size corresponds to the number of generated patterns or the size of the string array m_total_combitaion[].
   RATING_SET ratings[];

//---
   total_patterns=ArraySize(total_combination);
...
   ArrayResize(ratings,total_patterns);
This array stores all generated patterns, which are however presented as a string to be displayed in the first column of the tables result. So, the next stage is to extract from each string indexes of used simple candlestick patterns and convert them to the candlestick type from the CANDLE_STRUCTURE.
struct CANDLE_STRUCTURE
  {
   double            open,high,low,close;       // OHLC
   TYPE_TREND        trend;                     //Trend
   bool              bull;                      //Bullish candlestick
   double            bodysize;                  //Bearish candlestick
   TYPE_CANDLESTICK  type;                      //Candlestick type
  };
For this purpose, we will perform a few conversions. Additionally, we will consider an additional method which helps to convert the candlestick index into its type.
//---
   for(int i=0;i<total_patterns;i++)
     {
      StringReplace(total_combination[i],"[","");
      StringReplace(total_combination[i],"]","");
      if(m_pattern_size>1)
        {
         ushort sep=StringGetCharacter(",",0);
         StringSplit(total_combination[i],sep,elements);
        }
      ZeroMemory(ratings[i]);
      m_pattern_total[i]=0;
      if(m_pattern_size==1)
         IndexToPatternType(cand1[i],(int)total_combination[i]);
      else if(m_pattern_size==2)
        {
         IndexToPatternType(cand1[i],(int)elements[0]);
         IndexToPatternType(cand2[i],(int)elements[1]);
        }
      else if(m_pattern_size==3)
        {
         IndexToPatternType(cand1[i],(int)elements[0]);
         IndexToPatternType(cand2[i],(int)elements[1]);
         IndexToPatternType(cand3[i],(int)elements[2]);
        }
     }
Loop through each string value of the generated patterns, remove the square brackets, apply StringSplit() based on the separator "," and add information to the elements[] array. Note that this procedure is to be applied to patterns consisting of more than 1 candlestick, because for one candlestick there will be no commas and we only need to remove the square brackets. Now let us consider the IndexToPatternType() method, to which we input CANDLE_STRUCTURE to fill out and processed data from the array of generated patterns.
void CProgram::IndexToPatternType(CANDLE_STRUCTURE &res,const int index)
  {
//--- Long - bullish
   if(index==1)
     {
      res.bull=true;
      res.type=CAND_LONG;
     }
//--- Long - bearish
   else if(index==2)
     {
      res.bull=false;
      res.type=CAND_LONG;
     }
//--- Short - bullish
   else if(index==3)
     {
      res.bull=true;
      res.type=CAND_SHORT;
     }
//--- Short - bearish
   else if(index==4)
     {
      res.bull=false;
      res.type=CAND_SHORT;
     }
//--- Spinning Top - bullish
   else if(index==5)
     {
      res.bull=true;
      res.type=CAND_SPIN_TOP;
     }
//--- Spinning Top - bearish
   else if(index==6)
     {
      res.bull=false;
      res.type=CAND_SPIN_TOP;
     }
//--- Doji
   else if(index==7)
     {
      res.bull=true;
      res.type=CAND_DOJI;
     }
//--- Marubozu - bullish
   else if(index==8)
     {
      res.bull=true;
      res.type=CAND_MARIBOZU;
     }
//--- Marubozu - bearish
   else if(index==9)
     {
      res.bull=false;
      res.type=CAND_MARIBOZU;
     }
//--- Hammer - bullish
   else if(index==10)
     {
      res.bull=true;
      res.type=CAND_HAMMER;
     }
//--- Hammer - bearish
   else if(index==11)
     {
      res.bull=false;
      res.type=CAND_HAMMER;
     }
  }
Depending on the pattern size, one, two or three CANDLE_STRUCTURE are filled: cand1, cand2, cand3. See the code below:
if(m_pattern_size==1)
         IndexToPatternType(cand1[i],(int)total_combination[i]);
      else if(m_pattern_size==2)
        {
         IndexToPatternType(cand1[i],(int)elements[0]);
         IndexToPatternType(cand2[i],(int)elements[1]);
        }
      else if(m_pattern_size==3)
        {
         IndexToPatternType(cand1[i],(int)elements[0]);
         IndexToPatternType(cand2[i],(int)elements[1]);
         IndexToPatternType(cand3[i],(int)elements[2]);
        }
This enables the immediate analysis of the required number of candlesticks, no matter what pattern size was found on the chart.
For single-candlestick pattern, only one candlestick will be used for analysis and calculation in each specific case, while the entire set will be used for 2- and 3-candlestick patterns. For example, with a sampling range of 2000 candlestick, for 1-candle patterns the set will consist of one 2000th candlestick. With two candlesticks, a set consists of 2000th and 1999th, and so on.
Next, we consider the following fragment of the GetPatternType() method, which is responsible for finding each of the generated patterns on the chart.
//---
   for(int i=m_range_total2;i>5;i--)
     {
      if(m_pattern_size==1)
        {
         //--- Get the current candlestick type
         GetCandleType(symbol,cur_cand,m_timeframe2,i);                                         // Current candlestick
         //---
         for(int j=0;j<total_patterns;j++)
           {
            if(cur_cand.type==cand1[j].type && cur_cand.bull==cand1[j].bull)
              {
               m_pattern_total[j]++;
               GetCategory(symbol,i-3,ratings[j],m_timeframe2);
              }
           }
        }
      else if(m_pattern_size==2)
        {
         //--- Get the current candlestick type
         GetCandleType(symbol,prev_cand,m_timeframe2,i);                                        // Previous candlestick
         GetCandleType(symbol,cur_cand,m_timeframe2,i-1);                                       // Current candlestick
         //---
         for(int j=0;j<total_patterns;j++)
           {
            if(cur_cand.type==cand1[j].type && cur_cand.bull==cand1[j].bull &&
               prev_cand.type==cand2[j].type && prev_cand.bull==cand2[j].bull)
              {
               m_pattern_total[j]++;
               GetCategory(symbol,i-4,ratings[j],m_timeframe2);
              }
           }
        }
      else if(m_pattern_size==3)
        {
         //--- Get the current candlestick type
         GetCandleType(symbol,prev_cand2,m_timeframe2,i);                                       // Previous candlestick
         GetCandleType(symbol,prev_cand,m_timeframe2,i-1);                                      // Previous candlestick
         GetCandleType(symbol,cur_cand,m_timeframe2,i-2);                                       // Current candlestick
         //---
         for(int j=0;j<total_patterns;j++)
           {
            if(cur_cand.type==cand1[j].type && cur_cand.bull==cand1[j].bull &&
               prev_cand.type==cand2[j].type && prev_cand.bull==cand2[j].bull &&
               prev_cand2.type==cand3[j].type && prev_cand2.bull==cand3[j].bull)
              {
               m_pattern_total[j]++;
               GetCategory(symbol,i-5,ratings[j],m_timeframe2);
              }
           }
        }
     }
As we can see in the code above, the loop is at the very beginning and it stops at the sixth candlestick. Why? In the first article we mentioned that in order to analyze the pattern efficiency, we need to determine where the price goes after the pattern formation and find out what the pattern predicts, what's the prediction frequency and probability. For this assessment, we implemented the analysis of price movement within three candlesticks following the pattern. The current zero candlestick does not participate in the analysis because it is yet not complete.
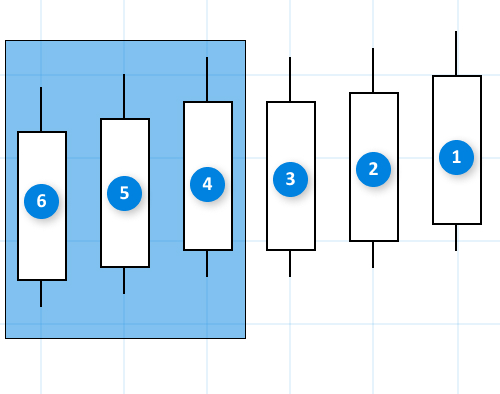
Fig.9 Calculation of the pattern efficiency assessment.
A three-candlestick pattern is shown in Figure 9. To evaluate its efficiency, we need three more candles except the zero one. Therefore, in order to fulfill these conditions for the current pattern, the first candlestick within the pattern can have a minimum index of 6.
After searching for patterns, counting their number, and evaluating by A, B, C categories , we need to process the received data and add results into a table. These calculations are performed in the CoefCalculation() method.
//---
   for(int i=0;i<total_patterns;i++)
      CoefCalculation(m_table2,i,ratings[i],m_pattern_total[i]);
The method arguments are:
- m_table2 — a link to the table to which the calculation results of each generated pattern will be added.
- i — table row.
- ratings[i] — an array of structures RATING_SET, which contains a set of category based ratings for each pattern.
- m_pattern_total[i] — an array containing the amount of found patterns of each type.
Let us consider the method in more detail.
//+------------------------------------------------------------------+
//| Calculating efficiency assessment coefficients                   |
//+------------------------------------------------------------------+
bool CProgram::CoefCalculation(CTable &table,const int row,RATING_SET &rate,int found)
  {
   double p1,p2,k1,k2;
   int sum1=0,sum2=0;
   sum1=rate.a_uptrend+rate.b_uptrend+rate.c_uptrend;
   sum2=rate.a_dntrend+rate.b_dntrend+rate.c_dntrend;
//---
   p1=(found>0)?NormalizeDouble((double)sum1/found*100,2):0;
   p2=(found>0)?NormalizeDouble((double)sum2/found*100,2):0;
   k1=(found>0)?NormalizeDouble((m_k1*rate.a_uptrend+m_k2*rate.b_uptrend+m_k3*rate.c_uptrend)/found,3):0;
   k2=(found>0)?NormalizeDouble((m_k1*rate.a_dntrend+m_k2*rate.b_dntrend+m_k3*rate.c_dntrend)/found,3):0;

   table.SetValue(1,row,(string)found);
   table.SetValue(2,row,(string)((double)found/m_range_total2*100),2);
   table.SetValue(3,row,(string)p1,2);
   table.SetValue(4,row,(string)p2,2);
   table.SetValue(5,row,(string)k1,2);
   table.SetValue(6,row,(string)k2,2);
//--- Update the table
   table.Update(true);
   table.GetScrollVPointer().Update(true);
   table.GetScrollHPointer().Update(true);
   return(true);
  }
As can be seen from the method implementation, due to the use of the structure we can clearly see how the pattern analyzing coefficients are calculated.
Demonstration of the application operation
As an example, we will test some of the generated patterns with different parameters.
Step 1. Selecting simple candlestick models.
First, we need to select all possible simple candlestick models in the Used candlesticks section, set "With repetitions" and "The number of candlesticks in a pattern" equal to one. Threshold trend value in points will be set to 200. Here is the setup:
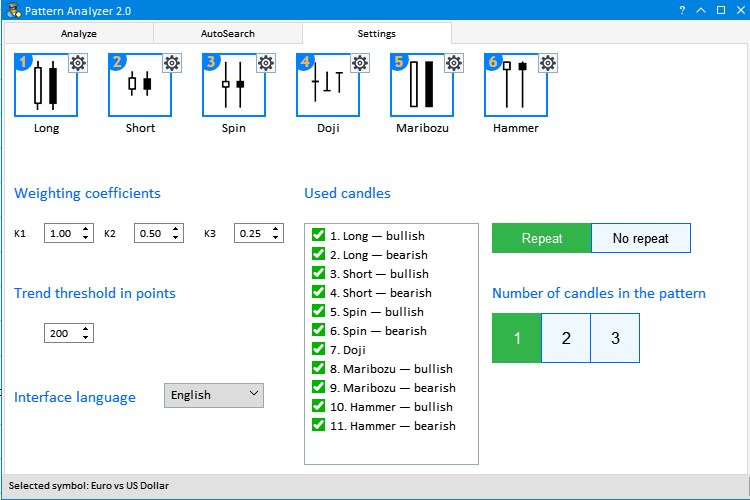
Fig.10 The first setup step for the analysis of generated patterns.
Now navigate to the AutoSearch tab, type Major in the search box and click Search. Then set the timeframe to Н1 and select the currency pair GBPUSD. Here are the testing results.
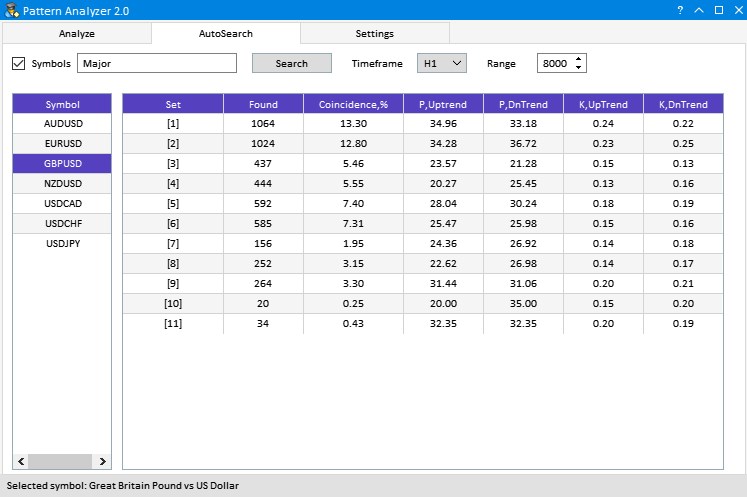
Fig.11 Results of testing generated one-candlestick patterns.
Select six most frequent candlestick types. These are 1,2,5,6,3,4 in the descending order.
Step 2. Testing two-candlestick patterns.
Now form two-candlestick patterns based on simple types. Navigate to the Settings tab and uncheck boxes from 7 to 11. This time we set the mode "No Repeat" and set the 'Number of candles in the pattern' to 2. The above configuration is shown in Fig.12.
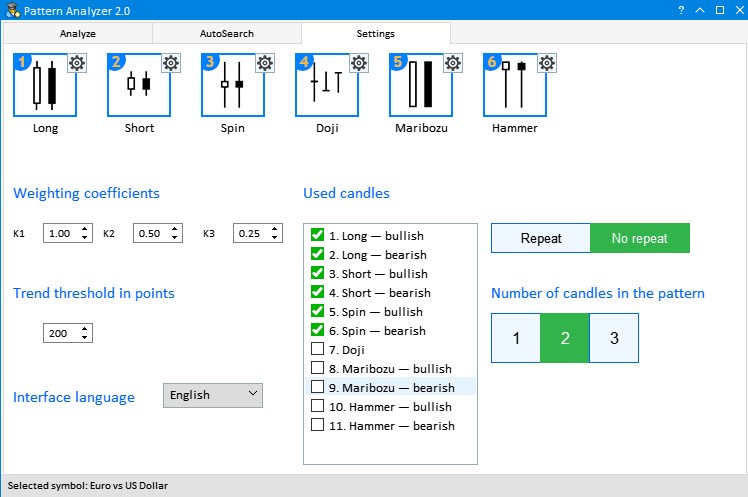
Fig.12 Testing configuration for generated two-candlestick patterns.
Navigate back to AutoSearch and click on GBPUSD. This generates various combinations of select candlesticks and provides their rating. But if the "Threshold trend value" is low, especially on higher timeframes, price movement results are often almost the same. By increasing the threshold value, you can set stricter conditions for pattern search. For example, below are the results for the threshold equal to 400:
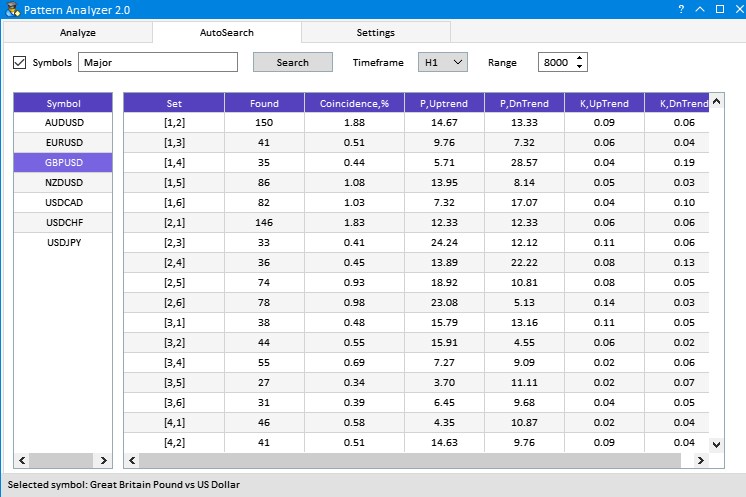
Fig.13 Testing result with an increased Trend threshold value.
Among the obtained results, I tried to find a large price movement in one direction and several times less movement in the opposite one. As can be seen from Figure 13, the situation was encountered twice: [1,4] and [2,6]. These are the patterns Long(bullish)—Short(bearish) and Long(bearish)—Spinning Top(bearish). The second pattern variant is more preferable, because the frequency of its occurrence is almost to times higher.
Now let us test three-candlestick patterns. With all the possible simple model options we get too many pattern variants, therefore we will use only 4 types, which were often encountered in previous tests — 1,2,5,6. A properly configured Settings tab looks as follows:
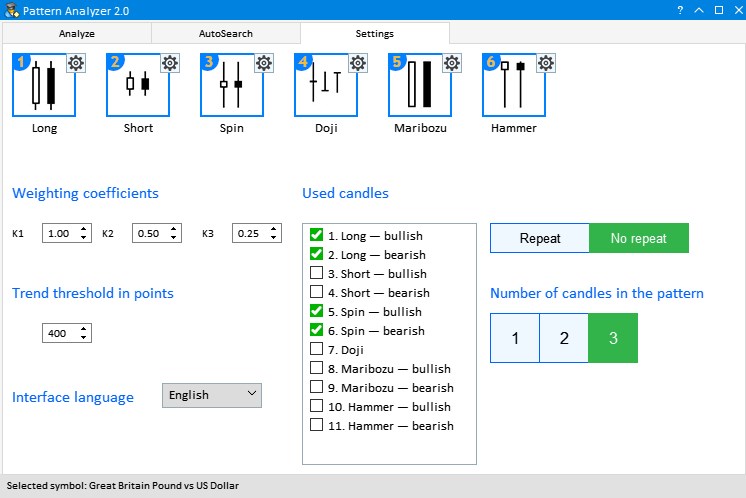
Fig.14 Testing configuration for generated three-candlestick patterns.
The Threshold trend value is still equal to 400. Then open the AutoSearch tab and again click on GBPUSD. The same principle for selecting well-performing patterns is used here: a much larger price movement in one direction than in the opposite one. This can be seen from the efficiency coefficient. For example, twice in a row I encountered very interesting results having very good coefficients and probability parameters.
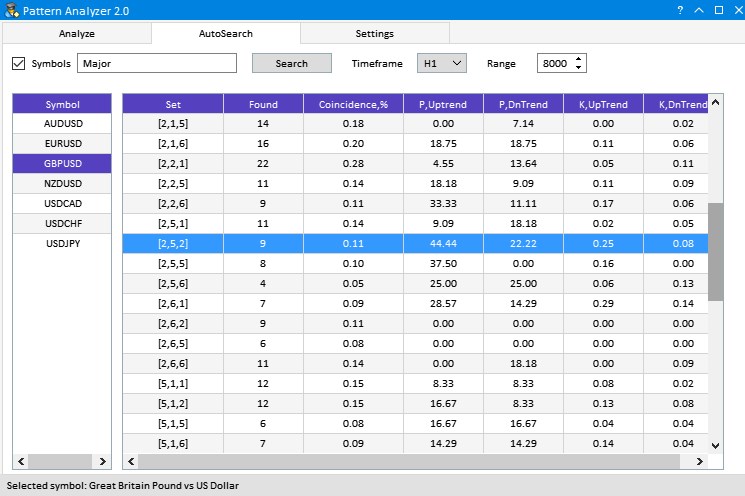
Fig.15 Results of testing generated three-candlestick patterns.
These are patterns [2,5,2] and the next [2,5,5]: Long(bearish)—Spinning Top(bullish)—Long(bearish) and Long(bearish)—Spinning Top(bullish)—Spinning Top(bullish). The first candlestick pattern showed a high probability of an uptrend and a large efficiency coefficient. The second one has good one-direction probability but a little lower efficiency coefficient.
A large number of parameter combination can provide other interesting results. When testing, it is not recommended to use all the eleven candlestick types at once, since data processing may take much time. The maximum possible combinations of patterns for analysis is equal to 1463, not taking into account the sample range, the timeframe, the trend threshold value and individual settings of simple candlestick types. Such a large analysis requires much time.
Conclusions
The archive attached below contains all described files properly arranged into folders. For their proper operation, you only need to save the MQL5 folder into the terminal folder.
Programs used in the article
| # |
Name |
Type |
Description |
|---|---|---|---|
| 1 |
PatternAnalyzer.mq5 | Graphical interface |
Toolbar for analyzing candlestick patterns |
| 2 | MainWindow.mqh | Code Base | GUI library |
| 3 | Program.mqh | Code Base | Library of methods for creating interface and calculation elements |