Developing graphical interfaces for Expert Advisors and indicators based on .Net Framework and C#
Vasiliy Sokolov | 5 April, 2019
Introduction
Since October 2018, MQL5 supports native integration with Net Framework libraries. Native support means that types, methods and classes placed in the .Net library are now accessible directly from an MQL5 program without prior declaration of the calling functions and their parameters, as well as without the complex typecasting of the two languages. This can indeed be considered a definite breakthrough, since the giant .Net Framework code base and the power of the C# language are now available out of the box for all MQL5 users.
Net Framework features are not limited by the library itself. The integrated freemium Visual Studio development environment greatly simplifies the development process. For example, you can use it to develop a full-fledged Windows application in the drag-n-drop mode with all its elements behaving in the usual way like in any other graphical Windows application. This is what MQL was missing.
Over the course of the language existence, multiple libraries greatly facilitating the graphical application development inside an MQL application have been created. However, no matter how good these libraries are, they still consist of a set of code that requires understanding as well as the ability to integrate it with the code of custom EAs and indicators. In other words, non-programmers can hardly use them. The gap between the simplicity of creating forms in Visual Studio and the complexity of configuring graphic libraries in MQL would have still remained today if not for the integration with the .Net Framework libraries.
This article deals with the development of custom graphical interfaces (GUIs) for MQL5 trading experts and indicators. The GUIs are standard Windows forms containing a set of standard graphical elements where each element is closely interconnected with the EA's trading logic.
To develop a graphical application, we need to integrate an MQL program with the .Net libraries. The article tackles this task in detail as well. Therefore, it will be useful not only to those who want to create any graphical form for their MQL program, but also to those interested in integration with a third-party .Net code base.
The emphasis is made on the simplicity of the proposed method. The main task is to make the interaction with the C# code as simple as possible. The interaction itself is arranged so that the C# code is created without user intervention! This is possible thanks to the advanced C# language tools and rich features of Visual Studio.
Thus, the readers do not need any knowledge of C#. The main idea is to place the graphical controls, like buttons or text labels, in visual mode and then provide each element with the appropriate logic using MQL language. Integration of the panel with the MQL program is done automatically "behind the scenes".
Interaction with .Net GUIs. General principles
.Net is a proprietary name of the common language platform developed by Microsoft in 2002 as an alternative to the popular Java platform. The platform is based on Common Language Runtime (CLR). Unlike a conventional program compiled directly into a machine code and launched directly on a computer, a .Net application runs on the CLR virtual machine. Thus, .Net is a kind of environment applied by a program developed using a high-level language to run on a user's PC.
C# is a main programming language in Net. When someone talks about C#, they mean Net, and vice versa — Net is clearly associated with C#. Simplistically, we can say that Net is an execution environment for programs developed mostly in C#. Our article is not an exception. All the code presented in the article is written in C#.
After a program for the .Net platform has been developed, it is compiled into an intermediate low-level CIL (Common Intermediate Language) language byte code executed by the CLR virtual machine. The code itself is packaged into standard Windows program entities: exe executable modules or dll dynamic libraries. The compiled code for the Net virtual machine has a high-level structure, its properties are easy to explore and we can see what types of data it contains. This remarkable feature is used by the latest versions of the MQL compiler. During compilation, the compiler downloads the dynamic Net library and reads the public static methods defined in it. In addition to the public static methods, the MQL compiler understands the C# basic data types. These data types include:
- All integer data types: long/ulong, int/uint, byte, short/ushort;
- Floating-point numbers float/double;
- 'char' character data type (unlike MQL, where char and uchar are byte data types, in С#, this type is used for defining a symbol);
- 'string' types;
- Simple structures containing the basic types listed above as their fields.
In addition to the types listed, the MQL compiler sees C# arrays. Currently, it is impossible to gain standard access to the array elements by the '[]' indexer in an MQL program. I can confidently say that the support of types will be expanded in the future. However, today's capabilities are quite enough for arranging a full-fledged interaction.
In our project, we will develop forms using the Windows Forms technology. This is a fairly simple set of APIs allowing even an unprepared user to draw a GUI quickly and easily. Its feature is an event-oriented approach. This means that when a user clicks on a button or enters a text in the input window, a corresponding event is generated. After processing such an event, a C# program determines that a particular graphical element of the form has been modified by the user. Working with events is a rather complicated process for those unfamiliar with C#. A special intermediate code is needed to handle events occurring in the form and pass them to the MQL program running in the MetaTrader 5 terminal.
Thus, our project will contain three independent objects that will interact with each other:
- A program in the form of an EA or indicator developed in MQL (EX5 file) to receive events from the graphical window or pass them to that window using a special controller;
- A controller in the form of the Net dynamic library (DLL file) the MQL program is to refer to;
- A graphical window developed by a user in C# as an independent program (EXE) or a dynamic library (DLL) whose events are to be analyzed by the controller.
All three objects will interact with each other through the message systems. One message system is to be used in the interaction between the MQL application and the controller, while another one is to be used in the interaction between the controller and the user window.
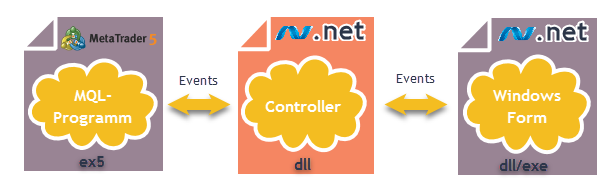
Fig. 1. Interaction between an MQL program and a C# graphical application. General structure
The structure is presented in the most general form, and so far does not reveal the specifics of the interaction between the described parts of our future graphical application. However, considering the proposed scheme, it becomes clear that our system is to be highly distributed: each module will be independent and will not require intervention in its code if any other module undergoes changes. In the following sections, we will have a detailed look at the interaction between these parts and the means, by which this separation will be implemented.
Installing and configuring Visual Studio
Now that we have prepared the general implementation structure, it is time to proceed with the project. To do this, you should have the working version of Visual Studio installed on your PC. If you already have this program installed, you can skip this section. Keep reading if you are a beginner and have never dealt with the program before.
Visual Studio is a professional development environment for a wide variety of programming tasks. The software is presented in several editions. We are going to work with the Community edition. This is a freemium version. After thirty days of use, it should be registered for free. To do this, you should undergo the standard verification procedure using one of the Microsoft services. Here I will show the basic steps of downloading, installing and registering the platform so that newcomers can start using its functionality in the shortest possible time and without much hurdles.
Below is a step-by-step guide for installing Visual Studio on a computer. Screenshots for the international English version of the installer are provided below. The specific look may differ in your case depending on the regional settings of your PC.
First, go to the official Visual Studio website visualstudio.microsoft.com and choose the appropriate distribution kit. Select the Community version:
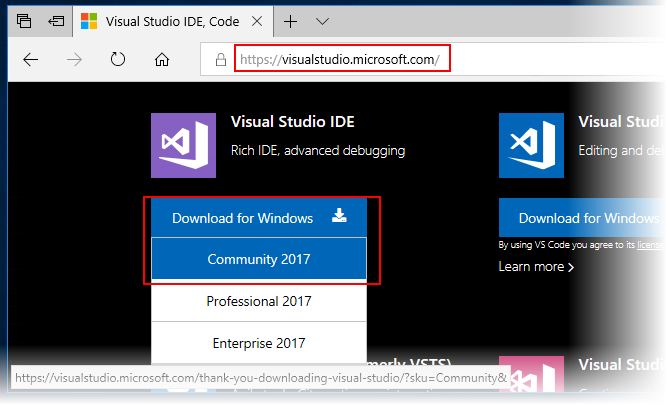
Fig. 2. Selecting the VisualStudio distribution kit
After that, the download of the Visual Studio installer starts. If the website prompts you to register, skip this step. We will do that later.
After launching the installer, a window will appear notifying you of the need to configure the installer. Click Сontinue:
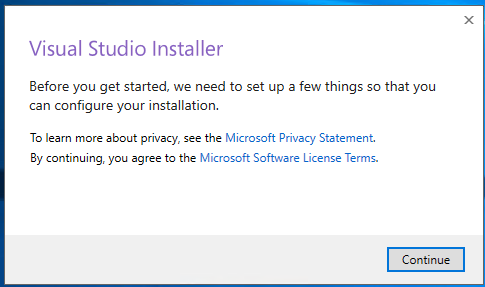
Fig. 3. Click Agree to continue the installation
The download of the necessary installation files starts next. It may take some time, depending on your bandwidth. After the download is complete, the installation configuration window appears. Select the ".Net desktop development" option out of the proposed components:
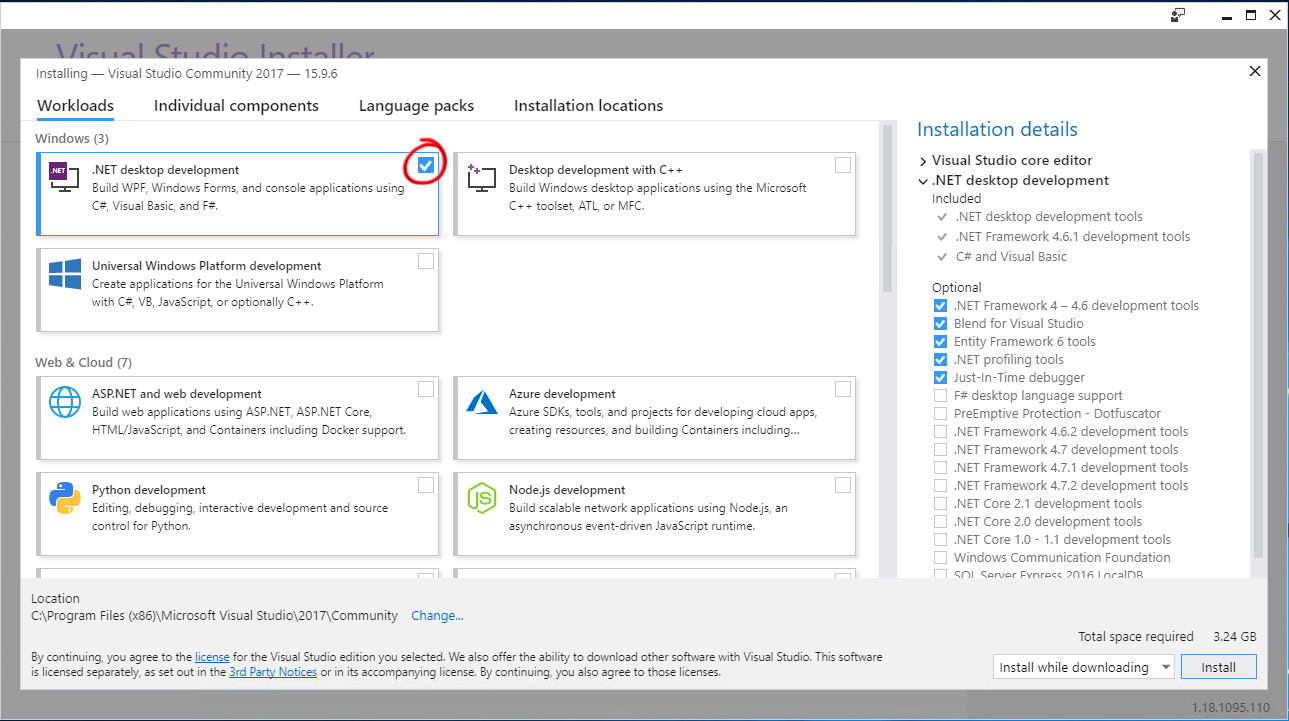
Fig. 4. Selecting the components
Click Install. The installation process begins. It may also take some time:
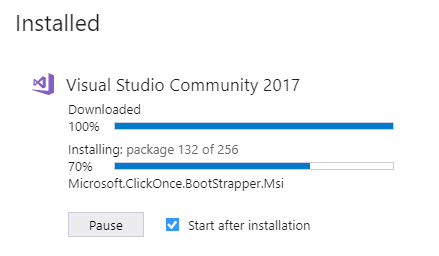
Fig. 5. Installation
After the installation is complete, Visual Studio is launched automatically. If it is not, start it manually. During the first launch, Visual Studio will ask you to sign in to your account or create a new one. If you do not have an account, create it now by clicking the "Create One" link:
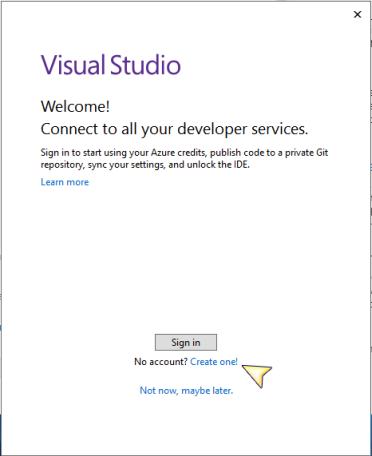
Fig. 6. Creating a new account
Registration of a new mailbox will start. This mailbox will be tied to all Microsoft services. Complete registration performing the proposed actions consistently. The registration process is quite standard, so we will not dwell on it in detail.
If you do not want to register, click "Not now, maybe later" to skip this step. However, keep in mind that Visual Studio will require registration in thirty days. Otherwise, it will stop working.
Creating the first form. Quick start
After registering and logging in to the account, Visual Studio will start. Let's develop our first visual form and connect it to MetaTrader. This section will show you how easily this can be done.
First, create a new project. Select File -> New -> Project. Project type selection window pops up:
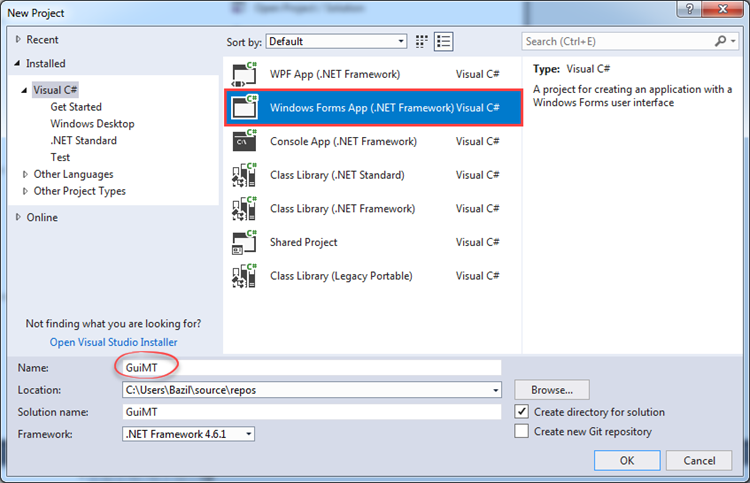
Fig. 7
Select "Windows Form App (.Net Framework)". Enter the project name in the Name field. Let's change the default name and call our project GuiMT. Click OK. Visual Studio displays a visual designer with an automatically created form:
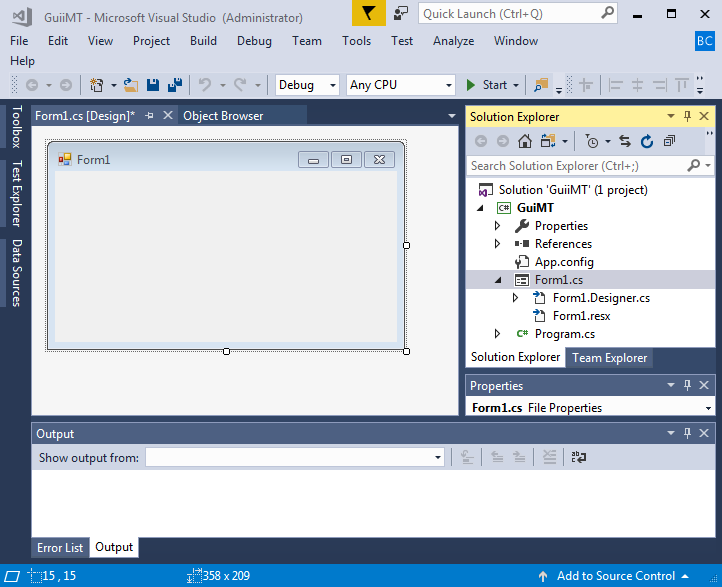
Fig. 8. Creating a graphical form in the Visual Studio window
Solution Explorer window contains the project structure. Note the Form1.cs. This is a file containing the program code creating the form's graphical representation that we see in the Form1.cs[Disign] graphical editor window. Remember the file's name. We will need it later.
The visual designer allows us to change the form size using mouse. You can also place custom elements on the form. These features are sufficient for our first experiments. Open the Toolbox tab and select the Button element on the side tabs to the left of the main window and in the All Windows Form section:
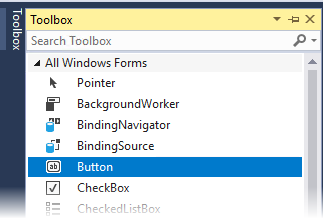
Fig. 9. Selecting the button
Use the mouse to drag it onto the main surface of Form1:
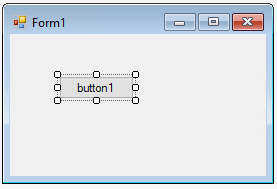
Fig. 10. The first form
The button size can also be changed. You can experiment with the size of the main window and the button location. Now that the form has the button, we will assume that our first application is ready. Let's compile it. This can be done in different ways, but now we just run it in debug mode. To do this, click Start:
![]()
Fig. 11. The button for running an application in debug mode
After clicking the button, the application is compiled and launched automatically. After the application is launching, it can be stopped by simply closing the window or stopping the debug in Visual Studio by clicking Stop:
![]()
Fig. 11. Debug stop button
Our first application is ready. The last thing we need to do is find out the absolute path to the program we have just created. The easiest way is to simply look at the path in the Project Folder field of the Properties window. The GuiMT project should be highlighted in the Solution Explorer window:
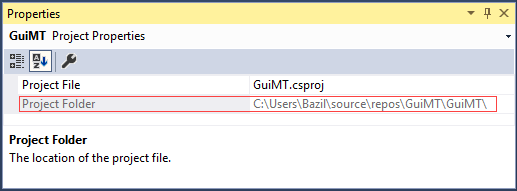
Fig. 12. The absolute path to the application in the Project Folder line
The path in this window is related to the project itself. The specific assembly of our program is to be located in one of the subdirectories depending on the compilation mode. In our case, this is .\bin\debug\<Custom_project_name.exe>. Thus, the full path to the application is as follows: C:\Users\<User_name>\source\repos\GuiMT\GuiMT\bin\debug\GuiMT.exe. After we have defined the path, we should save it somewhere, since we need to insert it to our MQL code later.
Receiving the latest version of GuiController.dll. Working with GitHub
The files attached to this article contain the GuiController.dll library. Place it to the \MQL5\Libraries directory. However, it often happens that the library continues to be updated and developed making the archive attached to the article obsolete. To avoid that and all similar issues, I recommend using a version control system allowing the new code to become available for users automatically. Our project is no exception. Let's use the GitHub.com service for storing open source codes to get the latest version of GuiController. The controller's source code is already contained in this repository. All we need to do is to download its project and compile the controller into the dynamic library. If you cannot or do not want to use the system, simply skip this section. Instead, copy the GuiController.dll file to the MQL5\Libraries directory.
If you still have the current solution open, close it (File -> Solution). Now, move to the Team Explorer tab and click the Clone link. Enter the project address in the yellow field:
https://github.com/PublicMqlProjects/MtGuiController
The next field specifies the local path used to save the downloaded project. The path is selected automatically according to the downloaded project name, so we will not change it. The screenshot below shows the values to be entered to Team Explorer:
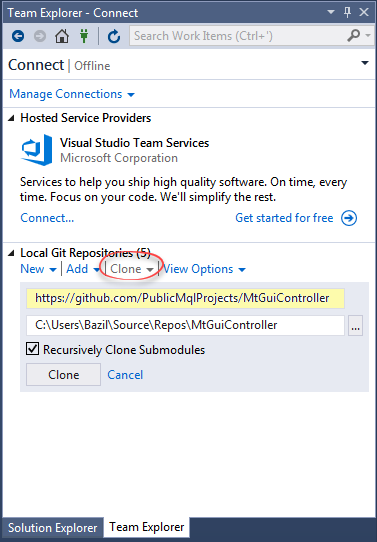
Fig. 13. Connecting to the remote source code repository
Now that everything is ready, click Clone. The project with the latest version of MtGuiController will appear at the specified address after some time. Open it via the command in the File -> Open -> Project/Solution menu. After downloading and opening the project, it should be compiled. To do this, press F6 or select Build -> Build Solution in the menu. Find the compiled MtGuiController.dll file in the MtGuiController\bin\debug folder and copy it to the directory of the MetaTrader 5 libraries: MQL5\Libraries.
If for some reason you cannot get the latest version via github, copy the controller from the archive attached below.
Integrating the first application with MetaTrader 5
Now that we have the first application and the controller to broadcast graphical window signals to MetaTrader, we have to perform the final part: write an MQL program as an EA that would receive events from the window via the controller. Let's develop a new EA in MetaEditor named GuiMtController with the following contents:
//+------------------------------------------------------------------+
//|                                              GuiMtController.mq5 |
//|                        Copyright 2019, MetaQuotes Software Corp. |
//|                                              http://www.mql5.com |
//+------------------------------------------------------------------+
#property copyright "Copyright 2018, MetaQuotes Software Corp."
#property link      "http://www.mql5.com"
#property version   "1.00"
#import  "MtGuiController.dll"
string assembly = "С:\\Users\\Bazil\\source\\repos\\GuiMT\\GuiMT\\bin\\Debug\\GuiMT.exe";
//+------------------------------------------------------------------+
//| Expert initialization function                                   |
//+------------------------------------------------------------------+
int OnInit()
  {
//--- create timer
   EventSetMillisecondTimer(200);
   GuiController::ShowForm(assembly, "Form1");
//---
   return(INIT_SUCCEEDED);
  }
//+------------------------------------------------------------------+
//| Expert deinitialization function                                 |
//+------------------------------------------------------------------+
void OnDeinit(const int reason)
  {
//--- destroy timer
   GuiController::HideForm(assembly, "Form1");
   EventKillTimer();
  }
//+------------------------------------------------------------------+
//| Expert tick function                                             |
//+------------------------------------------------------------------+
void OnTick()
{
//---
}
//+------------------------------------------------------------------+
//| Timer function                                                   |
//+------------------------------------------------------------------+
void OnTimer()
  {
//---
   for(static int i = 0; i < GuiController::EventsTotal(); i++)
   {
      int id;
      string el_name;
      long lparam;
      double dparam;
      string sparam;
      GuiController::GetEvent(i, el_name, id, lparam, dparam, sparam);
      if(id == ClickOnElement)
         printf("Click on element " + el_name);
   }
  }
//+------------------------------------------------------------------+
As I have already mentioned, the MtGuiController.dll library should be placed in the MQL5\Libraries directory to compile the code. Besides, the absolute path specified in the line:
string assembly = "С:\\Users\\Bazil\\source\\repos\\GuiMT\\GuiMT\\bin\\Debug\\GuiMT.exe";
should be replaced with the actual location of your program with a window.
If all is done correctly, the EA is compiled. After it is launched, our window appears on the background of the main MetaTrader window:
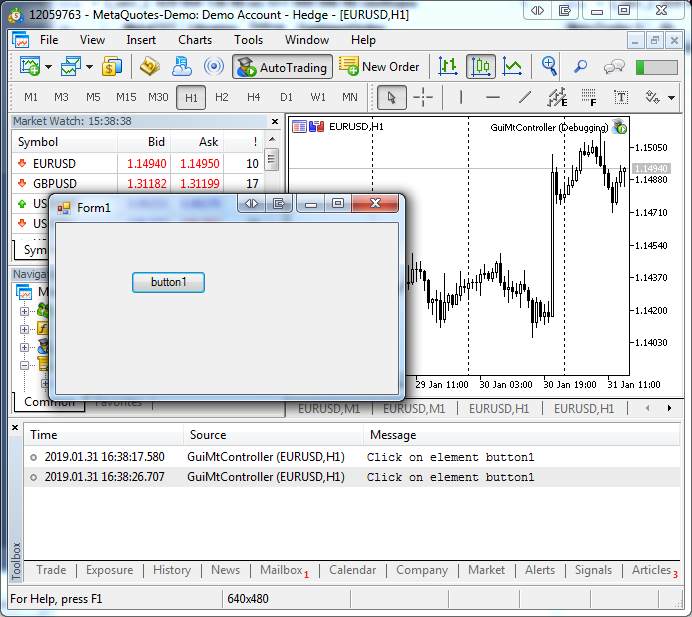
Fig. 14. EA with the integrated graphical application in C#
When clicking button1, the EA displays the "Click on element button1" message on the Experts tab indicating that it has received the button pressing event.
MQL program interactions with GuiController. Event model
Let's thoroughly analyze the MQL code listing shown above to understand how the program we have developed works.
The first things we can see are the import directive and assembly string:
#import  "MtGuiController.dll"
string assembly = "C:\\Users\\Bazil\\source\\repos\\GuiMT\\GuiMT\\bin\\Debug\\GuiMT.exe";
The first string informs the compiler that calls to the open static class methods located in MtGuiController.dll are to be used. In this assembly, there is no need to specify the exact methods we are to refer to. The compiler does that automatically.
The second string contains the path to the form we are to manage. This address should correspond to the actual location of your form.
The standard OnInit code of the EA initialization procedure comes next:
//+------------------------------------------------------------------+
//| Expert initialization function                                   |
//+------------------------------------------------------------------+
int OnInit()
  {
//--- create timer
   EventSetMillisecondTimer(200);
   GuiController::ShowForm(assembly, "Form1");
//---
   return(INIT_SUCCEEDED);
  }
Here, the high-frequency timer is set and one of the custom class methods is called for the first time. The timer function will be described a bit later. Now let's have a look at calling ShowForm:
GuiController::ShowForm(assembly, "Form1");
In C#, functions cannot exist separately from classes. Thus, each function (method) has its own class it is defined in. The single GuiController class is defined in MtGuiController.dll. It contains static methods allowing you to manage windows. There are no other classes in MtGuiController.dll, which means the entire management is performed via the class, which is very convenient since the user works with a single interaction interface and does not search for the necessary function within a set of disparate definitions.
The first thing performed in the initialization block is calling the ShowForm method. As the name suggests, it launches the process of displaying the form. The first parameter of the method sets the absolute path to the file the form is defined in, while the second sets the name of the form itself. Several forms can be defined in a single file. Therefore, it is necessary to specify the exact form we want to launch in the file. In this case, the form is named after the form class assigned by Visual Studio to the custom form by default. If we open the previously created project in Visual Studio and the Form1.Designer.cs file in the code view mode, we will see the necessary name of the class:
partial class Form1
{
        /// <summary>
        /// Required designer variable.
        /// </summary>
        private System.ComponentModel.IContainer components = null;
        ...
}
It is necessary to give more meaningful class names further on. In Visual Studio, this can be easily done by just renaming the class and all references to it. In this case, the value of the second parameter of the ShowForm method should also be changed.
The next function is OnTimer. According to the timer setting, it is called five times per second. It contains the most interesting code of our entire project. The function body contains the for loop iterating the serial numbers of events:
for(static int i = 0; i < GuiController::EventsTotal(); i++)
   {
      int id;
      string el_name;
      long lparam;
      double dparam;
      string sparam;
      GuiController::GetEvent(i, el_name, id, lparam, dparam, sparam);
      if(id == ClickOnElement)
         printf("Click on element " + el_name);
   }
From the controller's point of view, an event is any user action directed at the form. For example, when a user clicks a button or enters a text into a text box, the controller receives the corresponding event and places it in the event list. The number of events in the list is broadcast by the GuiController::EventsTotal() static method that can be called by our MQL program.
Windows Forms features a lot of events. Each element, such as a form, a button or a text box, contains dozens of events. Not all events can be handled, but this is not necessary. GuiController handles only the most important ones. In the current version, there are only three handled events. They are as follows:
- Button click event;
- Text entering completion event;
- Horizontal scroll event.
The list is to be expanded in the future, although its current state is already sufficient for the purposes of the article.
After the event supported by our GuiController occurs, it is handled and added to the event list. Handling an event consists of creating data, upon receiving which an MQL program can define the event type and its parameters relatively easily. That is why the data format of each event has a very similar structure to the event model of the OnChartEvent function. Due to this similarity, a user working with GuiController does not need to learn the format of a new event model. Of course, the presented approach has its own difficulties, for example, complex events (like scrolling) are extremely difficult to fit into the proposed format, but these issues are easily solved using C# language tools and its advanced object-oriented programming model. In the meantime, the proposed model is sufficient enough to solve our tasks.
Every time a new event arrives, its data become available for receiving via reference types using the GuiController::GetEvent static method. This method has the following prototype:
public static void GetEvent(int event_n, ref string el_name, ref int id, ref long lparam, ref double dparam, ref string sparam)
Let's describe its parameters:
- event-n — serial number of an event to be received. Thanks to the ability to specify the serial number of an event, it is easier to control new events, no matter how numerous they are;
- el_name — name of the element that generated this event;
- id — event type;
- lparam — event's integer value;
- dparam — event's real value;
- sparam — event's string value.
As you can see, the GuiController event model strongly resembles the OnChartEvent one. Any event in GuiController always has a serial number and a source (element name) that generated it. The remaining parameters are optional. Some events, like clicking a button, has no additional parameters at all (lparam, dparam, sparam), while a text completion event in the sparam parameter contains the text entered into the field by a user.
Below is a table containing events and their parameters that are currently supported:
| Event name | ID | Parameters |
|---|---|---|
| Exception | 0 | sparam - message causing the exceptions |
| ClickOnElement | 1 | - |
| TextChange | 2 | sparam - new text entered by a user |
| ScrollChange | 3 | lparam - previous scroll level dparam - current scroll level |
Now that we have dealt with the event model in GuiController, we can finally comprehend the code presented inside the for loop. String:
GuiController::GetEvent(i, el_name, id, lparam, dparam, sparam);
gets an event by i index. If an event type corresponds to a button click, the button name and a message about its pressing are displayed in the terminal console:
if(id == ClickOnElement)
   printf("Click on element " + el_name);
Note that the ID is compared with the ClickOnElement constant not defined anywhere in the MQL program code. This constant is part of the enumeration defined in GuiController itself in C#
/// <summary>
/// Type of gui event
/// </summary>
public enum GuiEventType
{
    Exception,
    ClickOnElement,
    TextChange,
    ScrollChange
}
As you can see, the compiler understands and works with external enumerations defined in Net libraries.
Let's focus again on how messages are received. The process involves the timer, although any other function called periodically (like OnTick) can be used. However, periodicity is very difficult to control. It is not certain how much time will pass between two consecutive OnTick calls.
Moreover, it is impossible to guarantee the periodicity of a call (even OnTimer). For example, in the strategy tester, the OnTimer threshold call frequency is very different from the one that can be set for this function in real work. These effects make it possible for users to generate several events in a row between two function calls. For example, users may click the button two or three times before an MQL program has time to react to the first click.
The event queue addresses this issue. Each event enters the list and then waits for its parameters to be retrieved by the MQL program. The program remembers the event's last number by defining a static variable in the function. During the next launch, it receives newly arrived events! That is why the for loop has a non-standard signature:
//-- The loop remembers the event's last index and starts working from it during the next launch of the function
for(static int i = 0; i < GuiController::EventsTotal(); i++)
Events can be received using the GuiController::GetEvent method. You can also send them via GuiController::SendEvent. The second method is used when some data should be sent to a window to change its contents. It has the same prototype as GetEvent. The only difference is that it contains no serial number of an event since it is meaningless here. We will not dwell on it in detail, however, we will show working with it in an example in the final part of the article.
The last method we have not studied yet is GuiController::HideForm. Its signature is similar to ShowForm, while the action is mirror opposite: this method hides the window. To do that, its location and name should be specified.
As you can see, the MQL code for displaying the form and analyzing incoming events is quite compact and simple. In fact, the code describes three simple steps:
- Display a window when launching the program;
- Receive new data from the window;
- Hide the window when exiting the program.
As you can see, the structure is as simple as possible. Also, note the code of the form we have developed. Although the window form contains the same code, we have not written a single code string in C#. Visual Studio's enhanced means of code auto generation, as well as GuiController, made all the work for us. This is how the power of the Net technology is manifested, for the ultimate goal of powerful environments is simplicity.
Under the hood of GuiController
If you are not well-versed in C#, you can skip this section. It will be of interest to those who want to understand how GuiController works and how access to individual isolated Net applications takes place.
GuiController is a shared class consisting of two parts: static and instance ones. The static part of the class contains open static methods for interacting with MetaTrader. This part of the class implements the interface between MetaTrader 5 and the controller itself. The second part is the instance one, which means that the data and methods of this part exist only at the instance level. Their task is to interact with the independent Net assemblies graphic windows are located in. The graphic window in Windows Forms is a class inherited from the Form base class. Thus, with each user window, you can work on a higher and abstract level of the Form class.
Net assemblies (such as DLL or EXE) contain Net types that are inherently open. Getting access to them, their properties and even methods is quite simple. This can be done using a mechanism called reflection in Net. Thanks to this mechanism, every file, like DLL or EXE, created in Net can be examined for the presence of the necessary element. This is what the GuiController class does. When the absolute path to a Net assembly is passed to it, the controller loads this assembly using a special mechanism. After that, it finds the graphic window that needs to be displayed. Let's provide the GetGuiController method code performing the work:
/// <summary>
/// Create GuiController for windows form
/// </summary>
/// <param name="assembly_path">Path to assembly</param>
/// <param name="form_name">Windows Form's name</param>
/// <returns></returns>
private static GuiController GetGuiController(string assembly_path, string form_name)
{
    //-- Load the specified assembly
    Assembly assembly = Assembly.LoadFile(assembly_path);
    //-- Find the specified form in it
    Form form = FindForm(assembly, form_name);
    //-- Assign the managing controller to the detected form
    GuiController controller = new GuiController(assembly, form, m_global_events);
    //-- Return the managing controller to the calling method
    return controller;
}
This procedure resembles the actions of a so-called resource grabber: a special program allowing the extraction of media content like icons and images from the binary code of a program.
The search for a form is performed by using reflection. The FindForm method receives all types defined in the assembly passed to it. Among these types, it searches for those whose base type matches the Form type. If the name of a detected type also matches the required one, then an instance of this type is created, which is returned as the form:
/// <summary>
/// Find needed form
/// </summary>
/// <param name="assembly">Assembly</param>
/// <returns></returns>
private static Form FindForm(Assembly assembly, string form_name)
{
    Type[] types = assembly.GetTypes();
    foreach (Type type in types)
    {
        //assembly.CreateInstance()
        if (type.BaseType == typeof(Form) && type.Name == form_name)
        {
            object obj_form = type.Assembly.CreateInstance(type.FullName);
            return (Form)obj_form;
        }
    }
    throw new Exception("Form with name " + form_name + " in assembly " + assembly.FullName + "  not find");
}
The most exciting moment is the development of the application itself and its launch. After all, the real program comes to life from the external set of binary data and starts working as an independent application.
After creating the instance, a controller is assigned to it. The controller is an instance of the GuiController class that monitors the form submitted to it. The controller's objectives include tracking events and passing them for the form.
The form is launched and deleted in a parallel thread. This prevents the current thread from being blocked while waiting for the completion of the current operation. Suppose that we have launched the window in the current thread. As the window works, the external process that called it hangs waiting for the window to close. Launching the window in a separate thread solves this issue.
The corresponding controller methods are responsible for starting and deleting a window:
/// <summary>
/// The custom form called from MetaTrader should be run asynchronously
/// to ensure the interface remains responsive.
/// </summary>
public static void ShowForm(string assembly_path, string form_name)
{
    try
    {
        GuiController controller = GetGuiController(assembly_path, form_name);
        string full_path = assembly_path + "/" + form_name;
        m_controllers.Add(full_path, controller);
        controller.RunForm();
    }
    catch(Exception e)
    {
        SendExceptionEvent(e);
    }
}

/// <summary>
/// After the EA finishes working with the form, its execution should be completed.
/// </summary>
public static void HideForm(string assembly_path, string form_name)
{
    try
    {
        string full_path = assembly_path + "/" + form_name;
        if (!m_controllers.ContainsKey(full_path))
            return;
        GuiController controller = m_controllers[full_path];
        controller.DisposeForm();
    }
    catch(Exception ex)
    {
        SendExceptionEvent(ex);
    }
}
The last controller-related thing we should consider is working with events. When a new form is created using reflection, it is passed to the method that subscribes to its events, or rather only to the ones the controller can handle. The <element - event handler list> mapping is created for that. In this mapping, the event handler is subscribed to the necessary event:
/// <summary>
/// Subscribe on supported events
/// </summary>
/// <param name="form">Windows form</param>
private void SubscribeOnElements(Form form)
{
    Dictionary<Type, List<HandlerControl>> types_and_events = new Dictionary<Type, List<HandlerControl>>();
    types_and_events.Add(typeof(VScrollBar), new List<HandlerControl>() { vscrol => ((VScrollBar)vscrol).Scroll += OnScroll });
    types_and_events.Add(typeof(Button), new List<HandlerControl>()  { button => ((Button)button).Click += OnClick });
    types_and_events.Add(typeof(Label), new List<HandlerControl>());
    types_and_events.Add(typeof(TextBox), new List<HandlerControl>() { text_box => text_box.LostFocus += OnLostFocus, text_box => text_box.KeyDown += OnKeyDown });
    foreach (Control control in form.Controls)
    {
        if (types_and_events.ContainsKey(control.GetType()))
        {
            types_and_events[control.GetType()].ForEach(el => el.Invoke(control));
            m_controls.Add(control.Name, control);
        }
    }
}
Each form has an open list of elements it contains. While searching through the list of elements, the method finds the ones the controller is capable of supporting and subscribes to the events it needs. If the element on the form is not supported by the controller, it is simply ignored. The events associated with it are not delivered to the MQL program, and the MQL program itself is not able to interact with this element.
Trading panel based on GUIs
Now that we have covered all the parts of our system, it is time to create something really useful. We will make an analogue of the standard trading panel from the upper left corner of the chart:

Fig. 15. MetaTrader 5 built-in trading panel
Of course, our panel will consist of standard graphical elements of the Windows OS window, so it will have a simpler design, while the functionality will remain identical.
We can develop such a panel from scratch. However, description of the visual designer exceeds the boundaries of the article's topic. Therefore, let's simply upload the project containing the panel to Visual Studio. This can be done in two ways: copy the project from the archive and open it in Visual Studio or download it from the remote Git repository at the following address:
https://github.com/PublicMqlProjects/TradePanelForm
In this case, working with git is the same as described in the appropriate section, so let's not dwell on that again.
After downloading and opening the project, you will see the following form:
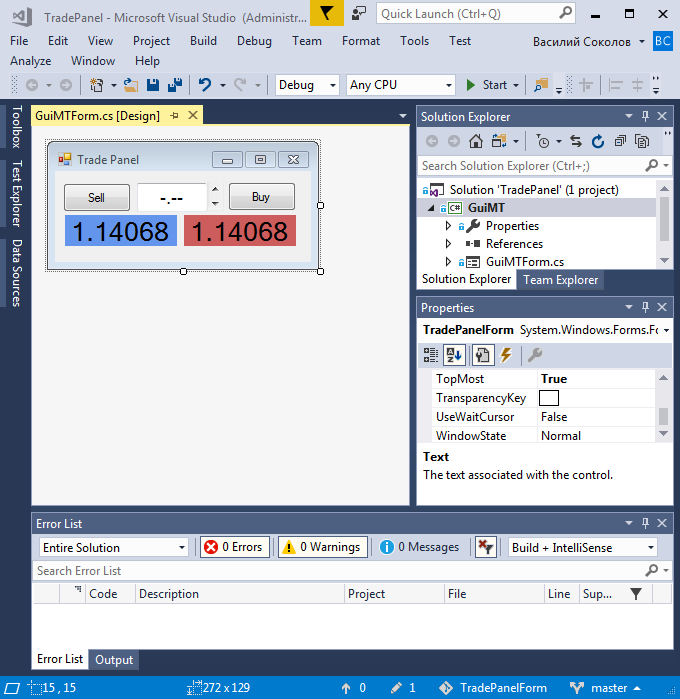
Fig. 16. TradePanel window in the Visual Studio editor
The project contains the layout of the trading panel. In real projects like this, we need to constantly get access to the elements placed on this form, as well as send events to them. For these purposes, it will be necessary to refer to each element by its name. Therefore, the names of the elements should be meaningful and memorable. Let's see how the elements we are to use are called. To view the name of each element, find the Name property in the Properties window while selecting the necessary element first. For example, the button labeled Buy has the name Buttonbuy:
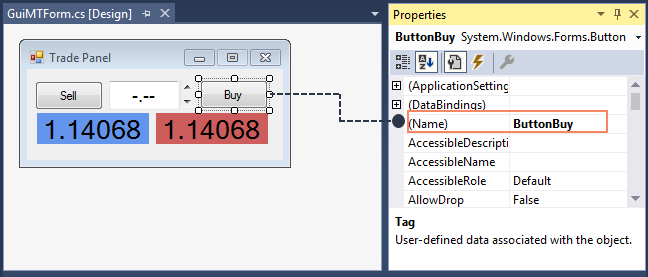
Fig. 17. Element name in the Properties window
It is necessary to distinguish the text depicted on the element and the name of the element itself. These are different values, although they often have a similar meaning.
Here is a list of elements that our trading panel contains:
- The main graphic window (Form) named TradePanelForm where all other controls are located.
- Red text label (Label) named AskLabel. The label is to display the Ask price of the current symbol;
- Blue text label (Label) named BidLabel. The label is to display the Bid price of the current symbol;
- Text input field (TextBox) named CurrentVolume. The necessary deal volume is to be entered here;
- Vertical scroll (VScrollBar) named IncrementVol. The scroll increases or decreases the volume by one step. The step size is to be defined by an MQL program based on the current trading environment.
- Buy button named ButtonBuy. By clicking it, users are able to buy a specified volume at Ask price — the one that is displayed on the red text label.
- Sell button named ButtonSell. By clicking it, users are able to sell a specified volume at Bid price displayed on the blue text label.
Although there are only a few elements, their combination provides a fairly advanced interface. Like in the previous example, our solution does not contain a single string of C# code. All the necessary element properties are displayed in the Properties window, and the location and size of the elements are set using the drag-n-drop, i.e. by the mouse!
Integrating the graphic window with the EA code
Now that our window is ready, it needs to be integrated into a trading EA. We will use MQL to write the trading logic that is to interact with the interface elements. The full EA code is provided below:
//+------------------------------------------------------------------+
//|                                                   TradePanel.mq5 |
//|                        Copyright 2019, MetaQuotes Software Corp. |
//|                                              http://www.mql5.com |
//+------------------------------------------------------------------+
#property copyright "Copyright 2019, MetaQuotes Software Corp."
#property link      "http://www.mql5.com"
#property version   "1.00"
#import  "MtGuiController.dll"
#include <Trade\Trade.mqh>
string assembly = "c:\\Users\\Bazil\\source\\repos\\TradePanel\\TradePanel\\bin\\Debug\\TradePanel.dll";
string FormName = "TradePanelForm";
double current_volume = 0.0;

//-- Trade module for executing orders
CTrade Trade;
//+------------------------------------------------------------------+
//| Expert initialization function                                   |
//+------------------------------------------------------------------+
int OnInit()
{
//--- create timer, show window and set volume
   EventSetMillisecondTimer(200);
   GuiController::ShowForm(assembly, FormName);
   current_volume = SymbolInfoDouble(Symbol(), SYMBOL_VOLUME_MIN);
   GuiController::SendEvent("CurrentVolume", TextChange, 0, 0.0, DoubleToString(current_volume, 2));
//---
   return(INIT_SUCCEEDED);
}
//+------------------------------------------------------------------+
//| Expert deinitialization function                                 |
//+------------------------------------------------------------------+
void OnDeinit(const int reason)
  {
//--- Dispose form
   EventKillTimer();
   GuiController::HideForm(assembly, FormName);
//---
  }
//+------------------------------------------------------------------+
//| Expert tick function                                             |
//+------------------------------------------------------------------+
void OnTick()
{
//--- refresh ask/bid
   double ask = SymbolInfoDouble(Symbol(), SYMBOL_ASK);
   double bid = SymbolInfoDouble(Symbol(), SYMBOL_BID);
   GuiController::SendEvent("AskLabel", TextChange, 0, 0.0, DoubleToString(ask, Digits()));
   GuiController::SendEvent("BidLabel", TextChange, 0, 0.0, DoubleToString(bid, Digits()));
//---
}

//+------------------------------------------------------------------+
//| Timer function                                                   |
//+------------------------------------------------------------------+
void OnTimer()
{
//--- get new events by timer
   for(static int i = 0; i < GuiController::EventsTotal(); i++)
   {
      int id;
      string el_name;
      long lparam;
      double dparam;
      string sparam;
      GuiController::GetEvent(i, el_name, id, lparam, dparam, sparam);
      if(id == TextChange && el_name == "CurrentVolume")
         TrySetNewVolume(sparam);
      else if(id == ScrollChange && el_name == "IncrementVol")
         OnIncrementVolume(lparam, dparam, sparam);
      else if(id == ClickOnElement)
         TryTradeOnClick(el_name);
   }
//---
}
//+------------------------------------------------------------------+
//| Validate volume                                                  |
//+------------------------------------------------------------------+
double ValidateVolume(double n_vol)
{
   double min_vol = SymbolInfoDouble(Symbol(), SYMBOL_VOLUME_MIN);
   double max_vol = SymbolInfoDouble(Symbol(), SYMBOL_VOLUME_MAX);
   //-- check min limit
   if(n_vol < min_vol)
      return min_vol;
   //-- check max limit
   if(n_vol > max_vol)
      return max_vol;
   //-- normalize volume
   double vol_step = SymbolInfoDouble(Symbol(), SYMBOL_VOLUME_STEP);
   double steps = MathRound(n_vol / vol_step);
   double corr_vol = NormalizeDouble(vol_step * steps, 2);
   return corr_vol;
}
//+------------------------------------------------------------------+
//| Set new current volume from a given text                         |
//+------------------------------------------------------------------+
bool TrySetNewVolume(string nstr_vol)
{
   double n_vol = StringToDouble(nstr_vol);
   current_volume = ValidateVolume(n_vol);
   string corr_vol = DoubleToString(current_volume, 2);
   GuiController::SendEvent("CurrentVolume", TextChange, 0, 0.0, corr_vol);
   return true;
}
//+------------------------------------------------------------------+
//| Execute trade orders                                             |
//+------------------------------------------------------------------+
bool TryTradeOnClick(string el_name)
{
   if(el_name == "ButtonBuy")
      return Trade.Buy(current_volume);
   if(el_name == "ButtonSell")
      return Trade.Sell(current_volume);
   return false;
}
//+------------------------------------------------------------------+
//| Increment or decrement current volume                            |
//+------------------------------------------------------------------+
void OnIncrementVolume(long lparam, double dparam, string sparam)
{
   double vol_step = 0.0;
   //-- detect increment press
   if(dparam > lparam)
      vol_step = (-1.0) * SymbolInfoDouble(Symbol(), SYMBOL_VOLUME_STEP);
   //-- detect decrement press
   else if(dparam < lparam)
      vol_step = SymbolInfoDouble(Symbol(), SYMBOL_VOLUME_STEP);
   //-- detect increment press again
   else if(lparam == 0)
      vol_step = SymbolInfoDouble(Symbol(), SYMBOL_VOLUME_STEP);
   //-- detect decrement press again
   else
      vol_step = (-1.0) * SymbolInfoDouble(Symbol(), SYMBOL_VOLUME_STEP);
   double n_vol = current_volume + vol_step;
   current_volume = ValidateVolume(n_vol);
   string nstr_vol = DoubleToString(current_volume, 2);
   GuiController::SendEvent("CurrentVolume", TextChange, 0, 0.0, nstr_vol);
}
//+------------------------------------------------------------------+
The presented code is the working core of our form. It is worth noting that the entire functionality is written in MQL5 inside the standard event handling functions. Let's analyze the provided code in detail.
The first thing the OnInit function does is set the timer with the resolution of 200 milliseconds. The window is displayed afterwards using the ShowForm method:
GuiController::ShowForm(assembly, FormName);
where 'assembly' is a path to the assembly the window is located in, while FormName is a name of our form class.
Immediately after the window is launched, we set the minimum volume in the CurrentVolume text box:
GuiController::SendEvent("CurrentVolume", TextChange, 0, 0.0, DoubleToString(current_volume, 2));
The minimum volume itself is calculated based on the current trading environment using the SymbolInfoDouble function.
When closing the EA, the form window is closed as well. This is done in the OnDeinit function using the GuiController::HideForm method.
The OnTick function reacts to changing the current Ask/Bid price. Thus, if we receive the current prices in the function and pass them to the appropriate text labels of the form, the panel promptly displays all changes of the current price.
//-- Get Ask price
double ask = SymbolInfoDouble(Symbol(), SYMBOL_ASK);
//-- Get Bid price
double bid = SymbolInfoDouble(Symbol(), SYMBOL_BID);
//-- Replace the text in the AskLabel text label with the current Ask price converted into the string:
GuiController::SendEvent("AskLabel", TextChange, 0, 0.0, DoubleToString(ask, Digits()));
//-- Replace the text in the BidLabel text label with the current Bid price converted into the string:
GuiController::SendEvent("BidLabel", TextChange, 0, 0.0, DoubleToString(bid, Digits()));
Three actions users can perform with the form are tracked in the OnTimer function. These actions include:
- Entering a new volume to the CurrentVolume text label;
- Clicking the volume step increase or decrease button made in the form of a scroll;
- Clicking the Buy or Sell button for sending a trade request.
Depending on the action performed by the user, a certain set of instructions is executed. We have not analyzed an event of clicking the scroll buttons for increasing/decreasing the current volume by the minimum allowable step yet, so let's dwell on it in more detail.
The scroll event in the current event model consists of the two parameters: lparam and dparam. The first parameter contains a conventional value that characterizes the carriage shift relative to the zero level before a user clicks the scroll buttons. The second parameter contains the same value after clicking them. The scroll itself has a certain range of operation, for example, from 0 to 100. Thus, if lparam is 30, while dparam is 50, this means the vertical scroll was moved down from 30 up to 50% (the vertical scroll moves right by the same amount). There is no need to define the scroll location in the panel. We only need to know which button a user has clicked. To do this, we should analyze the previous and current values. The OnIncrementVolume function is provided for that. After defining the scroll click type, it increases or decreases the current volume by the minimum volume step it defines using the SystemInfoDouble system function.
Scroll arrows are not the only way to set a new trading volume. You can also enter it directly into a text label. When a user enters a new character, Windows Forms generates a corresponding event. However, it is important for us to analyze the final string, rather than each character individually. Therefore, GuiController responds to pressing the 'Enter' key or changing the text label focus. These events are considered the end of text input. When one of them occurs, the generated text is passed to the event queue read by the EA sequentially. After reaching the text change in the label event, the MQL program parses its new value and sets a new volume according to the specified one. The analysis is performed using the ValidateVolume function. It controls the following parameters of the entered volume:
- The volume should be between the minimum and maximum allowable values;
- The volume value should be a multiple of its step. For example, if the step is 0.01 lots, and a user enters the value of 1.0234, it is adjusted to 1.02.
Note that it is possible to control these parameters only with the help of the current trading environment. Thus, the entire control of user-entered values is performed by the MQL program itself, rather than the form created by the user.
Let's launch the trading panel on the chart and try to perform several deals with it:
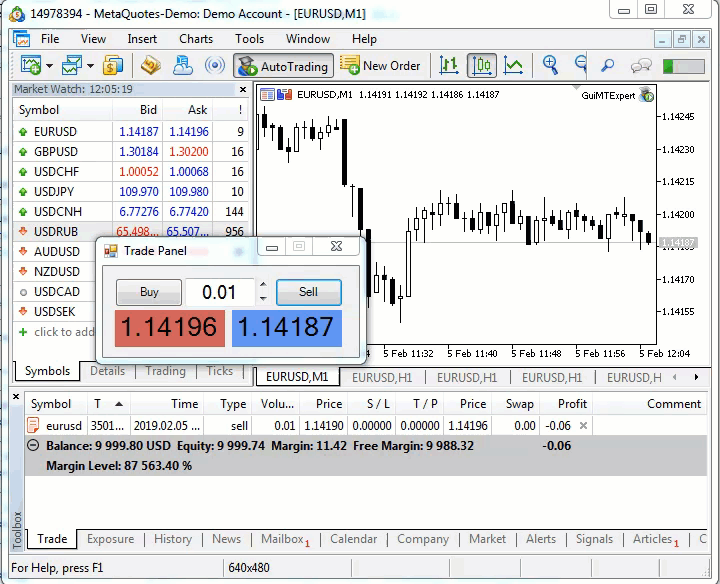
Fig. 18. The panel operation in real time
As you can see, the trading panel successfully fulfills all functions assigned to it.
GUI operation in the strategy tester
MetaTrader 5 strategy tester has a number of features that should be considered by MQL GUI developers. The main one is the fact that the OnChartEvent graphic event processing function is not called at all. This feature is logical since the graphic form involves working with a user in real time. However, it would be extremely interesting to implement a certain type of panels in the tester. These are the so-called trading players allowing users to manually test their trading strategies. For example, the strategy tester generates the current market prices in fast forward, while a user clicks the Buy and Sell buttons simulating trading operations on history. TradePanel that we have developed is exactly this type of panels. Despite its simplicity, it may well be a plain trading player with the most necessary functionality.
But let's think about how our panel will work in the MetaTrader 5 strategy tester. TradePanel's graphical window exists as an independent Net assembly. Therefore, it does not depend on the current MetaTrader 5 environment or even the terminal itself. Strictly speaking, it can be run from any other program, while even users themselves can launch assemblies located in the exe container.
Thus, our program does not need to call OnChartEvent. Moreover, it is possible to update data in the window and receive new orders from users in any event handling function regularly launched in the strategy tester. OnTick and OnTimer are such functions. The panel works through them. Therefore, although designed for real-time operation, our panel will also work well in the strategy tester. No changes are required for that. Let's check this statement by launching our panel in the tester and performing several deals:
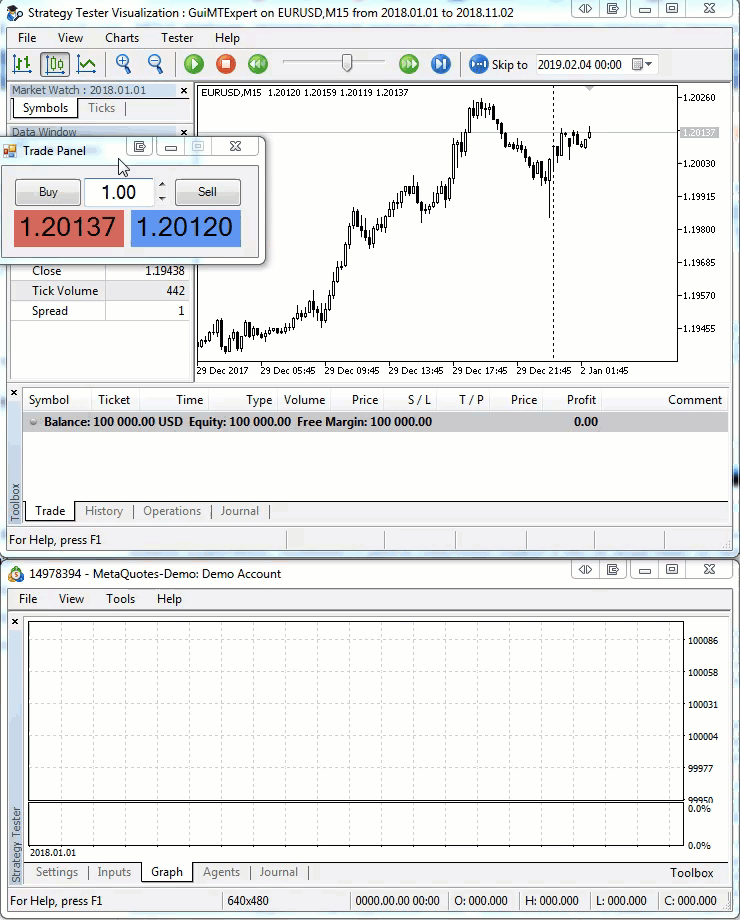
Fig. 19. The panel operation in simulation mode in the strategy tester
It turns out that the development of graphical interfaces using C# provides us with an unexpected bonus when working in the strategy tester. For a Windows Forms application, the strategy tester does not impose any restrictions. The event model operation features do not affect either the panel, or the ways of working with them. There is also no need to alter the program to work in the strategy tester.
Conclusion
The article proposes the approach allowing users to develop a custom visual form quickly and easily. This approach divides the graphical application into three independent parts: the MQL program, the GuiController adapter and the visual panel itself. All parts of the application are independent of each other. The MQL program works in the MetaTrader trading environment and performs trading or analytical functions based on the parameters it receives from the panel via GuiController. GuiController itself is an independent program you do not need to change when changing a form or its elements. Finally, the graphical panel is created by users themselves using the advanced visual tools of Visual Studio. Thanks to this, the knowledge of C# programming language may not be necessary even when developing a fairly complex form.
The custom forms themselves do not depend on the program that launches them. It may be MetaTrader 5 itself or its strategy tester. In both cases, the window works in accordance with the embedded logic. Besides, the window does not depend on the function it is called in. Thanks to this, the graphical interfaces work equally well both in MetaTrader 5 itself and in its strategy tester, and it does not matter if an EA or an indicator works with the window. In all cases, the window behavior will be the same.
Considering the above features, the proposed approach will surely find its fans. It might be most popular among those willing to develop a semi-automatic form: a trading engine or player, data panel or any other visual form in the form of a standard GUI. The approach will also appeal to those who are not well versed in programming. You only need to have a general knowledge of MQL5 to develop a custom form.
Like any technology, the proposed approach has its drawbacks. The main one is the impossibility of working in the Market, since calling third-party DLLs is prohibited. Besides, the launch of an unfamiliar DLL or EXE may be unsafe, because these modules may contain malicious functions. However, the open nature of the project solves this issue. Users know that the programs they developed do not contain any other elements than those specified by them, and GuiController is a public open source project. Another drawback is that the inter-application interaction is a rather complicated process. It may cause freezing or unexpected program termination. Much depends on the interface developer here. It is easier to take such a system down as compared to the monolith one developed in pure MQL5.
The project is currently in its infancy. Perhaps, you have not found the necessary controls here, while the current features of interacting with graphic windows are still very limited. All this is true. However, the article has completed its main task. We have shown that developing Windows Forms and interacting with them are easier than it seems. If this article turns out to be useful to the MQL community, then we will definitely continue to build on this area of work.