Create Your Own Graphical Panels in MQL5
MetaQuotes | 7 February, 2012
Introduction
There is a new set of classes available in the Standard Library. These classes are designed for independent development of control dialogs and display panels in MQL5 programs.
The new set of classes enables everyone to create custom interface components using the event-driven model as the underlying model. Everything is based on the embedded chart objects and events of the Terminal.
- Display panel in a separate chart subwindow;
- Control panel for an Expert Advisor;
- Custom display control panel.
This article will demonstrate how easy it is to create your own display panels in a separate chart subwindow using the Standard Library classes.
What Does the Standard Library Have to Offer?
The Standard Library provides the developer with the following ready-to-use controls:
1. Simple controls:
Control Application Implementation based on the embedded object Standard Library file Button with text
Ensuring interaction between the mouse and MQL program
"Button" <Controls\Button.mqh> Button with image
Ensuring interaction between the mouse and MQL program
"Graphical label" <Controls\BmpButton.mqh> Edit
Input or display of text information (in the "Read Only") mode
"Edit" <Controls\Edit.mqh> Caption
Display of auxiliary text information
"Text label" <Controls\Label.mqh> Panel
Auxiliary control (visual grouping of controls)
"Rectangle label" <Controls\Panel.mqh> Image
Decorative control
"Graphical label" <Controls\Picture.mqh>
2. Complex controls:
Control Application Implementation based on the controls Standard Library file List
Viewing a list
"Rectangle", "Button with image" and "Edit" <Controls\List.mqh> Field with a drop-down list
Selection from a drop-down list
"Edit", "Button with image" and "List" <Controls\ComboBox.mqh> Increment/decrement field
Enumeration of values
"Edit" and "Button with image" <Controls\SpinEdit.mqh> Radio button
Switch "Button with image" and "Caption" <Controls\RadioButton.mqh> Radio button group Editing fields of enum type "Rectangle" and "Radio button" <Controls\RadioGroup.mqh> Checkbox
Selection option
"Button with image" and "Caption" <Controls\CheckBox.mqh> Checkbox group
Editing a set of flags
"Rectangle" and "Checkbox" <Controls\CheckGroup.mqh> Dialog Dialog form "Rectangle", "Button with image" and "Edit" <Controls\Dialog.mqh>
Creating a Display Panel
Let us first define the terms. The Display panel is a term we will use to describe a separate window custom display that has no drawing buffer. Such panel simply displays the required information using the chart objects embedded in the Terminal. The information can be displayed:
- numerically,
- as text,
- as color,
- etc.
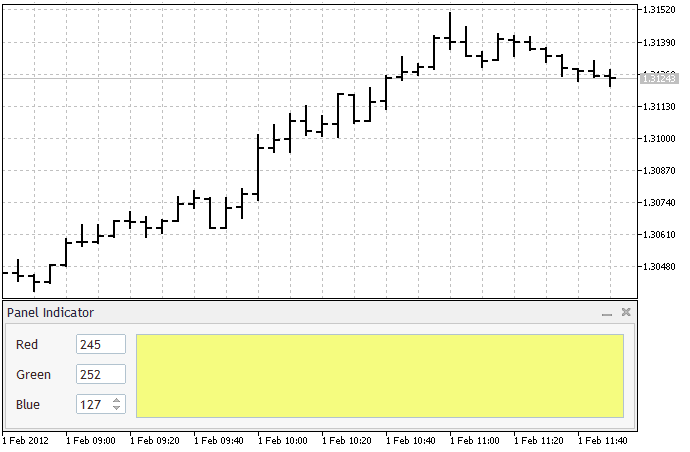
We will have a detailed look at every step required and create a graphical panel as follows:
In order to create a display panel, we will need two files:
- The include file containing the description of the display panel class.
- The indicator source code file.
Templates of these files can be obtained using the MQL5 Wizard. In the indicators directory (MQL5\Indicators), create a separate folder MyIndicators and a subfolder MyPanel. The process of creating folders will not be dealt with here as it is well described in the Help.
Class Description
So we have already created the working folder. Let us now find it in the "Navigator" window and right-click on it. Select the "New File" in the appearing menu. Select the "New Class" out of the options given by the MQL5 Wizard and click "Next >". Complete the class description dialog as shown below:

Click "Finish". As a result, we have the following code:
//+------------------------------------------------------------------+
//|                                                  PanelDialog.mqh |
//|                        Copyright 2011, MetaQuotes Software Corp. |
//|                                              https://www.mql5.com |
//+------------------------------------------------------------------+
#property copyright "Copyright 2011, MetaQuotes Software Corp."
#property link      "https://www.mql5.com"
#property version   "1.00"
//+------------------------------------------------------------------+
//|                                                                  |
//+------------------------------------------------------------------+
class CPanelDialog : public CAppDialog
  {
private:

public:
                     CPanelDialog();
                    ~CPanelDialog();
  };
//+------------------------------------------------------------------+
//|                                                                  |
//+------------------------------------------------------------------+
CPanelDialog::CPanelDialog()
  {
  }
//+------------------------------------------------------------------+
//|                                                                  |
//+------------------------------------------------------------------+
CPanelDialog::~CPanelDialog()
  {
  }
//+------------------------------------------------------------------+
Add the include <Controls\Dialog.mqh> file from the Standard Library with the description of the base CAppDialog class and comments.
//+------------------------------------------------------------------+
//|                                                  PanelDialog.mqh |
//|                        Copyright 2011, MetaQuotes Software Corp. |
//|                                              https://www.mql5.com |
//+------------------------------------------------------------------+
#include <Controls\Dialog.mqh>
//+------------------------------------------------------------------+
//| CPanelDialog class                                               |
//| Function: main application dialog                                |
//+------------------------------------------------------------------+
class CPanelDialog : public CAppDialog
  {
private:

public:
                     CPanelDialog(void);
                    ~CPanelDialog(void);
  };
//+------------------------------------------------------------------+
//| Constructor                                                      |
//+------------------------------------------------------------------+
CPanelDialog::CPanelDialog(void)
  {
  }
//+------------------------------------------------------------------+
//| Destructor                                                       |
//+------------------------------------------------------------------+
CPanelDialog::~CPanelDialog(void)
  {
  }
//+------------------------------------------------------------------+
We now have the description of the class which will allow us to use a dialog box in its indicator. Our dialog is currently empty but we are going to add controls to it a little later. At the moment, let us proceed to the indicator.
The Indicator Source Code
The indicator will also be created using the MQL5 Wizard. Our actions will be similar to the ones required when writing the class description. There is only one difference - we select "Custom Indicator" out of the options given by the MQL5 Wizard. In order to create an indicator, three dialogs should be completed.
The first one requires specifying the name of the indicator:

In the second dialog, tick off "OnChartEvent" (required) and "OnTimer":

Tick off "Separate Window Indicator" (required) in the third dialog:

And click "Finish". The code produced is as follows:
//+------------------------------------------------------------------+
//|                                               PanelIndicator.mq5 |
//|                        Copyright 2011, MetaQuotes Software Corp. |
//|                                              https://www.mql5.com |
//+------------------------------------------------------------------+
#property copyright "Copyright 2011, MetaQuotes Software Corp."
#property link      "https://www.mql5.com"
#property version   "1.00"
#property indicator_separate_window
//+------------------------------------------------------------------+
//| Custom indicator initialization function                         |
//+------------------------------------------------------------------+
int OnInit()
  {
//--- indicator buffers mapping

//---
   return(0);
  }
//+------------------------------------------------------------------+
//| Custom indicator iteration function                              |
//+------------------------------------------------------------------+
int OnCalculate(const int rates_total,
              const int prev_calculated,
              const int begin,
              const double &price[])
  {
//---

//--- return value of prev_calculated for next call
   return(rates_total);
  }
//+------------------------------------------------------------------+
//| Timer function                                                   |
//+------------------------------------------------------------------+
void OnTimer()
  {
//---

  }
//+------------------------------------------------------------------+
//| ChartEvent function                                              |
//+------------------------------------------------------------------+
void OnChartEvent(const int id,
                const long &lparam,
                const double &dparam,
                const string &sparam)
  {
//---

  }
//+------------------------------------------------------------------+
Our template can now be completed by adding:
- missing descriptions of indicator properties;
- include file containing the class description of our dialog;
- a global variable - the class object of our dialog;
- code for creating the dialog, starting the application and creating the timer to the OnInit() function body;
- OnDeinit() function containing a code that destroys the dialog and kills the timer;
- OnChartEvent(...) function to the event handler calling code;
- comments.
We've got the ready-to-use indicator:
//+------------------------------------------------------------------+
//|                                               PanelIndicator.mq5 |
//|                        Copyright 2011, MetaQuotes Software Corp. |
//|                                              https://www.mql5.com |
//+------------------------------------------------------------------+
#property copyright "Copyright 2011, MetaQuotes Software Corp."
#property link      "https://www.mql5.com"
#property version   "1.00"
#property indicator_separate_window
#property indicator_plots               0
#property indicator_buffers             0
#property indicator_minimum             0.0
#property indicator_maximum             0.0
//+------------------------------------------------------------------+
//| Include files                                                    |
//+------------------------------------------------------------------+
#include "PanelDialog.mqh"
//+------------------------------------------------------------------+
//| Global variables                                                 |
//+------------------------------------------------------------------+
CPanelDialog ExtDialog;
//+------------------------------------------------------------------+
//| Initialization                                                   |
//+------------------------------------------------------------------+
int OnInit()
  {
//--- creating the application dialog
   if(!ExtDialog.Create(0,"Panel Indicator",0,0,0,0,130))
     return(-1);
//--- starting the application
   if(!ExtDialog.Run())
     return(-2);
//--- creating the timer
   EventSetTimer(1);
//--- success
   return(0);
  }
//+------------------------------------------------------------------+
//| Deinitialization                                                 |
//+------------------------------------------------------------------+
int OnDeinit()
  {
//--- destroying the dialog
   ExtDialog.Destroy();
//--- killing the timer
   EventKillTimer();
  }
//+------------------------------------------------------------------+
//| Iteration                                                        |
//+------------------------------------------------------------------+
int OnCalculate(const int rates_total,
              const int prev_calculated,
              const int begin,
              const double &price[])
  {
//--- returning the prev_calculated value for the next call
   return(rates_total);
  }
//+------------------------------------------------------------------+
//| Timer event handler                                              |
//+------------------------------------------------------------------+
void OnTimer()
  {
//---
  }
//+------------------------------------------------------------------+
//| Chart event handler                                              |
//+------------------------------------------------------------------+
void OnChartEvent(const int id,
                const long &lparam,
                const double &dparam,
                const string &sparam)
  {
//--- handling the event
   ExtDialog.ChartEvent(id,lparam,dparam,sparam);
  }
//+------------------------------------------------------------------+
The indicator in the above form does not show anything as yet. When compiled and dropped from the Navigator on the chart, it will be displayed as an empty dialog in a separate window.
In spite of the dialog being empty, our indicator has already acquired certain features:
- the subwindow height has been adjusted to the dialog height by the indicator during creation;
- the dialog width is always equal to the chart width;
- the indicator can minimize and maximize its own subwindow.
Let It Display
In order for our panel to start displaying any information, we should decide on the answers to three questions:
- What kind of information do we want to display?
- What additional display elements and/or controls are required to be placed on our dialog?
- How these additional elements/controls will interact?
Another important factor is that our dialog shall be visually appealing and user-friendly. It does not affect the functionality of the dialog but shows that we care about the users of the future MQL5 program.
Step 1. What kind of information do we want to display?
Since the article serves as a learning tool, let us not dwell on the usability of the indicator. The color will be displayed as a function of three parameters. We will not overcomplicate the parameters - these will be "red", "green" and "blue" levels.
The parameter values will be set as follows:
- The "red" level value will be set in the range from 0 to 255 changing in a random way at every Calculate event;
- The "green" level value will be set in the range from 0 to 255 changing in a random way at every Timer event;
- The "blue" level value will be set in the range from 0 to 255 and will be changed manually by means of a special control.
By the way, the values of these levels will also be displayed in our indicator.
Step 2. What additional controls will be required?
Step 3. How these additional dialog controls will interact?
- Color will be displayed using the "Panel" control.
- The "red" and "green" levels will be displayed using the "Edit" control in the "Read Only" mode.
- The "blue" level will be managed by the "Spin Edit" control. The same control will help display the level value.
- Both the "Edit" and "Spin Edit" controls will be enhanced with explanatory captions by means of the "Caption" control.
Add the include files from the Standard Library, as well as the required controls and variables that store the parameter values to the class description having provided comments.
We will have:
//+------------------------------------------------------------------+
//|                                                  PanelDialog.mqh |
//|                        Copyright 2011, MetaQuotes Software Corp. |
//|                                              https://www.mql5.com |
//+------------------------------------------------------------------+
#include <Controls\Dialog.mqh>
#include <Controls\Panel.mqh>
#include <Controls\Edit.mqh>
#include <Controls\Label.mqh>
#include <Controls\SpinEdit.mqh>
//+------------------------------------------------------------------+
//| CPanelDialog class                                               |
//| Function: main application dialog                                |
//+------------------------------------------------------------------+
class CPanelDialog : public CAppDialog
  {
private:
   //--- additional controls
   CPanel            m_color;                         // object for displaying color
   CLabel            m_label_red;                     // "red" level caption object
   CEdit             m_field_red;                     // "red" value display object
   CLabel            m_label_green;                   // "green" level caption object
   CEdit             m_field_green;                   // "green" value display object
   CLabel            m_label_blue;                    // "blue" level caption object
   CSpinEdit         m_edit_blue;                     // "blue" value control object
   //--- parameter values
   int               m_red;                           // "red" value
   int               m_green;                         // "green" value
   int               m_blue;                          // "blue" value

public:
                     CPanelDialog(void);
                    ~CPanelDialog(void);
  };
//+------------------------------------------------------------------+
//| Constructor                                                      |
//+------------------------------------------------------------------+
CPanelDialog::CPanelDialog(void)
  {
  }
//+------------------------------------------------------------------+
//| Destructor                                                       |
//+------------------------------------------------------------------+
CPanelDialog::~CPanelDialog(void)
  {
  }
//+------------------------------------------------------------------+
The principle of interaction between the dialog controls will be very simple - "The dialog shall display changes in any parameter ("red", "green" and "blue" levels)". The implementation of interaction algorithms will be addressed later as now it is about time to start creating the dialog.
A Few Words About Eye Appeal
Before we proceed to creating the dialog, let us have a quick insight into eye appeal. Or better said, a user-friendly arrangement and (possible) future rearrangement of the dialog controls. Named constants (#define) best serve this purpose.
There are some advantages offered by the predefined named constants:
- certain numeric values used in specific cases do not have to be remembered. The constant names accurately selected will provide a fast access to them via the "Auto List Names";
- when the constant values are further modified, numerous inclusions of numeric values do not have to be searched for and replaced. It is sufficient to change the constant description only.
The use of the following constants is suggested:
//+------------------------------------------------------------------+
//| defines                                                          |
//+------------------------------------------------------------------+
//--- indents and spacing
#define INDENT_LEFT                         (11)      // left indent (including the border width)
#define INDENT_TOP                          (11)      // top indent (including the border width)
#define INDENT_RIGHT                        (11)      // right indent (including the border width)
#define INDENT_BOTTOM                       (11)      // bottom indent (including the border width)
#define CONTROLS_GAP_X                      (10)      // spacing along the X-axis
#define CONTROLS_GAP_Y                      (10)      // spacing along the Y-axis
//--- for labels
#define LABEL_WIDTH                         (50)      // size along the X-axis
//--- for edits
#define EDIT_WIDTH                          (50)      // size along the Y-axis
#define EDIT_HEIGHT                         (20)      // size along the Y-axis
//--- for base colors (RGB)
#define BASE_COLOR_MIN                      (0)       // minimum value of the color component
#define BASE_COLOR_MAX                      (255)     // maximum value of the color component
Filling the Display Panel
We earlier created the display panel class; now in order to attain the required functionality, we need to do the following:
1. Redefine the Create(...) method of the parent class. Originally, our method will appear as follows:
//+------------------------------------------------------------------+
//| Creation                                                         |
//+------------------------------------------------------------------+
bool CPanelDialog::Create(const long chart,const string name,const int subwin,const int x1,const int y1,const int x2,const int y2)
  {
//--- calling the method of the parent class
   if(!CAppDialog::Create(chart,name,subwin,x1,y1,x2,y2))  return(false);
//--- additional controls shall be created here

//--- success
   return(true);
  }
2. Create additional controls.
A slight lyrical digression. Codes for creating all additional controls can of course be inserted directly into the Create(...) method body, but in this way we risk getting a big unreadable "bulk".
We will therefore divide the creation process into self-contained parts represented by methods:
- bool CreateColor(void) - color panel creation,
- bool CreateRed(void) - creating the display element "Red" with explanatory caption,
- bool CreateGreen(void) - creating the display element "Green" with explanatory caption,
- bool CreateBlue(void) - creating the control "Blue" with explanatory caption.
These methods are sequentially called from the Create(...) method:
//+------------------------------------------------------------------+
//| Creation                                                         |
//+------------------------------------------------------------------+
bool CPanelDialog::Create(const long chart,const string name,const int subwin,
                             const int x1,const int y1,const int x2,const int y2)
  {
//--- calling the parent class method
   if(!CAppDialog::Create(chart,name,subwin,x1,y1,x2,y2)) return(false);

//--- creating additional elements
   if(!CreateColor()) return(false);
   if(!CreateRed())   return(false);
   if(!CreateGreen()) return(false);
   if(!CreateBlue())  return(false);
//--- success
   return(true);
  }
Creation of Controls
We will not review the creation of every additional control but will have a detailed look at the bool CreateBlue(void) method.
It is as follows:
//+------------------------------------------------------------------+
//| Creating the "Blue" control with explanatory caption             |
//+------------------------------------------------------------------+
bool CPanelDialog::CreateBlue(void)
  {
//--- coordinates
   int x1=INDENT_LEFT;
   int y1=INDENT_TOP+2*(EDIT_HEIGHT+CONTROLS_GAP_Y);
   int x2=x1+EDIT_WIDTH;
   int y2=y1+EDIT_HEIGHT;
//--- creating the caption
   if(!m_label_blue.Create(m_chart_id,m_name+"LabelBlue",m_subwin,x1,y1+1,x2,y2)) return(false);
   if(!m_label_blue.Text("Blue")) return(false);
   if(!Add(m_label_blue)) return(false);
//--- adjusting coordinates
   x1+=LABEL_WIDTH+CONTROLS_GAP_X;
   x2=x1+EDIT_WIDTH;
//--- creating the control
   if(!m_edit_blue.Create(m_chart_id,m_name+"Blue",m_subwin,x1,y1,x2,y2)) return(false);
   if(!Add(m_edit_blue)) return(false);
   m_edit_blue.MinValue(BASE_COLOR_MIN);
   m_edit_blue.MaxValue(BASE_COLOR_MAX);
   m_edit_blue.Value(m_blue);
//--- success
   return(true);
  }
There are two nuances:
- The control is created with relative coordinates, i.e. the offset is set relative to the top left corner of the container (complex element) to which the control will be added after creation.
- Following the creation, it is necessary to add the control to a container using the Add(...) method. In our case, the dialog serves as the container.
Changing the Parameters
Add the void SetColor(void) method to change the color of the color panel;
In order to be able to change the parameters (levels of the base colors) externally, we will add three public methods:
- void SetRed(const int value) - changes the "red" level and displays the change in the indicator,
- void SetGreen(const int value) - changes the "green" level and displays the change in the indicator,
- void SetBlue(const int value) - changes the "blue" level and displays the change in the indicator.
The phrase "displays the change in the indicator" means that the new value of the base color level is displayed in the numerical form in the corresponding control and the color panel changes its color.
Below is a code of one of the methods to serve as the example:
//+------------------------------------------------------------------+
//| Setting the "Red" value                                          |
//+------------------------------------------------------------------+
void CPanelDialog::SetRed(const int value)
  {
//--- checking
   if(value<0 || value>255) return;
//--- saving
   m_red=value;
//--- setting
   m_field_red.Text(IntegerToString(value));
//--- setting the panel color
   SetColor();
  }
As agreed above:
- The "red" level value will change in a random way at every Calculate event;
- The "green" level value will change in a random way at every Timer event;
Let us add the relevant code in the original indicator:
//+------------------------------------------------------------------+
//|                                               PanelIndicator.mq5 |
//|                        Copyright 2011, MetaQuotes Software Corp. |
//|                                              https://www.mql5.com |
//+------------------------------------------------------------------+
#property copyright "Copyright 2011, MetaQuotes Software Corp."
#property link      "https://www.mql5.com"
#property version   "1.00"
#property indicator_separate_window
#property indicator_plots               0
#property indicator_buffers             0
#property indicator_minimum             0.0
#property indicator_maximum             0.0
//+------------------------------------------------------------------+
//| Include files                                                    |
//+------------------------------------------------------------------+
#include "PanelDialog.mqh"
//+------------------------------------------------------------------+
//| Global variables                                                 |
//+------------------------------------------------------------------+
CPanelDialog ExtDialog;
//+------------------------------------------------------------------+
//| Initialization                                                   |
//+------------------------------------------------------------------+
int OnInit()
  {
//--- creating the application dialog
   if(!ExtDialog.Create(0,"Panel Indicator",0,0,0,0,130))
      return(-1);
//--- starting the application
   if(!ExtDialog.Run())
      return(-2);
//--- creating the timer
   EventSetTimer(1);
//--- success
   return(0);
  }
//+------------------------------------------------------------------+
//| Deinitialization                                                 |
//+------------------------------------------------------------------+
void OnDeinit(const int reason)
  {
//--- destroying the dialog
   ExtDialog.Destroy();
//--- killing the timer
   EventKillTimer();
  }
//+------------------------------------------------------------------+
//| Iteration                                                        |
//+------------------------------------------------------------------+
int OnCalculate(const int rates_total,
                const int prev_calculated,
                const int begin,
                const double &price[])
  {
//--- changing the dialog property
   ExtDialog.SetRed(MathRand()%256);
//--- returning the prev_calculated value for the next call
   return(rates_total);
  }
//+------------------------------------------------------------------+
//| Timer event handler                                              |
//+------------------------------------------------------------------+
void OnTimer()
  {
//--- changing the dialog property
   ExtDialog.SetGreen(MathRand()%256);
  }
//+------------------------------------------------------------------+
//| Chart event handler                                              |
//+------------------------------------------------------------------+
void OnChartEvent(const int id,
                  const long &lparam,
                  const double &dparam,
                  const string &sparam)
  {
//--- handling the event
   ExtDialog.ChartEvent(id,lparam,dparam,sparam);
  }
//+------------------------------------------------------------------+
Handling the Events
The entire interaction between the dialog and the Terminal as well as the interaction between the dialog controls is based on the event mechanism. We are not going to review its functions but will simply use it.
Events can conventionally be divided into two groups:
- Internal events that are handled bypassing the Terminal event queue;
- External events that are handled through the Terminal event queue.
We will handle both types of events.
Among the internal events, only the events of resizing the dialog require to be handled. For this purpose, reload the OnResize() method of the parents class. Our method will be simple as there is no change in the dialog height; if the dialog width changes, we only have to modify the color panel width:
//+------------------------------------------------------------------+
//| Resize handler                                                   |
//+------------------------------------------------------------------+
bool CPanelDialog::OnResize(void)
  {
//--- calling the parent class method
   if(!CAppDialog::OnResize()) return(false);
//--- changing the color panel width
   m_color.Width(ClientAreaWidth()-(INDENT_RIGHT+LABEL_WIDTH+CONTROLS_GAP_X+EDIT_WIDTH+CONTROLS_GAP_X+INDENT_LEFT));
//--- success
   return(true);
  }
The list of external events will also be limited to one item - the event of changing the "blue" level. The requirements to the external event handler are minimal: the handler shall be the parameterless class method of void type.
Let us describe the handler of this event:
//+------------------------------------------------------------------+
//| Handler of the event of changing the "blue" level                |
//+------------------------------------------------------------------+
void CPanelDialog::OnChangeBlue(void)
  {
//--- saving
   m_blue=m_edit_blue.Value();
//--- setting the panel color
   SetColor();
  }
As can be seen, there is nothing difficult in it.
In order for our dialog to handle external events, the parent class method shall be reloaded:
virtual bool  OnEvent(const int id,const long &lparam,
                       const double &dparam,const string &sparam);
And now a bit of mystery. If you have already opened PanelDialog.mqh file in the Editor, you will see that there is no OnEvent(...) method body.
Do not be confused - the thing is, for the description of handling external events a set of macros was created (see <Controls\Defines.mqh> file in the Standard Library).
Our event handler is as follows:
//+------------------------------------------------------------------+
//| Handling events                                                  |
//+------------------------------------------------------------------+
EVENT_MAP_BEGIN(CPanelDialog)
   ON_EVENT(ON_CHANGE,m_edit_blue,OnChangeBlue)
EVENT_MAP_END(CAppDialog)
This pseudocode which may be unclear at first sight, does the following:
- When the ON_CHANGE event is received from the m_edit_blue control, the OnChangeBlue method is called and the handling of the event is completed (returning true);
- Upon receipt of any other event, control is transferred to the parent class method.
Conclusion
This article has provided the review of the process of creating a display panel using the Standard Library classes.
It is unlikely that you will use the indicator as created, yet it is not overloaded with unnecessary information and we have managed to cover nearly all peculiarities of the process when creating it.
More complex standard delivery examples can be found in the following directories of your Terminal:
- Experts\Examples\Controls\
- Indicators\Examples\Panels\ChartPanel\
- Indicators\Examples\Panels\SimplePanel\