TradeObjects: Automation of trading based on MetaTrader graphical objects
Stanislav Korotky | 13 October, 2017
Geometrical constructions on symbol charts have been remaining one of the most popular trading tools for decades. The advanced technologies make it easier to apply support or resistance lines, historical price levels and entire patterns, for example channels and Fibo grid. Algorithmic trading software allows us both to analyze standard patterns and trade using them. MetaTrader also has applications that automate the process to some extent: in most cases, it is enough to add an object to the chart with an EA or script launched in it. The application will open a position, track and close it in due time according to the settings. Such applications enable us not only to trade online but also polish our skills in the tester's visualization mode. We can find such applications in the CodeBase and the Market.
However, all is not that simple. Generally, CodeBase applications have simplified functionality. Besides, they are rarely updated and become obsolete fast (often losing compatibility with the latest MQL language and platform versions), while commercial products are often too expensive.
In this article, we will develop a new tool that represents the golden mean. It will be as simple as possible and provide ample opportunities at the same time. It will be compatible with both MetaTrader 4 and MetaTrader 5. Thanks to the open source code, it can easily be expanded and modified to fit your needs.
Support for MetaTrader 4 is important not only in terms of reaching a larger audience, but also because of some limitations of the MetaTrader 5 tester. In particular, the MetaTrader 5 visual tester does not currently allow working with objects in an interactive way (add, delete, edit properties), which is necessary for this tool. Only the MetaTrader 4 tester enables us to sharpen our skills of managing objects on history.
Setting requirements
The main ideological requirement for our automated trading system involving graphical objects is simplicity. We are going to use the standard MetaTrader interface and properties of graphical objects without special panels and complex configuration logic. As practice shows, all the advantages of powerful systems full of various options are often leveled by the difficulties of development and low relevance of each particular operation mode. We will strive to use only well-known methods of working with objects and an intuitive interpretation of their properties.
Among multiple types of graphical objects for making trading decisions, the most commonly used ones are as follows:
- trend line;
- horizontal line;
- vertical line;
- equidistant channel;
- Fibo retracement.
We will provide support for them in the first place. This list could have been extended by new types available in MetaTrader 5, but this would have broken compatibility with MetaTrader 4. Users will be able to easily add other objects according to their preferences applying the basic principles of processing objects implemented in this project.
Each of the objects mentioned above forms a logical boundary in the two-dimensional space of the chart. Crossing or roll-back from that boundary provides a signal. Its interpretation usually corresponds to one of the following situations:
- breakdown or roll-back from a support/resistance line;
- breakdown or roll-back from the historical price level;
- reaching a specified stop loss/take profit level;
- reaching a specified time.
Depending on a chosen strategy, traders can buy or sell, set a pending order or close a position as a result of the event. Our system should support all these actions. Thus, the list of basic functions looks as follows:
- sending various notifications (alerts, push notifications, emails);
- opening market orders;
- placing pending orders (buy stop, sell stop, buy limit, sell limit);
- full or partial closing of a position, including by stop loss and take profit.
Developing the user interface
In many similar products, a lot of attention is paid to the user interface elements, such as panels, dialogs, buttons, as well as the widespread drag'n'drop. Our project will have none of this. Instead of a special graphical interface, let's use the default elements provided by MetaTrader.
Each object has a standard set of properties that can be adapted to the current task.
First, we need to distinguish objects intended for auto trading from other objects we can plot on the chart. To do this, we need to provide our object names with a predefined prefix. If no prefix is specified, the EA assumes all objects with the appropriate properties are active. However, such mode is not recommended since the terminal can create its own objects (for example, closed orders), which may have side effects.
Second, in order to execute various functions (the list of functions provided above), we should reserve different execution styles. For example, in the EA settings, set the STYLE_DASH style for placing pending orders and STYLE_SOLID — for instant market entry when the price crosses the corresponding line. Styles of different operations should be different.
Third, we should specify the trading direction. For example, you can use blue for buying and red for selling. Actions that are not related to market entry/exit, are to be marked in a third color - for example, gray. For instance, these may be notifications or placing pending orders. The latter case is classified as a "neutral" category, because it often sets a pair of differently directed pending orders.
Fourth, we should define the type of pending orders. This can be done by the mutual arrangement of the order line relative to the current market price and the line color. For example, a blue line above the price implies a buy stop, while the blue line below the price means buy limit.
Fifth, we need some additional data and attributes for most operations. In particular, if an alert (or several ones) has been triggered, the user will most likely want to receive a meaningful message. The Description field we have not used yet is well-suited for that. We will set a lot size and expiration time for orders in this field. All this is optional, since we are to provide the input parameters with default values for the convenience and minimization of the necessary object settings in the EA. In addition to object settings, these defaults will contain both stop loss and take profit values.
If specific stop loss and take profit are set for each line, use the objects combining multiple lines. For example, an equidistant channel has two lines. The first one passing through the two lines is responsible for forming a trade signal, while the parallel one (with the third point) sets the distance to stop loss and take profit. The level we are dealing with is easy to define by the mutual arrangement and color of the lines. For example, an additional line located above the main one forms a stop loss for the red channel. If it was lower, it would be treated as a take profit.
If you want to set both a stop loss and take profit, the object should consist of at least three lines. For example, a grid of Fibo levels is suitable for this. By default, the project applies the standard levels 38.2% (stop loss), 61.8% (market entry point) and 161.8% (take profit). We will not dwell on more flexible configuration of this and other more complex object types in this article.
When activating one of the objects as a result of price crossing, the object should be marked as activated. This can be done, for example, by assigning the OBJPROP_BACK "background" attribute to it. We will decrease the brightness of the original color of such objects for visual feedback from users. For example, the blue line becomes dark blue after processing.
However, the trader's markups often include so "strong" lines and levels that the events related to them — like a roll-back from the support line during the uptrend correction — may occur many times.
Let's consider this situation with the help of line thickness. As we know, MetaTrader styles allow setting the width from 1 to 5. When activating the line, we will look at its thickness and if it exceeds 1, we will decrease the thickness by 1 instead of excluding it from subsequent processing. For example, we can designate the expected multiple events on the chart with the number of repetitions up to 5.
This possibility has a nuance: prices tend to fluctuate around a certain value, and any line can be crossed many times over a short period of time. A manual trader analyzes the dynamics of price deviations by sight and sorts out all the price noise. The EA should implement a mechanism that does the same automatically.
For this purpose, we will introduce the inputs that determine the size of the "hot region" of the intersection, i.e. the minimum range of price movement and its duration, within which the signals are not formed. In other words, the "line crossing" event will not happen immediately after the price crosses it, but only when it retreats to the specified distance in points.
Similarly, we will introduce a parameter that specifies the minimum interval between two consecutive events with the same line (only for lines having thickness greater than 1). Here a new task arises: we need to store the time of the previous event with the line somewhere. Let's use the OBJPROP_ZORDER object property for that. This is a long type number, and the datetime value is perfectly placed there. The change in the order of displaying the lines has almost no effect on the visual representation of the chart.
It is enough to perform the following actions for configuring the line for working with the system:
- open the object properties dialog;
- add the selected prefix to the name;
- set parameters in the description:
- lot for market and pending order lines, as well as partial order closing,
- names of pending order lines for the pending order activation line,
- expiration line for the pending order line;
- color as a direction indicator (the default are blue — buy, red — sell, gray — neutral);
- style as an operation selector (alert, market entry, placing a pending order, position closing);
- width as an event repetition indicator.
 with the lot 0.02 and the expiration time 24 bars (hours)")
Configuring the horizontal line properties for a buy limit order (blue dash) with the lot 0.02 and the expiration time 24 bars (hours)
The list of orders managed by the system (meeting the described requirements) is displayed in the chart comment together with the details — object type, description and status.
Developing the execution mechanism
Let's start the implementation of the EA beginning with the inputs used to pass the object names' prefixes, process colors and styles, default values as well as sizes of the areas generating chart events taking into account the requirements and general considerations outlined above.
input int Magic = 0;
input double Lot = 0.01 /*default lot*/;
input int Deviation = 10 /*tolerance to price changes during order execution*/;

input int DefaultTakeProfit = 0 /*points*/;
input int DefaultStopLoss = 0 /*points*/;
input int DefaultExpiration = 0 /*bars*/;

input string CommonPrefit = "exp" /*empty to handle all compatible objects*/;

input color BuyColor = clrBlue /*market and pending buy orders - open, close, sl, tp*/;
input color SellColor = clrRed /*market and pending sell orders - open, close, sl, tp*/;
input color ActivationColor = clrGray /*activation of pending orders placement, alert*/;

input ENUM_LINE_STYLE InstantType = STYLE_SOLID /*opens market trades*/;
input ENUM_LINE_STYLE PendingType = STYLE_DASH /*defines probable pending orders (requires activation)*/;
input ENUM_LINE_STYLE CloseStopLossTakeProfitType = STYLE_DOT /*applied to open positions*/;

input int EventHotSpot = 10 /*points*/;
input int EventTimeSpan = 10 /*seconds*/;
input int EventInterval = 10 /*bars*/;
The EA itself is implemented as TradeObjects class (TradeObjects.mq4 and .mq5). Its only public elements are constructor, destructor and methods of processing standard events.
class TradeObjects
{
  private:
    Expert *e;

  public:
    void handleInit()
    {
      detectLines();
    }

    void handleTick()
    {
      #ifdef __MQL4__
      if(MQLInfoInteger(MQL_TESTER))
      {
        static datetime lastTick = 0;
        if(TimeCurrent() != lastTick)
        {
          handleTimer();
          lastTick = TimeCurrent();
        }
      }
      #endif

      e.trailStops();
    }

    void handleTimer()
    {
      static int counter = 0;

      detectLines();

      counter++;
      if(counter == EventTimeSpan) // wait until we have history record of bid for EventTimeSpan
      {
        counter = 0;
        if(PreviousBid > 0) processLines();
        if(PreviousBid != Bid) PreviousBid = Bid;
      }
    }

    void handleChart(const int id, const long &lparam, const double &dparam, const string &sparam)
    {
      if(id == CHARTEVENT_OBJECT_CREATE || id == CHARTEVENT_OBJECT_CHANGE)
      {
        if(checkObjectCompliance(sparam))
        {
          if(attachObject(sparam))
          {
            display();
            describe(sparam);
          }
        }
        else
        {
          detectLines();
        }
      }
      else if(id == CHARTEVENT_OBJECT_DELETE)
      {
        if(removeObject(sparam))
        {
          display();
          Print("Line deleted: ", sparam);
        }
      }
    }

    TradeObjects()
    {
      e = new Expert(Magic, Lot, Deviation);
    }

    ~TradeObjects()
    {
      delete e;
    }
};
The instant of the class is created statically, and its event handlers are then bound to the appropriate global functions.
TradeObjects to;

void OnInit()
{
  ChartSetInteger(0, CHART_EVENT_OBJECT_DELETE, true);
  EventSetTimer(1);
  to.handleInit();
}

void OnChartEvent(const int id, const long &lparam, const double &dparam, const string &sparam)
{
  to.handleChart(id, lparam, dparam, sparam);
}

void OnTimer()
{
  to.handleTimer();
}

void OnTick()
{
  to.handleTick();
}
All trade operations are assigned to a separate engine hidden in the external Expert class (Expert01.mqh). We create its instance in the constructor and remove them in the TradeObjects class destructor. We will examine the engine in more details later. TradeObjects will delegate many operations to it.
All handleInit, handleTick, handleTimer, handleChart event handlers call the detectLines method we should write. In this method, the objects are analyzed and the ones meeting our requirements are selected. A user is able to create, remove and modify the objects when running the EA. Found objects are saved to the internal array. Its presence allows you to monitor the chart status change and inform the user on the discovery of new objects and removal of old ones.
The processLines method is called periodically by timer. It checks the occurrence of events by array in a loop and performs appropriate actions.
As we can see, the method checks the objects' prefix, as well as their styles, colors and status using the checkObjectCompliance method (see below). Suitable objects are added to the internal array using the attachObject function, while the ones removed from the chart are removed from the array using the removeObject function. The list of objects is displayed as a chart comment using the 'display' method.
The array consists of simple structures containing the object name and status:
  private:
    struct LineObject
    {
      string name;
      int status;
      void operator=(const LineObject &o)
      {
        name = o.name;
        status = o.status;
      }
    };

    LineObject objects[];
The status is primarily used to mark existing objects — for example, right after adding a new object to the array using the attachObject function:
  protected:
    bool attachObject(const string name)
    {
      bool found = false;
      int n = ArraySize(objects);
      for(int i = 0; i < n; i++)
      {
        if(objects[i].name == name)
        {
          objects[i].status = 1;
          found = true;
          break;
        }
      }

      if(!found)
      {
        ArrayResize(objects, n + 1);
        objects[n].name = name;
        objects[n].status = 1;
        return true;
      }

      return false;
    }
The detectLines method checks the existence of each object at subsequent moments of time:
    bool detectLines()
    {
      startRefresh();
      int n = ObjectsTotal(ChartID(), 0);
      int count = 0;
      for(int i = 0; i < n; i++)
      {
        string obj = ObjectName(ChartID(), i, 0);
        if(checkObjectCompliance(obj))
        {
          if(attachObject(obj))
          {
            describe(obj);
            count++;
          }
        }
      }
      if(count > 0) Print("New lines: ", count);
      bool changes = stopRefresh() || (count > 0);

      if(changes)
      {
        display();
      }

      return changes;
    }
Here, the startRefresh auxiliary function is called at the very beginning. Its objective is to reset status flags to 0 for all array objects. After that, the working objects receive the status of 1 again inside the loop using attachObject. The call of stopRefresh is performed in the end. It finds unused objects in the internal array by the zero status and informs the user of that.
Each object is checked for compliance with the requirements in the checkObjectCompliance method:
    bool checkObjectCompliance(const string obj)
    {
      if(CommonPrefit == "" || StringFind(obj, CommonPrefit) == 0)
      {
        if(_ln[ObjectGetInteger(0, obj, OBJPROP_TYPE)]
        && _st[ObjectGetInteger(0, obj, OBJPROP_STYLE)]
        && _cc[(color)ObjectGetInteger(0, obj, OBJPROP_COLOR)])
        {
          return true;
        }
      }
      return false;
    }
Apart from the name prefix, the flag sets with types, styles and object colors are checked in it as well. The Set auxiliary class is used for that:
#include <Set.mqh>

Set<ENUM_OBJECT> _ln(OBJ_HLINE, OBJ_VLINE, OBJ_TREND, OBJ_CHANNEL, OBJ_FIBO);
Set<ENUM_LINE_STYLE> _st(InstantType, PendingType, CloseStopLossTakeProfitType);
Set<color> _cc(BuyColor, SellColor, ActivationColor);
Now, it is time to describe the main method — processLines. The method's role affects its size. The entire code is presented in the attachment. Here we only display the most revealing fragments.
    void processLines()
    {
      int n = ArraySize(objects);
      for(int i = 0; i < n; i++)
      {
        string name = objects[i].name;
        if(ObjectGetInteger(ChartID(), name, OBJPROP_BACK)) continue;

        int style = (int)ObjectGetInteger(0, name, OBJPROP_STYLE);
        color clr = (color)ObjectGetInteger(0, name, OBJPROP_COLOR);
        string text = ObjectGetString(0, name, OBJPROP_TEXT);
        datetime last = (datetime)ObjectGetInteger(0, name, OBJPROP_ZORDER);

        double aux = 0, auxf = 0;
        double price = getCurrentPrice(name, aux, auxf);
        ...
Inside the loop, we pass along all objects excluding already used ones (having the OBJPROP_BACK flag). The getCurrentPrice function shown below allows us to find out the current object price. Since some object types consist of several lines, we should pass additional price values using 2 parameters.
        if(clr == ActivationColor)
        {
          if(style == InstantType)
          {
            if(checkActivation(price))
            {
              disableLine(i);
              if(StringFind(text, "Alert:") == 0) Alert(StringSubstr(text, 6));
              else if(StringFind(text, "Push:") == 0) SendNotification(StringSubstr(text, 5));
              else if(StringFind(text, "Mail:") == 0) SendMail("TradeObjects", StringSubstr(text, 5));
              else Print(text);
            }
          }
Next, we should check the object style to determine the type of an event and how its price correlates with the Bid price on the 0 th bar — the checkActivation function does that in case of an alert and placing pending orders. If activation has occurred, perform the appropriate action (in case of an alert, display the message or send it to the user) and mark the object as disabled using disableLine.
The activation code for trade operations will be more complicated, of course. Below is an example of a simplified option for buying by the market price and closing open short positions:
        else if(clr == BuyColor)
        {
          if(style == InstantType)
          {
            int dir = checkMarket(price, last);
            if((dir == 0) && checkTime(name))
            {
              if(clr == BuyColor) dir = +1;
              else if(clr == SellColor) dir = -1;
            }
            if(dir > 0)
            {
              double lot = StringToDouble(ObjectGetString(0, name, OBJPROP_TEXT)); // lot[%]
              if(lot == 0) lot = Lot;

              double sl = 0.0, tp = 0.0;
              if(aux != 0)
              {
                if(aux > Ask)
                {
                  tp = aux;
                  if(DefaultStopLoss != 0) sl = Bid - e.getPointsForLotAndRisk(DefaultStopLoss, lot) * _Point;
                }
                else
                {
                  sl = aux;
                  if(DefaultTakeProfit != 0) tp = Bid + e.getPointsForLotAndRisk(DefaultTakeProfit, lot) * _Point;
                }
              }
              else
              {
                if(DefaultStopLoss != 0) sl = Bid - e.getPointsForLotAndRisk(DefaultStopLoss, lot) * _Point;
                if(DefaultTakeProfit != 0) tp = Bid + e.getPointsForLotAndRisk(DefaultTakeProfit, lot) * _Point;
              }

              sl = NormalizeDouble(sl, _Digits);
              tp = NormalizeDouble(tp, _Digits);

              int ticket = e.placeMarketOrder(OP_BUY, lot, sl, tp);
              if(ticket != -1) // success
              {
                disableLine(i);
              }
              else
              {
                showMessage("Market buy failed with '" + name + "'");
              }
            }
          }
          else if(style == CloseStopLossTakeProfitType) // close sell position, stoploss for sell, takeprofit for sell
          {
            int dir = checkMarket(price) || checkTime(name);
            if(dir != 0)
            {
              double lot = StringToDouble(ObjectGetString(0, name, OBJPROP_TEXT)); // lot
              if(lot > 0)
              {
                if(e.placeMarketOrder(OP_BUY, lot) != -1) // will trigger OrderCloseBy();
                {
                  disableLine(i);
                }
                else
                {
                  showMessage("Partial sell close failed with '" + name + "'");
                }
              }
              else
              {
                if(e.closeMarketOrders(e.mask(OP_SELL)) > 0)
                {
                  disableLine(i);
                }
                else
                {
                  showMessage("Complete sell close failed with '" + name + "'");
                }
              }
            }
          }
The checkMarket function (a more complex version of checkActivation) checks the event occurrence (both are described below). When an event is triggered, we receive stop loss or take profit and lot levels from the object properties and open an order afterwards.
The lot size is specified in the object description in contracts or as a percentage of the free margin - in the latter case, the value is written as negative. The meaning of such notation is easy to remember if you imagine that you are actually indicating which part of the funds is to be used as a security of a new order.
The checkActivation and checkMarket functions are similar. They both use the EA inputs defining the event activation area size:
    bool checkActivation(const double price)
    {
      if(Bid >= price - EventHotSpot * _Point && Bid <= price + EventHotSpot * _Point)
      {
        return true;
      }

      if((PreviousBid < price && Bid >= price)
      || (PreviousBid > price && Bid <= price))
      {
        return true;
      }
      return false;
    }

    int checkMarket(const double price, const datetime last = 0) // returns direction of price movement
    {
      if(last != 0 && (TimeCurrent() - last) / PeriodSeconds() < EventInterval)
      {
        return 0;
      }

      if(PreviousBid >= price - EventHotSpot * _Point && PreviousBid <= price + EventHotSpot * _Point)
      {
        if(Bid > price + EventHotSpot * _Point)
        {
          return +1; // up
        }
        else if(Bid < price - EventHotSpot * _Point)
        {
          return -1; // down
        }
      }

      if(PreviousBid < price && Bid >= price && MathAbs(Bid - PreviousBid) >= EventHotSpot * _Point)
      {
        return +1;
      }
      else if(PreviousBid > price && Bid <= price && MathAbs(Bid - PreviousBid) >= EventHotSpot * _Point)
      {
        return -1;
      }

      return 0;
    }
As you may remember, the PreviousBid price is saved by the EA in the handleTimer handler with the periodicity of EventTimeSpan seconds. The result of the functions' operation is a flag of the price crossing the object's Bid price on the 0 th bar, whereby checkActivation returns a simple logical flag, while checkMarket is a price movement direction: +1 — up, -1 — down.
The crossing of objects by quotes is detected by the bid price because the entire chart is built at the bid price including the applied price. Even if a trader forms the markup for buy orders, they are triggered by correct signals: the ask chart implicitly passes above the bid chart by the spread value, while potential lines that could have been based on the ask chart would have crossed the price synchronously with the current markup by bid.
For the lines of the PendingType style and neutral ActivationColor, the behavior is special: at the moment of their crossing by the price, pending orders are placed. Order placement is set using other lines. Their names are separated by a slash ('/') in the activation line description. If the description is empty, the system finds all pending order lines by style and places them. Just like market orders, direction of pending orders corresponds to their color — BuyColor or SellColor for buying or selling, while in the description, you can specify the lot and expiry date (in bars).
The methods for combining styles and colors of objects and their corresponding values are given in the table.
| Color and style | BuyColor | SellColor | ActivationColor |
| InstantType | buying by market | selling by market | alert |
| PendingType | potential pending buy order | potential pending sell order | initiate placing pending orders |
| CloseStopLossTakeProfitType | closing, stop loss, take profit for a short position |
closing, stop loss, take profit for a long position |
close all |
Let's go back to the getCurrentPrice method, which is perhaps the most important one after processLines.
    double getCurrentPrice(const string name, double &auxiliary, double &auxiliaryFibo)
    {
      int type = (int)ObjectGetInteger(0, name, OBJPROP_TYPE);
      if(type == OBJ_TREND)
      {
        datetime dt1 = (datetime)ObjectGetInteger(0, name, OBJPROP_TIME, 0);
        datetime dt2 = (datetime)ObjectGetInteger(0, name, OBJPROP_TIME, 1);
        int i1 = iBarShift(NULL, 0, dt1, true);
        int i2 = iBarShift(NULL, 0, dt2, true);
        if(i1 <= i2 || i1 == -1 || i2 == -1)
        {
          Print("Incorrect line: ", name);
          return 0;
        }
        double p1 = ObjectGetDouble(0, name, OBJPROP_PRICE, 0);
        double p2 = ObjectGetDouble(0, name, OBJPROP_PRICE, 1);

        double k = -(p1 - p2)/(i2 - i1);
        double b = -(i1 * p2 - i2 * p1)/(i2 - i1);

        return b;
      }
      else if(type == OBJ_HLINE)
      {
        return ObjectGetDouble(0, name, OBJPROP_PRICE, 0);
      }
      else if(type == OBJ_VLINE)
      {
        return EMPTY_VALUE; // should not be a null, not used otherwise
      }
      else if(type == OBJ_CHANNEL)
      {
        datetime dt1 = (datetime)ObjectGetInteger(0, name, OBJPROP_TIME, 0);
        datetime dt2 = (datetime)ObjectGetInteger(0, name, OBJPROP_TIME, 1);
        datetime dt3 = (datetime)ObjectGetInteger(0, name, OBJPROP_TIME, 2);
        int i1 = iBarShift(NULL, 0, dt1, true);
        int i2 = iBarShift(NULL, 0, dt2, true);
        int i3 = iBarShift(NULL, 0, dt3, true);
        if(i1 <= i2 || i1 == -1 || i2 == -1 || i3 == -1)
        {
          Print("Incorrect channel: ", name);
          return 0;
        }
        double p1 = ObjectGetDouble(0, name, OBJPROP_PRICE, 0);
        double p2 = ObjectGetDouble(0, name, OBJPROP_PRICE, 1);
        double p3 = ObjectGetDouble(0, name, OBJPROP_PRICE, 2);

        double k = -(p1 - p2)/(i2 - i1);
        double b = -(i1 * p2 - i2 * p1)/(i2 - i1);

        double dy = i3 * k + b - p3;

        auxiliary = p3 - i3 * k;

        return b;
      }
      else if(type == OBJ_FIBO)
      {
        // level 61.8 is enter point at retracement (buy/sell limit),
        // 38.2 and 161.8 as stoploss/takeprofit

        double p1 = ObjectGetDouble(0, name, OBJPROP_PRICE, 0);
        double p2 = ObjectGetDouble(0, name, OBJPROP_PRICE, 1);
        datetime dt1 = (datetime)ObjectGetInteger(0, name, OBJPROP_TIME, 0);
        datetime dt2 = (datetime)ObjectGetInteger(0, name, OBJPROP_TIME, 1);

        if(dt2 < dt1)
        {
          swap(p1, p2);
        }

        double price = (p2 - p1) * ObjectGetDouble(0, name, OBJPROP_LEVELVALUE, 4) + p1;
        auxiliary = (p2 - p1) * ObjectGetDouble(0, name, OBJPROP_LEVELVALUE, 2) + p1;
        auxiliaryFibo = (p2 - p1) * ObjectGetDouble(0, name, OBJPROP_LEVELVALUE, 6) + p1;
        return price;
      }
      return 0;
    }
The idea is simple — depending on the object type, we should calculate its price on the 0 th bar (for the main and additional lines). When placing objects on the chart, it is important for all the object points to be located in the past — where there is a valid bar number. Otherwise, the object is considered invalid, since it is impossible to calculate its price unambiguously.
In case of a vertical line, we return EMPTY_VALUE — this is neither zero, nor a specific price (because such a line satisfies any price). Therefore, for vertical lines, you should use an additional check for matching the current time. This is performed by the checkTime function. It has already been called in the processLines fragment.
    bool checkTime(const string name)
    {
      return (ObjectGetInteger(0, name, OBJPROP_TYPE) == OBJ_VLINE
        && (datetime)ObjectGetInteger(0, name, OBJPROP_TIME, 0) == Time[0]);
    }
Finally, let's describe the implementation of the disableLine function we have already encountered in the code many times.
    void disableLine(const string name)
    {
      int width = (int)ObjectGetInteger(0, name, OBJPROP_WIDTH);
      if(width > 1)
      {
        ObjectSetInteger(0, name, OBJPROP_WIDTH, width - 1);
        ObjectSetInteger(0, name, OBJPROP_ZORDER, TimeCurrent());
      }
      else
      {
        ObjectSetInteger(0, name, OBJPROP_BACK, true);
        ObjectSetInteger(0, name, OBJPROP_COLOR, darken((color)ObjectGetInteger(0, name, OBJPROP_COLOR)));
      }
      display();
    }
If the line width exceeds 1, we increase it by 1 and save the current event time in the OBJPROP_ZORDER property. In case of ordinary lines, we shift them to the background and decrease the color brightness. Objects in the background are considered disabled.
As for the OBJPROP_ZORDER property, it is read in the processLines method to the 'datetime last' variable (as shown above), which, in turn, is passed as an argument to the checkMarket(price, last) method. Inside, we make sure that the time since the previous activation exceeds the interval set in the input variable (in bars):
      if(last != 0 && (TimeCurrent() - last) / PeriodSeconds() < EventInterval)
      {
        return 0;
      }
TradeObjects allows you to perform partial closing if a lot is specified in the description of the CloseStopLossTakeProfitType type of object. The system opens a counter order of the specified volume and then calls OrderCloseBy. To enable the mode, there is a special AllowOrderCloseBy flag in the input variables. If it is on, the counter positions always "collapse" into one. As you may know, this function is not allowed on all accounts (the EA checks the settings and sends the appropriate message if the option is blocked). In case of MetaTrader 5, the account should support hedging. Those interested can improve the system by implementing an alternative partial closing — without using OrderCloseBy and with an ability to view the list of positions and select a specific one that can be reduced by various attributes.
Let's get back to the Expert class executing all trade operations for TradeObjects. This is a simple set of methods for opening and closing orders, supporting stop loss and calculating lots based on the specified risk. It applies the MetaTrader 4 order metaphor, which is adapted for MetaTrader 5 using the MT4Orders library.
The class does not provide functionality for modifying placed pending orders. Moving their prices, as well as stop loss and take profit levels is managed by the terminal: if "Show trading levels" option is enabled, it allows doing this using Drag'n'Drop.
The Expert class can be replaced with any other you are accustomed to.
The attached source code is compiled in both MetaTrader 4 and MetaTrader 5 (with additional header files).
In the current TradeObjects implementation, there is a deviation from strict OOP practices for the sake of simplicity. Otherwise, you would have had to apply an abstract trading interface, implement the Expert class as the inheritor of the interface and then pass it to the TradeObjects class (for example, via the constructor parameter). This is a well-known dependency injection OOP template. In this project, the trading engine is hardwired into the code: it is created and deleted inside the TradeObjects object.
In addition, we use global input variables directly in the code of the TradeObjects class in violation of the OOP principles. The best programming style requires passing them to the class as constructor or special methods parameters. This would allow us, for example, to use TradeObjects as a library within another EA supplementing it with functions for manual trading by markup.
The larger the project, the more important the basic OOP principles become. Since we consider a rather simple and isolated engine for auto trading by objects, its improvement (which knows no limits) is left for optional study.
Program in action
Below, we are going to show how the system looks in action with default styles and colors.
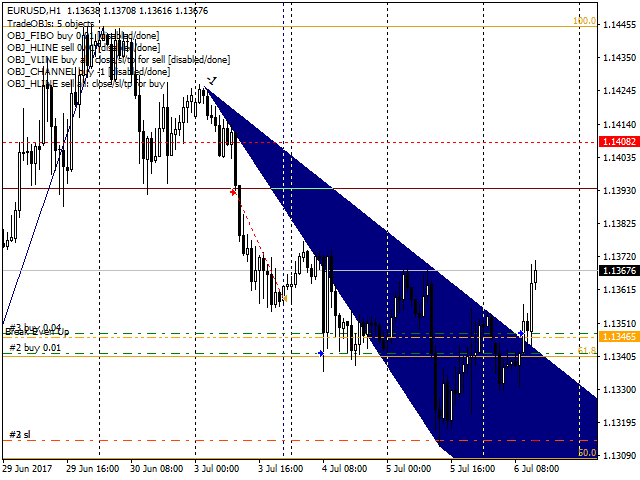
Suppose that we have detected the head and shoulders pattern and are going to place the horizontal red line for a sell order. The system displays a list of objects detected and controlled by it in a comment.

A stop loss is set in accordance with the DefaultStopLoss EA parameter. The market lifetime is limited by a vertical blue dotted line instead of a take profit.
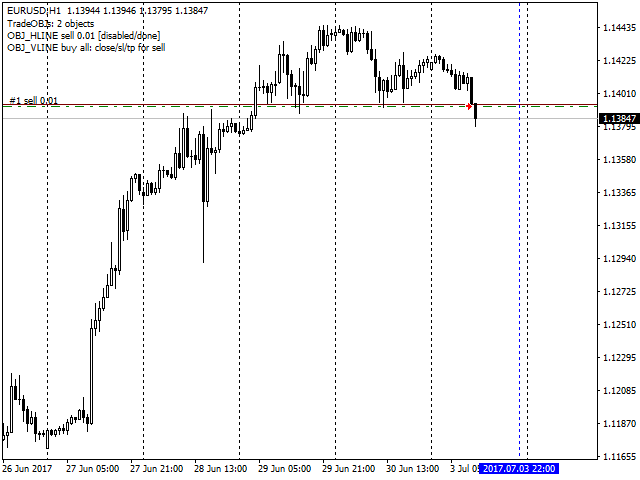
When reaching this line, the position is closed (regardless of profitability). The activated lines are marked as inactive (their color brightness is decreased and they are moved to the background).

After a while, the quotes seem to be moving down again and we set Fibo levels in hope of a breakout from the level of 61.8 (this is all that Fibonacci can do in this project by default, but you can implement other types of behavior). Note that the color of the Fibo object is the color of the diagonal line, not of the levels: the color of the levels is set by a separate setting.
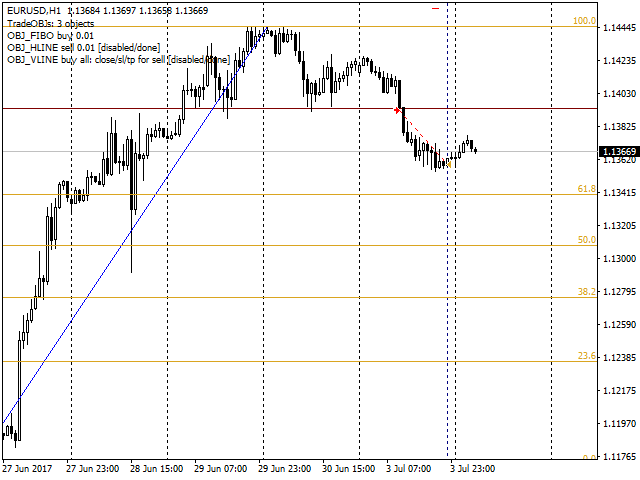
When the price reaches the level, a trade with the specified stop loss (38.2) and take profit prices is opened (161.8, not visible on the screenshot).
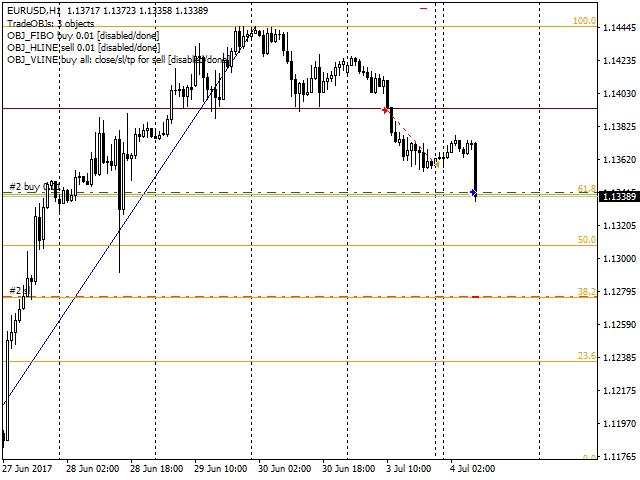
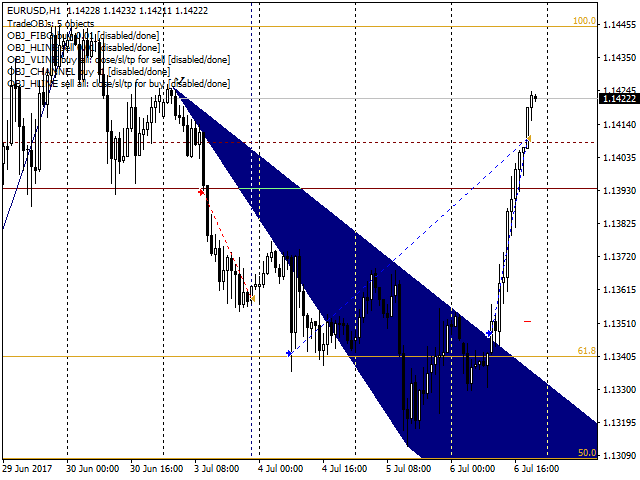
Some time later, we see the formation of a resistance line from above and place the blue channel assuming that the price will still go up.
Note that all the lines so far did not contain descriptions, and so the orders opened with the lot from the Lot parameter (0.01 by default). In this case, there is a description of '-1', i.e. the lot size will be calculated as requiring 1% of the free margin. Since the auxiliary line is located below the main one, the channel specifies the distance to the stop loss (different from the default value).

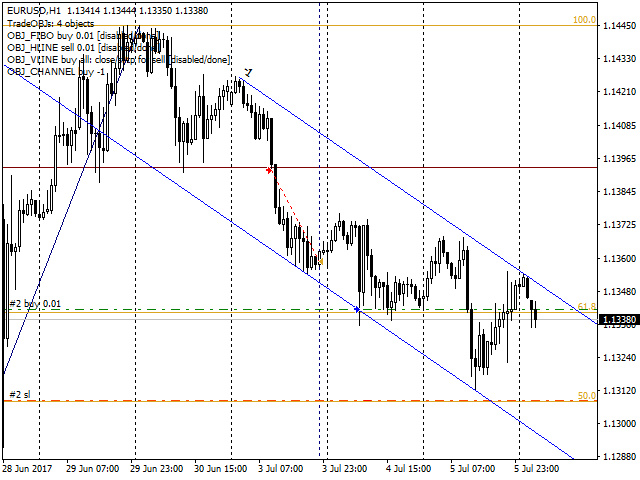
The channel breaks through, and a new long position is opened. As we can see, the volume was calculated as 0.04 (with a deposit of $1000). The blue segment in the screenshot is the activated channel moved to the background (so MetaTrader 4 shows the channels in the background).
In order to close both open buy positions, place an obvious red dotted take profit line.
The price reaches this level, and both orders are closed.
Suppose that after such movement, the price moves within the "corridor". In order to catch this volatility, we establish two horizontal dashed lines for limit orders above and below the price, as well as a gray dashed vertical line for their activation. In fact, they do not have to be horizontal or vertical.
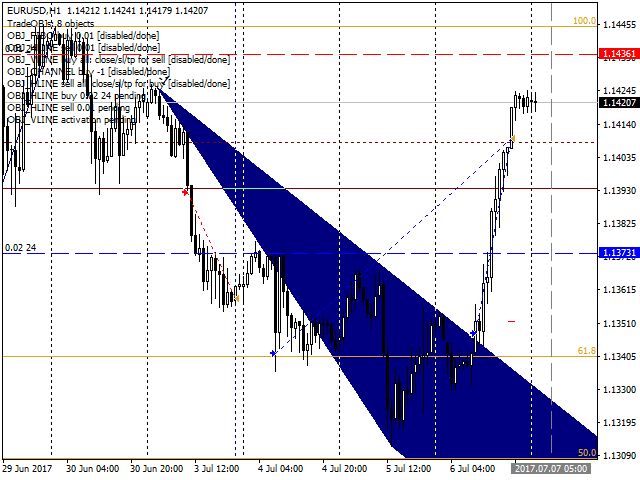
Note, for example, that a custom lot of 0.02 and expiration date of 24 bars (hours) are specified for a lower pending order in the description. Once the activation line is reached, pending orders are set.

After some time, sell limit is triggered.
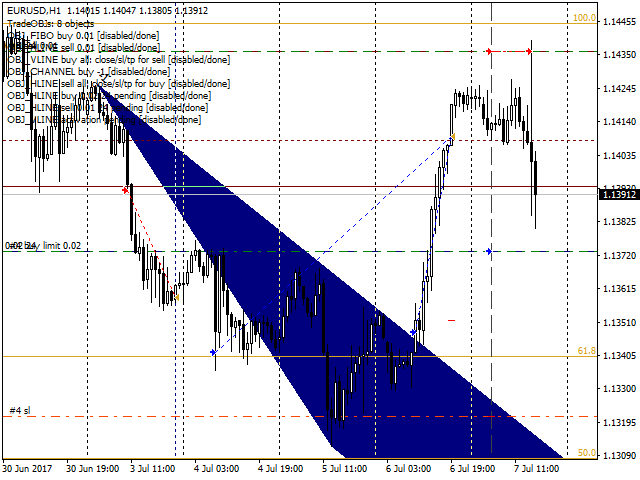
Buy limit expires on Monday.
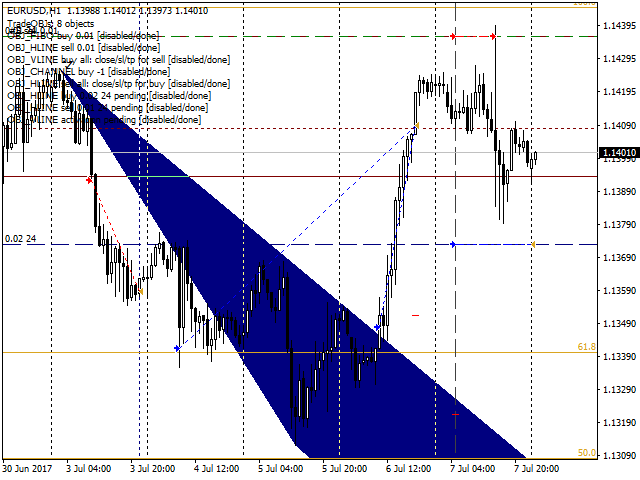
We put a vertical gray dotted line, meaning the closing of all positions.
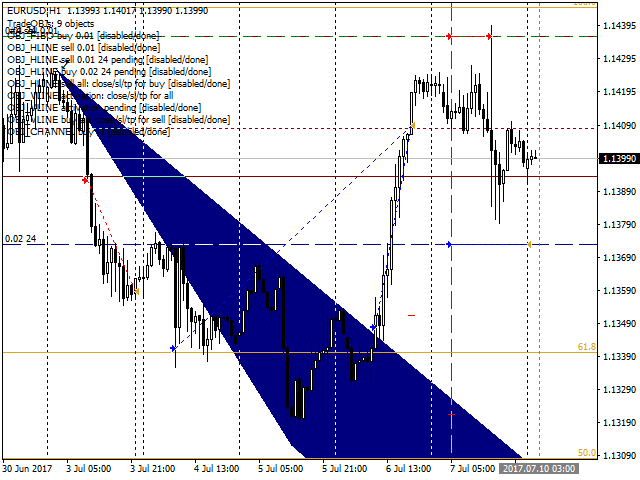
After it is reached, a short position is closed, but even if it were open and long, it would be closed, too.

During its work, the EA displays the main events in the log.
It is, of course, possible to delete obsolete objects in order to clear the chart. In the example, they are left as a protocol for the performed actions.
The templates for MetaTrader 4 and MetaTrader 5 with the lines for demo trading in the tester on EURUSD H1 starting from July 1, 2017 (the period described above) are attached to the article. We apply the standard EA settings with the exception of the DefaultStopLoss parameter set to -1 (corresponding to losing 1% of the free margin). The initial deposit of $1000 and the leverage of 1:500 are offered to illustrate the stop loss calculation and tracking. In case of MetaTrader 5, the template should first be renamed to tester.tpl (loading and editing templates directly in the tester are not yet supported by the platform).