Graphical interfaces X: Advanced management of lists and tables. Code optimization (build 7)
Anatoli Kazharski | 7 February, 2017
Contents
- Introduction
- Changes in the library scheme and code optimization
- Controlling a scrollbar programmatically
- Controlling lists programmatically
- Code optimization for table of the CTable type
- Controlling a table of the CTable type programmatically
- Application for testing the controls
- Conclusion
Introduction
In order to get a better understanding of this library's purpose, please read the first article: Graphical interfaces I: Preparation of the library structure (Chapter 1). You will find a list of articles with links at the end of each chapter. There, you can also download a complete version of the library at the current stage of development. The files must be located in the same directories as in the archive.
The library code could do with an optimization to make it more regularized and thus more readable and comprehensible for studying. In addition, we will continue to develop the controls created in the previous articles: lists, tables and scrollbars. Let us add methods that will allows to programmatically manage the properties of those controls during the runtime of the MQL application.
Changes in the library scheme and code optimization
Partially optimized the code in all library files related to controls. Cases with the frequently repeated code have been placed in separate methods, and the methods themselves have been moved to a separate class.
Here is how it was done. The CElement has been renamed to CElementBase. This is the base class for all controls of the library. Now, the next derived class after it is the new CElement class, which contains the methods frequently repeated in all controls. Those include:
- Method for storing the form pointer, to which the control is attached
- Check for availability of the form pointer
- Check for the identifier of the activated control
- Calculation of absolute coordinates
- Calculation of the relative coordinates from the edge of the form
The CElementBase and CElement classes are located in different files, ElementBase.mqh and Element.mqh, respectively. Therefore, the ElementBase.mqh file with the base class is included in the Element.mqh file. Since the CWindows type must be defined here, include the Window.mqh file as well. This is presented in the code listing below:
//| Element.mqh |
//| Copyright 2016, MetaQuotes Software Corp. |
//| http://www.mql5.com |
//+------------------------------------------------------------------+
#include "ElementBase.mqh"
#include "Controls\Window.mqh"
//+------------------------------------------------------------------+
//| Class for getting the mouse parameters |
//+------------------------------------------------------------------+
class CElement : public CElementBase
{
protected:
//--- Pointer to the form to which the element is attached
CWindow *m_wnd;
//---
public:
CElement(void);
~CElement(void);
//--- Store pointer to the form
void WindowPointer(CWindow &object) { m_wnd=::GetPointer(object); }
//---
protected:
//--- Check if there is a form pointer
bool CheckWindowPointer(void);
//--- Check the identifier of the activated control
bool CheckIdActivatedElement(void);
//--- Calculation of absolute coordinates
int CalculateX(const int x_gap);
int CalculateY(const int y_gap);
//--- Calculation of the relative coordinates from the edge of the form
int CalculateXGap(const int x);
int CalculateYGap(const int y);
};
//+------------------------------------------------------------------+
//| Constructor |
//+------------------------------------------------------------------+
CElement::CElement(void)
{
}
//+------------------------------------------------------------------+
//| Destructor |
//+------------------------------------------------------------------+
CElement::~CElement(void)
{
}
All those methods and their code had been repeated frequently in all classes of controls. Moving them to a separate class made the code in classes of controls significantly more understandable and readable. The code of all those methods is simple and literally fits on a single line (see the code below). The control positioning relative to a side of the form is considered in calculation of the coordinates.
//| Check the identifier of the activated control |
//+------------------------------------------------------------------+
bool CElement::CheckIdActivatedElement(void)
{
return(m_wnd.IdActivatedElement()==CElementBase::Id());
}
//+------------------------------------------------------------------+
//| Calculate the absolute X coordinate |
//+------------------------------------------------------------------+
int CElement::CalculateX(const int x_gap)
{
return((CElementBase::AnchorRightWindowSide())? m_wnd.X2()-x_gap : m_wnd.X()+x_gap);
}
//+------------------------------------------------------------------+
//| Calculate the absolute Y coordinate |
//+------------------------------------------------------------------+
int CElement::CalculateY(const int y_gap)
{
return((CElementBase::AnchorBottomWindowSide())? m_wnd.Y2()-y_gap : m_wnd.Y()+y_gap);
}
//+------------------------------------------------------------------+
//| Calculate the relative X coordinate from the edge of the form |
//+------------------------------------------------------------------+
int CElement::CalculateXGap(const int x)
{
return((CElementBase::AnchorRightWindowSide())? m_wnd.X2()-x : x-m_wnd.X());
}
//+------------------------------------------------------------------+
//| Calculate the relative Y coordinate from the edge of the form |
//+------------------------------------------------------------------+
int CElement::CalculateYGap(const int y)
{
return((CElementBase::AnchorBottomWindowSide())? m_wnd.Y2()-y : y-m_wnd.Y());
}
One may ask: "Why have these methods not been placed in the old version of the CElement class?" This was not possible: when including the Window.mqh file and trying to compile, a declaration without type error occurs, and as a result — many other related errors:
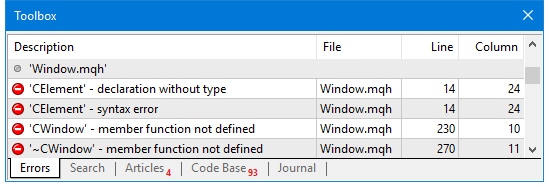
Fig. 1. Message at compilation that the CElement type is missing
Attempts to bypass this difficulty by including the Window.mqh after the body of the CElement class, when an object of the CWindow has already been declared in the body of that class, lead to the familiar compilation error of the specified type missing.
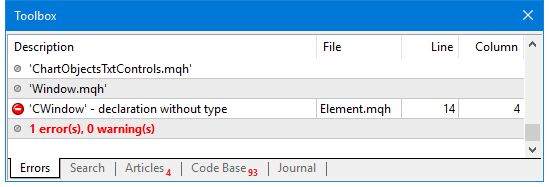
Fig. 2. Message at compilation that the CWindow type is missing
Therefore, it was decided to create an additional inherited intermediate class to place the frequently repeated code and methods for working with the form pointer, to which the controls are attached. Part of the library scheme regarding the relationship between the form and controls looks as follows:
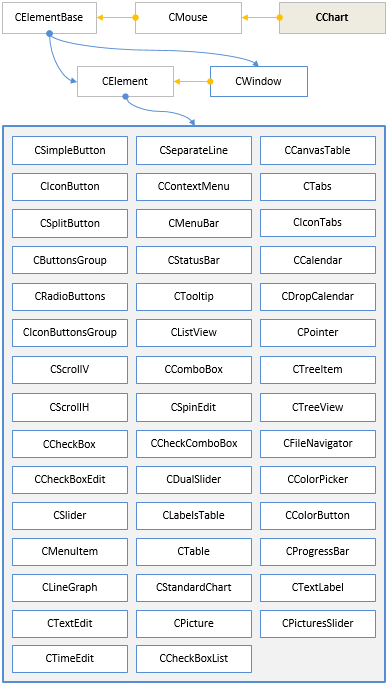
Fig. 3. Part of the library scheme regarding the relationship between the form and controls
As seen from the scheme above, the CWindow class is directly derived from the CElementBase class, as the intermediate CElement class is now superfluous and inappropriate for the form. All other classes of controls are derived from the intermediate CElement class.
Controlling a scrollbar programmatically
The need to programmatically control the scrollbars arose during the application of the library. For this purpose, the MovingThumb() method has been implemented in the CScrollV and CScrollH classes, which can be used to move the scrollbar thumb to the specified position.
The listing below shows the code for the vertical scrollbar only, as it is virtually identical to the horizontal scrollbar. The method has one argument, which defaults to WRONG_VALUE. If the method is called without specifying the position (with the default value), the thumb will be moved to the last position of the list. This is useful when items are added to the list while the program is running, and it also allows to implement automatic scrolling of the list.
//| Class for managing the vertical scrollbar |
//+------------------------------------------------------------------+
class CScrollV : public CScroll
{
public:
//--- Moves the thumb to the specified position
void MovingThumb(const int pos=WRONG_VALUE);
};
//+------------------------------------------------------------------+
//| Moves the thumb to the specified position |
//+------------------------------------------------------------------+
void CScrollV::MovingThumb(const int pos=WRONG_VALUE)
{
//--- Leave, if the scrollbar is not required
if(m_items_total<=m_visible_items_total)
return;
// --- To check the position of the thumb
uint check_pos=0;
//--- Adjustment the position in case the range has been exceeded
if(pos<0 || pos>m_items_total-m_visible_items_total)
check_pos=m_items_total-m_visible_items_total;
else
check_pos=pos;
//--- Store the position of the thumb
CScroll::CurrentPos(check_pos);
//--- Calculate and set the Y coordinate of the scrollbar thumb
CalculateThumbY();
}
Controlling lists programmatically
A number of public methods for managing the lists have been implemented, which perform the following actions:
- Rebuilding the list
- Adding an item to the end of the list
- Clearing the list (deleting all items)
- Scrolling the list
In addition, as part of library code optimization, private methods for repeated code have been added to the list classes:
- Calculation of the Y coordinate of the item
- Calculating the width of items
- Calculation of the list size along the Y axis
Let us take a closer look at the structure of these methods in the CListView class. The private method are merely auxiliary methods for the code repeated more than once in different parts of the class. They occupy only one line in each method:
//| Class for creating a list view |
//+------------------------------------------------------------------+
class CListView : public CElement
{
private:
//--- Calculation of the Y coordinate of the item
int CalculationItemY(const int item_index=0);
//--- Calculating the width of items
int CalculationItemsWidth(void);
//--- Calculation of the list size along the Y axis
int CalculationYSize(void);
//+------------------------------------------------------------------+
//| Calculation of the Y coordinate of the item |
//+------------------------------------------------------------------+
int CListView::CalculationItemY(const int item_index=0)
{
return((item_index>0)? m_items[item_index-1].Y2()-1 : CElementBase::Y()+1);
}
//+------------------------------------------------------------------+
//| Calculating the width of items |
//+------------------------------------------------------------------+
int CListView::CalculationItemsWidth(void)
{
return((m_items_total>m_visible_items_total) ? CElementBase::XSize()-m_scrollv.ScrollWidth()-1 : CElementBase::XSize()-2);
}
//+------------------------------------------------------------------+
//| Calculation of the list size along the Y axis |
//+------------------------------------------------------------------+
int CListView::CalculationYSize(void)
{
return(m_item_y_size*m_visible_items_total-(m_visible_items_total-1)+2);
}
Clearing the list speaks for itself: all the items are removed from the list. To do this, use the CListView::Clear() method. Here, the graphical primitives are removed first, the array of pointers to those objects is released and the default values are set for certain fields of the class. After that, the list size is set to zero and the scrollbar parameters are reset. At the very end of the method, it is necessary to add pointer to the list background into the array of pointers again, as it has been previously deleted by the CElementBase::FreeObjectsArray() method.
//| Class for creating a list view |
//+------------------------------------------------------------------+
class CListView : public CElement
{
public:
//--- Clears the list (deletes all items)
void Clear(void);
};
//+------------------------------------------------------------------+
//| Clears the list (deletes all items) |
//+------------------------------------------------------------------+
void CListView::Clear(void)
{
//--- Delete the item objects
for(int r=0; r<m_visible_items_total; r++)
m_items[r].Delete();
//--- Clear the array of pointers to objects
CElementBase::FreeObjectsArray();
//--- Set the default values
m_selected_item_text ="";
m_selected_item_index =0;
//--- Set the zero size to the list
ListSize(0);
//--- Reset the scrollbar values
m_scrollv.Hide();
m_scrollv.MovingThumb(0);
m_scrollv.ChangeThumbSize(m_items_total,m_visible_items_total);
//--- Add the list background to the array of pointers to objects of the control
CElementBase::AddToArray(m_area);
}
To rebuild the list, use the CListView::Rebuilding() method. Rebuilding is a situation in which it is necessary to fully re-create the list. This method can be used to change the total number of items and the number of visible items. That is, the list size will also change, if the number of visible items is set different from the original value.
The list is cleared at the beginning of the CListView::Rebuilding() method. Then, the values of the passed arguments are used to set the new sizes and to adjust the list height, if the number of visible items has changed. Next, the sizes of the scrollbar objects are adjusted. After that, the list is created, and if the total number of items exceeds the specified amount of visible items, a scrollbar is displayed.
//| Class for creating a list view |
//+------------------------------------------------------------------+
class CListView : public CElement
{
public:
//--- Rebuilding the list
void Rebuilding(const int items_total,const int visible_items_total);
};
//+------------------------------------------------------------------+
//| Rebuilding the list |
//+------------------------------------------------------------------+
void CListView::Rebuilding(const int items_total,const int visible_items_total)
{
//--- Clearing the list
Clear();
//--- Set the size of the list view and its visible part
ListSize(items_total);
VisibleListSize(visible_items_total);
//--- Adjust the list size
int y_size=CalculationYSize();
if(y_size!=CElementBase::YSize())
{
m_area.YSize(y_size);
m_area.Y_Size(y_size);
CElementBase::YSize(y_size);
}
//--- Adjust the size of the scrollbar
m_scrollv.ChangeThumbSize(m_items_total,m_visible_items_total);
m_scrollv.ChangeYSize(y_size);
//--- Create the list
CreateList();
//--- Display the scrollbar, if necessary
if(m_items_total>m_visible_items_total)
{
if(CElementBase::IsVisible())
m_scrollv.Show();
}
}
A separate CListView::CreateItem() method has been implemented for creation of a single item, as its code will be used when adding an item to the list in the CListView::AddItem() during the runtime, and not only when creating an entire list in the cycle within the CListView::CreateList() method.
The CListView::AddItem() takes inly one argument - the displayed text of the item. It is an empty string by default. Text can also be added after creating the item using the CListView::SetItemValue() method. At the beginning of the CListView::AddItem() method, the array of items is increased by one element. Then, if the total amount of items is currently not greater than the number of visible items, this means that it is necessary to create a graphical object. If the number of visible amount is exceeded, then it is necessary to show the scrollbar and adjust its thumb size, as well as adjust the width of items.
//| Class for creating a list view |
//+------------------------------------------------------------------+
class CListView : public CElement
{
public:
//--- Add item to the list
void AddItem(const string value="");
};
//+------------------------------------------------------------------+
//| Add item to the list |
//+------------------------------------------------------------------+
void CListView::AddItem(const string value="")
{
//--- Increase the array size by one element
int array_size=ItemsTotal();
m_items_total=array_size+1;
::ArrayResize(m_item_value,m_items_total);
m_item_value[array_size]=value;
//--- If the total number of items is greater than visible
if(m_items_total>m_visible_items_total)
{
//--- Adjust the size of the thumb and display the scrollbar
m_scrollv.ChangeThumbSize(m_items_total,m_visible_items_total);
if(CElementBase::IsVisible())
m_scrollv.Show();
//--- Leave, if the array has less than one element
if(m_visible_items_total<1)
return;
//--- Calculating the width of the list view items
int width=CElementBase::XSize()-m_scrollv.ScrollWidth()-1;
if(width==m_items[0].XSize())
return;
//--- Set the new size to the list items
for(int i=0; i<m_items_total && i<m_visible_items_total; i++)
{
m_items[i].XSize(width);
m_items[i].X_Size(width);
}
//---
return;
}
//--- Calculating coordinates
int x=CElementBase::X()+1;
int y=CalculationItemY(array_size);
//--- Calculating the width of the list view items
int width=CalculationItemsWidth();
//--- Creating the object
CreateItem(array_size,x,y,width);
//--- Highlighting the selected item
HighlightSelectedItem();
//--- Store the text of the selected item
if(array_size==1)
m_selected_item_text=m_item_value[0];
}
The CListView::Scrolling() method is designed for scrolling the list items programmatically. The position number in the list is taken as the only argument. The default value is WRONG_VALUE, which means shifting the list to the last position.
//| Class for creating a list view |
//+------------------------------------------------------------------+
class CListView : public CElement
{
public:
//--- Scrolling the list
void Scrolling(const int pos=WRONG_VALUE);
};
//+------------------------------------------------------------------+
//| Scrolling the list |
//+------------------------------------------------------------------+
void CListView::Scrolling(const int pos=WRONG_VALUE)
{
//--- Leave, if the scrollbar is not required
if(m_items_total<=m_visible_items_total)
return;
//--- To determine the position of the thumb
int index=0;
//--- Index of the last position
int last_pos_index=m_items_total-m_visible_items_total;
//--- Adjustment in case the range has been exceeded
if(pos<0)
index=last_pos_index;
else
index=(pos>last_pos_index)? last_pos_index : pos;
//--- Move the scrollbar thumb
m_scrollv.MovingThumb(index);
//--- Move the list
UpdateList(index);
}
Similar methods have been implemented for lists of the CCheckBoxList type.
Code optimization for table of the CTable type
The code of the CTable class has also been optimized. It has become more compact and readable due to addition of a number of private methods, containing the frequently repeated code. Those methods are:
- Resizing the arrays of row
- Initialization of cells with default values
- Calculation of the table size along the X axis
- Calculation of the table size along the Y axis
- Calculation of the X coordinate of the cell
- Calculation of the Y coordinate of the cell
- Calculation of the column width
- Changing the width of columns
- Changing the table size along the Y axis
//| Class for creating an edit box table |
//+------------------------------------------------------------------+
class CTable : public CElement
{
private:
//--- Resizing the arrays of row
void RowResize(const uint column_index,const uint new_size);
//--- Initialization of cells with default values
void CellInitialize(const uint column_index,const int row_index=WRONG_VALUE);
//--- Calculation of the table size along the X axis
int CalculationXSize(void);
//--- Calculation of the table size along the Y axis
int CalculationYSize(void);
//--- Calculation of the X coordinate of the cell
int CalculationCellX(const int column_index=0);
//--- Calculation of the Y coordinate of the cell
int CalculationCellY(const int row_index=0);
//--- Calculation of the column width
int CalculationColumnWidth(const bool is_last_column=false);
//--- Changing the width of columns
void ColumnsXResize(void);
//--- Changing the table size along the Y axis
void YResize(void);
};
The CTable::CalculationColumnWidth() method is intended to calculate the width of the table columns and takes only one argument with the value false. The default value is used to calculate the total width for all columns. If the value true is passed, then the width for the last column will be calculated. In this case, a recursive method call is used. The division into calculation of the total width and the width of the last column is required, as in general calculation, the right edge of the last column may not match the right edge of the table.
//| Calculation of the column width |
//+------------------------------------------------------------------+
int CTable::CalculationColumnWidth(const bool is_last_column=false)
{
int width=0;
//--- Check for presence of a vertical scrollbar
bool is_scrollv=m_rows_total>m_visible_rows_total;
//---
if(!is_last_column)
{
if(m_visible_columns_total==1)
width=(is_scrollv)? m_x_size-m_scrollv.ScrollWidth() : width=m_x_size-2;
else
{
if(is_scrollv)
width=(m_x_size-m_scrollv.ScrollWidth())/int(m_visible_columns_total);
else
width=m_x_size/(int)m_visible_columns_total+1;
}
}
else
{
width=CalculationColumnWidth();
int last_column=(int)m_visible_columns_total-1;
int w=m_x_size-(width*last_column-last_column);
width=(is_scrollv) ? w-m_scrollv.ScrollWidth()-1 : w-2;
}
//---
return(width);
}
The CTable::ColumnsXResize() method is called when a table is created or when the table width is changed. Here, the CTable::CalculationColumnWidth() method is called for calculation of the column widths, which was discussed above. At the end of the method, if the table is sorted, it is necessary to adjust the position of the arrow-sign of sorted table.
//| Changing the width of columns |
//+------------------------------------------------------------------+
void CTable::ColumnsXResize(void)
{
//--- Calculation of column widths
int width=CalculationColumnWidth();
//--- Columns
for(uint c=0; c<m_columns_total && c<m_visible_columns_total; c++)
{
//--- Calculation of the X coordinate
int x=CalculationCellX(c);
//--- Adjust the width of the last column
if(c+1>=m_visible_columns_total)
width=CalculationColumnWidth(true);
//--- Rows
for(uint r=0; r<m_rows_total && r<m_visible_rows_total; r++)
{
//--- Coordinates
m_columns[c].m_rows[r].X(x);
m_columns[c].m_rows[r].X_Distance(x);
//--- Width
m_columns[c].m_rows[r].XSize(width);
m_columns[c].m_rows[r].X_Size(width);
//--- Margins from the edge of the panel
m_columns[c].m_rows[r].XGap(CalculateXGap(x));
}
}
//--- Leave, if table is not sorted
if(m_is_sorted_column_index==WRONG_VALUE)
return;
//--- Shift by one index, if the fixed header mode is enabled
int l=(m_fix_first_column) ? 1 : 0;
//--- Get the current positions of thumbs of the vertical and horizontal scrollbars
int h=m_scrollh.CurrentPos()+l;
//--- If not exceeding the array range
if(m_is_sorted_column_index>=h && m_is_sorted_column_index<(int)m_visible_columns_total)
{
//--- Shifting the arrow to the sorted table column
ShiftSortArrow(m_is_sorted_column_index);
}
}
You can easily study the code of the other private methods, provided in the list at the beginning of this section, as they do not contain anything complex, which could cause questions.
In addition to methods described above, as part of the optimization, a separate private CTable::CreateCell() method has been implemented for creating table cells. Another useful addition for tables of the CTable type in this update is the automatic Zebra style formatting. Previously, if a library user needed to make the table striped for better comprehension of the data array, the CTable::CellColor() method has to be used. That is, it was necessary to assign colors to every cell of the table individually. This is inconvenient and time-consuming. Now, to make the table striped, simply call the CTable::IsZebraFormatRows() method before creating the control, passing the second color as the sole argument. The value defined by the CTable::CellColor() method for all table cells (default — white) is used as the first color.
//| Class for creating an edit box table |
//+------------------------------------------------------------------+
class CTable : public CElement
{
private:
//--- Zebra style striped coloring mode of the table
color m_is_zebra_format_rows;
//---
public:
//--- Mode of formatting rows in Zebra style
void IsZebraFormatRows(const color clr) { m_is_zebra_format_rows=clr; }
};
If the second color for formatting in the Zebra style is specified, then the private CTable::ZebraFormatRows() method is called wherever necessary.
//| Class for creating an edit box table |
//+------------------------------------------------------------------+
class CTable : public CElement
{
private:
//--- Formats the table in Zebra style
void ZebraFormatRows(void);
};
//+------------------------------------------------------------------+
//| Formats the table in Zebra style |
//+------------------------------------------------------------------+
void CTable::ZebraFormatRows(void)
{
//--- Leave, if the mode is disabled
if(m_is_zebra_format_rows==clrNONE)
return;
//--- The default color
color clr=m_cell_color;
//---
for(uint c=0; c<m_columns_total; c++)
{
for(uint r=0; r<m_rows_total; r++)
{
if(m_fix_first_row)
{
if(r==0)
continue;
//---
clr=(r%2==0)? m_is_zebra_format_rows : m_cell_color;
}
else
clr=(r%2==0)? m_cell_color : m_is_zebra_format_rows;
//--- Store the cell background color in the common array
m_vcolumns[c].m_cell_color[r]=clr;
}
}
}
Controlling a table of the CTable type programmatically
In this update of the library, only the CTable type tables receive a programmatic control. Multiple public methods have been implemented to perform the following actions:
- Rebuilding the table
- Adding a column
- Adding a row
- Clearing the table (deleting all columns and rows)
- Horizontal and vertical scrolling of the table
//| Class for creating an edit box table |
//+------------------------------------------------------------------+
class CTable : public CElement
{
public:
//--- Rebuilding the table
void Rebuilding(const int columns_total,const int visible_columns_total,const int rows_total,const int visible_rows_total);
//--- Adds a column to the table
void AddColumn(void);
//--- Adds a row to the table
void AddRow(void);
//--- Clears the table (deletes all rows and columns)
void Clear(void);
//--- Table scrolling: (1) vertical and (2) horizontal
void VerticalScrolling(const int pos=WRONG_VALUE);
void HorizontalScrolling(const int pos=WRONG_VALUE);
};
The CTable::Clear() method for clearing the table will not be covered: it is virtually identical to the one in lists, which was covered in the previous sections of this article.
To rebuild the table, it is necessary to call the CTable::Rebuilding() method, where the total number of columns and rows as well as their visible amount must be passed as the arguments. Here, at the beginning of the method, the table is cleared. That is, all its columns and rows are deleted. Then the new sizes are set for arrays based on the values of passed arguments. Scrollbars are set depending on the current total number of rows and columns relative to their visible amount. After all calculations are made, the table cells are created, and if necessary, the scrollbars are made visible.
//| Rebuilding the table |
//+------------------------------------------------------------------+
void CTable::Rebuilding(const int columns_total,const int visible_columns_total,const int rows_total,const int visible_rows_total)
{
//--- Clearing the table
Clear();
//--- Set the size of the table and its visible part
TableSize(columns_total,rows_total);
VisibleTableSize(visible_columns_total,visible_rows_total);
//--- Adjust the sizes of the scrollbars
m_scrollv.ChangeThumbSize(rows_total,visible_rows_total);
m_scrollh.ChangeThumbSize(columns_total,visible_columns_total);
//--- Check for presence of a vertical scrollbar
bool is_scrollv=m_rows_total>m_visible_rows_total;
//--- Check for presence of a horizontal scrollbar
bool is_scrollh=m_columns_total>m_visible_columns_total;
//--- Calculate the table size along the Y axis
int y_size=CalculationYSize();
//--- Resize the vertical scrollbar
m_scrollv.ChangeYSize(y_size);
//--- Resize the table
m_y_size=(is_scrollh)? y_size+m_scrollh.ScrollWidth()-1 : y_size;
m_area.YSize(m_y_size);
m_area.Y_Size(m_y_size);
//--- Adjust the location of the horizontal scrollbar along the Y axis
m_scrollh.YDistance(CElementBase::Y2()-m_scrollh.ScrollWidth());
//--- If a horizontal scrollbar is required
if(is_scrollh)
{
//--- Set the size according to the presence of a vertical scrollbar
if(!is_scrollv)
m_scrollh.ChangeXSize(m_x_size);
else
{
//--- Calculate and change the width of the horizontal scrollbar
int x_size=m_area.XSize()-m_scrollh.ScrollWidth()+1;
m_scrollh.ChangeXSize(x_size);
}
}
//--- Create table cells
CreateCells();
//--- Display the scrollbar, if necessary
if(rows_total>visible_rows_total)
{
if(CElementBase::IsVisible())
m_scrollv.Show();
}
if(columns_total>visible_columns_total)
{
if(CElementBase::IsVisible())
m_scrollh.Show();
}
}
Methods for adding a column CTable::AddColumn() and row CTable::AddRow() are very similar in their algorithms, therefore, only one of them will be considered here.
At the beginning of the CTable::AddColumn() method, the size of the array for columns and rows in that column is set. Then, initialization of cells with default values for the added column is performed using the CTable::CellInitialize() method. After that, if the total number of columns is not greater than the specified visible amount:
- Widths of columns are calculated
- A certain number of graphical objects (table cells) are created for the added columns
- If necessary, the table is formatted in the Zebra style
- And at the end of the method, the table is updated
If it turns out that the total number of columns and rows is greater than the specified visible amount after increasing the arrays of columns and rows, then it is necessary to show a horizontal scrollbar and thus to adjust the table height. After this, the table is formatted in the Zebra style and the program leaves the method.
//| Adds a column to the table |
//+------------------------------------------------------------------+
void CTable::AddColumn(void)
{
//--- Increase the array size by one element
uint array_size=ColumnsTotal();
m_columns_total=array_size+1;
::ArrayResize(m_vcolumns,m_columns_total);
//--- Set the size of the rows arrays
RowResize(array_size,m_rows_total);
//--- Initialize the arrays with the default values
CellInitialize(array_size);
//--- If the total number of columns is greater than the visible amount
if(m_columns_total>m_visible_columns_total)
{
//--- Adjust the table size along the Y axis
YResize();
//--- If there is no vertical scrollbar, make the horizontal scrollbar occupy the full width of the table
if(m_rows_total<=m_visible_rows_total)
m_scrollh.ChangeXSize(m_x_size);
//--- Adjust the size of the thumb and display the scrollbar
m_scrollh.ChangeThumbSize(m_columns_total,m_visible_columns_total);
//--- Show the scrollbar
if(CElementBase::IsVisible())
m_scrollh.Show();
//--- Formatting of rows in Zebra style
ZebraFormatRows();
//--- Update the table
UpdateTable();
return;
}
//--- Calculation of column widths
int width=CalculationColumnWidth();
//--- Adjust the width of the last column
if(m_columns_total>=m_visible_columns_total)
width=CalculationColumnWidth(true);
//--- Calculation of the X coordinate
int x=CalculationCellX(array_size);
//---
for(uint r=0; r<m_rows_total && r<m_visible_rows_total; r++)
{
//--- Calculation of the Y coordinate
int y=CalculationCellY(r);
//--- Creating the object
CreateCell(array_size,r,x,y,width);
//--- Set the corresponding color to the header
if(m_fix_first_row && r==0)
m_columns[array_size].m_rows[r].BackColor(m_headers_color);
}
//--- Formatting of rows in Zebra style
ZebraFormatRows();
//--- Update the table
UpdateTable();
}
The CTable::VerticalScrolling() and CTable::HorizontalScrolling() methods for scrolling the table are virtually identical to the ones discussed in the lists section, therefore their code will not be provided here. You can find them in the files attached to this article.
Now, let us create a test MQL application, which would demonstrate the new features of lists and tables of the CTable type.
Application for testing the controls
For testing purposes, let us create such an MQL application that would allow to immediately see the operation of methods added to the classes of lists and tables of the CTable type. Create two tabs in the graphical interface of this application. The first tab will contain a table of the CTable type and controls for managing the table properties, located above the table. Those will consist of two buttons and four numeric edit boxes:
- «CLEAR TABLE» button for clearing the table (deleting all columns and rows)
- «REBUILD TABLE» button for rebuilding the table based on the parameters specified in the numeric edit boxes
- «Rows total» edit box for entering the total number of table rows
- «Columns total» edit box for entering the total number of table columns
- «Visible rows total» edit box for entering the number of visible table rows
- «Visible columns total» edit box for entering the number of visible table columns
The screenshot below shows its appearance:
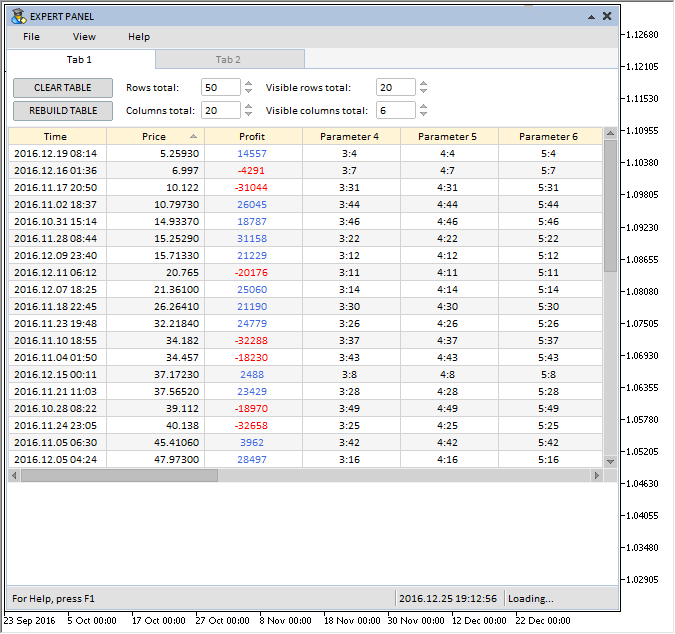
Fig. 4. Group of controls on the first tab
The second tab will contain two lists (list view and list of checkboxes). To demonstrate the programmatic management of the lists, the following controls will be present:
- «CLEAR LISTS» button for clearing the lists (deleting all items)
- «REBUILD LISTS» button for rebuilding the lists based on the parameters specified in the numeric edit boxes
- «Items total» edit box for entering the total number of list items
- «Visible items total» edit box for entering the number of visible list items
The screenshot below shows the controls on the second tab. As an addition, two more controls were added to it: Drop Down calendar and Time control.
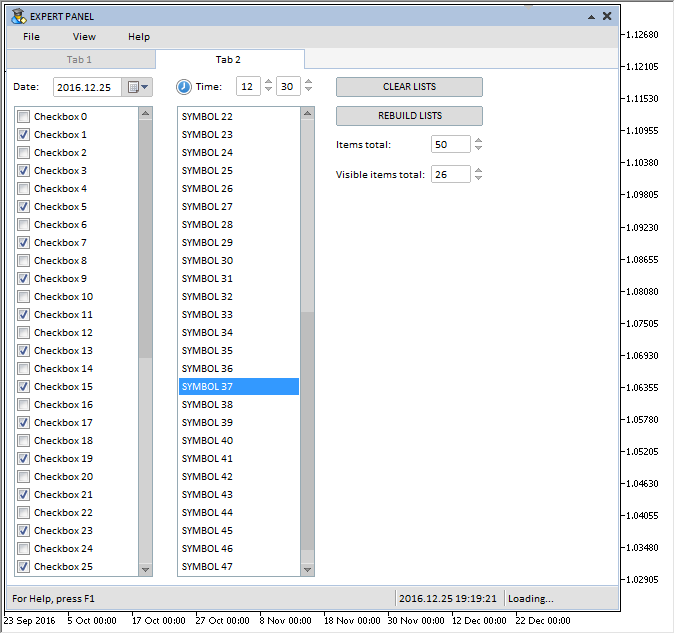
Fig. 5. Group of controls on the second tab
Before proceeding with the demonstration of features of the lists and tables implemented in this update, let us dwell on another addition, which will facilitate the work of the MQL developer in the timer of his MQL application. This is the CTimeCounter class. It can be used to manage the update (redraw) frequency for separate groups of graphical interface controls at the specified time intervals. The CTimeCounter class contains only three fields and two methods (see the code below).
//| TimeCounter.mqh |
//| Copyright 2016, MetaQuotes Software Corp. |
//| http://www.mql5.com |
//+------------------------------------------------------------------+
//+------------------------------------------------------------------+
//| Time counter |
//+------------------------------------------------------------------+
class CTimeCounter
{
private:
//--- Step of the counter
uint m_step;
//--- Time interval
uint m_pause;
//--- Time counter
uint m_time_counter;
//---
public:
CTimeCounter(void);
~CTimeCounter(void);
//--- Setting the step and time interval
void SetParameters(const uint step,const uint pause);
//--- Check if the specified time interval had elapsed
bool CheckTimeCounter(void);
};
//+------------------------------------------------------------------+
//| Constructor |
//+------------------------------------------------------------------+
CTimeCounter::CTimeCounter(void) : m_step(16),
m_pause(1000),
m_time_counter(0)
{
}
//+------------------------------------------------------------------+
//| Destructor |
//+------------------------------------------------------------------+
CTimeCounter::~CTimeCounter(void)
{
}
The CTimeCounter::SetParameters() method can be used to set the counter increment and time interval for a pause:
//| Setting the step and time interval |
//+------------------------------------------------------------------+
void CTimeCounter::SetParameters(const uint step,const uint pause)
{
m_step =step;
m_pause =pause;
}
The CTimeCounter::CheckTimeCounter() method is designed for checking if the time interval specified in the class parameters had elapsed. If the time interval had elapsed, the method returns true.
//| Check if the specified time interval had elapsed |
//+------------------------------------------------------------------+
bool CTimeCounter::CheckTimeCounter(void)
{
//--- Increase the counter, if the specified time interval has not elapsed
if(m_time_counter<m_pause)
{
m_time_counter+=m_step;
return(false);
}
//--- Zero the counter
m_time_counter=0;
return(true);
}
Before proceeding further, it should be noted that the location of files in the directories of the developed library has also been changed. Only the files that contain the classes of controls are located the «MetaTrader 5\MQL5\Include\EasyAndFastGUI\Controls» directory now. All other files have been moved to the library root directory: «MetaTrader 5\MQL5\Include\EasyAndFastGUI». Therefore, to include the library in a file of a custom class, it is necessary to specify the path, as shown in the listing below. It also shows how to include a file with the CTimeCounter class (will be used in test examples).
//| Program.mqh |
//| Copyright 2016, MetaQuotes Software Corp. |
//| http://www.mql5.com |
//+------------------------------------------------------------------+
#include <EasyAndFastGUI\WndEvents.mqh>
#include <EasyAndFastGUI\TimeCounter.mqh>
The parameters of the time counters will be set in the constructor of the custom counter:
//| Class for creating an application |
//+------------------------------------------------------------------+
class CProgram : public CWndEvents
{
protected:
//--- Time counters
CTimeCounter m_counter1; // for updating the status bar
CTimeCounter m_counter2; // for updating the lists and the table
};
//+------------------------------------------------------------------+
//| Constructor |
//+------------------------------------------------------------------+
CProgram::CProgram(void)
{
//--- Setting parameters for the time counters
m_counter1.SetParameters(16,500);
m_counter2.SetParameters(16,150);
}
Demonstration of adding items to lists and adding columns and rows to table after a complete purge of those controls will be implemented in a timer. After the specified time interval, if the number of items/rows/columns is less than specified in the corresponding edit boxes, then they will be added in this block (see the code below). To demonstrate the programmatic management of the scrollbar, the thumbs of scrollbars will be moved to the end of the lists every time an item is added to the lists.
//| Timer |
//+------------------------------------------------------------------+
void CProgram::OnTimerEvent(void)
{
CWndEvents::OnTimerEvent();
...
//--- Pause between updates of the controls
if(m_counter2.CheckTimeCounter())
{
//--- Add a row to the table, if the total amount is less than specified
if(m_table.RowsTotal()<m_spin_edit1.GetValue())
m_table.AddRow();
//--- Add a column to the table, if the total amount is less than specified
if(m_table.ColumnsTotal()<m_spin_edit2.GetValue())
m_table.AddColumn();
//--- Add an item to the list view, if the total amount is less than specified
if(m_listview.ItemsTotal()<m_spin_edit5.GetValue())
{
m_listview.AddItem("SYMBOL "+string(m_listview.ItemsTotal()));
//--- Move the scrollbar thumb to the end of the list
m_listview.Scrolling();
}
//--- Add an item to the list of checkboxes, if the total amount is less than specified
if(m_checkbox_list.ItemsTotal()<m_spin_edit5.GetValue())
{
m_checkbox_list.AddItem("Checkbox "+string(m_checkbox_list.ItemsTotal()));
//--- Move the scrollbar thumb to the end of the list
m_checkbox_list.Scrolling();
}
//--- Redraw the chart
m_chart.Redraw();
}
}
Handling the events of pressing the button for clearing and rebuilding the lists and the table look the following way:
//| Chart event handler |
//+------------------------------------------------------------------+
void CProgram::OnEvent(const int id,const long &lparam,const double &dparam,const string &sparam)
{
//--- The button press event
if(id==CHARTEVENT_CUSTOM+ON_CLICK_BUTTON)
{
Print(__FUNCTION__," > id: ",id,"; lparam: ",lparam,"; dparam: ",dparam,"; sparam: ",sparam);
//--- Event of the first button
if(lparam==m_simple_button1.Id())
{
//--- Clear the table
m_table.Clear();
return;
}
//--- Event of the second button
if(lparam==m_simple_button2.Id())
{
//--- Rebuild the table
m_table.Rebuilding((int)m_spin_edit3.GetValue(),(int)m_spin_edit4.GetValue(),
(int)m_spin_edit1.GetValue(),(int)m_spin_edit2.GetValue());
//--- Initialize the table
InitializeTable();
//--- Update the table to display changes
m_table.UpdateTable();
return;
}
//--- Event of the third button
if(lparam==m_simple_button3.Id())
{
//--- Clear the lists
m_listview.Clear();
m_checkbox_list.Clear();
return;
}
//--- Event of the second button
if(lparam==m_simple_button4.Id())
{
//--- Rebuild the lists
m_checkbox_list.Rebuilding((int)m_spin_edit5.GetValue(),(int)m_spin_edit6.GetValue());
m_listview.Rebuilding((int)m_spin_edit5.GetValue(),(int)m_spin_edit6.GetValue());
//--- Select the eighth item in the list view
m_listview.SelectItem(7);
//--- Filling the list view with data
int items_total=m_listview.ItemsTotal();
for(int i=0; i<items_total; i++)
m_listview.SetItemValue(i,"SYMBOL "+string(i));
//--- Filling the list of checkboxes with data, tick every second checkbox
items_total=m_checkbox_list.ItemsTotal();
for(int i=0; i<items_total; i++)
{
m_checkbox_list.SetItemValue(i,"Checkbox "+string(i));
m_checkbox_list.SetItemState(i,(i%2!=0)? true : false);
}
//---
return;
}
//---
return;
}
}
The test application featured in the article can be downloaded using the below link for further studying.
Conclusion
Currently, the general schematic of the library for creating graphical interfaces looks as shown below:
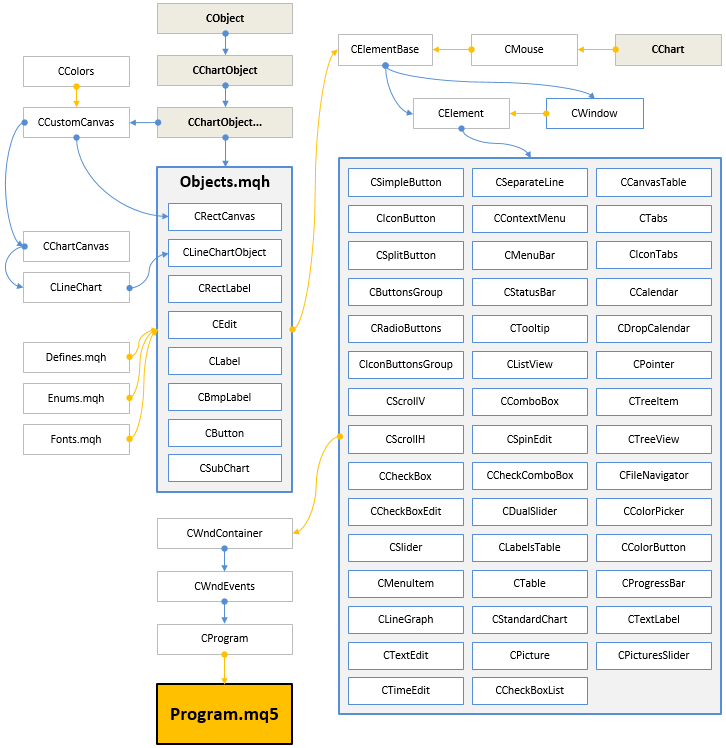
Fig. 6. Structure of the library at the current stage of development.
In the next version of the library, the existing controls will be improved and supplemented with new features. Below you can download the latest version of the library and files for testing.
If you have questions on using the material presented in those files, you can refer to the detailed description of the library development in one of the articles of this series or ask your question in the comments of this article.