
Graphical Interfaces VIII: The Tree View Control (Chapter 2)

Contents
- Introduction
- Tree view element
- Development of the CTreeItem class to create a tree view item
- CPointer class used for creating a mouse pointer
- Development of the CTreeView class used for creating a tree view
- Parameters for forming the element lists
- Methods for managing element lists
- Managing width of list areas
- Mode of tab items
- Methods for event handling
- Element integration into the library engine
- Testing the tree view element
- Conclusion
Introduction
More detailed information about the purpose of this library is available from the first article — Graphical Interfaces I: Preparation of the Library Structure (Chapter 1). A list of chapters with links is provided at the end of the articles of each part. You can also download from there a complete version of the library at the current stage of development. Files must be placed under the same directories as they are located in the archive.
The previous chapter of part VIII on graphical interfaces has focused on the elements of static and drop-down calendar. The second chapter will be dedicated to an equally complex element — a tree view, that is included in every complete library used for creating graphical interfaces. A tree view implemented in this article contains multiple flexible settings and modes, thus allowing to adjust this element of control to your needs.
The implementation of another useful class used for creating mouse pointers will be also covered in this article. In addition to that, we will also give an example of using this type of element in a tree view.
Tree view element
Unlike simple lists, a tree view allows to arrange elements it contains on unlimited nesting levels by categories. Each element (item or node) that contains a list of other elements (1 and above) is equipped with a control that allows to collapse and expand a local list. Apart from the text description, each item may have a label (pictogram) to simplify the experience for users. End points (that have no local lists) can contain groups of controls to display an application in a graphical interface or carry out a certain function.
A tree view can be used for creating catalogs with elements that have an established hierarchy. For example, it can be used to create a file navigator similar to how this is done in Windows Explorer. MetaTrader and MetaEditor also have navigating windows where a tree view is applied.
In MetaTrader, you can display/hide the "Navigator" window (see the screenshot below) by pressing the keys ‘Ctrl+N’:
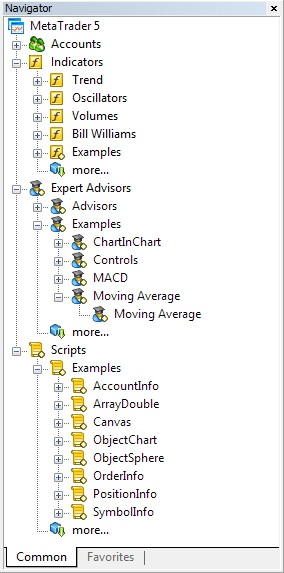
Fig. 1. "Navigator" window in MetaTrader.
In MetaEditor you can display/hide the "Navigator" window (see screenshot below) by pressing the keys ‘Ctrl+D’:
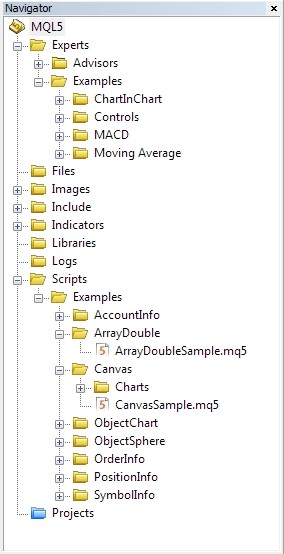
Fig. 2. "Navigator" window in MetaEditor.
Development of the CTreeItem class to create a tree view item
Before we proceed to writing a tree view class, two more elements will have to be created. A tree view item is a crucial one. Its structure partially resembles the context menu item (CMenuItem) that we have observed in the article Graphical Interfaces II: The Menu Item Element (Chapter 1), however, it holds unique properties and, therefore, requires a separate class to be created.
The second element is a mouse pointer. It will be used as an indicator to evaluate the state of readiness to change a width of the list view area. In order to create this type of element, we will write a separate class called CPointer that could be used in other elements later. The CPointer class will be considered in the following section.
From the start we need to make sure from which objects the tree view item will be collected.
The components of the tree view item are listed below.
- Background
- Sign of local list of items. Arrows and plus/minus pictograms are used to display the status (expanded/collapsed).
- Item label. For example, it may be required to visually classify an item to a certain category.
- Item description as a text.
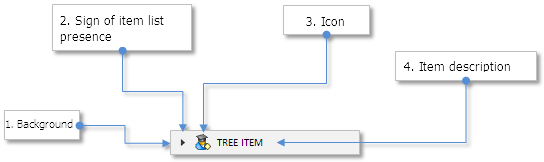
Fig. 3. Components of a tree view item.
We create a file with a name TreeItem.mqh and connect it to the library (WndContainer.mqh):
//+------------------------------------------------------------------+
//|                                                 WndContainer.mqh |
//|                        Copyright 2015, MetaQuotes Software Corp. |
//|                                              http://www.mql5.com |
//+------------------------------------------------------------------+
#include "TreeItem.mqh"
In the TreeItem.mqh file we need to create the CTreeItem class with standard methods for all library elements (see the code listing below):
//+------------------------------------------------------------------+
//|                                                     TreeItem.mqh |
//|                        Copyright 2015, MetaQuotes Software Corp. |
//|                                              http://www.mql5.com |
//+------------------------------------------------------------------+
#include "Element.mqh"
#include "Window.mqh"
//+------------------------------------------------------------------+
//| Class for creating a tree view item                              |
//+------------------------------------------------------------------+
class CTreeItem : public CElement
  {
private:
   //--- Pointer to the form that the element is attached to.
   CWindow          *m_wnd;
   //---
public:
                     CTreeItem (void);
                    ~CTreeItem (void);
   //--- Stores the pointer to the form
   void              WindowPointer(CWindow &object)             { m_wnd=::GetPointer(object);            }
   //---
public:
   //--- Handler of chart events
   virtual void      OnEvent(const int id,const long &lparam,const double &dparam,const string &sparam);
   //--- Timer
   virtual void      OnEventTimer(void) {}
   //--- Moving the element
   virtual void      Moving(const int x,const int y);
   //--- (1) Show, (2) hide, (3) reset, (4) delete
   virtual void      Show(void);
   virtual void      Hide(void);
   virtual void      Reset(void);
   virtual void      Delete(void);
   //--- (1) Set, (2) reset priorities for clicking the left mouse button
   virtual void      SetZorders(void);
   virtual void      ResetZorders(void);
   //--- Reset color
   virtual void      ResetColors(void);
  };
The following qualities for setting its appearance will be available before creating the element.
- Colors of item background in various states
- Item label
- Arrow icons that display the current status (expanded/collapsed) of the local list of item
- Τext label offsets
- Text colors in different states
class CTreeItem : public CElement
  {
private:
   //--- Background colors in different states
   color             m_item_back_color;
   color             m_item_back_color_hover;
   color             m_item_back_color_selected;
   //--- Icons for item arrow
   string            m_item_arrow_file_on;
   string            m_item_arrow_file_off;
   string            m_item_arrow_selected_file_on;
   string            m_item_arrow_selected_file_off;
   //--- Item label
   string            m_icon_file;
   //--- Text label offsets
   int               m_label_x_gap;
   int               m_label_y_gap;
   //--- Text colors in different item states
   color             m_item_text_color;
   color             m_item_text_color_hover;
   color             m_item_text_color_selected;
   //---
public:
   //--- Colors of item background
   void              ItemBackColor(const color clr)                   { m_item_back_color=clr;                    }
   void              ItemBackColorHover(const color clr)              { m_item_back_color_hover=clr;              }
   void              ItemBackColorSelected(const color clr)           { m_item_back_color_selected=clr;           }
   //--- (1) Set the item label, (2) set icons for item arrow
   void              IconFile(const string file_path)                 { m_icon_file=file_path;                    }
   void              ItemArrowFileOn(const string file_path)          { m_item_arrow_file_on=file_path;           }
   void              ItemArrowFileOff(const string file_path)         { m_item_arrow_file_off=file_path;          }
   void              ItemArrowSelectedFileOn(const string file_path)  { m_item_arrow_selected_file_on=file_path;  }
   void              ItemArrowSelectedFileOff(const string file_path) { m_item_arrow_selected_file_off=file_path; }
   //--- (1) Return item text, (2) set offsets for text label
   string            LabelText(void)                            const { return(m_label.Description());            }
   void              LabelXGap(const int x_gap)                       { m_label_x_gap=x_gap;                      }
   void              LabelYGap(const int y_gap)                       { m_label_y_gap=y_gap;                      }
   //--- Text colors in different states
   void              ItemTextColor(const color clr)                   { m_item_text_color=clr;                    }
   void              ItemTextColorHover(const color clr)              { m_item_text_color_hover=clr;              }
   void              ItemTextColorSelected(const color clr)           { m_item_text_color_selected=clr;           }
  };
We are going to need 4 private methods and 1 public method in order to create a tree type list. Please note that a graphic object like CEdit will be used as a text label. We will shortly specify what will be required for this purpose.
class CTreeItem : public CElement
  {
private:
   //--- Objects for creating a tree type view
   CRectLabel        m_area;
   CBmpLabel         m_arrow;
   CBmpLabel         m_icon;
   CEdit             m_label;
   //---
public:
   //--- Methods for creating a tree type item
   bool              CreateTreeItem(const long chart_id,const int subwin,const int x,const int y,const ENUM_TYPE_TREE_ITEM type,
                                    const int list_index,const int node_level,const string item_text,const bool item_state);
   //---
private:
   bool              CreateArea(void);
   bool              CreateArrow(void);
   bool              CreateIcon(void);
   bool              CreateLabel(void);
  };
Values for parameters used to position an item in the list with regard to other items must be sent to the public method CTreeItem::CreateTreeItem(). Some of them will participate in forming the name of a graphic objects used for collecting the element. The relevant fields of the class are initialized with values of sent parameters that are used in private methods for creating element objects.
Key features are listed below.
- The item type can be selected out of two options: (1) a simple item (TI_SIMPLE) that doesn't contain other items and is a final node, or (2) the one that has items (TI_HAS_ITEMS). Therefore, the ENUM_TYPE_TREE_ITEM enumeration is added to Enums.mqh:
//+------------------------------------------------------------------+
//| Enumeration of types of a tree view item                         |
//+------------------------------------------------------------------+
enum ENUM_TYPE_TREE_ITEM
  {
   TI_SIMPLE    =0,
   TI_HAS_ITEMS =1
  };
- General index in the list.
- Node level (number).
- Displayed text (description).
- State of item.
Please pay attention to how the arrow offset is calculated (sign of a local list in an item). Eventually, every node of a tree view is moved from the previous node to the value calculated in this string.
class CTreeItem : public CElement
  {
private:
   //--- Offset for arrow (sign)
   int               m_arrow_x_offset;
   //--- Item type
   ENUM_TYPE_TREE_ITEM m_item_type;
   //--- Item index in a general list
   int               m_list_index;
   //--- Level of node
   int               m_node_level;
   //--- Displayed item text
   string            m_item_text;
   //--- State of an item list (expanded/collapsed)
   bool              m_item_state;
  };
//+------------------------------------------------------------------+
//| Create an item of a tree type                                    |
//+------------------------------------------------------------------+
bool CTreeItem::CreateTreeItem(const long chart_id,const int subwin,const int x,const int y,const ENUM_TYPE_TREE_ITEM type,
                               const int list_index,const int node_level,const string item_text,const bool item_state)
  {
//--- Exit if there is no pointer to the form
   if(::CheckPointer(m_wnd)==POINTER_INVALID)
     {
      ::Print(__FUNCTION__," > Before creating a list item, we need to send "
              "a pointer to the form CTreeItem::WindowPointer(CWindow &object)") to the class list;
      return(false);
     }
//--- Initialization of variables
   m_id             =m_wnd.LastId()+1;
   m_chart_id       =chart_id;
   m_subwin         =subwin;
   m_x              =x;
   m_y              =y;
   m_item_type      =type;
   m_list_index     =list_index;
   m_node_level     =node_level;
   m_item_text      =item_text;
   m_item_state     =item_state;
   m_arrow_x_offset =(m_node_level>0)? (12*m_node_level)+5 : 5;
//--- Offsets from the extreme point
   CElement::XGap(CElement::X()-m_wnd.X());
   CElement::YGap(CElement::Y()-m_wnd.Y());
//--- Creating a menu item
   if(!CreateArea())
      return(false);
   if(!CreateArrow())
      return(false);
   if(!CreateIcon())
      return(false);
   if(!CreateLabel())
      return(false);
//--- Hide the control for a dialog window or for a minimized window
   if(m_wnd.WindowType()==W_DIALOG || m_wnd.IsMinimized())
      Hide();
//---
   return(true);
  }
The following components will be used to form a name of the element objects (see the code listing below):
- Program name
- Element index
- Sign of belonging to the element («treeitem»)
- Sign of belonging to the element part
- General index of a tree-type item
- Element identifier
We will use a private method for creating objects that compound the CTreeItem::CreateArrow() element as an example. The library by default has icons for a drop down list. You can download them from the attached archive at the end of the article. They can be re-determined prior to creating an element, if necessary.
An offset from the left side of the element for this object is calculated with the m_node_level parameter (node level) in the main method of creating an element before creating element objects. If it appears that this is a simple item type (TI_SIMPLE), then the program exits the method. Please note that coordinates for this object must be saved to check the item type (before possible exit from the method), since they will be used to calculate coordinates following in a queue of creating element objects. The same principle is applied in the CTreeItem::CreateIcon() method for creating the item label.
Here, right after it was created, the object has the state established that is sent to the main method by the item_state value, and it can be used to control which items should be open after a tree view is created.
//+------------------------------------------------------------------+
//| Create arrow (sign of a drop down list)                          |
//+------------------------------------------------------------------+
#resource "\\Images\\EasyAndFastGUI\\Controls\\RightTransp_black.bmp"
#resource "\\Images\\EasyAndFastGUI\\Controls\\RightTransp_white.bmp"
#resource "\\Images\\EasyAndFastGUI\\Controls\\RightTransp_rotate_black.bmp"
#resource "\\Images\\EasyAndFastGUI\\Controls\\RightTransp_rotate_white.bmp"
//---
bool CTreeItem::CreateArrow(void)
  {
//--- Calculate coordinates
   int x =CElement::X()+m_arrow_x_offset;
   int y =CElement::Y()+2;
//--- Save coordinates to calculate coordinates that follow in a queue of creating element objects
   m_arrow.X(x);
   m_arrow.Y(y);
//--- Exit if a point has no drop down list
   if(m_item_type!=TI_HAS_ITEMS)
      return(true);
//--- Formation of the object name
   string name=CElement::ProgramName()+"_"+(string)CElement::Index()+"_treeitem_arrow_"+(string)m_list_index+"__"+(string)CElement::Id();
//--- Set icons by default
   if(m_item_arrow_file_on=="")
      m_item_arrow_file_on="Images\\EasyAndFastGUI\\Controls\\RightTransp_rotate_black.bmp";
   if(m_item_arrow_file_off=="")
      m_item_arrow_file_off="Images\\EasyAndFastGUI\\Controls\\RightTransp_black.bmp";
   if(m_item_arrow_selected_file_on=="")
      m_item_arrow_selected_file_on="Images\\EasyAndFastGUI\\Controls\\RightTransp_rotate_white.bmp";
   if(m_item_arrow_selected_file_off=="")
      m_item_arrow_selected_file_off="Images\\EasyAndFastGUI\\Controls\\RightTransp_white.bmp";
//--- Set the object
   if(!m_arrow.Create(m_chart_id,name,m_subwin,x,y))
      return(false);
//--- Set properties
   m_arrow.BmpFileOn("::"+m_item_arrow_file_on);
   m_arrow.BmpFileOff("::"+m_item_arrow_file_off);
   m_arrow.State(m_item_state);
   m_arrow.Corner(m_corner);
   m_arrow.GetInteger(OBJPROP_ANCHOR,m_anchor);
   m_arrow.Selectable(false);
   m_arrow.Z_Order(m_arrow_zorder);
   m_arrow.Tooltip("\n");
//--- Offsets from the extreme point
   m_arrow.XGap(x-m_wnd.X());
   m_arrow.YGap(y-m_wnd.Y());
//--- Store the object pointer
   CElement::AddToArray(m_arrow);
   return(true);
  }
We will require methods to manage sizes (width) and color of a tree view after it was created. The set up of a tree view is implemented the way that apart from the area with a hierarchic list, has an opportunity to enable the mode that displays the area with the selected item contents to the right of a tree view. In other words, there will be a list of items contained in a selected item of a tree view list in this area. When you hover over the border between these areas and hold the left mouse button pressed, you can also change (at the same time) a width of the tree view areas and the content list.
When changing a width of the areas, (1) X coordinates of objects of content list items and (2) width of item objects of both lists will be updated. Therefore, the object of CEdit, instead of the CLabel type, is used here to display the text of items. If you use the objects of the CLabel type, then when changing the sizes of list areas, you may face a problem when text labels go beyond the boundaries of the form (window).
In order to update X coordinates, we write the CTreeItem::UpdateX() method. In order to set X coordinate, it should be sent to this method. In this case, all calculations will be performed in the tree view class. We will return to this matter shortly.
class CTreeItem : public CElement
  {
public:
   void              UpdateX(const int x);
  };
//+------------------------------------------------------------------+
//| Update X coordinate                                              |
//+------------------------------------------------------------------+
void CTreeItem::UpdateX(const int x)
  {
//--- Update common coordinates and offset from the extreme point
   CElement::X(x);
   CElement::XGap(CElement::X()-m_wnd.X());
//--- Coordinates and background offset
   m_area.X_Distance(CElement::X());
   m_area.XGap(CElement::X()-m_wnd.X());
//--- Coordinates and arrow offset
   int l_x=CElement::X()+m_arrow_x_offset;
   m_arrow.X(l_x);
   m_arrow.X_Distance(l_x);
   m_arrow.XGap(l_x-m_wnd.X());
//--- Coordinates and icon offset
   l_x=m_arrow.X()+17;
   m_icon.X(l_x);
   m_icon.X_Distance(l_x);
   m_icon.XGap(l_x-m_wnd.X());
//--- Coordinates and text label offset
   l_x=(m_icon_file=="")? m_icon.X() : m_icon.X()+m_label_x_gap;
   m_label.X(l_x);
   m_label.X_Distance(l_x);
   m_label.XGap(l_x-m_wnd.X());
  }
In order to change a width of the list item, the CTreeItem::UpdateWidth() method should be used:
class CTreeItem : public CElement
  {
public:
   void              UpdateWidth(const int width);
  };
//+------------------------------------------------------------------+
//| Width update                                                     |
//+------------------------------------------------------------------+
void CTreeItem::UpdateWidth(const int width)
  {
//--- Background width
   CElement::XSize(width);
   m_area.XSize(width);
   m_area.X_Size(width);
//--- Text label width
   int w=CElement::X2()-m_label.X()-1;
   m_label.XSize(w);
   m_label.X_Size(w);
  }
Apart from updating the X coordinate and the item width, a method for updating Y coordinates will be required. The implementation of both lists of the element assumes that when implementing the CTreeView element, all items of the list are created right away, instead of just their number displayed, as it is done in the CListView, CLabelsTable and CTable types that are considered previously in this series of articles. Technology will be applied here when items that don't fit in the list area will be hidden. Instead of a regular update of several parameters of objects, when scrolling down the list or collapsing/expanding a local list of items, only the item visibility will be managed here. When it is sufficient to hide items that are not required at the moment, then the Y coordinate should be updated at the point of displaying. For this purpose we need to write the CTreeItem::UpdateY() method, the code listing below reveals the code.
class CTreeItem : public CElement
  {
public:
   void              UpdateY(const int y);
  };
//+------------------------------------------------------------------+
//| Update Y coordinate                                              |
//+------------------------------------------------------------------+
void CTreeItem::UpdateY(const int y)
  {
//--- Update common coordinates and offset from the extreme point
   CElement::Y(y);
   CElement::YGap(CElement::Y()-m_wnd.Y());
//--- Coordinates and background offset
   m_area.Y_Distance(CElement::Y());
   m_area.YGap(CElement::Y()-m_wnd.Y());
//--- Coordinates and arrow offset
   int l_y=CElement::Y()+2;
   m_arrow.Y(l_y);
   m_arrow.Y_Distance(l_y);
   m_arrow.YGap(l_y-m_wnd.Y());
//--- Coordinates and icon offset
   l_y=CElement::Y()+2;
   m_icon.Y(l_y);
   m_icon.Y_Distance(l_y);
   m_icon.YGap(l_y-m_wnd.Y());
//--- Coordinates and text label offset
   l_y=CElement::Y()+m_label_y_gap;
   m_label.Y(l_y);
   m_label.Y_Distance(l_y);
   m_label.YGap(l_y-m_wnd.Y());
  }
The management of the item color will be performed in the tree view class (CTreeView), and the following methods will be required:
- for changing the item color regarding the indicated state;
- for changing the object color when hovering over with the mouse.
Codes of these methods are shown in the listing below:
class CTreeItem : public CElement
  {
public:
   //--- Change of the item color depending on the highlighted state
   void              HighlightItemState(const bool state);
   //--- Change of the color when hovering over with the mouse
   void              ChangeObjectsColor(void);
  };
//+------------------------------------------------------------------+
//| Change of the item color depending on the highlighted state      |
//+------------------------------------------------------------------+
void CTreeItem::HighlightItemState(const bool state)
  {
   m_area.BackColor((state)? m_item_back_color_selected : m_item_back_color);
   m_label.BackColor((state)? m_item_back_color_selected : m_item_back_color);
   m_label.BorderColor((state)? m_item_back_color_selected : m_item_back_color);
   m_label.Color((state)? m_item_text_color_selected : m_item_text_color);
   m_arrow.BmpFileOn((state)? "::"+m_item_arrow_selected_file_on : "::"+m_item_arrow_file_on);
   m_arrow.BmpFileOff((state)? "::"+m_item_arrow_selected_file_off : "::"+m_item_arrow_file_off);
  }
//+------------------------------------------------------------------+
//| Changing the object's color when hovering over with a mouse      |
//+------------------------------------------------------------------+
void CTreeItem::ChangeObjectsColor(void)
  {
   if(CElement::MouseFocus())
     {
      m_area.BackColor(m_item_back_color_hover);
      m_label.BackColor(m_item_back_color_hover);
      m_label.BorderColor(m_item_back_color_hover);
      m_label.Color(m_item_text_color_hover);
     }
   else
     {
      m_area.BackColor(m_item_back_color);
      m_label.BackColor(m_item_back_color);
      m_label.BorderColor(m_item_back_color);
      m_label.Color(m_item_text_color);
     }
  }
Further we will consider the class that aims at creating pointers for the mouse cursor in a graphic interface.
CPointer class used for creating a mouse pointer
A tree view element consists of two areas. A hierarchic list is positioned in the area on the left. On the right side there is a content of the item highlighted in the tree view. More details will be provided below, and now we will have to focus on the fact that the size (width) of these areas can be changed as it is done, for example, in Windows Explorer. When hovering over with the mouse on the border where the areas of a tree view and content are linked, the label of the pointer is changed to the two-sided arrow. Let's create the CPointer class with a functionality that would allow to manage pointers for the mouse cursor for the developing library. The system cursor of the mouse cannot be replaced with MQL in the current version of the terminal, but we can add a user icon to it, making a graphic interface more user friendly.
The CPointer class, just like the remaining elements of the library, will be inherited from the CElement class. You can only connect to those elements where it will be used. It doesn't require a pointer to the form since this type of objects is not linked to anything. It doesn't have to be entered in the base of elements, and the control over this element will be entirely on the class that it is connected to.
In the same directory where files and libraries are located, we create the Pointer.mqh file with the CPointer class. In order to create a pointer, we use the object of the CBmpLabel type. The CBmpLabel class is located in the Objects.mqh file, whose content was considered in the first part of these articles.
//+------------------------------------------------------------------+
//|                                                      Pointer.mqh |
//|                        Copyright 2015, MetaQuotes Software Corp. |
//|                                              http://www.mql5.com |
//+------------------------------------------------------------------+
#include "Element.mqh"
//+------------------------------------------------------------------+
//| Class for creating a pointer of mouse cursor                     |
//+------------------------------------------------------------------+
class CPointer : public CElement
  {
private:
   //--- Object for creating element
   CBmpLabel         m_pointer_bmp;
   /---
public:
                     CPointer(void);
                    ~CPointer(void);
   //---
public:
   //--- Moving the element
   virtual void      Moving(const int x,const int y);
   //--- (1) Show, (2) hide, (3) reset, (4) delete
   virtual void      Show(void);
   virtual void      Hide(void);
   virtual void      Reset(void);
   virtual void      Delete(void);  };
//+------------------------------------------------------------------+
//| Constructor                                                      |
//+------------------------------------------------------------------+
CPointer::CPointer(void)
  {
  }
//+------------------------------------------------------------------+
//| Destructor                                                       |
//+------------------------------------------------------------------+
CPointer::~CPointer(void)
  {
  }
In the current version of the library we can set one out of four types of pointers for the mouse cursor. For the convenience of use, we add the ENUM_MOUSE_POINTER enumeration to the Enums.mqh file (see the code listing below). Apart from four pre-set types, we could choose a custom type (MP_CUSTOM).
//+------------------------------------------------------------------+
//| Enumeration of indicator types                                    |
//+------------------------------------------------------------------+
enum ENUM_MOUSE_POINTER
  {
   MP_CUSTOM     =0,
   MP_X_RESIZE   =1,
   MP_Y_RESIZE   =2,
   MP_XY1_RESIZE =3,
   MP_XY2_RESIZE =4
  };
Describing enumerations from the listing above:
- MP_CUSTOM — custom type.
- MP_X_RESIZE — change of horizontal sizes.
- MP_Y_RESIZE — change of vertical sizes.
- MP_XY1_RESIZE — change of sizes on diagonal 1.
- MP_XY2_RESIZE — change of sizes on diagonal 2.
Before creating a pointer of the mouse cursor, it is sufficient to set its type, and corresponding icons will be set in a graphic object automatically from the set pre-specified in the resources of the element. The archive with these icons can be downloaded to your PC, please find it attached at the end of this article.
//--- Resources
#resource "\\Images\\EasyAndFastGUI\\Controls\\pointer_x_resize.bmp"
#resource "\\Images\\EasyAndFastGUI\\Controls\\pointer_x_resize_blue.bmp"
#resource "\\Images\\EasyAndFastGUI\\Controls\\pointer_y_resize.bmp"
#resource "\\Images\\EasyAndFastGUI\\Controls\\pointer_y_resize_blue.bmp"
#resource "\\Images\\EasyAndFastGUI\\Controls\\pointer_xy1_resize.bmp"
#resource "\\Images\\EasyAndFastGUI\\Controls\\pointer_xy1_resize_blue.bmp"
#resource "\\Images\\EasyAndFastGUI\\Controls\\pointer_xy2_resize.bmp"
#resource "\\Images\\EasyAndFastGUI\\Controls\\pointer_xy2_resize_blue.bmp"
If you wish to set your icons for a pointer, then select the MP_CUSTOM type from the ENUM_MOUSE_POINTER enumeration and use the CPointer::FileOn() and CPointer::FileOff() methods to indicate the path to icons.
class CPointer : public CElement
  {
private:
   //--- Icons for a pointer
   string            m_file_on;
   string            m_file_off;
   //--- Type of a pointer
   ENUM_MOUSE_POINTER m_type;
   //---
public:
   //--- Set labels for a pointer
   void              FileOn(const string file_path)       { m_file_on=file_path;         }
   void              FileOff(const string file_path)      { m_file_off=file_path;        }
   //--- Return and set the type of a pointer
   ENUM_MOUSE_POINTER Type(void)                    const { return(m_type);              }
   void              Type(ENUM_MOUSE_POINTER type)        { m_type=type;                 }
  };
Also, methods for updating coordinates and returning/setting the states of the pointer will be required here:
class CPointer : public CElement
  {
public:
   //---Returning and setting the state of a pointer
   bool              State(void)                    const { return(m_pointer_bmp.State()); }
   void              State(const bool state)              { m_pointer_bmp.State(state);    }
   //--- Update coordinates
   void              UpdateX(const int x)                 { m_pointer_bmp.X_Distance(x);   }
   void              UpdateY(const int y)                 { m_pointer_bmp.Y_Distance(y);   }
  };
The class constructor for the pointer has the MP_X_RESIZE type set by default:
//+------------------------------------------------------------------+
//| Constructor                                                      |
//+------------------------------------------------------------------+
CPointer::CPointer(void) : m_file_on(""),
                           m_file_off(""),
                           m_type(MP_X_RESIZE)
  {
  }
We need a method where prior to creating an element icons for a pointer will be defined, depending on the type set. We will write the CPointer::SetPointerBmp() method for these purposes. If it appears that the user type (MP_CUSTOM) was selected, and paths to icons were not indicated, then the relevant message will be displayed in the log.
class CPointer : public CElement
  {
private:
   //--- Set icons for the pointer of the mouse cursor
   void              SetPointerBmp(void);
  };
//+------------------------------------------------------------------+
//| Setting icons for the pointer based on the pointer type          |
//+------------------------------------------------------------------+
void CPointer::SetPointerBmp(void)
  {
   switch(m_type)
     {
      case MP_X_RESIZE :
         m_file_on  ="Images\\EasyAndFastGUI\\Controls\\pointer_x_resize_blue.bmp";
         m_file_off ="Images\\EasyAndFastGUI\\Controls\\pointer_x_resize.bmp";
         break;
      case MP_Y_RESIZE :
         m_file_on  ="Images\\EasyAndFastGUI\\Controls\\pointer_y_resize_blue.bmp";
         m_file_off ="Images\\EasyAndFastGUI\\Controls\\pointer_y_resize.bmp";
         break;
      case MP_XY1_RESIZE :
         m_file_on  ="Images\\EasyAndFastGUI\\Controls\\pointer_xy1_resize_blue.bmp";
         m_file_off ="Images\\EasyAndFastGUI\\Controls\\pointer_xy1_resize.bmp";
         break;
      case MP_XY2_RESIZE :
         m_file_on  ="Images\\EasyAndFastGUI\\Controls\\pointer_xy2_resize_blue.bmp";
         m_file_off ="Images\\EasyAndFastGUI\\Controls\\pointer_xy2_resize.bmp";
         break;
     }
//--- If the custom type (MP_CUSTOM) is indicated
   if(m_file_on=="" || m_file_off=="")
      ::Print(__FUNCTION__," > Both icons should be set for a cursor pointer!");
  }
We need one public method CPointer::CreatePointer() to create an element, its code is shown in the listing below. The element index will participate in forming the graphic object name, its value is set in the constructor of the CPointer class and equals zero by default. This is required to have an opportunity to create multiple objects of the CPointer type for various purposes within one element to which the pointer will be connected to.
class CPointer : public CElement
  {
public:
   //--- Create pointer label
   bool              CreatePointer(const long chart_id,const int subwin);
  };
//+------------------------------------------------------------------+
//| Create pointer                                                   |
//+------------------------------------------------------------------+
bool CPointer::CreatePointer(const long chart_id,const int subwin)
  {
//--- Formation of the object name
   string name=CElement::ProgramName()+"_pointer_bmp_"+(string)CElement::Index()+"__"+(string)CElement::Id();
//--- Set icons for indicator
   SetPointerBmp();
//--- Create an object
   if(!m_pointer_bmp.Create(m_chart_id,name,m_subwin,0,0))
      return(false);
//--- Set properties
   m_pointer_bmp.BmpFileOn("::"+m_file_on);
   m_pointer_bmp.BmpFileOff("::"+m_file_off);
   m_pointer_bmp.Corner(m_corner);
   m_pointer_bmp.Selectable(false);
   m_pointer_bmp.Z_Order(0);
   m_pointer_bmp.Tooltip("\n");
//--- Hide the object
   m_pointer_bmp.Timeframes(OBJ_NO_PERIODS);
   return(true);
  }
Now we have all elements required for creating a tree view, we can proceed with learning about the CTreeView class before attempting to create it.
Development of the CTreeView class used for creating a tree view
We create the TreeView.mqh file with the CTreeView class with standard methods, as we have done with all library elements, and connect it to the WndContainer.mqh file:
//+------------------------------------------------------------------+
//|                                                 WndContainer.mqh |
//|                        Copyright 2015, MetaQuotes Software Corp. |
//|                                              http://www.mql5.com |
//+------------------------------------------------------------------+
#include "TreeView.mqh"
Let's list the components of the element that the tree view will consist of.
- Background of the tree view
- List of items of the tree view
- Vertical scrollbar of the tree view
- Background of a content list
- List of content items
- Horizontal scrollbar of a content list
- Pointer to the mouse cursor to track how a width of a tree view area and a content area is changed
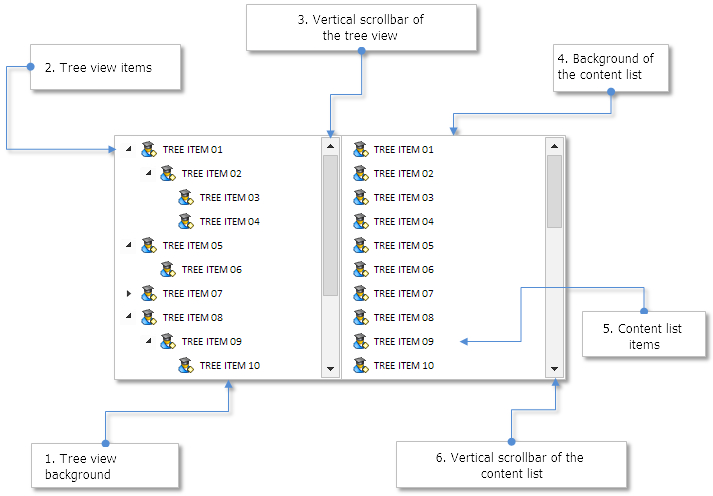
Fig. 4. Components of the tree view.
Icon for a pointer to the mouse cursor will be hidden after it is created. It will only appear in the narrow area on the border of connecting areas of lists when the mouse cursor is placed over it.
In order to create a tree view element, seven private methods and one public method will be required:
class CTreeView : public CElement
  {
private:
   //--- Objects for creating the element
   CRectLabel        m_area;
   CRectLabel        m_content_area;
   CTreeItem         m_items[];
   CTreeItem         m_content_items[];
   CScrollV          m_scrollv;
   CScrollV          m_content_scrollv;
   CPointer          m_x_resize;
   //---
public:
   //--- Methods for creating a tree view
   bool              CreateTreeView(const long chart_id,const int subwin,const int x,const int y);
   //---
private:
   bool              CreateArea(void);
   bool              CreateContentArea(void);
   bool              CreateItems(void);
   bool              CreateScrollV(void);
   bool              CreateContentItems(void);
   bool              CreateContentScrollV(void);
   bool              CreateXResizePointer(void);
  };
As an example, we will only provide the code of one of them – the CTreeView::CreateXResizePointer() method for creating a pointer to the mouse cursor (see the code listing below). We need to pay attention to the following details:
- If one of the below conditions is correct, a pointer to the cursor won't be created:
- the mode that allows changing a width of lists is disabled.
- the mode of tab items is enabled.
- Offsets of the pointer will be calculated here from the system cursor of the mouse (this element type is not connected to the window like the other elements).
- If multiple pointers are required in the element, then each of them needs to have its own element index set. Since only one pointer will be used in the current version of the tree view, then this property may be skipped here, since it is initialized with 0 in the pointer constructor by default.
- It is necessary to indicate the element identifier that the pointer is connected to. This is required to avoid conflicts of graphic object names from various elements, where cursor pointers may be used.
//+------------------------------------------------------------------+
//| Create pointer to the cursor of changing width                   |
//+------------------------------------------------------------------+
bool CTreeView::CreateXResizePointer(void)
  {
//--- Exit if width of the content area doesn't need to be changed or
//    the mode of tab items is enabled
   if(!m_resize_content_area_mode || m_tab_items_mode)
      return(true);
//--- Set properties
   m_x_resize.XGap(12);
   m_x_resize.YGap(9);
   m_x_resize.Id(CElement::Id());
   m_x_resize.Type(MP_X_RESIZE);
//--- Create element
   if(!m_x_resize.CreatePointer(m_chart_id,m_subwin))
      return(false);
//---
   return(true);
  }
Before describing other methods of the CTreeView class, let's see what functionality is required in the tree view element. We implement the class for creating this element, so eventually we can make hierarchic lists used for various purposes.
For example, you should bear in mind some features when developing classes for creating file navigators in the future. Please take notice of how the file navigator is arranged in Windows Explorer. If a tree view is displayed on the left side of the window (it is called "Navigation pane" in Windows 7), you will only see folders, not files. All files are displayed in the content area of Windows Explorer (see the screenshot below).
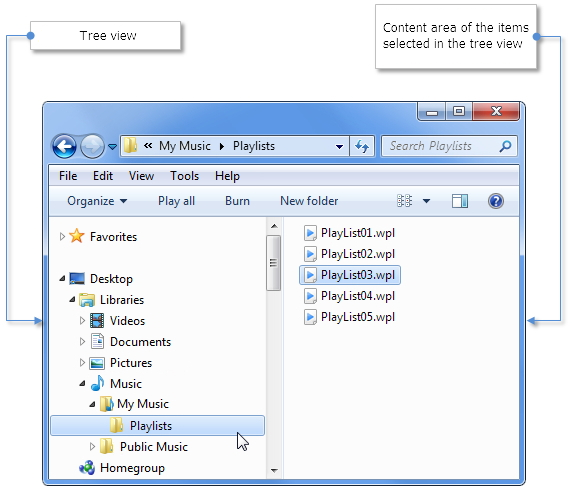
Fig. 5. File navigator in Windows 7. Tree view on the left, content area on the right.
However, in a tree view it is often necessary to display files in addition to folders. For example, you can arrange that when selecting a file in a tree view, its content will be displayed in the right area. Therefore, if the element class of the CTreeView type is used for creating a file navigator, a library user should be given two modes to select from: (1) display folders and files or (2) only folders in a tree view. Therefore, enumeration ENUM_FILE_NAVIGATOR_MODE will be added to Enums.mqh (see the code listing below).
//+------------------------------------------------------------------+
//| Enumeration of file navigator modes                              |
//+------------------------------------------------------------------+
enum ENUM_FILE_NAVIGATOR_MODE
  {
   FN_ALL          =0,
   FN_ONLY_FOLDERS =1
  };
It is not always required for the item content to be displayed in the content area, therefore we need to have an option to disable it. For instance, it could be useful when a tree view is used as a tab that groups of library control elements are linked to, as it was shown in the article Graphical Interfaces VII: the Tabs Control (Chapter 2).
Furthermore, we will also provide additional modes for a more precise setting of the tree view element. Below is a full list of the current version's modes.
- File navigator mode
- Highlighting mode when hovering over the cursor
- Mode of displaying item content in the content area
- Mode of changing width of the content area
- Mode of tab items
In order to set the element modes, before it is created we should apply methods provided in the code listing below:
class CTreeView : public CElement
  {
private:
   //--- File navigator mode
   ENUM_FILE_NAVIGATOR_MODE m_file_navigator_mode;
   //--- Highlighting mode when hovering over with the cursor
   bool              m_lights_hover;
   //--- Mode of displaying item content in the working area
   bool              m_show_item_content;
   //--- Mode of changing width of lists
   bool              m_resize_list_area_mode;
   //--- Mode of tab items
   bool              m_tab_items_mode;
   //---
public:
   //--- (1) File navigator mode, (2) highlighting mode when hovering over with the mouse cursor,
   //    (3) mode of displaying item content, (4) mode of changing width of lists, (5) mode of tab items
   void              NavigatorMode(const ENUM_FILE_NAVIGATOR_MODE mode) { m_file_navigator_mode=mode;                   }
   void              LightsHover(const bool state)                      { m_lights_hover=state;                         }
   void              ShowItemContent(const bool state)                  { m_show_item_content=state;                    }
   void              ResizeListAreaMode(const bool state)               { m_resize_list_area_mode=state;                }
   void              TabItemsMode(const bool state)                     { m_tab_items_mode=state;                       }
  };
The list below contains properties that will be available for setting the external appearance of the element.
- Width of a tree view area
- Background color
- Color of background border
- Width of content area
- Height of items in lists
- Colors of item background in different states
- Colors of item text in different states
- Icons as indication of content present in the item (an icon is set by default as arrow to the right)
class CTreeView : public CElement
  {
private:
   //--- Width of a tree view area
   int               m_treeview_area_width;
   //--- Color and border of the background
   color             m_area_color;
   color             m_area_border_color;
   //--- Width of content area
   int               m_content_area_width;
   //--- Item height
   int               m_item_y_size;
   //--- Colors of items in different states
   color             m_item_back_color_hover;
   color             m_item_back_color_selected;
   //--- Text colors in different states
   color             m_item_text_color;
   color             m_item_text_color_hover;
   color             m_item_text_color_selected;
   //--- Icons for arrows
   string            m_item_arrow_file_on;
   string            m_item_arrow_file_off;
   string            m_item_arrow_selected_file_on;
   string            m_item_arrow_selected_file_off;
   //---
public:
   //--- (1) Item height, (2) width of a tree view and (3) content list
   void              ItemYSize(const int y_size)                        { m_item_y_size=y_size;                         }
   void              TreeViewAreaWidth(const int x_size)                { m_treeview_area_width=x_size;                 }
   void              ContentAreaWidth(const int x_size)                 { m_content_area_width=x_size;                  }
   //--- Color of background and frame of element background
   void              AreaBackColor(const color clr)                     { m_area_color=clr;                             }
   void              AreaBorderColor(const color clr)                   { m_area_border_color=clr;                      }
   //--- Colors of items in different states
   void              ItemBackColorHover(const color clr)                { m_item_back_color_hover=clr;                  }
   void              ItemBackColorSelected(const color clr)             { m_item_back_color_selected=clr;               }
   //--- Text colors in different states
   void              ItemTextColor(const color clr)                     { m_item_text_color=clr;                        }
   void              ItemTextColorHover(const color clr)                { m_item_text_color_hover=clr;                  }
   void              ItemTextColorSelected(const color clr)             { m_item_text_color_selected=clr;               }
   //--- Icons for item arrow
   void              ItemArrowFileOn(const string file_path)            { m_item_arrow_file_on=file_path;               }
   void              ItemArrowFileOff(const string file_path)           { m_item_arrow_file_off=file_path;              }
   void              ItemArrowSelectedFileOn(const string file_path)    { m_item_arrow_selected_file_on=file_path;      }
   void              ItemArrowSelectedFileOff(const string file_path)   { m_item_arrow_selected_file_off=file_path;     }
  };
We will require fields where indexes of highlighted items in a tree view and a list of content area will be stored. Prior to creating a tree view using the CTreeView::SelectedItemIndex() method, we can select an item that must be highlighted right after the creation.
class CTreeView : public CElement
  {
private:
   //--- Indexes of selected items in lists
   int               m_selected_item_index;
   int               m_selected_content_item_index;
   //---
public:
   //--- (1) Select item by index and (2) return index of selected item
   void              SelectedItemIndex(const int index)                 { m_selected_item_index=index;              }
   int               SelectedItemIndex(void)                      const { return(m_selected_item_index);            }
  };
Parameters for forming the element lists
Before creating the element of the CTreeView type, first, we need to create a tree view. We will require a method to add items with certain parameters to the list. They will be used to help the program with the order of arranging items in the process of using a tree view. Without some parameters a hierarchic sequence cannot be achieved. A full list of these parameters is presented below.
- General index of a list
All tree view items are set in order in the loop, and the index of current iteration is set for every item. While using the element, despite of how extended the tree view is in front of a user at the current moment, the overall list index for every item remains initial until the end.
For example, for items A, B, C, D, E and F overall list indexes will be 0, 1, 2, 3, 4 and 5 respectively. For instance, points B and C remain in the item A, and item E is in the item D. For illustrative purposes, two options of a tree view state are displayed below. The left side of the image (1) is a fully extended list where an uninterrupted order of its indexation is shown. The right side of the image (2) shows an option when lists of items A and D that contain items B, C and E, are collapsed, and their previous indexes assigned during the formation and initialization of tree view arrays are saved.

Fig. 6. Left 1) – fully extended list. Right 2) – collapsed list.
- General index of the previous node's list
For example, items in a route catalog don't have a previous node, therefore they will have -1 parameter. If the item has content (local list of items), then all its elements are assigned the general index of a node list where they are placed.
The figure below shows that items A, D and H in a root catalog have -1 value assigned. Points B and C have been assigned a general index [0] of the previous node A, and for points E, F and G – a general index [3] of the previous node D.
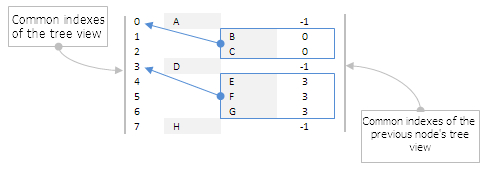
Fig. 7. All child elements of a node have a general index of the list assigned.
- Item description (text displayed in the item)
For example, it could be names of folders and files (if file navigator is created) or names of categories and sub-categories, some groups of elements (if the "Tab" element is created).
- Number of node level
The count starts from zero. I.e. points in the root catalog have 0 value. Further, while increasing the nesting level, value for a nesting item is increased by one unit. For a better understanding please see the image below. The item columns on the above horizontal scale have numbers of their levels assigned. Level of nodes A, D and J holds 0 value. Items B, C, E, I and K have number 1, and items F, G and H – number 2.
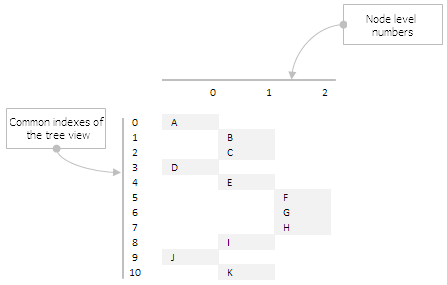
Fig. 8. A node number is linked to a level of its nesting.
- Local index
If the item has content (its local list of elements), then this list will have a custom identification that starts from zero. Indexes of local lists are shown in blue figures on the scheme below.
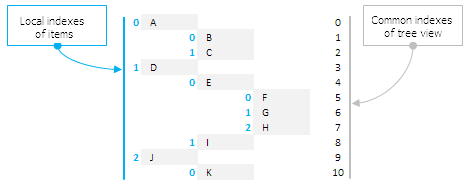
Fig. 9. Indexation of local lists.
- Local index of a previous node
The same principle as with a general index of the previous node is applied here. Items in a root catalog don't have a previous node, therefore value of this parameter equals -1. Items that have a previous node have its local index assigned to them. Local indexes of a previous node are marked red on the image below.
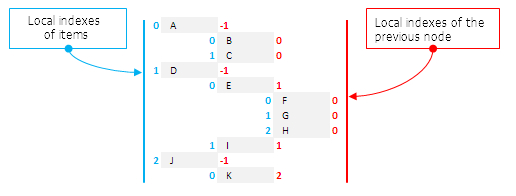
Fig. 10. Local indexes of the previous node.
- Number of items (array size of the local list of node).
The type (from the ENUM_TYPE_TREE_ITEM enumeration) assigned to the item in the field of the CTreeItem class depends on this value. The below mentioned scheme has a number of items in all local lists provided in a numeric form. It shows that items A, D, E and J have a content (2, 2, 3 and 1 respectively), in points B, C, F, G, H, I and K it is empty (0).
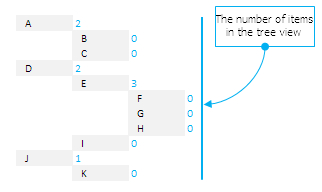
Fig. 11. Number of elements in local lists of nodes.
- State of item.
In case of a local list (content), it is collapsed/expanded. It allows to indicate which items should be expanded right after a tree view is created.
For example, all key parameters for defining an item in a tree view can be shown now in a single summary table (see example on the figure below). For a straightforward interpretation, values of all parameters are marked in different colors.
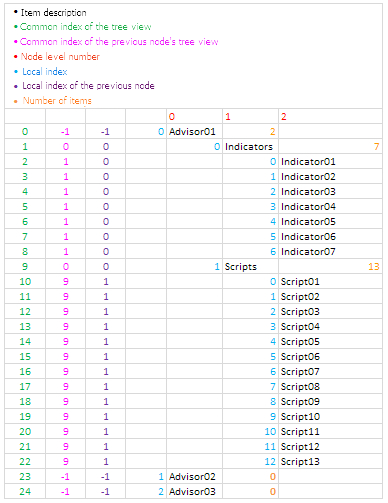
Fig. 12. Summary table of key (crucial) parameters to define items in a tree view.
When developing a class for creating a file navigator, all these parameters must be automatically calculated, by reading hierarchic structure of general and local file directories of the terminal. This will be shown in details in the next chapter of the 8th series, but some aspects can be covered already, in order to imagine adapted methods of the tree view class (CTreeView) for creating file navigators. For example, apart from the number of items in the local list of the node, in case when a file navigator is created, the number of items that are folders will also have to be indicated. Also, every item requires a parameter that is used to define whether it is a folder. In the context of file navigator, a local list absent from the item doesn't state yet that it is a file.
But when creating a simple tree view, its structure needs to be formed independently. In any case, the same CTreeView::AddItem() method will be used for this in both cases. It will allow to add an item to the tree view list with specified parameters that need to be sent as arguments. The code listing below shows the code of this method and the list of arrays where all item parameters are stored. Please note that a unique icon can be set for every item.
class CTreeView : public CElement
  {
private:
   //--- Arrays of all tree view items (common list)
   int               m_t_list_index[];
   int               m_t_prev_node_list_index[];
   string            m_t_item_text[];
   string            m_t_path_bmp[];
   int               m_t_item_index[];
   int               m_t_node_level[];
   int               m_t_prev_node_item_index[];
   int               m_t_items_total[];
   int               m_t_folders_total[];
   bool              m_t_item_state[];
   bool              m_t_is_folder[];
   //---
public:
   //--- Add item to the tree view
   void              AddItem(const int list_index,const int list_id,const string item_name,const string path_bmp,const int item_index,
                             const int node_number,const int item_number,const int items_total,const int folders_total,const bool item_state,const bool is_folder=true);
  };
//+------------------------------------------------------------------+
//| Add item to the common array of a tree view                     |
//+------------------------------------------------------------------+
void CTreeView::AddItem(const int list_index,const int prev_node_list_index,const string item_text,const string path_bmp,const int item_index,
                        const int node_level,const int prev_node_item_index,const int items_total,const int folders_total,const bool item_state,const bool is_folder)
  {
//--- Increase the size of arrays by one element
   int array_size =::ArraySize(m_items);
   m_items_total  =array_size+1;
   ::ArrayResize(m_items,m_items_total);
   ::ArrayResize(m_t_list_index,m_items_total);
   ::ArrayResize(m_t_prev_node_list_index,m_items_total);
   ::ArrayResize(m_t_item_text,m_items_total);
   ::ArrayResize(m_t_path_bmp,m_items_total);
   ::ArrayResize(m_t_item_index,m_items_total);
   ::ArrayResize(m_t_node_level,m_items_total);
   ::ArrayResize(m_t_prev_node_item_index,m_items_total);
   ::ArrayResize(m_t_items_total,m_items_total);
   ::ArrayResize(m_t_folders_total,m_items_total);
   ::ArrayResize(m_t_item_state,m_items_total);
   ::ArrayResize(m_t_is_folder,m_items_total);
//--- Store values of sent parameters
   m_t_list_index[array_size]           =list_index;
   m_t_prev_node_list_index[array_size] =prev_node_list_index;
   m_t_item_text[array_size]            =item_text;
   m_t_path_bmp[array_size]             =path_bmp;
   m_t_item_index[array_size]           =item_index;
   m_t_node_level[array_size]           =node_level;
   m_t_prev_node_item_index[array_size] =prev_node_item_index;
   m_t_items_total[array_size]          =items_total;
   m_t_folders_total[array_size]        =folders_total;
   m_t_item_state[array_size]           =item_state;
   m_t_is_folder[array_size]            =is_folder;
  }
Before creating an element, there is an opportunity to set its parameters and specify the initial width for a tree view area and a content area. By default, the value in the class field where width of content area is set is initialized by WRONG_VALUE (see the code listing below). It means that if a width of content area cannot be set, then three element components won't be created: (1) background of the content area, (2) arrays of items for this area and (3) scrollbars for a list in this area. This will not occur even with the "Show content of a highlighted item in a tree view" mode set in parameters. Therefore, you can disable the list to be displayed by keeping the background, however, you can't do the other way round.
//+------------------------------------------------------------------+
//| Constructor                                                      |
//+------------------------------------------------------------------+
CTreeView::CTreeView(void) : m_treeview_area_width(180),
                             m_content_area_width(WRONG_VALUE),
                             m_item_y_size(20),
                             m_visible_items_total(13),
                             m_tab_items_mode(false),
                             m_lights_hover(false),
                             m_show_item_content(true)
  {
//--- Store the name of the element class in the base class
   CElement::ClassName(CLASS_NAME);
//--- Set priorities for clicking the left mouse button
   m_zorder=0;
  }
A separate list of dynamic arrays will be required for a list of items in the content area. It is not as big as for a tree view, since a hierarchic order doesn't have to be followed. In order to create a certain list, only three parameters will be required.
- The overall index of the content area list
- Overall index of a tree view
- Item description (displayed text)
class CTreeView : public CElement
  {
private:
   //--- Arrays for a list containing items selected in a tree view (full list)
   int               m_c_list_index[];
   int               m_c_tree_list_index[];
   string            m_c_item_text[];
  };
Setting sizes and the initialization of these arrays will be performed in the method of creating a content list - CTreeView::CreateContentItems(). All items will be added to arrays, apart from those that belong to the root catalog, since there is no node above them that could be selected in a tree view. Here, in the beginning of the method, you can see a check for set modes from which the creation of the content area depends.
//+------------------------------------------------------------------+
//| Create a content list of the selected item                       |
//+------------------------------------------------------------------+
bool CTreeView::CreateContentItems(void)
  {
//--- Exit, if the item content doesn't have to be displayed or
//    if the content area is displayed
   if(!m_show_item_content || m_content_area_width<0)
      return(true);
//--- Coordinates and width
   int x =m_content_area.X()+1;
   int y =CElement::Y()+1;
   int w =m_content_area.X2()-x-1;
//--- Counter of items
   int c=0;
//---
   int items_total=::ArraySize(m_items);
   for(int i=0; i<items_total; i++)
     {
      //--- Items from the root catalog can't fall into this list,
      //    therefore, if the node level is below 1, we proceed to the following
      if(m_t_node_level[i]<1)
         continue;
      //--- Increase the sizes of arrays by one element
      int new_size=c+1;
      ::ArrayResize(m_content_items,new_size);
      ::ArrayResize(m_c_item_text,new_size);
      ::ArrayResize(m_c_tree_list_index,new_size);
      ::ArrayResize(m_c_list_index,new_size);
      //--- Calculation of Y coordinate
      y=(c>0)? y+m_item_y_size-1 : y;
      //--- Pass the panel object
      m_content_items[c].WindowPointer(m_wnd);
      //--- Set properties before creation
      m_content_items[c].Index(1);
      m_content_items[c].Id(CElement::Id());
      m_content_items[c].XSize(w);
      m_content_items[c].YSize(m_item_y_size);
      m_content_items[c].IconFile(m_t_path_bmp[i]);
      m_content_items[c].ItemBackColor(m_area_color);
      m_content_items[c].ItemBackColorHover(m_item_back_color_hover);
      m_content_items[c].ItemBackColorSelected(m_item_back_color_selected);
      m_content_items[c].ItemTextColor(m_item_text_color);
      m_content_items[c].ItemTextColorHover(m_item_text_color_hover);
      m_content_items[c].ItemTextColorSelected(m_item_text_color_selected);
      //--- Coordinates
      m_content_items[c].X(x);
      m_content_items[c].Y(y);
      //--- Offsets from the panel's extreme item
      m_content_items[c].XGap(x-m_wnd.X());
      m_content_items[c].YGap(y-m_wnd.Y());
      //--- Create an object
      if(!m_content_items[c].CreateTreeItem(m_chart_id,m_subwin,x,y,TI_SIMPLE,c,0,m_t_item_text[i],false))
         return(false);
      //--- Hide the element
      m_content_items[c].Hide();
      //--- Item will be a drop down element
      m_content_items[c].IsDropdown(true);
      //--- Save (1) index of the general list of content, (2) index of a tree view and (3) item text
      m_c_list_index[c]      =c;
      m_c_tree_list_index[c] =m_t_list_index[i];
      m_c_item_text[c]       =m_t_item_text[i];
      //---
      c++;
     }
//--- Save the size of the list
   m_content_items_total=::ArraySize(m_content_items);
   return(true);
  }
Dynamic arrays for a tree view and a list in the content area that we have considered before are aimed for storing full lists. But since not all items of these lists will be displayed at the same time, two more groups of dynamic arrays that will be constantly re-formed during the interaction with a tree view will also be required. The current state of nodes with local lists that can be collapsed or expanded will be considered. Let's look at another detailed example.
For example, we have a tree view that consists of 11 items:

Fig. 13. Model of a tree view that consists of 11 items.
Since items A, D and J are in the list of the root catalog, they won't get on the full list of items for content area. The figure below (1) shows a list of all tree view items on the left side. Dynamic arrays for storing parameters of this list that were considered in one of the above listings, contain ‘t’ prefix (shortened from the word ‘tree’) in their names. The right side of the image displays (2) list of items that fell into the content area. Dynamic arrays for storing parameters of this list contain ‘c’ prefix (shortened from the word ‘content’) in their names.

Fig. 14. Full lists for both groups.
Local lists in the observed examples are located in the items A, D, E and J. On the image below they are marked blue.
.")
Fig. 15. Items that contain local lists (marked blue).
Every time when selecting items in a tree view that has content, a list in the content area will be re-formed. For example, when selecting A, a list from items B and C is formed (1 option on the image) in the content area. If D is selected, then the list of items E and I is formed (2 option on the image).

Fig. 16. Example of forming lists for the content area.
Re-forming the list of displayed items in a tree view is performed at the point of collapsing and expanding local lists of nodes. It is all simple and pretty obvious. Items of collapsed lists are excluded from being displayed and won't be included into arrays aimed for storing displayed items of a tree view.
For everything listed above you will require one array for a list of displayed items in a tree view that will store common indexes of a tree view, and three arrays for a content list that will store (1) common indexes of the content list, (2) common indexes of a tree-type list and (3) a description (displayed text) of items:
class CTreeView : public CElement
  {
private:
   //--- Arrays for a list of displayed items of a tree view
   int               m_td_list_index[];
   //--- Arrays for a list of displayed items in the content list
   int               m_cd_list_index[];
   int               m_cd_tree_list_index[];
   string            m_cd_item_text[];
  };
Below we will consider methods that will be used to form and manage lists by the above mentioned algorithms.
Methods for managing element lists
After all parameters are sent to the CTreeView class and the element is created, we need to form and update the lists of items to be displayed. In order to reduce the code of main methods, we create additional private fields and methods that will be used for work-related purposes. We will need values of minimal and maximal levels of nodes and a number of items in the root catalog of a tree view.
class CTreeView : public CElement
  {
private:
   //--- (1) Minimal and (2) maximal level of the node
   int               m_min_node_level;
   int               m_max_node_level;
   //--- Number of items in the root catalog
   int               m_root_items_total;
   //---
private:
   //--- Determine and set (1) borders of nodes and (2) the size of root catalog
   void              SetNodeLevelBoundaries(void);
   void              SetRootItemsTotal(void);
  };
//+------------------------------------------------------------------+
//| Define and set the borders of nodes                              |
//+------------------------------------------------------------------+
void CTreeView::SetNodeLevelBoundaries(void)
  {
//--- Define minimum and maximum levels of nodes
   m_min_node_level =m_t_node_level[::ArrayMinimum(m_t_node_level)];
   m_max_node_level =m_t_node_level[::ArrayMaximum(m_t_node_level)];
  }
//+------------------------------------------------------------------+
//| Define and set the size of the root catalog                      |
//+------------------------------------------------------------------+
void CTreeView::SetRootItemsTotal(void)
  {
//--- Define the number of items in the root catalog
   int items_total=::ArraySize(m_items);
   for(int i=0; i<items_total; i++)
     {
      //--- If it is a minimum level, we increase the counter
      if(m_t_node_level[i]==m_min_node_level)
         m_root_items_total++;
     }
  }
Previously we have considered arrays for forming lists of displayed items. The CTreeView::AddDisplayedTreeItem() method that will be used to fill the array for a tree view will be required . In order to add the item to this list, the general index of the list must be sent to this method.
class CTreeView : public CElement
  {
private:
   //--- Add item to the list in the content area
   void              AddDisplayedTreeItem(const int list_index);
  };
//+------------------------------------------------------------------+
//| Add item to the array of displayed items                         |
//| in a tree view                                                   |
//+------------------------------------------------------------------+
void CTreeView::AddDisplayedTreeItem(const int list_index)
  {
//--- Increase the size of arrays by one element
   int array_size=::ArraySize(m_td_list_index);
   ::ArrayResize(m_td_list_index,array_size+1);
//--- Store values of sent parameters
   m_td_list_index[array_size]=list_index;
  }
After the array is formed, items should be swapped, and the element needs to be re-drawn to display last changes. For this purpose we are going to create another auxiliary method - CTreeView::RedrawTreeList(). The element is hidden in the beginning of this method. Then (1) Y coordinate for a first point is calculated, (2) the size of a scrollbar is corrected and (3) a width of items with consideration of presence/absence of a scrollbar is calculated. Then Y coordinate is calculated and the update of properties is performed for every item in the loop on every iteration. After terminating the loop, the element becomes visible again.
class CTreeView : public CElement
  {
private:
   //--- Re-drawing the tree view
   void              RedrawTreeList(void);
  };
//+------------------------------------------------------------------+
//| Re-drawing the element                                           |
//+------------------------------------------------------------------+
void CTreeView::RedrawTreeList(void)
  {
//--- Hide the element
   Hide();
//--- Y coordinate of the first item of the tree view
   int y=CElement::Y()+1;
//--- Get the number of items
   m_items_total=::ArraySize(m_td_list_index);
//--- Correct the scrollbar size
   m_scrollv.ChangeThumbSize(m_items_total,m_visible_items_total);
//--- Calculation of width of tree view items
   int w=(m_items_total>m_visible_items_total) ? CElement::XSize()-m_scrollv.ScrollWidth() : CElement::XSize()-2;
//--- Set new values
   for(int i=0; i<m_items_total; i++)
     {
      //--- Calculate Y coordinate for each item
      y=(i>0)? y+m_item_y_size-1 : y;
      //--- Obtain a common index of the item in the list
      int li=m_td_list_index[i];
      //--- Update coordinates and size
      m_items[li].UpdateY(y);
      m_items[li].UpdateWidth(w);
     }
//--- Show element
   Show();
  }
All the above listed fields and methods will be called in the CTreeView::UpdateTreeViewList() method where a tree view will be formed and updated (see the code listing below). Let's see this method in more details
Four local dynamic arrays will be required here and they will be used to control the order of items in the process of forming a list. Among them there are the following arrays for:
- common indexes of the list of previous nodes;
- local indexes of items;
- number of items in a node;
- number of folders in a node.
The initial size of arrays will be two elements more than a maximum number of nodes in a tree view. This is required so values of the current item (in the loop) are memorized in the next element of arrays, and values of the previous item are checked at the next iteration by the current loop index. Initially arrays are initialized with -1. Please note that every time when the program enters this method, the array buffer m_td_list_index[] required for creating a tree view is released, and zero size is given to the array. We will also need an additional counter of items (ii) and a variable (end_list) to set a flag of the last item in the root catalog.
After declaring all local arrays and variables, the main loop of the CTreeView::UpdateTreeViewList() method begins its operation. It will work until:
- node counter (nl) exceeds the set maximum;
- we haven't reached the last item in the root catalog (after checking all items inserted there);
- a user didn't delete the program.
This is a double loop. Nodes of the tree view are calculated on the first level. All items of the local list of current node are checked on the second level. At the beginning of the body of the second loop, a file navigator mode is checked, in case a tree view is used for this purpose. If the "show only folders in a tree view" mode is enabled, then it should be checked, if the current item is a folder, and proceed to the following item, if it's not.
If these conditions are met, then three more checks are followed. The program will proceed to the following item in three cases mentioned below.
- If nodes don't match.
- Order of local indexes of items is not followed.
- If we are not in the loop catalog now, and the general index of a list of the previous node doesn't equal the similar one stored in memory.
After all the above listed checks are passed, we memorize the local index of the item, if the following item exceeds the size of the local list.
Further, if it appears that the item contains a local list and it is currently expanded, we will add an item to the array of displayed items in a tree view. Here, you should memorize current item values to local arrays of the method. The only exception here is a local index of an item. It should be saved in the current node index (nl), and values of all remaining parameters — in the index of the next node (n). Furthermore, the counter of local index items is zeroed here, and the current (second) loop for proceeding to the next node is stopped here.
If the move to the next node has failed, it means that it was an item without a list, or a list is currently collapsed. In this case, a point is first added to the array of displayed items in a tree view. Then, a counter of local indexes of items is increased.
If now we are in the root catalog, and have already reached the last item of the list, it means that the list has been successfully formed. The flag is set and the loop is stopped. If we haven't yet reached the last item in the root catalog, we will obtain a number of items in the current node or the number of folders, if the respective mode is set. If this is not the last item from the list, we will move on to the next. If we have reached the last item, then we need to proceed to the previous node and continue a loop from the item that was checked last time in its list. We proceed so until the last item in the root catalog is reached.
After the tree view is created, the element is redrawn at the end of the method.
class CTreeView : public CElement
  {
private:
   //--- Update the tree view
   void              UpdateTreeViewList(void);
  };
//+------------------------------------------------------------------+
//| Update the tree view list                                        |
//+------------------------------------------------------------------+
void CTreeView::UpdateTreeViewList(void)
  {
//--- Arrays for controlling the order of items:
   int l_prev_node_list_index[]; // common index of the list of the previous node
   int l_item_index[];           // local index of the item
   int l_items_total[];          // number of items in the node
   int l_folders_total[];        // number of folders in the node
//--- Set the initial size of arrays
   int begin_size=m_max_node_level+2;
   ::ArrayResize(l_prev_node_list_index,begin_size);
   ::ArrayResize(l_item_index,begin_size);
   ::ArrayResize(l_items_total,begin_size);
   ::ArrayResize(l_folders_total,begin_size);
//--- Initialization of arrays
   ::ArrayInitialize(l_prev_node_list_index,-1);
   ::ArrayInitialize(l_item_index,-1);
   ::ArrayInitialize(l_items_total,-1);
   ::ArrayInitialize(l_folders_total,-1);
//--- Empty the array of displayed tree view items
   ::ArrayFree(m_td_list_index);
//--- Counter of local indexes of items
   int ii=0;
//--- For setting a flag of the last item in the root catalog
   bool end_list=false;
//--- Collect displayed items into array. The loop will work until:
//    1: the node counter doesn't exceed the maximum;
//    2: reaching the last item (after checking all input items);
//    3: a user deletes the program.
   int items_total=::ArraySize(m_items);
   for(int nl=m_min_node_level; nl<=m_max_node_level && !end_list; nl++)
     {
      for(int i=0; i<items_total && !::IsStopped(); i++)
        {
         //--- If the "show only folders" mode is enabled
         if(m_file_navigator_mode==FN_ONLY_FOLDERS)
           {
            //--- If it is a file, then proceed to the next item
            if(!m_t_is_folder[i])
               continue;
           }
         //--- If (1) it is not our node or (2) the order of local indexes of items is not followed,
         //    we proceed to the next item
         if(nl!=m_t_node_level[i] || m_t_item_index[i]<=l_item_index[nl])
            continue;
         //--- Proceed to the next item, if it is not in the root catalog and
         //    a general index of the previous node list doesn't equal the similar one stored in memory
         if(nl>m_min_node_level && m_t_prev_node_list_index[i]!=l_prev_node_list_index[nl])
            continue;
         //--- Remember the local index of the item, if the next item exceeds the size of the local list
         if(m_t_item_index[i]+1>=l_items_total[nl])
            ii=m_t_item_index[i];
         //--- If the list of the current item is maximized
         if(m_t_item_state[i])
           {
            //--- Add item to array of displayed items in the tree view
            AddDisplayedTreeItem(i);
            //--- Remember current values and proceed to the next node
            int n=nl+1;
            l_prev_node_list_index[n] =m_t_list_index[i];
            l_item_index[nl]          =m_t_item_index[i];
            l_items_total[n]          =m_t_items_total[i];
            l_folders_total[n]        =m_t_folders_total[i];
            //--- Zero the counter of local indexes of items
            ii=0;
            //--- Proceed to the next node
            break;
           }
         //--- Add item to array of displayed items in the tree view
         AddDisplayedTreeItem(i);
         //--- Increase the counter of local indexes of items
         ii++;
         //--- If reached the last item in the root catalog
         if(nl==m_min_node_level && ii>=m_root_items_total)
           {
            //--- Set the flag and end the current loop
            end_list=true;
            break;
           }
         //--- If we haven't reached the last item in the root catalog
         else if(nl>m_min_node_level)
           {
            //--- Get the number of items in the current node
            int total=(m_file_navigator_mode==FN_ONLY_FOLDERS)? l_folders_total[nl]: l_items_total[nl];
            //--- If it is not the last local index of the item, we proceed to the next
            if(ii<total)
               continue;
            //--- If we reach the last local index then
            //    we need to return to the previous node and proceed from the item where we stopped
            while(true)
              {
               //--- Reset values of the current node in arrays listed below
               l_prev_node_list_index[nl] =-1;
               l_item_index[nl]           =-1;
               l_items_total[nl]          =-1;
               //--- Decrease the number of nodes, while equality in the number of items in local lists is maintained
               //    or we haven't reached the root catalog
               if(l_item_index[nl-1]+1>=l_items_total[nl-1])
                 {
                  if(nl-1==m_min_node_level)
                     break;
                  //---
                  nl--;
                  continue;
                 }
               //---
               break;
              }
            //--- Proceed to the previous node
            nl=nl-2;
            //--- Zero out the counter of local indexes of items and proceed to the next node
            ii=0;
            break;
           }
        }
     }
//--- Re-drawing the element
   RedrawTreeList();
  }
Shifting lists regarding scrollbars will be performed via methods CTreeView::ShiftTreeList() and CTreeView::ShiftContentList(). The main logic of these methods is practically identical, therefore as an example we only provide here a code of one of them (for the tree view).
At the start of the method all tree view items are hidden. Then a width of items with consideration of a scrollbar in the current list assembly is calculated. If there is a scrollbar, then the slider position is determined. Then, coordinates and width are calculated and updated in the loop for every item, and the item becomes visible. At the end of method, in case the scrollbar should be displayed, it must be redrawn to be placed above the list.
class CTreeView : public CElement
  {
private:
   //--- Shift of lists
   void              ShiftTreeList(void);
   void              ShiftContentList(void);
  };
//+------------------------------------------------------------------+
//| Shift the tree view against the scrollbar                        |
//+------------------------------------------------------------------+
void CTreeView::ShiftTreeList(void)
  {
//--- Hide all items in the tree view
   int items_total=ItemsTotal();
   for(int i=0; i<items_total; i++)
      m_items[i].Hide();
//--- If the scrollbar is required
   bool is_scroll=m_items_total>m_visible_items_total;
//--- Calculation of width of the list items
   int w=(is_scroll)? m_area.XSize()-m_scrollv.ScrollWidth()-1 : m_area.XSize()-2;
//--- Defining the position of the scrollbar
   int v=(is_scroll)? m_scrollv.CurrentPos() : 0;
   m_scrollv.CurrentPos(v);
//--- Y coordinate of the first item of the tree view
   int y=CElement::Y()+1;
//---
   for(int r=0; r<m_visible_items_total; r++)
     {
      //--- Checking to prevent the exit from the range
      if(v>=0 && v<m_items_total)
        {
         //--- Calculate Y coordinate
         y=(r>0)? y+m_item_y_size-1 : y;
         //--- Obtain common index of the tree view item
         int li=m_td_list_index[v];
         //--- Set coordinates and width
         m_items[li].UpdateX(m_area.X()+1);
         m_items[li].UpdateY(y);
         m_items[li].UpdateWidth(w);
         //--- Show item
         m_items[li].Show();
         v++;
        }
     }
//--- Redraw the scrollbar
   if(is_scroll)
      m_scrollv.Reset();
  }
A method for forming and updating the content list is considerably easier, since a regular list is formed here and it doesn't require to follow a hierarchic order. Here in the beginning of the CTreeView::UpdateContentList() method, arrays that help forming the content list are released. Then, we iterate over all items of the tree view in the first loop and save only those items that have the following parameters match with the item selected in the tree view:
- Levels of nodes
- Local indexes of items
- Common indexes of items.
This loop only stores the item description (displayed text) and the general index of the tree view.
In the second loop we must iterate over the content list and fill the array for general indexes of this list. In order to determine necessary items, parameters that were obtained in the first loop will be used. At the end of the method, the size of a scrollbar is corrected, and a list for displaying the last changes is updated.
class CTreeView : public CElement
  {
private:
   //--- Refresh the content list
   void              UpdateContentList(void);
  };
//+------------------------------------------------------------------+
//| Update the content list                                          |
//+------------------------------------------------------------------+
void CTreeView::UpdateContentList(void)
  {
//--- Index of the selected item
   int li=m_selected_item_index;
//--- Free arrays of the content list
   ::ArrayFree(m_cd_item_text);
   ::ArrayFree(m_cd_list_index);
   ::ArrayFree(m_cd_tree_list_index);
//--- Form the content list
   int items_total=::ArraySize(m_items);
   for(int i=0; i<items_total; i++)
     {
      //--- If (1) levels of nodes and (2) local indexes of items match, as well as
      //    (3) the index of a previous node matches with the index of a selected item
      if(m_t_node_level[i]==m_t_node_level[li]+1 &&
         m_t_prev_node_item_index[i]==m_t_item_index[li] &&
         m_t_prev_node_list_index[i]==li)
        {
         //--- Increase arrays of displayed items of the content list
         int size     =::ArraySize(m_cd_list_index);
         int new_size =size+1;
         ::ArrayResize(m_cd_item_text,new_size);
         ::ArrayResize(m_cd_list_index,new_size);
         ::ArrayResize(m_cd_tree_list_index,new_size);
         //--- Store item text and general index of the tree view in arrays
         m_cd_item_text[size]       =m_t_item_text[i];
         m_cd_tree_list_index[size] =m_t_list_index[i];
        }
     }
//--- If eventually the list is not empty, we fill the array of general indexes of content list
   int cd_items_total=::ArraySize(m_cd_list_index);
   if(cd_items_total>0)
     {
      //--- Counter of items
      int c=0;
      //--- Iterate over the list
      int c_items_total=::ArraySize(m_c_list_index);
      for(int i=0; i<c_items_total; i++)
        {
         //--- If the description and common indexes of tree view items match
         if(m_c_item_text[i]==m_cd_item_text[c] &&
            m_c_tree_list_index[i]==m_cd_tree_list_index[c])
           {
            //--- Store general index of the content list and proceed to the next
            m_cd_list_index[c]=m_c_list_index[i];
            c++;
            //--- Exit the loop, if we have reached the end of the displayed list
            if(c>=cd_items_total)
               break;
           }
        }
     }
//--- Correct the size of the scrollbar slider
   m_content_scrollv.ChangeThumbSize(cd_items_total,m_visible_items_total);
//--- Correct the list of item content
   ShiftContentList();
  }
Managing width of list areas
Now, we will look in more details, how the mode of changing a width of lists operates. What we require: (1) one main private method CTreeView::ResizeListArea(), where all main checks will be performed and based on the results of these checks — change of width of lists and also (2) four auxiliary private methods for solving the below mentioned tasks.
- The CTreeView::CheckXResizePointer() method — checking for readiness to change a width of lists. The method code here consists of two blocks linked to one term. If the cursor pointer is not activated, but the mouse cursor is in its area, the coordinates of the pointer are updated, and it becomes visible. If the left mouse button is pressed, then the pointer is activated. If the first condition of the method is not performed, then the cursor pointer is de-activated and hidden.
class CTreeView : public CElement
  {
private:
   //--- Check for readiness to change a width of lists
   void              CheckXResizePointer(const int x,const int y);
  };
//+------------------------------------------------------------------+
//| Checking for readiness to change the width of lists              |
//+------------------------------------------------------------------+
void CTreeView::CheckXResizePointer(const int x,const int y)
  {
//--- If the pointer is not activated, but the mouse cursor is in its area
   if(!m_x_resize.State() &&
      y>m_area.Y() && y<m_area.Y2() && x>m_area.X2()-2 && x<m_area.X2()+3)
     {
      //--- Update coordinates of the pointer and make it visible
      int l_x=x-m_x_resize.XGap();
      int l_y=y-m_x_resize.YGap();
      m_x_resize.Moving(l_x,l_y);
      m_x_resize.Show();
      //--- Set the visibility flag
      m_x_resize.IsVisible(true);
      //--- If the left mouse button is pressed
      if(m_mouse_state)
         //--- Activate pointer
         m_x_resize.State(true);
     }
   else
     {
      //--- If the left mouse button is pressed
      if(!m_mouse_state)
        {
         //--- De-activate and hide the pointer
         m_x_resize.State(false);
         m_x_resize.Hide();
         //--- Remove visibility flag
         m_x_resize.IsVisible(false);
        }
     }
  }
- The CTreeView::CheckOutOfArea() method is a test for going beyond restrictions. There is no point in changing width of lists to completely exclude one of them from the visibility. Therefore, we will set the restriction to 80 pixels. Let's arrange it that if the cursor goes beyond the set restriction horizontally, then shifting the pointer will be only possible vertically, but within the area of connecting areas of lists.
class CTreeView : public CElement
  {
private:
   //--- Check to go beyond restrictions
   bool              CheckOutOfArea(const int x,const int y);
  };
//+------------------------------------------------------------------+
//| Check to go beyond restrictions                                  |
//+------------------------------------------------------------------+
bool CTreeView::CheckOutOfArea(const int x,const int y)
  {
//--- Restriction
   int area_limit=80;
//--- If we go beyond the element border horizontally ...
   if(x<m_area.X()+area_limit || x>m_content_area.X2()-area_limit)
     {
      // ... shift the pointer only vertically without exiting borders
      if(y>m_area.Y() && y<m_area.Y2())
         m_x_resize.UpdateY(y-m_x_resize.YGap());
      //--- Do not change a width of lists
      return(false);
     }
//--- Change a width of lists
   return(true);
  }
- CTreeView::UpdateTreeListWidth() and CTreeView::UpdateContentListWidth() methods are for updating (1) a width of the tree view and (2) a width of list in the content area. Only right border will be shifted in the tree view. For this purpose, only its width needs to be changed. Furthermore, it is required to update scrollbar coordinates. For a list in the content area, you need to update its width and X coordinate simultaneously to achieve the shift of the left border only.
class CTreeView : public CElement
  {
private:
   //--- Update width of the tree view
   void              UpdateTreeListWidth(const int x);
   //--- Update width of the list in the content area
   void              UpdateContentListWidth(const int x);
  };
//+------------------------------------------------------------------+
//| Update width of the tree view                                    |
//+------------------------------------------------------------------+
void CTreeView::UpdateTreeListWidth(const int x)
  {
//--- Calculate and set a width of the tree view
   m_area.X_Size(x-m_area.X());
   m_area.XSize(m_area.X_Size());
//--- Calculate and set a width for items in the tree view with consideration of a scrollbar
   int l_w=(m_items_total>m_visible_items_total) ? m_area.XSize()-m_scrollv.ScrollWidth()-4 : m_area.XSize()-1;
   int items_total=::ArraySize(m_items);
   for(int i=0; i<items_total; i++)
      m_items[i].UpdateWidth(l_w);
//--- Calculate and set coordinates for treeview scrollbar
   m_scrollv.X(m_area.X2()-m_scrollv.ScrollWidth());
   m_scrollv.XDistance(m_scrollv.X());
  }
//+------------------------------------------------------------------+
//| Update width of the list in the content area                     |
//+------------------------------------------------------------------+
void CTreeView::UpdateContentListWidth(const int x)
  {
//--- Calculate and set X coordinate, offset and width for content area
   int l_x=m_area.X2()-1;
   m_content_area.X(l_x);
   m_content_area.X_Distance(l_x);
   m_content_area.XGap(l_x-m_wnd.X());
   m_content_area.XSize(CElement::X2()-m_content_area.X());
   m_content_area.X_Size(m_content_area.XSize());
//--- Calculate and set X coordinate and width for items in the content list
   l_x=m_content_area.X()+1;
   int l_w=(m_content_items_total>m_visible_items_total) ? m_content_area.XSize()-m_content_scrollv.ScrollWidth()-4 : m_content_area.XSize()-2;
   int total=::ArraySize(m_content_items);
   for(int i=0; i<total; i++)
     {
      m_content_items[i].UpdateX(l_x);
      m_content_items[i].UpdateWidth(l_w);
     }
  }
All these auxiliary methods will be called in the main method CTreeView::ResizeListArea() that will be eventually used when handling application events. Several checks need to be made in the beginning of the method. The program will exit from here in the below mentioned cases.
- If the mode for changing a width of lists is disabled
- If the content area is disabled
- If the tab item mode is enabled
- If the scrollbar is active (slider is in the shift mode)
If all these checks are complete, then the CTreeView::CheckXResizePointer() method is called to determine the readiness of the state for changing a width of lists. If it eventually turns out that the pointer is disabled, then we should unblock the form that it has previously blocked.
If the pointer is enabled, then first we need to see if we go beyond the specified restrictions. In case we do, the program terminates in this method. If we are in the working area, then the form is blocked. The element identifier must be saved, because only the element that has blocked it should have an option to unblock the form. Coordinates of the cursor pointer are then updated, along with coordinates of lists and their width.
//+------------------------------------------------------------------+
//| Manage width of lists                                            |
//+------------------------------------------------------------------+
void CTreeView::ResizeListArea(const int x,const int y)
  {
//--- Exit, (1) if the width of content area shouldn't be changed or
//    (2) if the content area is disabled or (3) the tab item mode is enabled
   if(!m_resize_list_area_mode || m_content_area_width<0 || m_tab_items_mode)
      return;
//--- Exit, if the scrollbar is active
   if(m_scrollv.ScrollState())
      return;
//--- Check for readiness to change a width of lists
   CheckXResizePointer(x,y);
//--- Unblock the form if the pointer is disabled
   if(!m_x_resize.State())
     {
      //--- Whoever has blocked the form, can unblock it
      if(m_wnd.IsLocked() && m_wnd.IdActivatedElement()==CElement::Id())
        {
         m_wnd.IsLocked(false);
         m_wnd.IdActivatedElement(WRONG_VALUE);
         return;
        }
     }
   else
     {
      //--- Check for exiting beyond the specified restrictions
      if(!CheckOutOfArea(x,y))
         return;
      //--- Block the form and remember the active element identifier
      m_wnd.IsLocked(true);
      m_wnd.IdActivatedElement(CElement::Id());
      //--- Set X coordinate for the object in the middle of the mouse cursor
      m_x_resize.UpdateX(x-m_x_resize.XGap());
      //--- Y coordinate is set only if we are not beyond the element area
      if(y>m_area.Y() && y<m_area.Y2())
         m_x_resize.UpdateY(y-m_x_resize.YGap());
      //--- Update width of the tree view
      UpdateTreeListWidth(x);
      //--- Update width of content list
      UpdateContentListWidth(x);
      //--- Update coordinates and sizes of lists
      ShiftTreeList();
      ShiftContentList();
      //--- Redraw pointer
      m_x_resize.Reset();
     }
  }
For the interim outcome we can provide the code block from the element handler CTreeView::OnEvent() where the event of moving the mouse CHARTEVENT_MOUSE_MOVE is handled. Many methods that have been considered above, are used here specifically.
//+------------------------------------------------------------------+
//| Event handler                                                    |
//+------------------------------------------------------------------+
void CTreeView::OnEvent(const int id,const long &lparam,const double &dparam,const string &sparam)
  {
//--- Handling the cursor movement event
   if(id==CHARTEVENT_MOUSE_MOVE)
     {
      //--- Exit if the element is hidden
      if(!CElement::IsVisible())
         return;
      //--- Coordinates and the state of left mouse button
      int x=(int)lparam;
      int y=(int)dparam;
      m_mouse_state=(bool)int(sparam);
      //--- Checking focus over the list
      CElement::MouseFocus(x>X() && x<X2() && y>Y() && y<Y2());
      //--- Shift the tree view if managing the scrollbar slider is in action
      if(m_scrollv.ScrollBarControl(x,y,m_mouse_state))
        {
         ShiftTreeList();
         return;
        }
      //--- Shift the content list if managing the scrollbar slider is in action
      if(m_content_scrollv.ScrollBarControl(x,y,m_mouse_state))
        {
         ShiftContentList();
         return;
        }
      //--- Managing width of the content area
      ResizeListArea(x,y);
      //--- Exit if the form is blocked
      if(m_wnd.IsLocked())
         return;
      //--- Change of the color when hovering over with the mouse
      ChangeObjectsColor();
      return;
     }
  }
Mode of tab items
We will try to figure out how the tab mode will operate in a tree view. At the current moment, the library already has two classes for creating tabs: CTabs and CIconTabs. More detailed information on how they are designed is available from the article Graphical interfaces VII: the tab element (Chapter 2). In these classes tabs are created in a row both horizontally and vertically. In a tree view, elements could be arranged by categories which is very convenient when there a lot of elements in a graphic interface of the application and they need to be somehow grouped.
So, if when creating a tree view a mode of tab items was set, then after all element objects are created, it should be determined which tree view items will be tabs. Tabs can be only those items that don't contain local lists. It should be considered that tab items will have their order of indexation (see the figure below). This specific order of indexes should be focused on when adding controls to tab items.
The figure below shows an example of the tab items indexation order. Points A, D, G and H are not tabs because they contain lists.

Fig. 17. Indexes of tab items.
In order to solve this issue we will need a structure (with declaration of array of its instances), that will have a dynamic array for storing pointers to elements and a field where the tab index will be stored:
class CTreeView : public CElement
  {
private:
   //--- Structure of elements assigned to every tab item
   struct TVElements
     {
      CElement         *elements[];
      int               list_index;
     };
   TVElements        m_tab_items[];
  };
In order to determine which points will be tabs and also to form their array, the CTreeView::GenerateTabItemsArray() method will be used. If the tab item mode is disabled, then the program will instantly exit from this method. Then we will iterate over the entire tree view and every time a simple item is found, we will decrease the array of the TVElements structure by one element and keep the general index of the item.
Then, if the item content is displayed, then a first item in the list will be selected by default. If displaying the item content is disabled, then in case of exit from the range, the index is corrected. The tab item indicated in properties is then selected.
class CTreeView : public CElement
  {
private:
   //--- Forms array of tab items
   void              GenerateTabItemsArray(void);
  };
//+------------------------------------------------------------------+
//| Form array of tab items                                          |
//+------------------------------------------------------------------+
void CTreeView::GenerateTabItemsArray(void)
  {
//--- Exit if the tab item mode is disabled
   if(!m_tab_items_mode)
      return;
//--- Add only empty items to the array of item tabs
   int items_total=::ArraySize(m_items);
   for(int i=0; i<items_total; i++)
     {
      //--- If this item has other items we proceed to the next
      if(m_t_items_total[i]>0)
         continue;
      //--- Increase the size of array of tab items by one element
      int array_size=::ArraySize(m_tab_items);
      ::ArrayResize(m_tab_items,array_size+1);
      //--- Store general item index
      m_tab_items[array_size].list_index=i;
     }
//--- If showing item content is disabled
   if(!m_show_item_content)
     {
      //--- Receive the size of tab item array
      int tab_items_total=::ArraySize(m_tab_items);
      //--- Correct index upon exiting from the range
      if(m_selected_item_index>=tab_items_total)
         m_selected_item_index=tab_items_total-1;
      //--- Disable selection of the current item in the list
      m_items[m_selected_item_index].HighlightItemState(false);
      //--- Index of the selected tab
      int tab_index=m_tab_items[m_selected_item_index].list_index;
      m_selected_item_index=tab_index;
      //--- Select this item
      m_items[tab_index].HighlightItemState(true);
     }
  }
In order to connect any control to the tree view tab, the CTreeView::AddToElementsArray() method should be used. This method has two arguments: (1) index of the tab item and (2) the object of the CElement type whose pointer should be stored in the array of the specified tab item.
class CTreeView : public CElement
  {
public:
   //--- Add element to the tab item array
   void              AddToElementsArray(const int item_index,CElement &object);
  };
//+------------------------------------------------------------------+
//| Add element to the array of the specified tab                    |
//+------------------------------------------------------------------+
void CTreeView::AddToElementsArray(const int tab_index,CElement &object)
  {
//--- Check for exceeding the range
   int array_size=::ArraySize(m_tab_items);
   if(array_size<1 || tab_index<0 || tab_index>=array_size)
      return;
//--- Add pointer of the sent element to the array of the specified tab
   int size=::ArraySize(m_tab_items[tab_index].elements);
   ::ArrayResize(m_tab_items[tab_index].elements,size+1);
   m_tab_items[tab_index].elements[size]=::GetPointer(object);
  }
The CTreeView::ShowTabElements() method is used to show elements of only selected tab item. The program will exit from the method, if it turns out that the element is hidden or the mode is disabled. Then, in the first loop of the method, the index of the selected tab item is determined. Then, in the second loop, only those elements that were assigned to selected tab are shown, and the rest are hidden.
class CTreeView : public CElement
  {
public:
   //--- Display elements of only selected tab item
   void              ShowTabElements(void);
  };
//+------------------------------------------------------------------+
//| Shows elements of only selected tab item                         |
//+------------------------------------------------------------------+
void CTreeView::ShowTabElements(void)
  {
//--- Exit if the element is hidden or the mode of tab items is disabled
   if(!CElement::IsVisible() || !m_tab_items_mode)
      return;
//--- Index of the selected tab
   int tab_index=WRONG_VALUE;
//--- Define the index of the selected tab
   int tab_items_total=::ArraySize(m_tab_items);
   for(int i=0; i<tab_items_total; i++)
     {
      if(m_tab_items[i].list_index==m_selected_item_index)
        {
         tab_index=i;
         break;
        }
     }
//--- Display elements of only selected tab
   for(int i=0; i<tab_items_total; i++)
     {
      //--- Obtain number of elements connected to the tab
      int tab_elements_total=::ArraySize(m_tab_items[i].elements);
      //--- If this tab point is selected
      if(i==tab_index)
        {
         //--- Show elements
         for(int j=0; j<tab_elements_total; j++)
            m_tab_items[i].elements[j].Reset();
        }
      else
        {
         //--- Hide elements
         for(int j=0; j<tab_elements_total; j++)
            m_tab_items[i].elements[j].Hide();
        }
     }
  }
Methods for event handling
When selecting an item in lists, a message will be generated stating that a path to the tree view item was changed. Afterwards, this event could be accepted in file navigators to determine a path to the file. In order to implement what we have planned, we will require the ON_CHANGE_TREE_PATH identifier in the Defines.mqh file (see the code listing below):
//+------------------------------------------------------------------+
//|                                                      Defines.mqh |
//|                        Copyright 2015, MetaQuotes Software Corp. |
//|                                              http://www.mql5.com |
//+------------------------------------------------------------------+
#define ON_CHANGE_TREE_PATH       (23) // Path to the tree view is changed
In order to determine a path to the selected item we will write a public method CTreeView::CurrentFullPath() that will be called in a file navigator to obtain a path to the file. A fields and a method for receiving a selected file in the lists of the element will also be required. They will be relevant only when a tree view is used as a component of the file navigator. Let's consider the details of the CTreeView::CurrentFullPath() method.
The path is formed into the path_parts[] array by adding items to it one by one, starting from the item selected at the current moment, and then up the hierarchy of the list. At the very beginning we check if the selected item is a file. If it is a folder, then we add it to array (file names won't be added to the path).
Then, we iterate over the entire tree view from the selected item upwards. It is implemented accordingly. We skip all items that are files. In order to add the item to array, all three conditions need to be true.
- The index of a general list needs to match with the index of the general list of the previous node.
- The item index of a local list needs to match with the index of the previous node item.
- The decreasing order of nodes must be followed.
If all three conditions are met: (1) an item name is added to array, (2) a current index of the loop is saved for subsequent checking and (3) a loop counter is reset. But in case we reach the zero level of nodes, the loop is stopped.
Then, in the separate loop the string is formed (full path to a selected item) with the addition of the separator "\\". Further, if the selected item in a tree view is a folder, we will check if the selected item is present in the list of content area and if it is a file. If the mode "show files in a tree view" is on, then when the file is selected, its name is instantly saved after forming a string.
At the end of the method the string that contains a path to the selected item is returned. If the file is also selected in the current category, then it can be obtained using the public method CTreeView::SelectedItemFileName().
class CTreeView : public CElement
  {
private:
   //--- Text of the selected item in the list.
   //    Only for files in case of using a class for creating a file navigator.
   //    If it wasn't a file selected in the list, then this field should have an empty string"".
   string            m_selected_item_file_name;
   //---
public:
   //--- Return the file name
   string            SelectedItemFileName(void)                   const { return(m_selected_item_file_name);        }
   //--- Return a full path of the selected item
   string            CurrentFullPath(void);
  };
//+------------------------------------------------------------------+
//| Return a complete current path                                   |
//+------------------------------------------------------------------+
string CTreeView::CurrentFullPath(void)
  {
//--- For forming a directory to the selected item
   string path="";
//--- Index of the selected item
   int li=m_selected_item_index;
//--- Array for forming a directory
   string path_parts[];
//--- Receive description (text) of the selected item of the tree view,
//    but only if it is a folder
   if(m_t_is_folder[li])
     {
      ::ArrayResize(path_parts,1);
      path_parts[0]=m_t_item_text[li];
     }
//--- Iterate over the entire list
   int total=::ArraySize(m_t_list_index);
   for(int i=0; i<total; i++)
     {
      //--- Only folders are considered.
      //    If there is a file, we proceed to the next item.
      if(!m_t_is_folder[i])
         continue;
      //--- If the index of a general list matches the index of a general list of a previous node and
      //    the item index of a local list matches the index of a previous node item,
      //    then the order of node levels is maintained
      if(m_t_list_index[i]==m_t_prev_node_list_index[li] &&
         m_t_item_index[i]==m_t_prev_node_item_index[li] &&
         m_t_node_level[i]==m_t_node_level[li]-1)
        {
         //--- Increase the array by one element and save the item description
         int sz=::ArraySize(path_parts);
         ::ArrayResize(path_parts,sz+1);
         path_parts[sz]=m_t_item_text[i];
         //--- Memorize index for the next check
         li=i;
         //--- If we have reached the zero level of the node, exit from the loop
         if(m_t_node_level[i]==0 || i<=0)
            break;
         //--- Reset the loop counter
         i=-1;
        }
     }
//--- Form a string - full path to a selected item in a tree view
   total=::ArraySize(path_parts);
   for(int i=total-1; i>=0; i--)
      ::StringAdd(path,path_parts[i]+"\\");
//--- If a folder is a selected item in a tree view
   if(m_t_is_folder[m_selected_item_index])
     {
      m_selected_item_file_name="";
      //--- If an item is selected in the content area
      if(m_selected_content_item_index>0)
        {
         //--- If the selected item is a file, we store its name
         if(!m_t_is_folder[m_c_tree_list_index[m_selected_content_item_index]])
            m_selected_item_file_name=m_c_item_text[m_selected_content_item_index];
        }
     }
//--- If a selected item in a tree view is a file
   else
//--- Store its name
      m_selected_item_file_name=m_t_item_text[m_selected_item_index];
//--- Return directory
   return(path);
  }
Three user actions will be handled in the current version of a tree view element.
- Pressing the button of collapsing/expanding the local list of the item – the CTreeView::OnClickItemArrow() method. If it appears here that the name of a graphic object is not from the tree view or if the element identifier doesn't match the identifier of the tree view in the object name, the program exits from the method. Then (1) we need to obtain a state of the item button and change it to the opposite state, (2) update the tree view by displaying the last changes, (3) calculate the position of the scrollbar slider and (4) in case the relevant mode is enabled, to display elements of only selected tab item at the current moment.
class CTreeView : public CElement
  {
private:
   //--- Handle the pressing of the button of collapsing/expanding the item list
   bool              OnClickItemArrow(const string clicked_object);
  };
//+------------------------------------------------------------------+
//| Pressing the button of collapsing/expanding the item list        |
//+------------------------------------------------------------------+
bool CTreeView::OnClickItemArrow(const string clicked_object)
  {
//--- Leave, if it has a different object name
   if(::StringFind(clicked_object,CElement::ProgramName()+"_0_treeitem_arrow_",0)<0)
      return(false);
//--- Get identifier from the object name
   int id=IdFromObjectName(clicked_object);
//--- Leave, if identifiers do not match
   if(id!=CElement::Id())
      return(false);
//--- Obtain index of the item in the general list
   int list_index=IndexFromObjectName(clicked_object);
//--- Obtain the state of the item arrow and set the opposite one
   m_t_item_state[list_index]=!m_t_item_state[list_index];
   ((CChartObjectBmpLabel*)m_items[list_index].Object(1)).State(m_t_item_state[list_index]);
//--- Update a tree view
   UpdateTreeViewList();
//--- Calculate the position of a scrollbar slider
   m_scrollv.CalculateThumbY();
//--- Show elements of the selected tab item
   ShowTabElements();
   return(true);
  }
- Clicking the item in the tree view - the CTreeView::OnClickItem() method. Here, at the very beginning there have been multiple checks made, the same as in the previous item of description. Among others, the exit from the method is performed when one of the scrollbars in the element is active at the current moment.
Then in the loop we iterate over the visible part of the tree view. We find the item that was pressed. If it appears that this item is already selected, then the program exits from the method. If it is not selected, then in case when the mode of tab items is enabled and the display of the content of the selected item is disabled, but the item doesn't contain a list, the loop is immediately stopped and no changes are made. Otherwise, the item that was pressed is selected.
After the loop, if we have reached this moment, a new item is selected. It means that the index of a selected item in the list of content area and its color must be reset. For example, this is how it is implemented in Windows Explorer. Then the list in the content area is updated to display the last changes. At the very end, the message with the event identifier ON_CHANGE_TREE_PATH is generated, and that can be handled in the event handler of a custom application or some other element.
class CTreeView : public CElement
  {
private:
   //--- Handle the clicking on the item of the tree view
   bool              OnClickItem(const string clicked_object);
  };
//+------------------------------------------------------------------+
//| Clicking the item in a tree view                                 |
//+------------------------------------------------------------------+
bool CTreeView::OnClickItem(const string clicked_object)
  {
//--- Exit if the scrollbar is active
   if(m_scrollv.ScrollState() || m_content_scrollv.ScrollState())
      return(false);
//--- Leave, if it has a different object name
   if(::StringFind(clicked_object,CElement::ProgramName()+"_0_treeitem_area_",0)<0)
      return(false);
//--- Get identifier from the object name
   int id=IdFromObjectName(clicked_object);
//--- Leave, if identifiers do not match
   if(id!=CElement::Id())
      return(false);
//--- Obtain a current position of the scrollbar slider
   int v=m_scrollv.CurrentPos();
//--- Iterate over the list
   for(int r=0; r<m_visible_items_total; r++)
     {
      //--- Checking to prevent the exit from the range
      if(v>=0 && v<m_items_total)
        {
         //--- Obtain a general item index
         int li=m_td_list_index[v];
         //--- If this item is selected in the list
         if(m_items[li].Object(0).Name()==clicked_object)
           {
            //--- Exit if this item is already selected
            if(li==m_selected_item_index)
               return(false);
            //--- If the tab item mode is enabled, and the mode of showing content is disabled,
            //    we will not select items without a list
            if(m_tab_items_mode && !m_show_item_content)
              {
               //--- If the current item doesn't contain a list, we stop the loop
               if(m_t_items_total[li]>0)
                  break;
              }
            //--- Set the color to the previous selected item
            m_items[m_selected_item_index].HighlightItemState(false);
            //--- Remember index for the current one and change its color
            m_selected_item_index=li;
            m_items[li].HighlightItemState(true);
            break;
           }
         v++;
        }
     }
//--- Reset colors in the content area
   if(m_selected_content_item_index>=0)
      m_content_items[m_selected_content_item_index].HighlightItemState(false);
//--- Reset the selected item
   m_selected_content_item_index=WRONG_VALUE;
//--- Renew the content list
   UpdateContentList();
//--- Calculate the position of a scrollbar slider
   m_content_scrollv.CalculateThumbY();
//--- Correct the content list
   ShiftContentList();
//--- Show elements of the selected tab item
   ShowTabElements();
//--- Send message about selecting a new directory in a tree view
   ::EventChartCustom(m_chart_id,ON_CHANGE_TREE_PATH,0,0,"");
   return(true);
  }
- Press the item in the list of content area – the CTreeView::OnClickContentListItem() method. The code of this method is similar to the one described in the previous item of description and even significantly simpler, therefore we won't mention it here. It should be just noted that when clicking the item in the content area, the event with the ON_CHANGE_TREE_PATH identifier is also generated, that, for example, in a file navigator could imply the file selection.
Eventually, the process of interaction with element via methods previously considered in this article, both its lists (if the content area is enabled) will be re-formed "on the go". The code block in the event handler of the element with methods considered above could be thoroughly learned in the following listing:
//+------------------------------------------------------------------+
//| Event handler                                                    |
//+------------------------------------------------------------------+
void CTreeView::OnEvent(const int id,const long &lparam,const double &dparam,const string &sparam)
  {
//--- Handling the cursor movement event
//...
//--- Handling the left mouse clicking event on the object
   if(id==CHARTEVENT_OBJECT_CLICK)
     {
      //--- Exit if in the mode of changing the size of the content list area
      if(m_x_resize.IsVisible() || m_x_resize.State())
         return;
      //--- Handle clicking on the item arrow
      if(OnClickItemArrow(sparam))
         return;
      //--- Handle the clicking on the item of the tree view
      if(OnClickItem(sparam))
         return;
      //--- Handle clicking on the item in the content area
      if(OnClickContentListItem(sparam))
         return;
      //--- Shift the list against the scrollbar
      if(m_scrollv.OnClickScrollInc(sparam) || m_scrollv.OnClickScrollDec(sparam))
         ShiftTreeList();
      if(m_content_scrollv.OnClickScrollInc(sparam) || m_content_scrollv.OnClickScrollDec(sparam))
         ShiftContentList();
      //---
      return;
     }
  }
The first version of the class to create a tree view element is completely ready. But to achieve the correct operation in all its modes, it must be integrated in the library slider.
Element integration into the library engine
Files with classes of the tree view must be connected to the WndContainer.mqh file (see the code listing below). We will add a personal array for the tree view to the structure of element arrays. Furthermore, methods for receiving the number of tree view lists and for saving pointers of those elements that are a part of the tree view list will be required. The code of these methods could be more thoroughly studied in files attached at the end of this article.
#include "TreeItem.mqh"
#include "TreeView.mqh"
//+------------------------------------------------------------------+
//| Class for storing all interface objects                          |
//+------------------------------------------------------------------+
class CWndContainer
  {
protected:
   //--- Window array
   CWindow          *m_windows[];
   //--- Structure of element arrays
   struct WindowElements
     {
      //--- Tree view lists
      CTreeView        *m_treeview_lists[];
     };
   //--- Jagged array of elements for each window
   WindowElements    m_wnd[];
   //---
public:
   //--- Number of tree view lists
   int               TreeViewListsTotal(const int window_index);
   //---
private:
   //--- Store pointers to elements of tree view lists
   bool              AddTreeViewListsElements(const int window_index,CElement &object);
  };
Some additions should be entered into the CWndEvents class derived from the CWndContainer class, where main library events are handled. First of all, when expanding the form in case when a tree view is used as a tab for grouping elements in a graphic interface, it is required to show the elements only to the one selected at the current moment. Therefore, the code must be added to the CWndEvents::OnWindowUnroll() method as shown in the listing below. For this particular cases the elements are distributed among their personal arrays. Instead of iterating over the whole array of all elements, it is sufficient to iterate over personal arrays of those that are required in a specific situation.
//+------------------------------------------------------------------+
//| ON_WINDOW_UNROLL event                                           |
//+------------------------------------------------------------------+
bool CWndEvents::OnWindowUnroll(void)
  {
//--- If the "unroll window" signal
   if(m_id!=CHARTEVENT_CUSTOM+ON_WINDOW_UNROLL)
      return(false);
//--- Index of the active window
   int awi=m_active_window_index;
//--- If the window identifier and the sub-window number match
   if(m_lparam==m_windows[awi].Id() && (int)m_dparam==m_subwin)
     {
      int elements_total=CWndContainer::ElementsTotal(awi);
      for(int e=0; e<elements_total; e++)
        {
         //--- Make all elements visible apart from the form and ...
         if(m_wnd[awi].m_elements[e].ClassName()!="CWindow")
           {
            //--- ... those elements in a drop-down list
            if(!m_wnd[awi].m_elements[e].IsDropdown())
               m_wnd[awi].m_elements[e].Show();
           }
        }
      //--- If there are tabs then show only selected elements
      int tabs_total=CWndContainer::TabsTotal(awi);
      for(int t=0; t<tabs_total; t++)
         m_wnd[awi].m_tabs[t].ShowTabElements();
      //--- If there are tree view lists, then show elements of only selected tab item
      int treeview_total=CWndContainer::TreeViewListsTotal(awi);
      for(int tv=0; tv<treeview_total; tv++)
         m_wnd[awi].m_treeview_lists[tv].ShowTabElements();
     }
//--- Update location of all elements
   MovingWindow();
   m_chart.Redraw();
   return(true);
  }
The same loop should be added to the CWndEvents::OnOpenDialogBox() method right after the similar loop for elements of the CTabs type (tab). We won't provide this code here to save some space in the article.
It is also important to empty the personal array for tree view lists. The following string should be added to the CWndEvents::Destroy() method, as it is also done for other personal arrays of controls:
::ArrayFree(m_wnd[w].m_treeview_lists);
Testing the tree view element
Everything appears to be ready to test the tree view. We will use the EA from the previous article and clear it from it all elements apart from the main menu and the status string. Further we declare the instance of the CTreeView class, a method for creating the tree view list and offsets from the extreme point that the element will be connected to:
class CProgram : public CWndEvents
  {
private:
   //--- Tree view
   CTreeView         m_treeview;
   //---
private:
   //--- Tree view
#define TREEVIEW1_GAP_X       (2)
#define TREEVIEW1_GAP_Y       (43)
   bool              CreateTreeView(void);
  };
As an example, we create a tree view that was presented earlier in the fig. 12 in this article (see the code listing below). There are 25 items in the list in total. A number of visible items doesn't exceed 10. In the same section of the article, there was a clarification that when creating such list, its parameters need to be specified independently. Before forming the arrays with parameters for every item, it is better to display them all in a table editor. Such simple visualization will simplify the task and reduce the risks of making a mistake.
We will set images for every group of items. The first item will contain the list. For example, we will unroll it after creating the element (true state), and the lists of other items that they have we will keep collapsed (false state). We will enable modes to (1) highlight the item when hovering over with the mouse, (2) show content of the item in the adjacent area or (3) change width of list areas.
After all element properties are set, we will add items with parameters indicated in arrays to the list using the CTreeView::AddItem() method. A tree view is created afterwards, and the pointer to it is saved in the base of elements.
//+------------------------------------------------------------------+
//| Create a tree view                                               |
//+------------------------------------------------------------------+
bool CProgram::CreateTreeView(void)
  {
//--- Number of items in a tree view
#define TREEVIEW_ITEMS 25
//--- Store pointer to the window
   m_treeview.WindowPointer(m_window1);
//--- Coordinates
   int x=m_window1.X()+TREEVIEW1_GAP_X;
   int y=m_window1.Y()+TREEVIEW1_GAP_Y;
//--- Form arrays for a tree view:
//    Images for items
#define A "Images\\EasyAndFastGUI\\Icons\\bmp16\\advisor.bmp"   // Expert Advisor
#define I "Images\\EasyAndFastGUI\\Icons\\bmp16\\indicator.bmp" // Indicator
#define S "Images\\EasyAndFastGUI\\Icons\\bmp16\\script.bmp"    // Script
   string path_bmp[TREEVIEW_ITEMS]=
     {A,I,I,I,I,I,I,I,I,S,S,S,S,S,S,S,S,S,S,S,S,S,S,A,A};
//--- Description of items (displayed text)
   string item_text[TREEVIEW_ITEMS]=
     {"Advisor01","Indicators","01","02","03","04","05","06","07",
      "Scripts","01","02","03","04","05","06","07","08","09","10","11","12","13",
      "Advisor02","Advisor03"};
//--- Indexes of general list of previous nodes
   int prev_node_list_index[TREEVIEW_ITEMS]=
     {-1,0,1,1,1,1,1,1,1,0,9,9,9,9,9,9,9,9,9,9,9,9,9,-1,-1};
//--- Indexes of items in local lists
   int item_index[TREEVIEW_ITEMS]=
     {0,0,0,1,2,3,4,5,6,1,0,1,2,3,4,5,6,7,8,9,10,11,12,1,2};
//--- Number of node level
   int node_level[TREEVIEW_ITEMS]=
     {0,1,2,2,2,2,2,2,2,1,2,2,2,2,2,2,2,2,2,2,2,2,2,0,0};
//--- Local indexes of items of previous nodes
   int prev_node_item_index[TREEVIEW_ITEMS]=
     {-1,0,0,0,0,0,0,0,0,0,1,1,1,1,1,1,1,1,1,1,1,1,1,-1,-1};
//--- Number of items in local lists
   int items_total[TREEVIEW_ITEMS]=
     {2,7,0,0,0,0,0,0,0,13,0,0,0,0,0,0,0,0,0,0,0,0,0,0,0};
//--- State of item list
   bool item_state[TREEVIEW_ITEMS]=
     {1,0,0,0,0,0,0,0,0,0,0,0,0,0,0,0,0,0,0,0,0,0,0,0,0};
//--- Set properties before creation
   m_treeview.TreeViewAreaWidth(180);
   m_treeview.ContentAreaWidth(0);
   m_treeview.VisibleItemsTotal(10);
   m_treeview.LightsHover(true);
   m_treeview.ShowItemContent(true);
   m_treeview.ResizeListAreaMode(true);
//--- Properties of scrollbars
   m_treeview.GetScrollVPointer().AreaBorderColor(clrLightGray);
   m_treeview.GetContentScrollVPointer().AreaBorderColor(clrLightGray);
//--- Add points
   for(int i=0; i<TREEVIEW_ITEMS; i++)
      m_treeview.AddItem(i,prev_node_list_index[i],item_text[i],path_bmp[i],
                         item_index[i],node_level[i],prev_node_item_index[i],items_total[i],0,item_state[i],true);
//--- Create a tree view
   if(!m_treeview.CreateTreeView(m_chart_id,m_subwin,x,y))
      return(false);
//--- Add the pointer to element to the base
   CWndContainer::AddToElementsArray(0,m_treeview);
   return(true);
  }
Calling this method must be performed in the main method of creating a graphic interface of the MQL-application. In this case, this method is called CProgram::CreateExpertPanel().
We compile the program and run the EA on the chart. The result that must be eventually obtained is displayed in the figure. It appears that the first item is expanded and selected. And its content appears in the area on the right.

Fig. 18. Test of the tree view element. Only first item list is expanded.
In order to show you, we will expand lists of all items. Therefore, the arrow button of the item must be pressed. We do this and select the item with the "Scripts" description in order to display the list in the content area. The result is shown in the figure below. It appears that when a number of items doesn't fit in the range of 10 visible items, scrollbars appear. The third item is selected in the content area. We can also see that when hovering the mouse cursor over the border that connects two areas of the element lists, a user pointer (double-sided error) of the mouse cursor appears.

Fig. 19. Lists of all items are expanded.
We create another EA for tests where the tab item mode is shown. We make three expanded lists by the scheme described in the figure below:
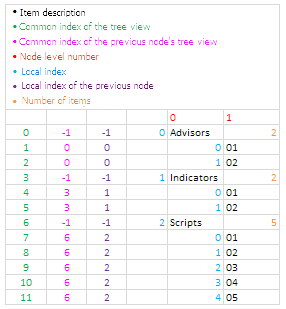
Fig. 20. Tree view scheme.
We secure elements like CCheckBox and CTable in favour of tab items lists "Advisors" and "Indicators". Tab items of the "Scripts" list remain empty, that you have an opportunity to practice quickly. We won't use the entire code. We should only note which key modes and properties will be used for this option: (1) a mode of tab items is enabled, (2) a display of item contents is disabled and (3) a third tab item is selected.
//...
   m_treeview.TabItemsMode(true);
   m_treeview.LightsHover(true);
   m_treeview.ShowItemContent(false);
   m_treeview.SelectedItemIndex((m_treeview.SelectedItemIndex()==WRONG_VALUE) ? 3 : m_treeview.SelectedItemIndex());
//--- Properties of scrollbars
//...
We just need to compile and load the program on the chart. The screen below shows the result:

Fig. 21. Test of the tab item mode.
Conclusion
In this article (second chapter, 8th part of series of articles), we have considered one of the most complicated elements of the graphic interface library - a tree view element. The article provides three classes of elements:
- The CPointer class for creating a user pointer for the mouse cursor.
- The CTreeItem class for creating a tree view item.
- The CTreeView class for creating a tree view.
In the next article, we will develop this subject further and create a very beneficial code class that we will facilitate the process of creating a file navigator in your MQL-application.
Below are all the materials from the part 7 of series of articles that you can download in order to test them. In case you have any questions regarding the use of materials provided in these files, you can refer to the detailed description of the library developing process in one of the articles from the below list, or simply ask a question in the comments section of this article.
List of articles (chapters) of part 8:
- Graphical Interfaces VIII: the Calendar Control (Chapter 1)
- Graphical Interfaces VIII: the Tree View Control (Chapter 2)
- Graphical interface VIII: the File Navigator Control (Chapter 3)
Translated from Russian by MetaQuotes Ltd.
Original article: https://www.mql5.com/ru/articles/2539

 Cross-Platform Expert Advisor: Introduction
 Graphical Interfaces VIII: The Calendar Control (Chapter 1)
 Graphical Interfaces VIII: the File Navigator Control (Chapter 3)
- Free trading apps
- Over 8,000 signals for copying
- Economic news for exploring financial markets
You agree to website policy and terms of use