A Non-Trading EA Testing Indicators
Sergey Kravchuk | 5 June, 2008
Introduction
All indicators can be divided into two groups: static indicators, the displaying of which, once shown, always remains the same in history and does not change with new incoming quotes, and dynamic indicators that display their status for the current moment only and are fully redrawn when a new price comes. The efficiency of a static indicator is directly visible on the chart. But how can we check whether a dynamic indicator works ok? This is the question the article is devoted to.
The overwhelming majority of indicators used in technical analysis are static. Let's take MACD, as an example. Arrival of a new quote will at best concern only the displaying of the latest period or, to be more exact, its final stage. However, its chart remains "impregnable" in history. To check whether a static indicator works ok or not, it would be enough just to investigate its indications on historical data. If there are several indicators available and you want to choose the most optimal one for your trading - it is no problems either: Just attach all the indicators to the chart and then select one of them that produces "more correct" indications.
In case of dynamic indicators, the situation becomes more complicated and even nearly "no go". Nearly all channel indicators can be used as an example of such indicators. As a rule, these indicators draw one or more lines that display the range of price movements. These lines are built for the current moment, of course. Thus, the arrival of new prices that significantly differ from the recent ones can change the lines arrangement in the chart for an absolutely different one within several seconds. It is just impossible to estimate how correctly the indicator works for all possible price arrangements, judging just by the last point of the current price. You can see that your indicator works correctly for several hours and consider it to work ok. However, exactly when you decide to start trading, there can occur such a market situation, in which it works incorrectly (an example of Barishpolets Moving Channels wrongly built by one of indicators is given below), and you may open your trade in an adverse direction. The indicator itself will "correct" its indications in just a couple of bars. But this will be too late for you, since your position will be losing!
Testing Indicators in Tester
The primary purpose of the Strategy Tester is to test Expert Advisors. Since some EAs use indicators in their operations, Tester should also be able to test them. We will use this feature!
An Expert Advisor can be tested in two modes: standard and visual. In the standard mode, Tester processes all the EA's commands in its history processing and stops to give final results, as soon as there are no available historical data of the currency pair under test anymore. In the visual mode, apart from the above,Tester additionally draws every bar/tick of the chart emulating the market working in the real-time mode. In Tester, you can quicken, slow or even stop the time, which will be of great help for us when testing indicators.
Non-Trading Screenshotting Expert Advisor
However, before we start testing indicators, we will have to prepare a rather unusual EA. For our purposes, this EA shouldn't trade. Its operations shouldn't take us off the testing of indicators, and, which is even more important, the preliminarily lost deposit due to trading errors should not stop our indicator testing. So we will just create an EA that does nothing.
Its only function will be to screenshot the current state of trading. They will be very helpful when we start analyze the indicator's operations step by step. Below is the code of the EA:
//+-----------------------------------------------------------------------------+
//|                                                         IndicatorTester.mq4 |
//|                                      Copyright © 2006-2008, Sergey Kravchuk |
//|                                                    http://forextools.com.ua |
//+-----------------------------------------------------------------------------+

#property copyright "Copyright © 2006-2008, Sergey Kravchuk. http://forextools.com.ua"
#property link      "http://forextools.com.ua"

//+-----------------------------------------------------------------------------+

extern datetime ScreenShotStart=0; // date and time of the first screenshotting
extern int ScreenShotMax=100;      // how many screenshots should be made
extern int ScreenShotStep=0;       // screenshotting step: <=0-not applicable, N-on each Nth bar
extern string FilesPrefix="_";     // prefix for screenshot filenames

//+-----------------------------------------------------------------------------+

datetime   NextScreenShot=0;       // date and time for making the next screenshot
double ScreenShotCnt=0;            // prepare a screenshot counter
double ScreenShotCur=0.001;        // number of the initial screenshot
string FileName;                   // filename to save the next screenshot

//+-----------------------------------------------------------------------------+
//| expert start function                                                       |
//+-----------------------------------------------------------------------------+

int start()
{
  if(ScreenShotStep>0                       // is it necessary to make screenshots?
    && ScreenShotStart<=Time[0]             // is it time for screenshotting?
    && NextScreenShot<=Time[0]              // is it time to make the next screenshot?
    && ScreenShotCur*1000<=ScreenShotMax+1) // have all screenshots not been made?
  {
    // compose the filename and save the screenshot under it
    FileName=FilesPrefix+StringSubstr(DoubleToStr(ScreenShotCur,3),2)+".gif";
    WindowScreenShot(FileName,800,600);

    // give a prompt
    Comment("Saved file "+FileName+
    "\nThere are "+DoubleToStr((ScreenShotMax-ScreenShotCur*1000),0) +" pcs. left");

    // shift the data and the counter to the next screenshot
    ScreenShotCur+=0.001;
    NextScreenShot=Time[0]+ScreenShotStep*Period()*60;
  }

  if(ScreenShotCur*1000>ScreenShotMax+1) Comment("All screenshots are saved");

  return(0);
}
//+-----------------------------------------------------------------------------+
Screenshotting algorithm is quite simple: We wait until the time comes, from which we want to start making a series of screenshots (ScreenShotStart) and then make up to ScreenShotMax screenshots at each ScreenShotStep bar. Each screenshot is saved in a file, the name of which starts with the preset prefix, FilesPrefix, with the screenshot number added to the name.
To form a number with leading zeros (this is necessary for correct sorting of screenshots in order _1.gif not to be immediately followed by _10.gif, whereas _2.gif ), we use an a bit unusual numbering method. Numbering starts with ScreenShotCur=0.001; and then it follows with a step of 0.001 (ScreenShotCur+=0.001;). The number itself is obtained from modifying a decimal number into a characters string, from which a substring is selected as a number, starting with the 3rd character. Thus, we cut the starting "0."s and obtain leading zeros before the number digits. This method allows us to accumulate up to one thousand of screenshots, which is more than enough for our analysis. However, if it is not enough for you, increase the "graininess" of the initial number and that of the step up to 0.0001. Then you will be able to accumulate up to 10 000 of screenshots.
Enter into Testing
Now, when we have everything ready and the EA has been compiled without errors, let's start testing. Launch the Tester using the menu of View/Tester or the combination of keys Ctrl+R. In the "Expert Advisor" field, select our EA, IndicatorTester. Then select a symbol and a period to be tested. If necessary, you can select the test range by checking the "Use date" field and specifying the "From" and "To" dates. To activate the visual testing mode, check the "Visual mode" field. Now we can press the "Expert properties" button and specify all necessary inputs for screenshotting.
Well, almost everything is ready. Press the "Start" button and, immediately after that, the "||" button located to the right from the visualization speed adjustment slider. The EA will stop its testing. Now you can attach the indicator to be tested to the chart and, having released the "||" button, continue testing the EA. As we remember, the EA does not make any trades. But Tester doesn't know about that and processes quotes scrupulously, tick after tick, bar after bar. Since only one or a few indicators are attached to the chart, the Tester has to recalculate and redraw them, since a normal EA would surely use the data obtained from these indicators.
That's about it. Now, as some programmers write in their pup-up boxes, "sit back and watch" how your indicator is working. You can pause testing (by pressing the "||" button) at any moment or you can accelerate or decelerate its speed. As soon as the Tester reaches the date/time preset by you as ScreenShotStart, it will start screenshotting with the preset periodicity and store the ready screenshots in the directory of c:\Program Files\MetaTrader 4\tester\files. If you don't need any screenshots and just want to see how your indicator works, set the EA's parameter ScreenShotStep as equal or less than zero before to press the "Start" button, then the screenshotting will be disabled.
Example Usage
I first performed this task for myself when I wanted to find the "most correct" Barishpolets Moving Channels indicator for my research. In the description of how to build the channels, there are some points that result in possible wrong building of a channel. First of all, this relates to the situation when two extremums, through which one of the channel lines should be drawn, are located close to each other. In such cases, some indicators start "throw" the channel from 45 degrees downside to 45 degrees upside, and then back, from top to bottom - well, all that jazz. Unfortunately, the developers of indicators, implicitly trusting Barishpolets' authority, just realize his set of rules by rote (it must be noted that the rules work ok, in the overwhelming majority of cases). However, they forget about that the market can spring all possible surprises on us. In such cases, the indicator's "top" starts to be "blown", and the indicators become the reason of losing instead of being a useful tool for gaining profits.
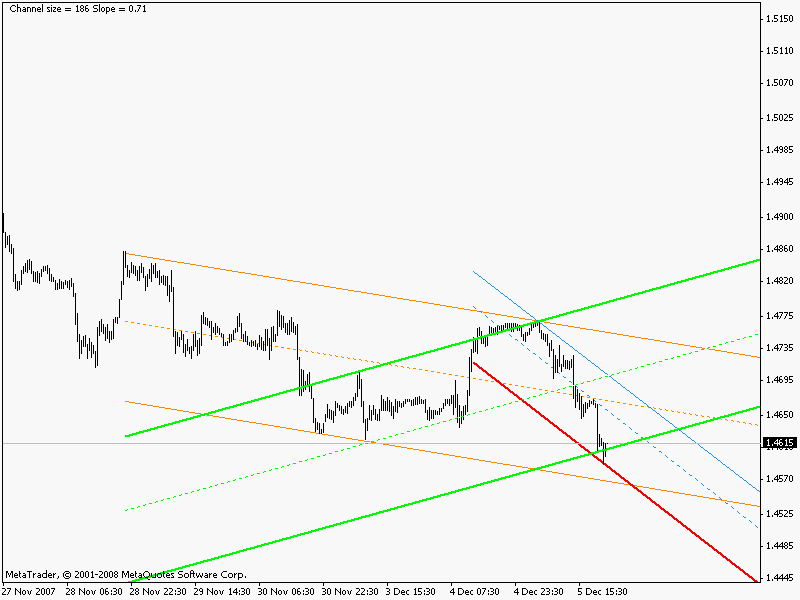
To compare different methods of building Barishpolets Moving Channels, I wrote my own indicator that builds channels, too, but "more objectively" - by the mean price movement line. It is very similar to how the standard tool, Equidistant Channel, does it, but the channel borders are built by a bit different algorithm (you can find some more details in my website Two-Channel Method - in Russian). Now let's see how one of the Barishpolets Moving Channels' indicators (SHI_Channel_true) located in the CodeBase will behave as compared to the "correct" mean price channel. The lines of the indicator under test are drawn in green, the lines of the long (weekly) channel from the two-channel indicator are orange, those of the short (33-hour) channel are light blue. They become red as soon as they approach to the channel borders.
Well, film is film, but let's have a closer look at some screenshots made.
For the period from the 4th to the 7th of December 2007 (EURUSD M30), we can see how many times the indicator of Barishpolets Moving Channels "turns over" and returns to the mean price movement line.

It is possible here, that a channel is broken through (the channel is just not drawn quite correctly, though, and the price reaches the weekly channel border, indeed). You can see how the indicator behaves. The channel turns over on the next bar and practically matches with the weekly channel:

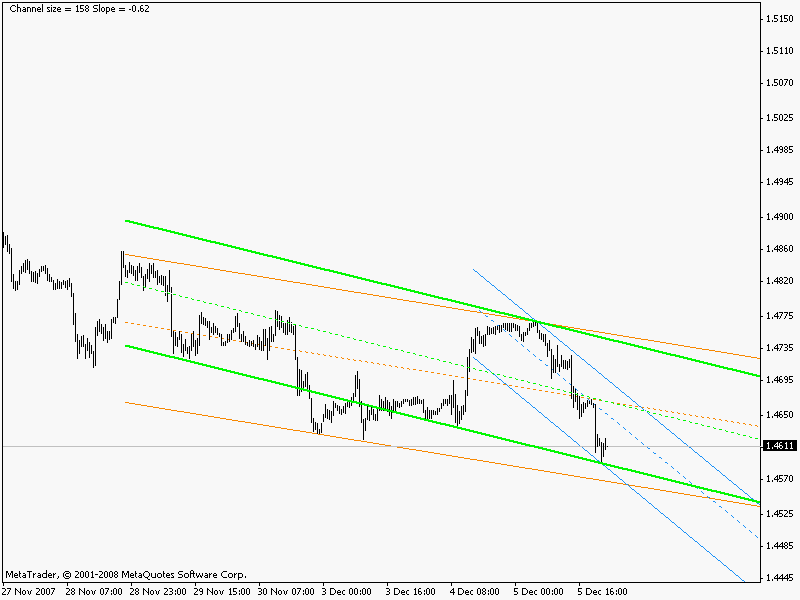
This happened, because a new extremum had been formed and the indicator was fairly processing it. However, only a few bars pass by - and it turns over again returning to its incorrect position.
That happened because a new quote had turned the extremum point into a normal internal point, and indicator processed that change again. A new turnover takes place at the next bar:
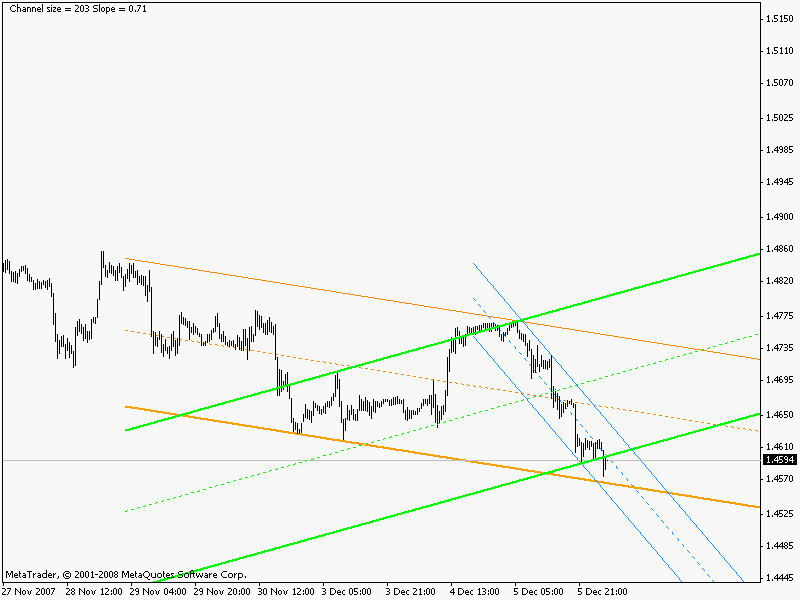
Two or three bars more, and - a turnover again:
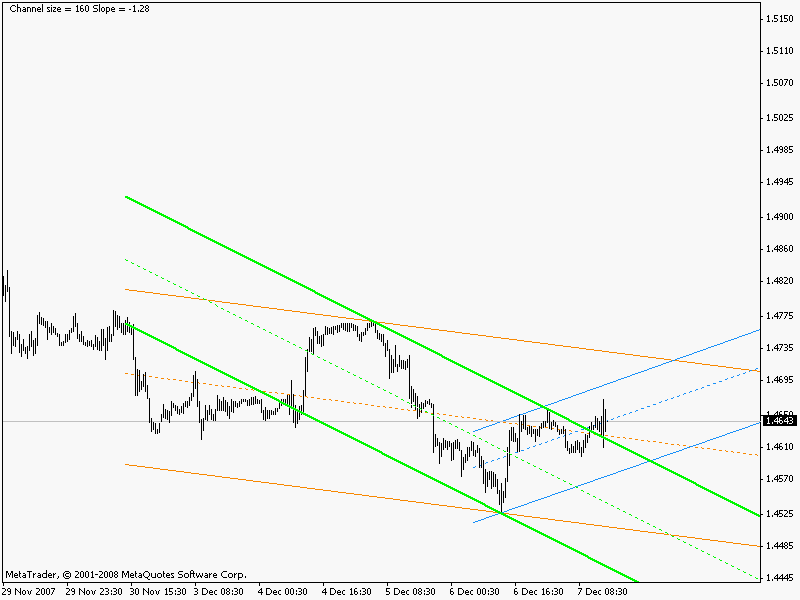
On this chart we can see another "extreme" of building Barishpolets Moving Channels - two near extremums set one of the channel borders, although a quite obvious picture can be seen in this chart: the price within the short 33-hour channel is well on its way to the borders of the weekly channel, from which it will most probably reflect and move back into the weekly channel. Indeed, it happens like this - we see our "foreseen" picture within the next day:
Thus, using our non-trading screenshotting EA, we can bring a reasonable verdict of the indicator SHI_Channel_true: It is a very "diffident" tool. I scrupled to trust it my deposit without a serious adaptation (this was one of the reasons why I created Two-Channel Methods).
Conclusion
The application field of the considered code is not limited to testing of indicators. You can insert the same mechanism into a trading EA. In this case, you will be able to both "seal" the debugged code and accumulate the history of the behavior of your EA and indicators working with this EA to analyze the EA's trading results for the indicators used for calculation of EA's signals. This can accelerate the debugging of an EA trading on a real account.
An important feature of the proposed indicators testing method is the possibility to screenshot. Many image viewers (for example, free IrfanView) can display files in the paging mode. Pressing PageDown, you go to the next screenshot like you would do manually when going to the next bar in Tester. What you cannot do in Tester, but easily can do in IrfanView is going to the preceding bar. Just press PageUp - and you will "page the history back". One more pressing - and you are even deeper in history.
This allows you both view the indicators' behavior and study them, and find out about the reasons why they work incorrectly.