Developing a trading Expert Advisor from scratch (Part 21): New order system (IV)
Daniel Jose | 1 September, 2022
Introduction
In the previous article, Developing a trading Expert Advisor from scratch (Part 20), we considered the main changes that need to be made to get the visual system of orders. However, further steps required more explanation, so I decided to split the article into several parts. Here we will finish making the main changes. There will be quite a few of them, but they are all necessary. Well, the whole work will be quite interesting. However, I will not complete the work here, because there is still something left to do to really finish the system. Anyway, by the end of this article, the system will have almost all the necessary functionality.
Let us move on directly to the implementation.
1.0. Implementation
First of all, let us add a Close or Cancel button for the order. The class responsible for the buttons is shown below.
1.0.1. C_Object_BtnBitMap Class
This class is responsible for supporting bitmap buttons on the chart, as you can see below.
#property copyright "Daniel Jose"
//+------------------------------------------------------------------+
#include "C_Object_Base.mqh"
//+------------------------------------------------------------------+
#define def_BtnClose    "Images\\NanoEA-SIMD\\Btn_Close.bmp"
//+------------------------------------------------------------------+
#resource "\\" + def_BtnClose
//+------------------------------------------------------------------+
class C_Object_BtnBitMap : public C_Object_Base
{
        public  :
//+------------------------------------------------------------------+
		void Create(string szObjectName, string szResource1, string szResource2 = NULL)
                        {
                                C_Object_Base::Create(szObjectName, OBJ_BITMAP_LABEL);
                                ObjectSetString(Terminal.Get_ID(), szObjectName, OBJPROP_BMPFILE, 0, "::" + szResource1);
                                ObjectSetString(Terminal.Get_ID(), szObjectName, OBJPROP_BMPFILE, 1, "::" + (szResource2 == NULL ? szResource1 : szResource2));
                                ObjectSetInteger(Terminal.Get_ID(), szObjectName, OBJPROP_STATE, false);
                        };
//+------------------------------------------------------------------+
                bool GetStateButton(string szObjectName) const
                        {
                                return (bool) ObjectGetInteger(Terminal.Get_ID(), szObjectName, OBJPROP_STATE);
                        }
//+------------------------------------------------------------------+
};
When writing this code class, I realized that the positioning class could be moved to the C_Object_Base class. The whole C_Object_BackGround class would eliminate this code as it would belong to a lower class. This is known as code reuse. This approach involves less programming, increases performance, but above all the code becomes more stable as the modifications are checked more frequently.
To add a CLOSE button, we will do the following:
#property copyright "Daniel Jose"
//+------------------------------------------------------------------+
#include "C_Object_TradeLine.mqh"
#include "C_Object_BtnBitMap.mqh"
//+------------------------------------------------------------------+
class C_ObjectsTrade
{

// ... Class code ...

}
The next step
enum eEventType {EV_GROUND = 65, EV_LINE, EV_CLOSE};
And the next step
C_Object_BackGround     m_BackGround;
C_Object_TradeLine      m_TradeLine;
C_Object_BtnBitMap      m_BtnClose;
And the next step
inline void CreateIndicatorTrade(ulong ticket, eIndicatorTrade it)
                        {
                                color cor1, cor2;
                                string sz0;


// ... Internal function code ...

                                switch (it)
                                {
                                        case IT_TAKE:
                                        case IT_STOP:
                                                m_BackGround.Size(sz0, 92, 22);
                                                break;
                                        case IT_PENDING:
                                                m_BackGround.Size(sz0, 110, 22);
                                                break;
                                }
                                m_BtnClose.Create(MountName(ticket, it, EV_CLOSE), def_BtnClose);
                        }
And the next step
#define macroDelete(A)  {                                                               \
                ObjectDelete(Terminal.Get_ID(), MountName(ticket, A, EV_GROUND));       \
                ObjectDelete(Terminal.Get_ID(), MountName(ticket, A, EV_LINE));         \
                ObjectDelete(Terminal.Get_ID(), MountName(ticket, A, EV_CLOSE));        \
                        }

inline void RemoveIndicatorTrade(ulong ticket, eIndicatorTrade it = IT_NULL)
                        {
                                ChartSetInteger(Terminal.Get_ID(), CHART_EVENT_OBJECT_DELETE, false);
                                if ((it != NULL) && (it != IT_PENDING) && (it != IT_RESULT)) macroDelete(it)
                                else
                                {
                                        macroDelete(IT_PENDING);
                                        macroDelete(IT_RESULT);
                                        macroDelete(IT_TAKE);
                                        macroDelete(IT_STOP);
                                }
                                ChartSetInteger(Terminal.Get_ID(), CHART_EVENT_OBJECT_DELETE, true);
                        }
#undef macroDelete
And finally, the last step...
#define macroSetAxleY(A)        {                                               \
                m_BackGround.PositionAxleY(MountName(ticket, A, EV_GROUND), y); \
                m_TradeLine.PositionAxleY(MountName(ticket, A, EV_LINE), y);    \
                m_BtnClose.PositionAxleY(MountName(ticket, A, EV_CLOSE), y);    \
                                }

#define macroSetAxleX(A, B)     {                                               \
                m_BackGround.PositionAxleX(MountName(ticket, A, EV_GROUND), B); \
                m_TradeLine.PositionAxleX(MountName(ticket, A, EV_LINE), B);    \
                m_BtnClose.PositionAxleX(MountName(ticket, A, EV_CLOSE), B + 3);\
                                }
inline void PositionAxlePrice(double price, ulong ticket, eIndicatorTrade it, int FinanceTake, int FinanceStop, int Leverange, bool isBuy)
                        {

// ... Internal code...

                        }
#undef macroSetAxleX
#undef macroSetAxleY
When you execute this system, you will get the following result:
But this button still does not work, although MetaTrader 5 generates an event for the button to be processed by the Expert Advisor. We have not yet implemented this functionality. We will get back to it a little later in this article.
1.0.2. The C_Object_Edit class
The system would be useless if it could not inform the trader about the values being traded. For this purpose, we have the C_Object_Edit class. The class will have to undergo some changes later to increase functionality, but for now we will leave it as is: it will inform the trader about what is going on. To implement this, we need to add a few code lines into the class. The first snippet which contains the new code:
void Create(string szObjectName, color cor, int InfoValue)
{
        C_Object_Base::Create(szObjectName, OBJ_EDIT);
        ObjectSetString(Terminal.Get_ID(), szObjectName, OBJPROP_FONT, "Lucida Console");
        ObjectSetInteger(Terminal.Get_ID(), szObjectName, OBJPROP_FONTSIZE, 10);
        ObjectSetInteger(Terminal.Get_ID(), szObjectName, OBJPROP_ALIGN, ALIGN_CENTER);
        ObjectSetInteger(Terminal.Get_ID(), szObjectName, OBJPROP_COLOR, clrBlack);
        ObjectSetInteger(Terminal.Get_ID(), szObjectName, OBJPROP_BORDER_COLOR, clrBlack);
        ObjectSetInteger(Terminal.Get_ID(), szObjectName, OBJPROP_READONLY, true);
        SetTextValue(szObjectName, InfoValue, cor);
}
The highlighted code prevents the values from being changed by the trader, but as I said, this will change in the future. This will require some other changes which are not relevant at the moment.
The following function causes the text to be displayed. Pay attention to one detail in this function:
void SetTextValue(string szObjectName, int InfoValue, color cor = clrNONE)
{
        color clr;
        clr = (cor != clrNONE ? cor  : (InfoValue < 0 ? def_ColorNegative : def_ColoPositive));
        ObjectSetString(Terminal.Get_ID(), szObjectName, OBJPROP_TEXT, IntegerToString(InfoValue < 0 ? -(InfoValue) : InfoValue));
        ObjectSetInteger(Terminal.Get_ID(), szObjectName, OBJPROP_BGCOLOR, clr);
}
The selected code will show the color of the text background based on the input value. It's important that we do this here, as we don't want to constantly try to guess if a value is negative or positive, or spend time trying to determine if there is a negative value in the text. It is very convenient to look and immediately understand whether the value is positive or negative. This is what the code does: now you can instantly determine, whether the value is negative or positive, based on the color. But there is a condition requiring that the color should not be previously defined. This will also be useful later.
Next we have the last function of this class shown below.
long GetTextValue(string szObjectName) const
{
        return (StringToInteger(ObjectGetString(Terminal.Get_ID(), szObjectName, OBJPROP_TEXT)) *
                                (ObjectGetInteger(Terminal.Get_ID(), szObjectName, OBJPROP_BGCOLOR) == def_ColorNegative ? -1 : 1));
};
You may notice that when we represent values, they will always be positive due to their formatting. But when we check the contents of an object, we must have the correct information. This is where the highlighted code is used. This is where the color information is used: if the color indicates that the value is negative, it will be corrected to provide the EA the correct information. If the color indicates a positive value, then the value will simply be saved.
Color definitions are located in the class itself. These can be modified if you want to set other colors later but be sure to use different colors so that the previous function works correctly, otherwise the EA will get ambiguous values. So, the EA may see negative values as positive, which will cause problems in the entire analysis performed by the EA.
1.0.3. The C_Object_Label class
This is the last class we need at this stage. Actually, I was thinking about not creating this class, as its actions are similar to the C_Object_BtnBitMap class. But since I wanted to be able to add text information independently of the C_Object_Edit class, I decided to create a new class here.
Its code is super simple, see below.
#property copyright "Daniel Jose"
//+------------------------------------------------------------------+
#include "C_Object_Edit.mqh"
//+------------------------------------------------------------------+
class C_Object_Label : public C_Object_Edit
{
        public  :
//+------------------------------------------------------------------+
                void Create(string szObjectName, string Font = "Lucida Console", string szTxt = "", int FontSize = 10, color cor = clrBlack)
                        {
                                C_Object_Base::Create(szObjectName, OBJ_LABEL);
                                ObjectSetString(Terminal.Get_ID(), szObjectName, OBJPROP_FONT, Font);
                                ObjectSetString(Terminal.Get_ID(), szObjectName, OBJPROP_TEXT, szTxt);
                                ObjectSetInteger(Terminal.Get_ID(), szObjectName, OBJPROP_FONTSIZE, FontSize);
                                ObjectSetInteger(Terminal.Get_ID(), szObjectName, OBJPROP_COLOR, cor);
                        };
//+------------------------------------------------------------------+
};
We don’t need anything else in this class, as all the rest of the work has already been implemented by lower class objects.
As you can see, OOP is a very powerful tool. The more we organize code into classes, the less we need to program classes that are similar to each other.
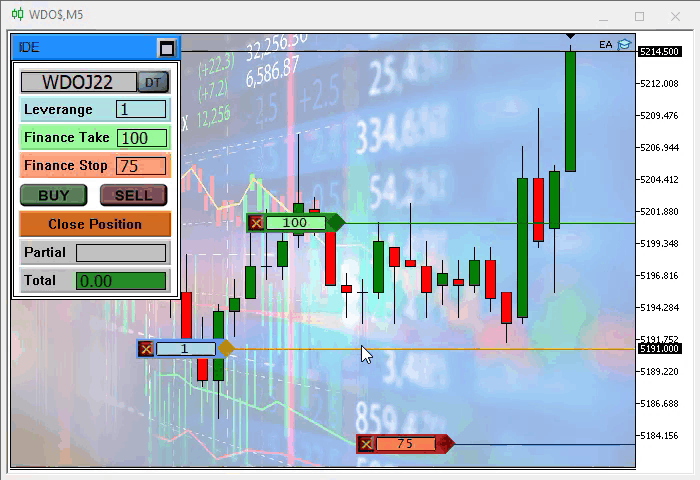
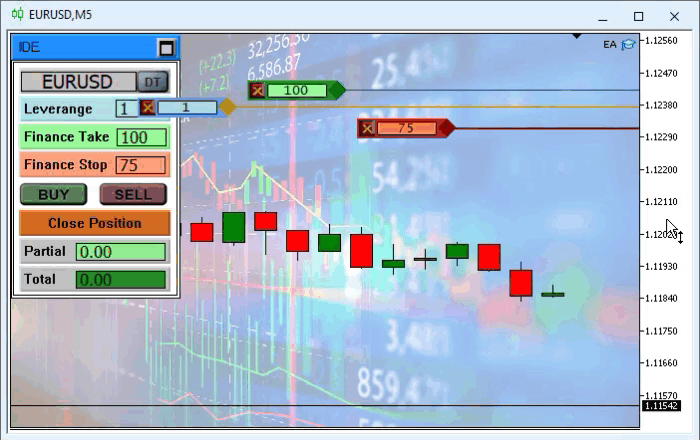
But there is a small change that we need to implement. While experimenting, I noticed that it is very difficult to interpret the panel data, so I changed it as follows.


This way it is easier to display large values. This is how the resulting object will look like: the upper part shows the number of contracts or the leverage factor of the open position, while the lower part shows the position result.
To implement this, we need to change the C_Object_Base class which is mainly responsible for the positioning of objects. The changes are highlighted in the code below.
virtual void PositionAxleY(string szObjectName, int Y, int iArrow = 0)
                        {
                                int desl = (int)ObjectGetInteger(Terminal.Get_ID(), szObjectName, OBJPROP_YSIZE);
                                ObjectSetInteger(Terminal.Get_ID(), szObjectName, OBJPROP_YDISTANCE, (iArrow == 0 ? Y - (int)(desl / 2) : (iArrow == 1 ? Y : Y - desl)));
                        };
After that, we can move on to the next step: changing the C_ObjectsTrade class.
1.0.4 The C_ObjectsTrade class
Now let's complete drawing the required objects after which we will really be able to get the desired result on the chart: we will have all of the presented information and all its connected objects. It is not difficult, we will analyze the actions step by step. If you understand how it's done, you will be able to add any other information you want by simply following the instructions and you'll be fine. The first thing we need to do is define new events that the objects should respond to. They are highlighted in the code below.
enum eEventType {EV_GROUND = 65, EV_LINE, EV_CLOSE, EV_EDIT, EV_VOLUME, EV_MOVE};
Now let's add the required objects. The new objects are also highlighted in the code below:
C_Object_BackGround     m_BackGround;
C_Object_TradeLine      m_TradeLine;
C_Object_BtnBitMap      m_BtnClose;
C_Object_Edit           m_EditInfo,
                        m_InfoVol;
C_Object_Label          m_BtnMove;
After that, we create objects and define how they will look like on the screen. Please note that the objects must be created in the same order in which they should appear: first the background object, then the next object to be placed over the background and so on, until all objects are created. If you do it in a wrong order and one of the objects is hidden, simply change its position in this code. Now, here is the code:
inline void CreateIndicatorTrade(ulong ticket, eIndicatorTrade it)
{
        color cor1, cor2, cor3;
        string sz0;
        int infoValue;

        switch (it)
        {
                case IT_TAKE    :
                        infoValue = m_BaseFinance.FinanceTake;
                        cor1 = clrForestGreen;
                        cor2 = clrDarkGreen;
                        cor3 = clrNONE;
                        break;
                case IT_STOP    :
                        infoValue = - m_BaseFinance.FinanceStop;
                        cor1 = clrFireBrick;
                        cor2 = clrMaroon;
                        cor3 = clrNONE;
                        break;
                case IT_PENDING:
                        infoValue = m_BaseFinance.Leverange;
                        cor1 = clrCornflowerBlue;
                        cor2 = clrDarkGoldenrod;
                        cor3 = clrLightBlue;
                        break;
                case IT_RESULT  :
                default:
                        infoValue = m_BaseFinance.Leverange;
                        cor1 = clrDarkBlue;
                        cor2 = clrDarkBlue;
                        cor3 = clrSilver;
                        break;
                }
                m_TradeLine.Create(MountName(ticket, it, EV_LINE), cor2);
                if (ticket == def_IndicatorTicket0) m_TradeLine.SpotLight(MountName(ticket, IT_PENDING, EV_LINE));
                m_BackGround.Create(sz0 = MountName(ticket, it, EV_GROUND), cor1);
                switch (it)
                {
                        case IT_TAKE:
                        case IT_STOP:
                        case IT_PENDING:
                                m_BackGround.Size(sz0, 92, 22);
                                break;
                        case IT_RESULT:
                                m_BackGround.Size(sz0, 84, 34);
                                break;
                }
                m_BtnClose.Create(MountName(ticket, it, EV_CLOSE), def_BtnClose);
                m_EditInfo.Create(sz0 = MountName(ticket, it, EV_EDIT), cor3, infoValue);
                m_EditInfo.Size(sz0, 60, 14);
                if (it != IT_RESULT) m_BtnMove.Create(MountName(ticket, it, EV_MOVE), "Wingdings", "u", 17, cor2);
                else
                {
                        m_InfoVol.Create(sz0 = MountName(ticket, it, EV_VOLUME), clrNONE, infoValue);
                        m_InfoVol.Size(sz0, 60, 14);
                }
}
All the highlighted lines are the additions to the code made since the last version presented in the previous article. Now we can write the code for the following function.
#define macroDelete(A)  {                                                                       \
                ObjectDelete(Terminal.Get_ID(), MountName(ticket, A, EV_GROUND));               \
                ObjectDelete(Terminal.Get_ID(), MountName(ticket, A, EV_LINE));                 \
                ObjectDelete(Terminal.Get_ID(), MountName(ticket, A, EV_CLOSE));                \
                ObjectDelete(Terminal.Get_ID(), MountName(ticket, A, EV_EDIT));                 \
                if (A != IT_RESULT)                                                             \
                        ObjectDelete(Terminal.Get_ID(), MountName(ticket, A, EV_MOVE));         \
                else                                                                            \
                        ObjectDelete(Terminal.Get_ID(), MountName(ticket, A, EV_VOLUME));       \
                        }

inline void RemoveIndicatorTrade(ulong ticket, eIndicatorTrade it = IT_NULL)
                        {
                                ChartSetInteger(Terminal.Get_ID(), CHART_EVENT_OBJECT_DELETE, false);
                                if ((it != NULL) && (it != IT_PENDING) && (it != IT_RESULT)) macroDelete(it)
                                else
                                {
                                        macroDelete(IT_PENDING);
                                        macroDelete(IT_RESULT);
                                        macroDelete(IT_TAKE);
                                        macroDelete(IT_STOP);
                                }
                                ChartSetInteger(Terminal.Get_ID(), CHART_EVENT_OBJECT_DELETE, true);
                        }
#undef macroDelete
Note the advantage of using the macro: I had to add only the highlighted parts so that we can delete all objects of the panel. Now we are using 6 objects in 4 panels. If this were implemented in a different way, this would require too much work and thus would have a high probability of errors. Let's finishing the positioning function.
#define macroSetAxleY(A)        {                                                                       \
                m_BackGround.PositionAxleY(MountName(ticket, A, EV_GROUND), y);                         \
                m_TradeLine.PositionAxleY(MountName(ticket, A, EV_LINE), y);                            \
                m_BtnClose.PositionAxleY(MountName(ticket, A, EV_CLOSE), y);                            \
                m_EditInfo.PositionAxleY(MountName(ticket, A, EV_EDIT), y, (A == IT_RESULT ? -1 : 0));  \
                if (A != IT_RESULT)                                                                     \
                        m_BtnMove.PositionAxleY(MountName(ticket, A, EV_MOVE), y);                      \
                else                                                                                    \
                        m_InfoVol.PositionAxleY(MountName(ticket, A, EV_VOLUME), y, 1);                 \
                                }

#define macroSetAxleX(A, B)     {                                                               \
                m_BackGround.PositionAxleX(MountName(ticket, A, EV_GROUND), B);                 \
                m_TradeLine.PositionAxleX(MountName(ticket, A, EV_LINE), B);                    \
                m_BtnClose.PositionAxleX(MountName(ticket, A, EV_CLOSE), B + 3);                \
                m_EditInfo.PositionAxleX(MountName(ticket, A, EV_EDIT), B + 21);                \
                if (A != IT_RESULT)                                                             \
                        m_BtnMove.PositionAxleX(MountName(ticket, A, EV_MOVE), B + 80);         \
                else                                                                            \
                        m_InfoVol.PositionAxleX(MountName(ticket, A, EV_VOLUME), B + 21);       \
                                }

inline void PositionAxlePrice(double price, ulong ticket, eIndicatorTrade it, int FinanceTake, int FinanceStop, int Leverange, bool isBuy)
                        {
                                double ad;
                                int x, y;

                                ChartTimePriceToXY(Terminal.Get_ID(), 0, 0, price, x, y);
                                macroSetAxleY(it);
                                macroSetAxleX(it, m_PositionMinimalAlxeX);
                                if (Leverange == 0) return;
                                if (it == IT_PENDING)
                                {
                                        ad = Terminal.GetAdjustToTrade() / (Leverange * Terminal.GetVolumeMinimal());
                                        ChartTimePriceToXY(Terminal.Get_ID(), 0, 0, price + Terminal.AdjustPrice(FinanceTake * (isBuy ? ad : (-ad))), x, y);
                                        macroSetAxleY(IT_TAKE);
                                        macroSetAxleX(IT_TAKE, m_PositionMinimalAlxeX + 110);
                                        ChartTimePriceToXY(Terminal.Get_ID(), 0, 0, price + Terminal.AdjustPrice(FinanceStop * (isBuy ? (-ad) : ad)), x, y);
                                        macroSetAxleY(IT_STOP);
                                        macroSetAxleX(IT_STOP, m_PositionMinimalAlxeX + 220);
                                }
                        }
#undef macroSetAxleX
#undef macroSetAxleY
Again, very little code has been added. Even so, the function can work with all elements because it correctly positions them thanks to the use of macros. After compiling the EA at this stage, we get the following result:
Although everything is looks nice, these controls still do not work: we must implement events for each of the objects. Without the events this interface is almost useless, since the only thing it will actually do is replace the originally used lines.
2.0. How to fix the problem
If it were simple, everyone could do it. But we always have problems to solve, and this is part of the development process. I could just provide the solution instead of showing how to solve. But I want these articles to motivate you to deal with problems and to learn how to actually program. So there will be something interesting in this section.
2.0.1. Adjusting things as the chart updates
This is the first problem we have. It is caused by the fact that the positions of the objects are not updated together with the chart update. To understand this, take a look at the gif below:

Things like this can be maddening, but the solution is very simple: MetaTrader 5 itself generates an event notifying that the chart needs to be updated. So, what we need to do is capture the event and update our order system.
The change should be captured at the CHARTEVENT_CHART_CHANGE event call. Updating is easier if you use the UpdatePosition function, which is present in the EA code. All we need to do is add only one line to our code. This is done in the C_OrderView as shown below:
void DispatchMessage(int id, long lparam, double dparam, string sparam)
{

// ... Code ....

        switch (id)
        {
                case CHARTEVENT_CHART_CHANGE:
                        SetPositionMinimalAxleX();
                        UpdatePosition();
                        break;

// ... The rest of the code...
This simple solution has one problem: if you have many orders for an asset, it may take some time, due to which the EA can get stuck with updating before it can move on to further processing. There are other more complicated solutions which speed up the process. But this solution is quite enough for this system. The result is as follows.
Everything seems to be correct, doesn't it? But there is an error here. It's hard to see it until we test the system. But there is indeed a flaw in this system that, even after fixing, does not go anywhere.
2.0.2. EA, please stop selecting elements automatically
If you look at the gif above, you will notice that the stop line is selected, although we did not select it. The EA does this every time. Depending on the settings at the panel creation time, it may happen that the RA will select the take profit or the position line, and so on every time the chart is moved.
You can go crazy trying to understand what's going on, but the solution is even simpler than the previous one: just add one line to the same code, and the EA will automatically stop selecting a line. The fix is highlighted in the code below.
inline void CreateIndicatorTrade(ulong ticket, eIndicatorTrade it)
{
        color cor1, cor2, cor3;
        string sz0;
        double infoValue;

// ... Internal code...

        Select(NULL);
}
These things will always happen during development. I mean the bugs, those easy to spot and those less obvious, that we sometimes don't notice at first. Anyway, they can happen. Therefore, learning programming is a continuous process. Sometimes you can solve these problems yourself and share it with everyone to help them solve the same problem. Try to do this. I personally do so practical, because that's how I learned to program. The same way you can also learn how to create programs. Generally, it is part of learning to get a source code and modify it. You should do this with a functional code, so it is simpler to understand how it was built, and this often bears good fruit, as we learn a lot understanding how each programmer has managed to solve a specific problem.
Well but this was just something to motivate you to study. Let's proceed to something really important.
3.0. Event handling
We are going to build a system that will report the result of a position. This will replace the relevant area in Chart Trade, but I will leave Chart Trade as it is, because it indicates the total result of positions. If an account supports hedging, then the value will differ from that specified in the order system, since one is a local value, and another one represents the total value. There will be no such difference on other types of accounts, so if you wish, you can remove the results system from Chart Trade.
3.0.1. View position result
Those who see the code for the first time can be lost, not knowing where to search for information, and can be creating other operations to do something that the original code already does. This is what usually leads to many problems - we may generate extra code that generates extra bugs that the original code did not have. This is not compliant with the REUSE rule, according to which you should program only when really necessary. So, knowing how MetaTrader 5 works, and knowing how the EA is already working, you should find the place where the result shown in Chart Trade is generated. Because if the result of the positions is presented, we should use it. Pay attention to the code below.
void OnTick()
{
        Chart.DispatchMessage(CHARTEVENT_CHART_CHANGE, 0, OrderView.CheckPosition(), C_Chart_IDE::szMsgIDE[C_Chart_IDE::eRESULT]);
        TimesAndTrade.Update();
}
Next, we move on to the highlighted point. The source code is shown below.
inline double CheckPosition(void)
                        {
                                double Res = 0, sl, profit, bid, ask;
                                ulong ticket;

                                bid = SymbolInfoDouble(Terminal.GetSymbol(), SYMBOL_BID);
                                ask = SymbolInfoDouble(Terminal.GetSymbol(), SYMBOL_ASK);
                                for (int i0 = PositionsTotal() - 1; i0 >= 0; i0--) if (PositionGetSymbol(i0) == Terminal.GetSymbol())
                                {
                                        ticket = PositionGetInteger(POSITION_TICKET);
                                        sl = PositionGetDouble(POSITION_SL);
                                        if (PositionGetInteger(POSITION_TYPE) == POSITION_TYPE_BUY)
                                        {
                                                if (ask < sl) ClosePosition(ticket);
                                        }else
                                        {
                                                if ((bid > sl) && (sl > 0)) ClosePosition(ticket);
                                        }
                                        Res += profit;
                                }
                                return Res;
                        };
Well, one might think: but how will I take the data from there and apply it to the panel, if there is no way to know which objects I should refer to? It may seem that the objects were created loose, without any criterion or care... Well, this is not true. If you think or imagine things this way, it would be better to start learning a little more about how the MetaTrader 5 platform actually works. It is quite true that I did not create any kind of list, array or structure that references the objects being created, but this was made of purpose. Because I know it works. I will show you that it really works: you can refer to a certain object without using any structure to store the objects that will be on the chart. What is really needed, is to correctly model the object name. That's it.
Q: How were the object names modeled?
The answer is as follows:
| 1 - Sequence of the header | This sequence will distinguish the object used in the order system from all other objects. |
| 2 - Limiting character | Indicates that some other information is to follow |
| 3 - Type indication | Distinguishes between Take and Stop. |
| 4 - Limiting character | The same as 2. |
| 5 - Order or position ticket | Remembers the order ticket - links OCO order data and distinguishes between orders |
| 6 - Limiting character | The same as 2. |
| 7 - Event indication | Distinguishes between objects within the same panel |
That is, modeling is everything, even if it seems to those who do not actually program that we are creating something repetitive, in fact we are creating something unique - each of the objects is unique and can be referenced through a simple rule. And this rule is created by the following code:
inline string MountName(ulong ticket, eIndicatorTrade it, eEventType ev)
                        {
                                return StringFormat("%s%c%c%c%d%c%c", def_NameObjectsTrade, def_SeparatorInfo, (char)it, def_SeparatorInfo, ticket, def_SeparatorInfo, (char)ev);
                        }
Therefore, if you tell the previous code which order ticket, which indicator, and which event you want to access, you will have the name of a particular object. This allows manipulating its attributes. Knowing that this is the first step, we need to make one more decision: how to make this manipulation safe, without causing havoc in the code and without turning it into Frankenstein?
Now let's do this. Let's go to the C_ObjectsTrade class and add the following code.
inline void SetResult(ulong ticket, double dVolume, double dResult)
                        {
                                m_InfoVol.SetTextValue(MountName(ticket, IT_RESULT, EV_VOLUME), (dVolume / Terminal.GetVolumeMinimal()), def_ColorVolumeResult);
                                m_EditInfo.SetTextValue(MountName(ticket, IT_RESULT, EV_EDIT), dResult);
                        }
Now let's move on to the C_Router class and add the highlighted code.
inline double CheckPosition(void)
                        {
                                double Res = 0, sl, profit, bid, ask;
                                ulong ticket;

                                bid = SymbolInfoDouble(Terminal.GetSymbol(), SYMBOL_BID);
                                ask = SymbolInfoDouble(Terminal.GetSymbol(), SYMBOL_ASK);
                                for (int i0 = PositionsTotal() - 1; i0 >= 0; i0--) if (PositionGetSymbol(i0) == Terminal.GetSymbol())
                                {
                                        ticket = PositionGetInteger(POSITION_TICKET);
                                        SetResult(ticket, PositionGetDouble(POSITION_VOLUME), profit = PositionGetDouble(POSITION_PROFIT));
                                        sl = PositionGetDouble(POSITION_SL);
                                        if (PositionGetInteger(POSITION_TYPE) == POSITION_TYPE_BUY)
                                        {
                                                if (ask < sl) ClosePosition(ticket);
                                        }else
                                        {
                                                if ((bid > sl) && (sl > 0)) ClosePosition(ticket);
                                        }
                                        Res += profit;
                                }
                                return Res;
                        };
This solves one of the problems. But we still have other unsolved problems.
3.0.2. Indicate the volume of the pending order
Now let's solve the problem of the volume indicated in a pending order. To do this we have to create a new function in the C_ObjectsTrade class.
inline void SetVolumePendent(ulong ticket, double dVolume)
                        {
                                m_EditInfo.SetTextValue(MountName(ticket, IT_PENDING, EV_EDIT), dVolume / Terminal.GetVolumeMinimal(), def_ColorVolumeEdit);
                        }
Once this is done, we use the UpdatePosition function from the C_Router class and the update will happen smoothly.
void UpdatePosition(int iAdjust = -1)
{

// ... Internal code ....

        for (int i0 = o; i0 >= 0; i0--) if ((ul = OrderGetTicket(i0)) > 0) if (OrderGetString(ORDER_SYMBOL) == Terminal.GetSymbol())
        {
                price = OrderGetDouble(ORDER_PRICE_OPEN);
                take = OrderGetDouble(ORDER_TP);
                stop = OrderGetDouble(ORDER_SL);
                bTest = CheckLimits(price);
                vol = OrderGetDouble(ORDER_VOLUME_CURRENT);

// ... Internal code...

                CreateIndicatorTrade(ul, price, IT_PENDING);
                SetVolumePendent(ul, vol);
                CreateIndicatorTrade(ul, take, IT_TAKE);
                CreateIndicatorTrade(ul, stop, IT_STOP);
        }
};
Thus, the problem is solved. Now we have to solve the problem of the values indicated as Take and Stop, because these values are not true after we place the order on the chart.
3.0.3. Panel Close button click event
The only safe way to remove an order or one of its stop levels is the Close button located in the corner of each of the values. But here we have an incorrectly implemented event. Let's fix this.
The click event should actually be implemented in the C_OrderView class. We replace the old system with the highlighted code.
void DispatchMessage(int id, long lparam, double dparam, string sparam)
{
        ulong   	ticket;
        double  	price, pp, pt, ps;
        eIndicatorTrade it;
        eEventType 	ev;

        switch (id)
        {

// ... Internal code...
                case CHARTEVENT_OBJECT_CLICK:
                        if (GetInfosOrder(sparam, ticket, price, it, ev))
                        {
                                switch (ev)
                                {
                                        case EV_CLOSE:
                                                if (OrderSelect(ticket)) switch (it)
                                                {
                                                        case IT_PENDING:
                                                                RemoveOrderPendent(ticket);
                                                                break;
                                                        case IT_TAKE:
                                                                ModifyOrderPendent(ticket, OrderGetDouble(ORDER_PRICE_OPEN), 0, OrderGetDouble(ORDER_SL));
                                                                break;
                                                        case IT_STOP:
                                                                ModifyOrderPendent(ticket, OrderGetDouble(ORDER_PRICE_OPEN), OrderGetDouble(ORDER_TP), 0);
                                                                break;
                                                }
                                                if (PositionSelectByTicket(ticket)) switch (it)
                                                {
                                                        case IT_RESULT:
                                                                ClosePosition(ticket);
                                                                break;
                                                        case IT_TAKE:
                                                                ModifyPosition(ticket, 0, PositionGetDouble(POSITION_SL));
                                                                break;
                                                        case IT_STOP:
                                                                ModifyPosition(ticket, PositionGetDouble(POSITION_TP), 0);
                                                                break;
                                                }
                                                break;

// ... Rest of the code...
There is another thing to add in this class. What would happen if the trader accidentally deleted an object that reports position data? To avoid this, the following code has been added to the system.
void DispatchMessage(int id, long lparam, double dparam, string sparam)
{
        ulong           ticket;
        double          price, pp, pt, ps;
        eIndicatorTrade it;
        eEventType      ev;

        switch (id)
        {
                case CHART_EVENT_OBJECT_DELETE:
                case CHARTEVENT_CHART_CHANGE:
                        SetPositionMinimalAxleX();
                        UpdatePosition();
                        break;

// ... Rest of the code...
This way, if the operator deletes something it shouldn't, the EA will quickly replace the deleted object.
The following video shows how the system is currently working. There were also some changes that I did not cover in the article, because these were minor changes that would not affect the explanation.
Conclusion
While the system appears to be complete and you may want to trade with it, I must warn you that it is not yet complete. This article was supposed to show you how you can add and change things to have a much more practical and easier to use the order system. But it still lacks the system responsible for moving positions and that is what will make the EA very instructive, practical and intuitive to use. But we will leave that for the next article.
The attachment contains the system as at the current stage of development.