Developing a trading Expert Advisor from scratch (Part 8): A conceptual leap
Daniel Jose | 21 June, 2022
Introduction
Sometimes, when developing some projects, we may find new ideal and new possible features that can come in handy and provide a big improvement to the system we are creating. But the question arises: what is the easiest way to implement the new functionality?
But the problem is that sometimes we have to forget everything that has already been developed and start from scratch. This is quite demotivating. Over time, after over 20 years of C++ programming, I developed a certain line of thinking. We develop some concepts that help us plan things and make changes with minimal effort, but sometimes things can change and become much more complex than we initially estimated.
Until now, we have been building the EA in such a way that it can receive new code without losing the current functionality: we have been simply creating and adding classes. Now we need to take a step back and then to make two steps forward. This step back will allow us to introduce new functionality. This functionality is a window class with some information based on templates; this is what will be the first part here. We will radically change the code, while keeping all the functionality that we have at the moment, and in the second part we will deal with the IDE.
Planning
Our Expert Advisor is currently structured in an object class. This can be seen in the diagram below.
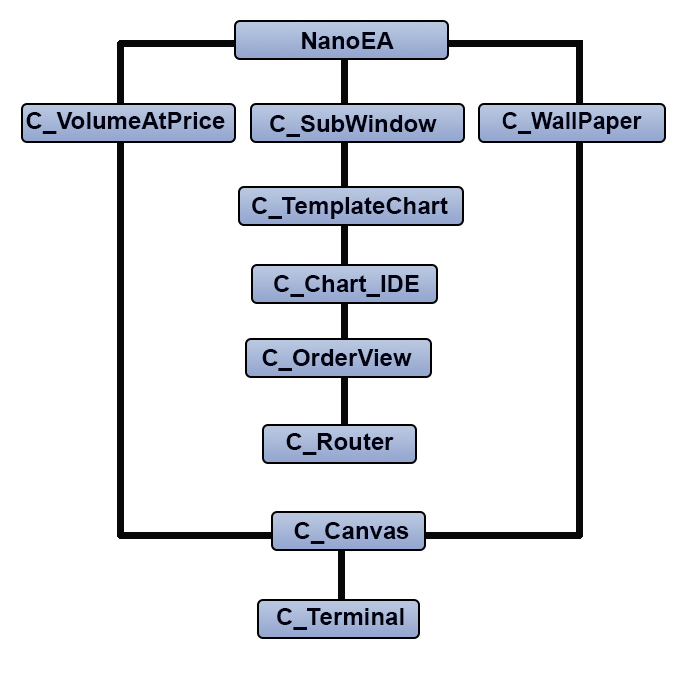
The system is currently well functioning and is very stable. But now we will have to restructure the EA as shown below. You may notice that there is an additional class, while the positions of C_TemplateChart and C_SubWindow have changed.
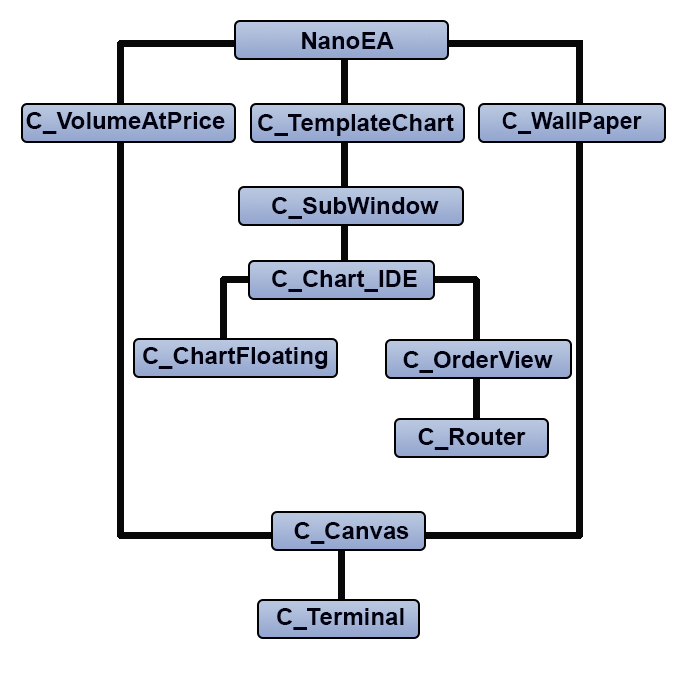
What's the purpose of such a restructuring? The problem is that the way in which floating windows were implemented is not suitable for windows containing asset data, and therefore such changes are necessary. However, this change is not only aesthetic in terms of structure, but it also required an extreme change in the code, so it will be very different from the previous code.
So, let's get to work.
Implementation in practice
1. Changes in the internal code of the Expert Advisor
The first big change starts in the EA initialization file. See the code below:
input group "Window Indicators"
input string                    user01 = "";                    //Subwindow indicators
input group "WallPaper"
input string                    user10 = "Wallpaper_01";        //Used BitMap
input char                      user11 = 60;                    //Transparency (from 0 to 100)
input C_WallPaper::eTypeImage   user12 = C_WallPaper::IMAGEM;   //Chart background type
input group "Chart Trader"
input int                       user20   = 1;                   //Leverage factor
input int                       user21   = 100;                 //Take Profit (financial)
input int                       user22   = 75;                  //Stop Loss (financial)
input color                     user23   = clrBlue;             //Price line color
input color                     user24   = clrForestGreen;      //Take Profit line color
input color                     user25   = clrFireBrick;        //Stop line color
input bool                      user26   = true;                //Day Trade?
input group "Volume At Price"
input color                     user30  = clrBlack;             //Bar color
input char                      user31  = 20;                   //Transparency (from 0 to 100 )
//+------------------------------------------------------------------+
C_TemplateChart Chart;
C_WallPaper     WallPaper;
C_VolumeAtPrice VolumeAtPrice;
//+------------------------------------------------------------------+
int OnInit()
{
        static string   memSzUser01 = "";

        Terminal.Init();
        WallPaper.Init(user10, user12, user11);
        if (memSzUser01 != user01)
        {
                Chart.ClearTemplateChart();
                Chart.AddThese(memSzUser01 = user01);
        }
        Chart.InitilizeChartTrade(user20, user21, user22, user23, user24, user25, user26);
        VolumeAtPrice.Init(user24, user25, user30, user31);

   OnTrade();
        EventSetTimer(1);

        return INIT_SUCCEEDED;
}
//+------------------------------------------------------------------+
Note that now we only have one variable which indicates which templates will be loaded. The rest of the code seems to be as it was, except for the highlighted part. It may not be entirely clear what it does here, or why this highlighted code was placed in the EA initialization part. When we load the EA onto a chart, it creates some things and in normal use they can be modified. Previously, there was no point in adding the highlighted code, because everything was intended to work together, and changes did not affect the EA behavior or appearance. But when we add floating indicators, something annoying happens: each time we change the timeframe, the EA restarts and the windows go back to their original state. If you do not destroy them, useless things will be accumulated on the chart, and if you destroy them incorrectly, they will be rebuilt in their original places which is also a big inconvenience. If the user does not change the required templates, the highlighted code will prevent floating windows from being destroyed incorrectly, but if there are changes to the templates, the EA will restart normally. This is very simple yet extremely efficient.
The next thing to pay attention to is related to the internal messaging system. Previously it had an additional variable, but we removed it, so the code now looks as follows:
void OnTick()
{
        Chart.DispatchMessage(CHARTEVENT_CHART_CHANGE, 0, NanoEA.CheckPosition(), C_Chart_IDE::szMsgIDE[C_Chart_IDE::eRESULT]);
}
The system now uses the MQL5 message exchange system more efficiently, while message sending is very similar to the OnChartEvent function itself. This allows the passing of parameters without any stress to the object class so that each class can process event messages generated by the MetaTrader 5 system in the most appropriate way. In this way, we further isolate each object class, and thus the EA can take on more diverse forms for each type of user and with less effort.
2. Changes in subwindow support code
Up to this point, the subwindow code was very simple, but it had a problem: for one reason or another, the EA could not delete the created subwindow. When the Expert Advisor was reopened, a new subwindow was created, due to which the control in the system was lost. Surprisingly, it was very easy to fix it. First, take a look at the fragment of the support file shown below:
int OnInit()
{
        IndicatorSetString(INDICATOR_SHORTNAME, "SubWinSupport");

        return INIT_SUCCEEDED;
}
The highlighted line will create an alias for the support file. The EA will see this alias EA and will check if the subwindow system is loaded or not. This is done regardless of the file name as the EA only checks the alias. The same code type will be used later to support other things in the EA. I will not go into too much detail here but later, in another article, I will explain how to take the advantage of the highlighted code.
Now that this is done, let's take a look at the code which loads and creates subwindows. It is shown below:
void Init(void)
{
        int i0;
        if ((i0 = ChartWindowFind(Terminal.Get_ID(), def_Indicador)) == -1)
                ChartIndicatorAdd(Terminal.Get_ID(), i0 = (int)ChartGetInteger(Terminal.Get_ID(), CHART_WINDOWS_TOTAL), iCustom(NULL, 0, "::" + def_Resource));
        m_IdSubWinEA = i0;
}
As you can see, it's much simpler, but this code is not public, it is accessed through another code that is public:
inline int GetIdSubWinEA(void)
{
        if (m_IdSubWinEA < 0) Init();
        return m_IdSubWinEA;
}
But why is it implemented this way? It may happen so that the EA does not use any indicators in the subwindow, and when the system realizes this, it removes the subwindow from the chart and creates it only if necessary. But this decision is made not by the EA code, but by the C_TemplateChart class.
Take a look at the following animation:
Notice that we now have a vertical line that indicates where we are analyzing. Such lines are independent of each other. They were not available previously, which made it difficult to analyze some points of the indicator depending on the chart. This is one of the improvements included in the C_TemplateChart class. Let's look at the code inside the class to understand further changes, as they were substantial.
Let's look at the following code where the variables are declared:
class C_TemplateChart : public C_SubWindow
{
#define def_MaxTemplates                8
#define def_NameTemplateRAD     "IDE"
//+------------------------------------------------------------------+
        private :
//+------------------------------------------------------------------+
        enum eParameter {TEMPLATE = 0, PERIOD, SCALE, WIDTH, HEIGHT};
//+------------------------------------------------------------------+
                struct st
                {
                        string          szObjName,
                                        szSymbol,
                                        szTemplate,
                                        szVLine;
                        int             width,
                                        scale;
                        ENUM_TIMEFRAMES timeframe;
                        long            handle;
                }m_Info[def_MaxTemplates];
                int     m_Counter,
                        m_CPre,
                        m_Aggregate;
                struct st00
                {
                        int     counter;
                        string  Param[HEIGHT + 1];
                }m_Params;
The first thing to pay attention to is that the C_TemplateChart class will extend the C_SubWindow class. This part of code doesn't seem special but pay attention to the highlighted part: it points to an internal data analysis system with which it is possible to create and present user-requested indicators appropriately. Now the system for describing how the user will indicate things started to be standardized. Even if it seems confusing, it will become clear over time. To explain the new format, it is necessary to analyze the following fragment, which is responsible for analyzing the user's request:
int GetCommand(int iArg, const string szArg)
{
        for (int c0 = TEMPLATE; c0 <= HEIGHT; c0++) m_Params.Param[c0] = "";
        m_Params.counter = 0;
        for (int c1 = iArg, c2 = 0; szArg[iArg] != 0x00; iArg++) switch (szArg[iArg])
        {
                case ')':
                case ';':
                        m_Params.Param[m_Params.counter++] = StringSubstr(szArg, c1, c2);
                        for (; (szArg[iArg] != 0x00) && (szArg[iArg] != ';'); iArg++);
                        return iArg + 1;
                case ' ':
                        c2 += (c1 == iArg ? 0 : 1);
                        c1 = (c1 == iArg ? iArg + 1 : c1);
                        break;
                case '(':
                case ',':
                        c2 = (m_Params.counter == SCALE ? (c2 >= 1 ? 1 : c2) : c2);
                        m_Params.Param[m_Params.counter++] = StringSubstr(szArg, c1, c2);
                        c2 = 0;
                        c1 = iArg + 1;
                        break;
                default:
                        c2++;
                        break;
        }
        return -1;
}
First of all, clear all the data that was previously in the structure. Then start analyzing and receiving parameter by parameter, if there are any. They are not required, but they indicate how things will be presented to the user. This system is self-expanding. So, if you want to add more information, you just need to specify it in the eParameter enumeration. Currently the system has five parameters, and they should be specified in the same order as they are indicated in the eParameters enumeration. This enum is highlighted in the variable declaration part. The parameters in the correct order and what their explanations are shown below.
| Parameter | Result |
|---|---|
| 1. TEMPLATE or ASSET | Specifies which template or asset to view |
| 2. PERIOD | If specified, will set the indicator to a specified fixed period, just as it was used before |
| 3. SCALE | If specified, the indicator will be bound to a fixed scale. |
| 4. WIDTH | If specified, the parameter will set how wide the indicator will be in the window. |
| 5. HEIGHT | This new parameter will be discussed later in this article - it indicates the use of a floating window. |
The only structure that will not benefit from parameter 5 at the moment is IDE, but this will be fixed and in the next article I will show how to benefit from IDE. This article will focus on other systems.
Now suppose that for one reason or another we want to allow the user to control the color of the indicator's vertical line. There is no need to make any changes to the parameter analyzing code - simply make the change as follows:
class C_TemplateChart : public C_SubWindow
{
#define def_MaxTemplates        8
#define def_NameTemplateRAD     "IDE"
//+------------------------------------------------------------------+
        private :
//+------------------------------------------------------------------+
        enum eParameter {TEMPLATE = 0, COLOR_VLINE, PERIOD, SCALE, WIDTH, HEIGHT};
//+------------------------------------------------------------------+

// ... Internal code ....

                struct st00
                {
                        int     counter;
                        string  Param[HEIGHT + 1];
                }m_Params;
The system will automatically recognize that there can be six parameters in one call. Now another problem has arisen. While the GetCommand code above works fine, there is a bug in it. Often we do not notice this bug when we create the system that we are going to use by ourselves. But when the system is made available for other people to use, the error becomes obvious and may leave some less experienced programmers unsure of how to fix the problem. That is why object-oriented programming is so highly valued — it allows creating the most appropriate model for use in the programs of greatest interest. One of the prerequisites of OOP is to make sure that data and class variables are initialized correctly. To guarantee this, it is important to test everything. Although the GetCommand code seems correct, it contains a bug — it does not check the maximum parameter limit. If the original model only accepts five parameters, what happens if the user sets six parameters? This is something to avoid: we should not assume that everything will work but guarantee that everything will work. Therefore, the code needs to be corrected as shown below (corrections are highlighted).
int GetCommand(int iArg, const string szArg)
{
        for (int c0 = TEMPLATE; c0 <= HEIGHT; c0++) m_Params.Param[c0] = "";
        m_Params.counter = 0;
        for (int c1 = iArg, c2 = 0; szArg[iArg] != 0x00; iArg++) switch (szArg[iArg])
        {
                case ')':
                case ';':
                        m_Params.Param[m_Params.counter++] = StringSubstr(szArg, c1, c2);
                        for (; (szArg[iArg] != 0x00) && (szArg[iArg] != ';'); iArg++);
                        return iArg + 1;
                case ' ':
                        c2 += (c1 == iArg ? 0 : 1);
                        c1 = (c1 == iArg ? iArg + 1 : c1);
                        break;
                case '(':
                case ',':
                        if (m_Params.counter == HEIGHT) return StringLen(szArg) + 1;
                        c2 = (m_Params.counter == SCALE ? (c2 >= 1 ? 1 : c2) : c2);
                        m_Params.Param[m_Params.counter++] = StringSubstr(szArg, c1, c2);
                        c2 = 0;
                        c1 = iArg + 1;
                        break;
                default:
                        c2++;
                        break;
        }
        return -1;
}
By simply adding a single line, we will prevent the system from generating an unexpected result, because if the last parameter expected is HEIGHT, but it is not the last one, this logically means that something is wrong, so the system ignores everything that is declared afterwards and thereby avoids problems.
If you do not understand how the system recognizes patterns and parameters, here is the syntax:
Parameter_00 (Parameter_01, Parameter_02, Parameter_03, Parameter_04)
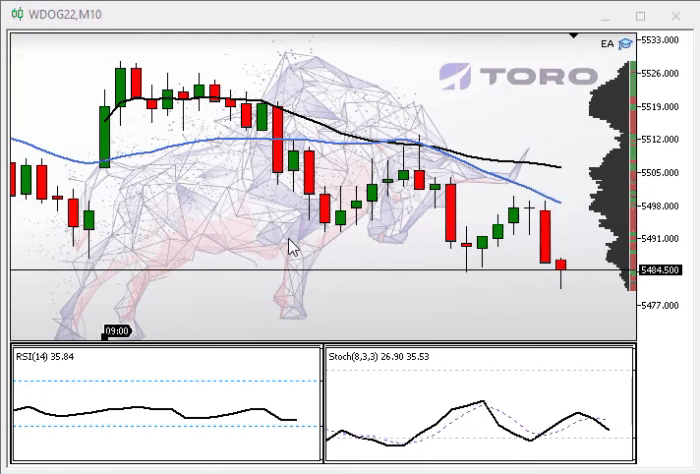
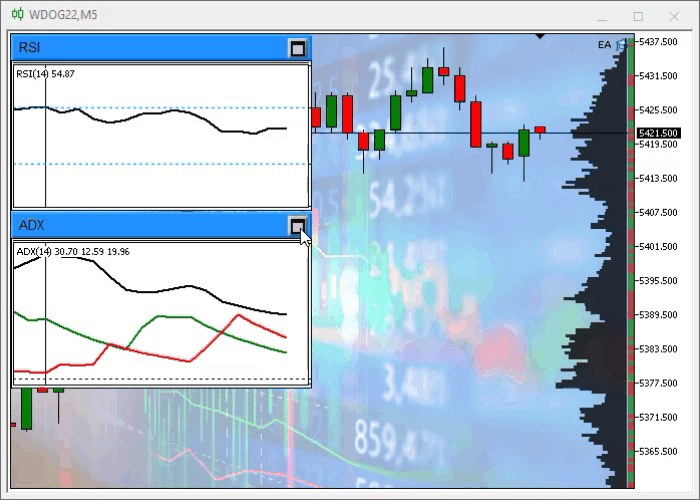
Where Parameter_00 specifies the template to use and the rest are separated by commas ( , ) and indicate the values that are defined in the eParameter enumeration. If we want to change only Parameter_03, we can leave the rest empty, as shown in the figure below. In this figure, I show that the system works the way the user wants.
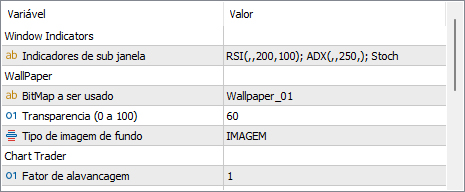
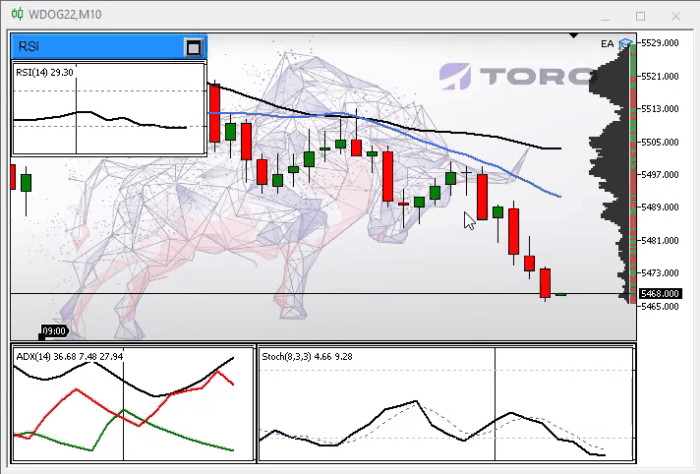
Note that we have a standardized indication which is very similar to function calls, but this may seem confusing. Here is what actually happened: we specify the RSI template, then we do not specify either the period or the scale. These values are left blank so that the system understands that it must follow the main chart. But we specify the width and height, so the system understands that this should be displayed in a floating window, and thus the RSI indicator appears in a floating window. In the ADX template, we only indicate the width so that the system displays it with the width defined in the subwindow. The Stoch indicator will take the entire remaining subwindow, sharing space with ADX. But if the user wants to change something, it will not be difficult, see what happens when we specify the height for the ADX.
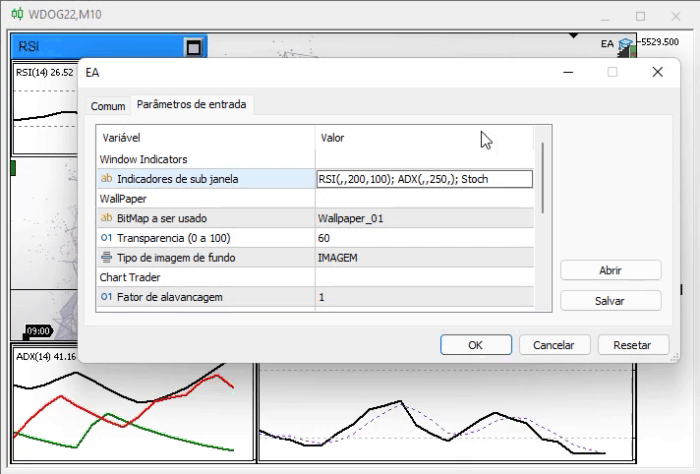
The system will immediately change the way the ADX is presented — it will place it in a floating window, while leaving the entire subwindow to Stoch. Every floating window will be completely independent of each other. But the thong goes beyond what can be seen, please see the next picture.
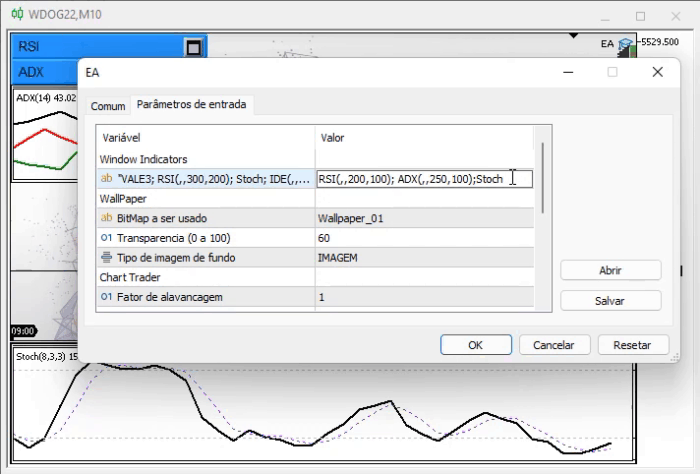
Note that the subwindow has been deleted because it is no longer needed. But what function is responsible for all this? It is shown below - a lot of interesting things can be done with just a few modifications:
void AddTemplate(void)
{
        ENUM_TIMEFRAMES timeframe = PERIOD_CURRENT;
        string sz0 = m_Params.Param[PERIOD];
        int w, h, i;
        bool bIsSymbol;

        if (sz0 == "1M") timeframe = PERIOD_M1; else
        if (sz0 == "2M") timeframe = PERIOD_M2; else
        if (sz0 == "3M") timeframe = PERIOD_M3; else
        if (sz0 == "4M") timeframe = PERIOD_M4; else
        if (sz0 == "5M") timeframe = PERIOD_M5; else
        if (sz0 == "6M") timeframe = PERIOD_M6; else
        if (sz0 == "10M") timeframe = PERIOD_M10; else
        if (sz0 == "12M") timeframe = PERIOD_M12; else
        if (sz0 == "15M") timeframe = PERIOD_M15; else
        if (sz0 == "20M") timeframe = PERIOD_M20; else
        if (sz0 == "30M") timeframe = PERIOD_M30; else
        if (sz0 == "1H") timeframe = PERIOD_H1; else
        if (sz0 == "2H") timeframe = PERIOD_H2; else
        if (sz0 == "3H") timeframe = PERIOD_H3; else
        if (sz0 == "4H") timeframe = PERIOD_H4; else
        if (sz0 == "6H") timeframe = PERIOD_H6; else
        if (sz0 == "8H") timeframe = PERIOD_H8; else
        if (sz0 == "12H") timeframe = PERIOD_H12; else
        if (sz0 == "1D") timeframe = PERIOD_D1; else
        if (sz0 == "1S") timeframe = PERIOD_W1; else
        if (sz0 == "1MES") timeframe = PERIOD_MN1;
        if ((m_Counter >= def_MaxTemplates) || (m_Params.Param[TEMPLATE] == "")) return;
        bIsSymbol = SymbolSelect(m_Params.Param[TEMPLATE], true);
        w = (m_Params.Param[WIDTH] != "" ? (int)StringToInteger(m_Params.Param[WIDTH]) : 0);
        h = (m_Params.Param[HEIGHT] != "" ? (int)StringToInteger(m_Params.Param[HEIGHT]) : 0);
        i = (m_Params.Param[SCALE] != "" ? (int)StringToInteger(m_Params.Param[SCALE]) : -1);
        i = (i > 5 || i < 0 ? -1 : i);
        if ((w > 0) && (h > 0)) AddIndicator(m_Params.Param[TEMPLATE], 0, -1, w, h, timeframe, i); else
        {
                SetBase(m_Params.Param[TEMPLATE], (bIsSymbol ? m_Params.Param[TEMPLATE] : _Symbol), timeframe, i, w);
                if (!ChartApplyTemplate(m_Info[m_Counter - 1].handle, m_Params.Param[TEMPLATE] + ".tpl")) if (bIsSymbol) ChartApplyTemplate(m_Info[m_Counter - 1].handle, "Default.tpl");
                if (m_Params.Param[TEMPLATE] == def_NameTemplateRAD)
                {
                        C_Chart_IDE::Create(GetIdSubWinEA());
                        m_Info[m_Counter - 1].szVLine = "";
                }else
                {
                        m_Info[m_Counter - 1].szVLine = (string)ObjectsTotal(Terminal.Get_ID(), -1, -1) + (string)MathRand();
                        ObjectCreate(m_Info[m_Counter - 1].handle, m_Info[m_Counter - 1].szVLine, OBJ_VLINE, 0, 0, 0);
                        ObjectSetInteger(m_Info[m_Counter - 1].handle, m_Info[m_Counter - 1].szVLine, OBJPROP_COLOR, clrBlack);
                }
                ChartRedraw(m_Info[m_Counter - 1].handle);
        }
}
The highlighted parts show the selection of the way the data will be presented on the screen. The code does not differ much from the earlier existing one. But these test guarantee that the system will behave the way the user wants. All this so far sis not really require code restructuring in a new model, but when we look at the function responsible for resizing the subwindow, the picture changes.
void Resize(void)
{
#define macro_SetInteger(A, B) ObjectSetInteger(Terminal.Get_ID(), m_Info[c0].szObjName, A, B)
        int x0, x1, y;
        if (!ExistSubWin()) return;
        x0 = 0;
        y = (int)(ChartGetInteger(Terminal.Get_ID(), CHART_HEIGHT_IN_PIXELS, GetIdSubWinEA()));
        x1 = (int)((Terminal.GetWidth() - m_Aggregate) / (m_Counter > 0 ? (m_CPre == m_Counter ? m_Counter : (m_Counter - m_CPre)) : 1));
        for (char c0 = 0; c0 < m_Counter; x0 += (m_Info[c0].width > 0 ? m_Info[c0].width : x1), c0++)
        {
                macro_SetInteger(OBJPROP_XDISTANCE, x0);
                macro_SetInteger(OBJPROP_XSIZE, (m_Info[c0].width > 0 ? m_Info[c0].width : x1));
                macro_SetInteger(OBJPROP_YSIZE, y);
                if (m_Info[c0].szTemplate == "IDE") C_Chart_IDE::Resize(x0);
        }
        ChartRedraw();
#undef macro_SetInteger
}
The highlighted line prevents the system from being built on the old base. This line will check if there is a subwindow opened and maintained by the EA, and if not, then it returns and the function does nothing else. But if such a subwindow exists, all the things in it should be resized as needed, and just because of this test, the system has been completely revamped.
Below is another function that has been modified:
void DispatchMessage(int id, long lparam, double dparam, string sparam)
{
        int mx, my;
        datetime dt;
        double p;

        C_Chart_IDE::DispatchMessage(id, lparam, dparam, sparam);
        switch (id)
        {
                case CHARTEVENT_MOUSE_MOVE:
                        mx = (int)lparam;
                        my = (int)dparam;
                        ChartXYToTimePrice(Terminal.Get_ID(), mx, my, my, dt, p);
                        for (int c0 = 0; c0 < m_Counter; c0++)  if (m_Info[c0].szVLine != "")
                        {
                                ObjectMove(m_Info[c0].handle, m_Info[c0].szVLine, 0, dt, 0);
                                ChartRedraw(m_Info[c0].handle);
                        }
                        break;
                case CHARTEVENT_CHART_CHANGE:
                        Resize();
                        for (int c0 = 0; c0 < m_Counter; c0++)
                        {
                                ObjectSetInteger(Terminal.Get_ID(), m_Info[c0].szObjName, OBJPROP_PERIOD, m_Info[c0].timeframe);
                                ObjectSetInteger(Terminal.Get_ID(), m_Info[c0].szObjName, OBJPROP_CHART_SCALE,(m_Info[c0].scale < 0 ? ChartGetInteger(Terminal.Get_ID(),CHART_SCALE):m_Info[c0].scale));
                        }
                        break;
        }
}
The highlighted part really deserves special attention. What does it do? This code will present the vertical line in the right place and in the right template. The rest of the code will simply maintain and adjust the templates as the chart changes.
There are many benefits to doing it here in the object class rather than in the EA inside the OnChartEvent system. The main thing is that each class can handle the event that MetaTrader 5 sends to the EA. Instead of centralizing everything in one single function, we let each class do its job, and if we do not want to use the class in the EA, we simply remove it without any side effects for the rest of the code.
Programming is BEAUTIFUL, isn't it? I LOVE programming...
Before moving on to the next point in this article, I we will briefly comment on the values that can be used in parameters 1 and 2. Parameter 1 can be assigned the following values: 1M, 2M, 3M, 4M, 5M, 6M, 10M, 12M, 15M, 20M, 30M, 1H, 2H, 3H, 4H, 6H, 8H, 12H, 1D, 1S, 1MONTH. These values are not random - they come from the ENUM_TIMEFRAME enumeration and repeat exactly what you would do if you were using a regular chart. Parameter 2 can take values from 0 to 5, where 0 is the furthest scale and 5 is the closest one. For more details see CHART_SCALE.
3.4 Supporting floating windows
Now let's understand how floating windows are created and maintained, because without understanding this it will be impossible to really take advantage of the system. The object class responsible for this was named C_ChartFloating. One might think: Why don't you use the Control class from the standard MQL5 library? The reason is simple. The control class allows us to create and maintain a window with a functionality very similar to that of the operating system present on the machine, but it is too exaggerated for our purpose. We need something much simpler. Using the control class to do what we want would be like using a bazooka to kill a fly, so for this reason we use the C_ChartFloating class - it contains the minimum elements necessary to support floating windows, while allowing us to control them.
The class itself does not need much explanation, since the only thing we do is create 4 graphical objects. But among the internal functions, there are two that deserve special attention. Let's start with the function that creates the window:
bool AddIndicator(string sz0, int x = 0, int y = -1, int w = 300, int h = 200, ENUM_TIMEFRAMES TimeFrame = PERIOD_CURRENT, int Scale = -1)
{
        m_LimitX = (int)ChartGetInteger(Terminal.Get_ID(), CHART_WIDTH_IN_PIXELS);
        m_LimitY = (int)ChartGetInteger(Terminal.Get_ID(), CHART_HEIGHT_IN_PIXELS);
        if (m_MaxCounter >= def_MaxFloating) return false;
        y = (y < 0 ? m_MaxCounter * def_SizeBarCaption : y);
        CreateBarTitle();
        CreateCaption(sz0);
        CreateBtnMaxMin();
        CreateRegion(TimeFrame, Scale);
        m_Win[m_MaxCounter].handle = ObjectGetInteger(Terminal.Get_ID(), m_Win[m_MaxCounter].szRegionChart, OBJPROP_CHART_ID);
        ChartApplyTemplate(m_Win[m_MaxCounter].handle, sz0 + ".tpl");
        m_Win[m_MaxCounter].szVLine = (string)ObjectsTotal(Terminal.Get_ID(), -1, -1) + (string)MathRand();
        ObjectCreate(m_Win[m_MaxCounter].handle, m_Win[m_MaxCounter].szVLine, OBJ_VLINE, 0, 0, 0);
        ObjectSetInteger(m_Win[m_MaxCounter].handle, m_Win[m_MaxCounter].szVLine, OBJPROP_COLOR, clrBlack);
        m_Win[m_MaxCounter].PosX = -1;
        m_Win[m_MaxCounter].PosY = -1;
        m_Win[m_MaxCounter].PosX_Minimized = m_Win[m_MaxCounter].PosX_Maximized = x;
        m_Win[m_MaxCounter].PosY_Minimized = m_Win[m_MaxCounter].PosY_Maximized = y;
        SetDimension(w, h, true, m_MaxCounter);
        SetPosition(x, y, m_MaxCounter);
        ChartRedraw(m_Win[m_MaxCounter].handle);
        m_MaxCounter++;
        return true;
}
This code creates all the necessary support so that you can apply the template on the CHART object. It is implemented in the highlighted code part, note that the only parameter really required to call this function is the template name. All other values are pre-initialized, but nothing prevents you from specifying which ones are needed. For each new window created, the next one will be offset slightly so that it does not overlap other windows by default. This is shown in the following line:
y = (y < 0 ? m_MaxCounter * def_SizeBarCaption : y);
The next interesting function in this class handles messages. Here is its code:
void DispatchMessage(int id, long lparam, double dparam, string sparam)
{
        int mx, my;
        datetime dt;
        double p;
        static int six = -1, siy = -1, sic = -1;

        switch (id)
        {
                case CHARTEVENT_MOUSE_MOVE:
                        mx = (int)lparam;
                        my = (int)dparam;
                        if ((((int)sparam) & 1) == 1)
                        {
                                if (sic == -1)  for (int c0 = m_MaxCounter - 1; (sic < 0) && (c0 >= 0); c0--)
                                        sic = (((mx > m_Win[c0].PosX) && (mx < (m_Win[c0].PosX + m_Win[c0].Width)) && (my > m_Win[c0].PosY) && (my < (m_Win[c0].PosY + def_SizeBarCaption))) ? c0 : -1);
                                if (sic >= 0)
                                {
                                        if (six < 0) ChartSetInteger(Terminal.Get_ID(), CHART_MOUSE_SCROLL, false);
                                        six = (six < 0 ? mx - m_Win[sic].PosX : six);
                                        siy = (siy < 0 ? my - m_Win[sic].PosY : siy);
                                        SetPosition(mx - six, my - siy, sic);
                                }
                        }else
                        {
                                if (six > 0) ChartSetInteger(Terminal.Get_ID(), CHART_MOUSE_SCROLL, true);
                                six = siy = sic = -1;
                        }
                        ChartXYToTimePrice(Terminal.Get_ID(), mx, my, my, dt, p);
                        for (int c0 = 0; c0 < m_MaxCounter; c0++)
                                ObjectMove(m_Win[c0].handle, m_Win[c0].szVLine, 0, dt, 0);
                        break;
                case CHARTEVENT_OBJECT_CLICK:
                        for (int c0 = 0; c0 < m_MaxCounter; c0++) if (sparam == m_Win[c0].szBtnMaxMin)
                        {
                                SwapMaxMin((bool)ObjectGetInteger(Terminal.Get_ID(), m_Win[c0].szBtnMaxMin, OBJPROP_STATE), c0);
                                break;
                        }
                        break;
                case CHARTEVENT_CHART_CHANGE:
                        for(int c0 = 0; c0 < m_MaxCounter; c0++)
                        {
                               ObjectSetInteger(Terminal.Get_ID(), m_Win[c0].szRegionChart, OBJPROP_PERIOD, m_Win[c0].TimeFrame);
                               ObjectSetInteger(Terminal.Get_ID(), m_Win[c0].szRegionChart, OBJPROP_CHART_SCALE,(m_Win[c0].Scale < 0 ? ChartGetInteger(Terminal.Get_ID(),CHART_SCALE):m_Win[c0].Scale));
                        }
                        m_LimitX = (int)ChartGetInteger(Terminal.Get_ID(), CHART_WIDTH_IN_PIXELS);
                        m_LimitY = (int)ChartGetInteger(Terminal.Get_ID(), CHART_HEIGHT_IN_PIXELS);
                        break;
        }
        for (int c0 = 0; c0 < m_MaxCounter; c0++)
                ChartRedraw(m_Win[c0].handle);
}
This function implements all the event handling that the C_ChartFloating class supports. No matter how many windows are present, it will handle all of them the same way. If we did this inside the OnChartEvent function in the Expert Advisor, the function would be extremely complex and not very stable. And by implementing the functionality here, in the object class, we guarantee the integrity of the code. So, if we do not need to use floating windows, then all we need to do is remove the file from the class and from the points in which it can be accessed. This implementation allows you to make the code much faster and easier.
There is also an interesting part in the above code. It is highlighted, and its internal code is as follows:
void SwapMaxMin(const bool IsMax, const int c0)
{
        m_Win[c0].IsMaximized = IsMax;
        SetDimension((m_Win[c0].IsMaximized ? m_Win[c0].MaxWidth : 100), (m_Win[c0].IsMaximized ? m_Win[c0].MaxHeight : 0), false, c0);
        SetPosition((m_Win[c0].IsMaximized ? m_Win[c0].PosX_Maximized : m_Win[c0].PosX_Minimized), (m_Win[c0].IsMaximized ? m_Win[c0].PosY_Maximized : m_Win[c0].PosY_Minimized), c0);
}
What does the above code do? Looks too confusing? To understand, let's take a close look at the animation below.
When a floating window is created, it has an initial anchor point, which is specified by the programmer or the positioning system of the class itself. This anchor point is the same for both the maximized and for the minimized window. These values are not fixed, i.e. the user can easily change these points.
Suppose you need a certain place on a blank chart, then you can move the maximized window to a place that is easy and quick to read, then minimize the same window and move it to another place, for example, to the corner of the screen. The system will remember it, and when you maximize the window, it will jump to the last anchor point where it was before minimizing. The same applies to the reverse situation when the window is minimized.
Conclusion
That's all for now. In the next article we will extend this functionality to the IDE support class.