Developing a trading Expert Advisor from scratch (Part 7): Adding Volume at Price (I)
Daniel Jose | 25 May, 2022
Introduction
Anyone who trades trying to have a certain degree of confidence must have this indicator on their chart. Most often the indicator is used by those who prefer tape reading while trading. Also, the indicator can be utilized by those who trade only based on the Price Action analysis. This is an extremely useful horizontal volume indicator which can be utilized to analyze the volume of trades that occurred at a particular price time. However, reading the indicator correctly can be tricky. I will add a link at the end of the article so you can learn more about this.
Here we will not dwell on how to interpret the indicator readings, because this is beyond the scope of this article. The purpose of this article is to show how to design and create this indicator in such a way that it does not degrade the performance of the MetaTrader 5 platform. Here is an interesting fact: although many think that this indicator should be updated in real time, actually a small delay is acceptable, as long as it is really small. Based on my own experience, I have not seen big problems with a delay in updating information of about 1 second. However, if it is important for you to use the true real time, you will have to make small changes. The changes should be made not in the indicator itself, but at the points where the Expert Advisor calls this indicator so that the call occurs in real time. However, I believe that the impact on performance will be minimal, so the delay can be neglected.
Interface
The Volume At Price class control interface is very simple, but for full control, it is necessary to ensure correct properties of the chart on which the indicator will be applied. The properties are shown in the following figure, with the main control highlighted.
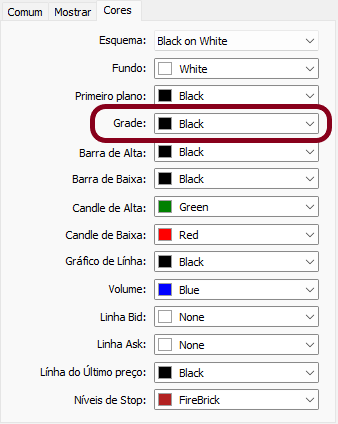
If the grid is not visible, then it will not be possible to resize the indicator as shown in the following animations. Please note that the interface is very simple and intuitive: it has only two controls, one of which indicates the size, and the other one shows the starting point for volume analysis.
In general, this indicator is quite effective and very interesting in implementation and construction. In this article, we will work with its most basic level, and then we will improve it in the next article.
I have nothing more to say about the interface, so let's move on to implementing the code.
Implementation
In order to have as little work as possible when creating the indicator, we will split our source code into parts, and also make a few modifications and additions. Let's start by breaking down the code into parts, since much of what we need is already written elsewhere. The main part of it is in the C_Wallpaper class. What are we going to do? Will we create an indicator based on a bitmap? Yes, any image on a computer screen should be treated as a BITMAP, but it should be built in a special way. So, the new C_Wallpaper object class will look like this:
class C_WallPaper : public C_Canvas
{
        protected:
                enum eTypeImage {IMAGEM, LOGO, COR};
//+------------------------------------------------------------------+
        private :
        public  :
//+------------------------------------------------------------------+
                ~C_WallPaper()
                        {
                                Destroy();
                        }
//+------------------------------------------------------------------+
                bool Init(const string szName, const eTypeImage etype, const char cView = 100)
                        {
                                if (etype == C_WallPaper::COR) return true;
                                if (!Create(szName, 0, 0, Terminal.GetWidth(), Terminal.GetHeight())) return false;
                                if(!LoadBitmap(etype == C_WallPaper::IMAGEM ? "WallPapers\\" + szName : "WallPapers\\Logos\\" + _Symbol, cView)) return false;
                                ObjectSetInteger(Terminal.Get_ID(), szName, OBJPROP_BACK, true);

                                return true;
                        }
//+------------------------------------------------------------------+
                void Resize(void)
                        {
                                ResizeBitMap(Terminal.GetWidth(), Terminal.GetHeight());
                        }
//+------------------------------------------------------------------+
};
Look, the code has become much more compact: we have removed the parts that are common between the C_Wallpaper and C_VolumeAtPrice classes and have put everything in another class, which is the C_C_Canvas class.
But why not use the MetaTrader 5 C_Canvas class? The question is more personal than practical. I like to have more control over everything I write and develop, but this is more of a bad habit for a C programmer than something really necessary. That is why I need to create a class for drawing objects on the screen. Of course, you can use the class already available in MetaTrader 5. Now let's focus on the C_VolumeAtPrice class, which is the main focus of this article. The class has seven functions which are shown in the following table.
| Function | Description | Access type |
|---|---|---|
| Init | Initializes the class with user-specified values. | General |
| Update | Updates Volume At Price data at specified intervals. | General |
| Resize | Changes the size of the Volume At Price image on the chart, which makes it easier to analyze some of the details. | General |
| DispatchMessage | Used to send messages to an object class. | General |
| FromNowOn | Initializes system variables | Private |
| SetMatrix | Creates and maintains a matrix with volume data | Private |
| Redraw | Creates a volume image | Private |
Now, let's move on to implementing the system, starting with the declaration of variables in the code below:
#define def_SizeMaxBuff                 4096
//+------------------------------------------------------------------+
#define def_MsgLineLimit                "Starting point from Volume At Price"
//+------------------------------------------------------------------+
class C_VolumeAtPrice : private C_Canvas
{
#ifdef macroSetInteger
        ERROR ...
#endif
#define macroSetInteger(A, B) ObjectSetInteger(Terminal.Get_ID(), m_Infos.szObjEvent, A, B)
        private :
                uint    m_WidthMax,
                        m_WidthPos;
                bool    m_bChartShift,
                        m_bUsing;
                double  m_dChartShift;
                struct st00
                {
                        ulong   nVolBuy,
                                nVolSell,
                                nVolTotal;
                        long    nVolDif;
                }m_InfoAllVaP[def_SizeMaxBuff];
                struct st01
                {
                        ulong    memTimeTick;
                        datetime StartTime,
                                 CurrentTime;
                        int      CountInfos;
                        ulong    MaxVolume;
                        color    ColorSell,
                                 ColorBuy,
                                 ColorBars;
                        int      Transparency;
                        string   szObjEvent;
                        double   FirstPrice;
                }m_Infos;
The highlighted part in this code is what you should pay attention to. This part ensures that the definition doesn't come from another file in a way that conflicts with the definition we'll be using in that file. Indeed, the MQL5 compiler shows a warning when you try to override an existing definition, and in some cases it's hard to figure out how to solve it. Therefore, to make our life a little easier, we use the test highlighted in the code above. The rest of the stuff in this code isn't particularly interesting. The only thing you should pay attention to is the def_SizeMaxBuff definition. It indicates what the size of our volume data array will be. If necessary, you can change this value to another, but according to test results, this value is more than adequate for the vast majority of cases. It represents variations in ticks between the low price and the price, and thus the current value can handle a huge range of cases.
The Init function: where it all starts
It is this function that initializes all variables correctly. It is called in the Expert Advisor as follows:
//.... Initial data....

input color     user10   = clrForestGreen;      //Take Profit line color
input color     user11   = clrFireBrick;        //Stop line color
input bool      user12   = true;                //Day Trade?
input group "Volume At Price"
input color     user15  = clrBlack;             //Color of bars
input char      user16  = 20;                   //Transparency (from 0 to 100 )
//+------------------------------------------------------------------+
C_SubWindow             SubWin;
C_WallPaper             WallPaper;
C_VolumeAtPrice         VolumeAtPrice;
//+------------------------------------------------------------------+
int OnInit()
{
        Terminal.Init();
        WallPaper.Init(user03, user05, user04);
        if ((user01 == "") && (user02 == "")) SubWin.Close(); else if (SubWin.Init())
        {
                SubWin.ClearTemplateChart();
                SubWin.AddThese(C_TemplateChart::SYMBOL, user02);
                SubWin.AddThese(C_TemplateChart::INDICATOR, user01);
        }
        SubWin.InitilizeChartTrade(user06, user07, user08, user09, user10, user11, user12);
        VolumeAtPrice.Init(user10, user11, user15, user16);

// ... Rest of the code
There are not many parameters here, and they mainly represent information about the colors that the indicator will use. Next, let's look at its internal code for this function. The below code shows how everything is initialized:
void Init(color CorBuy, color CorSell, color CorBar, char cView)
{
        m_Infos.FirstPrice = Terminal.GetRatesLastDay().open;
        FromNowOn(macroSetHours(macroGetHour(Terminal.GetRatesLastDay().time), TimeLocal()));
        m_Infos.Transparency = (int)(255 * macroTransparency(cView));
        m_Infos.ColorBars = CorBar;
        m_Infos.ColorBuy = CorBuy;
        m_Infos.ColorSell = CorSell;
        if (m_bUsing) return;
        m_Infos.szObjEvent = "Event" + (string)ObjectsTotal(Terminal.Get_ID(), -1, OBJ_EVENT);
        CreateObjEvent();
        m_bChartShift = ChartGetInteger(Terminal.Get_ID(), CHART_SHIFT);
        m_dChartShift = ChartGetDouble(Terminal.Get_ID(), CHART_SHIFT_SIZE);
        ChartSetInteger(Terminal.Get_ID(), CHART_SHIFT, true);
        ChartSetDouble(Terminal.Get_ID(), CHART_SHIFT_SIZE, 0.1);
        Create("VaP" + (string)MathRand(), 0, 0, 1, 1);
        Resize();
        m_bUsing = true;
};
As you can see, everything is very simple here. Still, there are some features here that make the code interesting. One of them is Terminal.GetRatesLastDay().open. Although this may seem strange, it is actually a very common situation when we follow the principles of Object-Oriented Programming (OOP). One of these principles states that nothing outside the class should have access to the class's internal variables. But how then to get the values of variables inside the class? The correct way is to use a form that only appears in OOP, so let's see how the GetRatesLastDay function is declared inside the C_Terminal class. This can be seen in the code below:
inline MqlRates GetRatesLastDay(void) const { return m_Infos.Rates; }
Let's see how it actually works. Let’s start with the reserved word inline. It will instruct the compiler that the code should be placed in all positions where it appears. Instead of generating a function call, the compiler actually copies all the code from the function to the point where the function is referenced. This speeds up code execution due to less memory consumption. But in a specific case, what actually happens is that the m_Infos.Rates variable will be referenced. This variable has the MqlRates type, that is, we can access the values of the MqlRates structure. In this case, we do not pass the address of the variable reference. But in some cases, in order to make the code faster, we pass the address of the reference, in which case it is possible to change the value of a variable inside the class, which should be prohibited. To prevent this from happening, we use the reserved word const, which guarantees that the variable will never be changed without the class itself. While many reserved words from C++ are also present in MQL5 in documented form, some of them are not yet documented, but they are part of MQL5 because it is very close to C++. At the end of the article, I will add links for those who want to learn more about C++ and use the same knowledge in MQL5 programming.
Now inside the Init function code we have an interesting part, I've highlighted it below to explain what it is doing:
m_bChartShift = ChartGetInteger(Terminal.Get_ID(), CHART_SHIFT);
m_dChartShift = ChartGetDouble(Terminal.Get_ID(), CHART_SHIFT_SIZE);
ChartSetInteger(Terminal.Get_ID(), CHART_SHIFT, true);
ChartSetDouble(Terminal.Get_ID(), CHART_SHIFT_SIZE, 0.1);
When the EA is launched, it changes the chart, but it's good practice to reset the system to its initial state when the user shuts it down. Therefore, we save the chart scroll settings and then create a minimal scroll. This is done with the highlighted points, so we need to see the grid on the chart in order to be able to adjust dimensions. This is done interactively, as shown at the beginning of the article. See CHART_SHIFT for more information.
Securing objects on the screen
Although the internal functions of the class are very simple, there are some points that deserve special attention. The first is a security system that does not allow the user to remove the dot that indicates the beginning of the volume analysis:
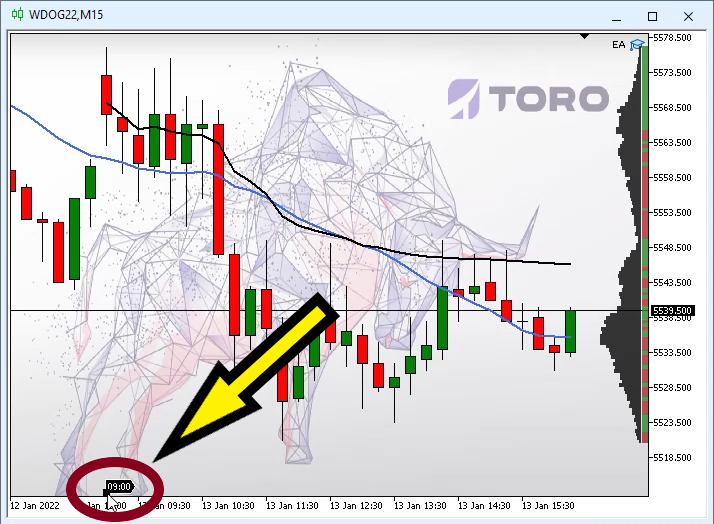
The dot is very small, so you have to be careful to really notice it.
IMPORTANT NOTE: If you want to change the analysis point, pay attention to the timeframe of the chart. For example, if you need to move the analysis from 9:00 to 9:02, you need to use a timeframe of 1 minute or 2 minutes. And if you use a chart, for example, of 5 minutes, you cannot do this.
Next, we need to take care to ensure that the user does not accidentally delete this element. This is done in the following code:
void DispatchMessage(int iMsg, string sparam)
{
        switch (iMsg)
        {

// ... The inside of the code

                case CHARTEVENT_OBJECT_DELETE:
                        if ((sparam == m_Infos.szObjEvent) && (m_bUsing))
                        {
                                m_bUsing = false;
                                CreateObjEvent();
                                Resize();
                                m_bUsing = true;
                        }
                break;
        }
};
When the class realizes that the object has been deleted, it will immediately recreate that object, thus preventing the user from being left without a required object for the class and thus from being forced to restart the EA. Use the model shown in the code whenever you need to ensure that the user does not delete a sensitive object. But we need to add additional code to ensure that the event is noticed by the EA:
ChartSetInteger(m_Infos.ID, CHART_EVENT_OBJECT_DELETE, 0, true);
This simple line ensures that MetaTrader 5 will report the deletion of the object. See CHART_EVENT_OBJECT_DELETE for more information.
Building a Volume At Price chart
This is the heart of the class, it has three functions: one public and two private. Let's start with the public function, it is shown below:
inline virtual void Update(void)
{
        MqlTick Tick[];
        int i1, p1;

        if (m_bUsing == false) return;
        if ((i1 = CopyTicksRange(Terminal.GetSymbol(), Tick, COPY_TICKS_TRADE, m_Infos.memTimeTick)) > 0)
        {
                if (m_Infos.CountInfos == 0)
                {
                        macroSetInteger(OBJPROP_TIME, m_Infos.StartTime = macroRemoveSec(Tick[0].time));
                        m_Infos.FirstPrice = Tick[0].last;
                }
                for (p1 = 0; (p1 < i1) && (Tick[p1].time_msc == m_Infos.memTimeTick); p1++);
                for (int c0 = p1; c0 < i1; c0++) SetMatrix(Tick[c0]);
                if (p1 == i1) return;
                m_Infos.memTimeTick = Tick[i1 - 1].time_msc;
                m_Infos.CurrentTime = macroRemoveSec(Tick[i1 - 1].time);
                Redraw();
        };
};
The highlighted lines are very important to the system. When the system gets to work, it doesn't know exactly where to start. These lines update these points, they inform the user where the analysis started and what the starting price was, so that the system can create an internal table. The system will always wait for a new tick to arrive. Once that happens we have data to parse and collect to present it on the screen. So, here is the function:
inline void SetMatrix(MqlTick &tick)
{
        int pos;

        if ((tick.last == 0) || ((tick.flags & (TICK_FLAG_BUY | TICK_FLAG_SELL)) == (TICK_FLAG_BUY | TICK_FLAG_SELL))) return;
        pos = (int) ((tick.last - m_Infos.FirstPrice) / Terminal.GetPointPerTick()) * 2;
        pos = (pos >= 0 ? pos : (pos * -1) - 1);
        if ((tick.flags & TICK_FLAG_BUY) == TICK_FLAG_BUY) m_InfoAllVaP[pos].nVolBuy += tick.volume; else
        if ((tick.flags & TICK_FLAG_SELL) == TICK_FLAG_SELL) m_InfoAllVaP[pos].nVolSell += tick.volume;
        m_InfoAllVaP[pos].nVolDif = (long)(m_InfoAllVaP[pos].nVolBuy - m_InfoAllVaP[pos].nVolSell);
        m_InfoAllVaP[pos].nVolTotal = m_InfoAllVaP[pos].nVolBuy + m_InfoAllVaP[pos].nVolSell;
        m_Infos.MaxVolume = (m_Infos.MaxVolume > m_InfoAllVaP[pos].nVolTotal ? m_Infos.MaxVolume : m_InfoAllVaP[pos].nVolTotal);
        m_Infos.CountInfos = (m_Infos.CountInfos == 0 ? 1 : (m_Infos.CountInfos > pos ? m_Infos.CountInfos : pos));
}
Perhaps this function is not so important, since it only stores and holds volume values in price, but the lines highlighted in it are the heart of the system. To really understand what's going on in these two lines, let’s think a little. Consider the following: which is faster - to store each of the prices and note the volumes in each of them, or to store only the volumes, wondering what the price is? The second option is faster, so let's save the volumes and find out where the price is. But what will be the first price in the system? Because yes, we need an initial value, without it everything will fall apart. How about using the price of the first traded tick? Yes, this is great. Perfect. But we have a problem: if the price goes up, that's great, all the data can be easily stored in an array. But what if it goes down? In this case, we will have negative values and we will not be able to access an array with a negative index. We could use two arrays instead of one, but this would lead to unnecessary load. There is a simple solution. Let's look at the table below:
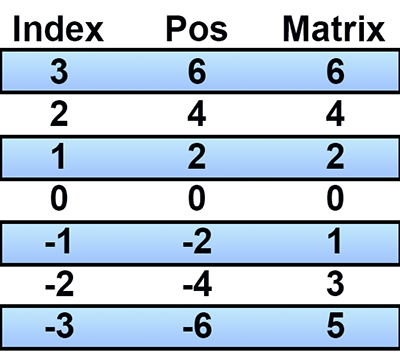
If the index is positive we don't have to worry, but if it's negative we'll have problems because we're using a bidirectional array, where the zero value is what represents the price of the first tick, the negative values are the ones that moved down, and positive values are those which have grown. Next: if we have two directions, then by multiplying the index by 2, we get the middle column. It doesn't seem to help. But if we convert the negative values to positive and subtract 1, we get the right column. If you look closely, you can see that the values are interleaved in this right column, which gives us the perfect index to access an array that we know will grow, but we don't know how much it will grow. And that's exactly what the two highlighted lines do: they create an index for our array, alternating between values that are higher with those that are lower than the starting price. But while this is a very good solution, it won't do any good if we can't show the data on the screen, which is exactly what the next function does.
void Redraw(void)
{
        uint x, y, y1, p;
        double reason = (double) (m_Infos.MaxVolume > m_WidthMax ? (m_WidthMax / (m_Infos.MaxVolume * 1.0)) : 1.0);
        double desl = Terminal.GetPointPerTick() / 2.0;
        Erase();
        p = m_WidthMax - 8;
        for (int c0 = 0; c0 <= m_Infos.CountInfos; c0++)
        {
                if (m_InfoAllVaP[c0].nVolTotal == 0) continue;
                ChartTimePriceToXY(Terminal.Get_ID(), 0, 0, m_Infos.FirstPrice + (Terminal.GetPointPerTick() * (((c0 & 1) == 1 ? -(c0 + 1) : c0) / 2)) + desl, x, y);
                y1 = y + Terminal.GetHeightBar();
                FillRectangle(p + 2, y, p + 8, y1, macroColorRGBA(m_InfoAllVaP[c0].nVolDif > 0 ? m_Infos.ColorBuy : m_Infos.ColorSell, m_Infos.Transparency));
                FillRectangle((int)(p - (m_InfoAllVaP[c0].nVolTotal * reason)), y, p, y1, macroColorRGBA(m_Infos.ColorBars, m_Infos.Transparency));
        }
        C_Canvas::Update();
};
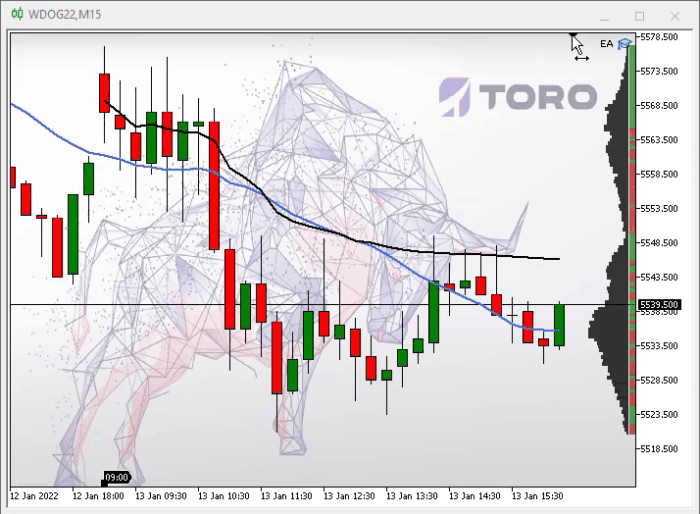
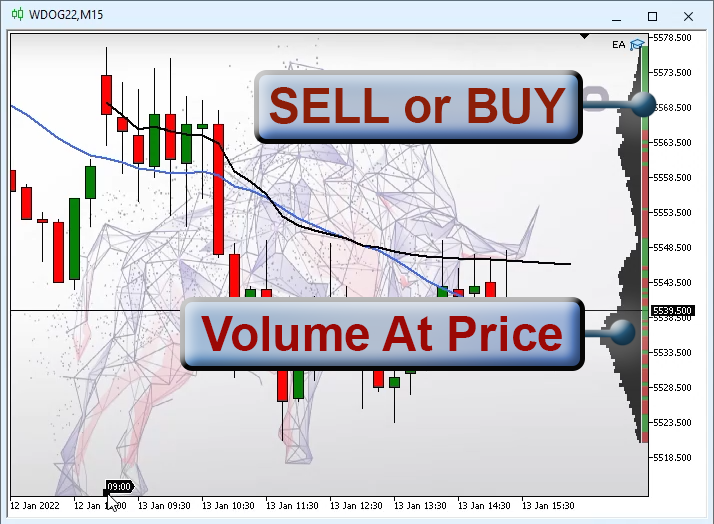
This function plots the volume chart, and the highlighted part takes care of inverting the calculation made during the volume capture. In order to get the display at the right point, the price shifts a little so that the bars are positioned correctly. The rest of the function is just drawing routines. Some explanation are needed here. Note that there are two FillRectangle calls. Why? The first call indicates which volume was larger: sellers or buyers, and the second call actually plots the volume. But why not build them together by dividing the volume band between buyers and sellers? The reason is that as volume increases in one price range, it begins to interfere with analysis in other, smaller price ranges. It becomes difficult to determine which volume was larger, selling or buying. When placed in this way, this problem disappears, making data reading easier and more understandable. As a result, the chart will look like the figure below:
All other class functions serve as support for the earlier explained ones, so they are not so important to be covered in detail.
Conclusion
Here I have presented a very simple Volume at Price, but it is an extremely effective tool. If you are starting to learn coding and want to focus on Object Oriented Programming (OOP), you need to carefully study this code, because it has several concepts that are very good, because all the code is based on a 100% object oriented approach.
The application contains the Expert Advisor up to the current development stage.