Multiple indicators on one chart (Part 06): Turning MetaTrader 5 into a RAD system (II)
Daniel Jose | 17 May, 2022
Introduction
In my previous article, I showed you how to create a Chart Trade using MetaTrader 5 objects and thus to turn the platform into a RAD system. The system works very well, and for sure many of the readers might have thought about creating a library, which would allow having extended functionality in the proposed system. Based on this, it would be possible to develop a more intuitive Expert Advisor with a nicer and easier to use interface.
The idea is so good that it prompted me to show you step by step how to start adding functionality. Here I am going to implement two new and major features (this information will serve as a basis for implementing other features in the way we need and want). The only limitation is our creativity as the elements themselves can be used in a wide variety of ways.
Planning
Our IDE changes will be as shown in the following images:
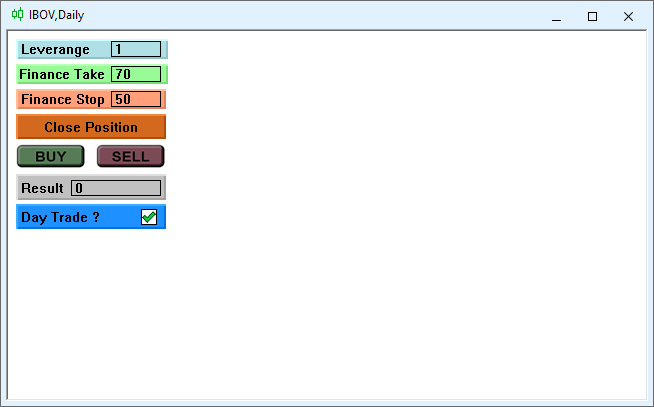

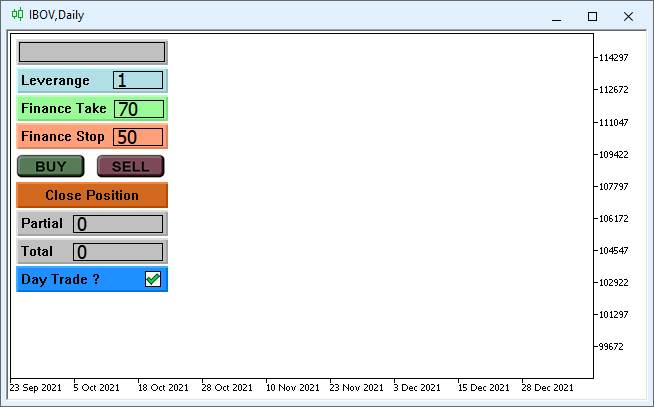
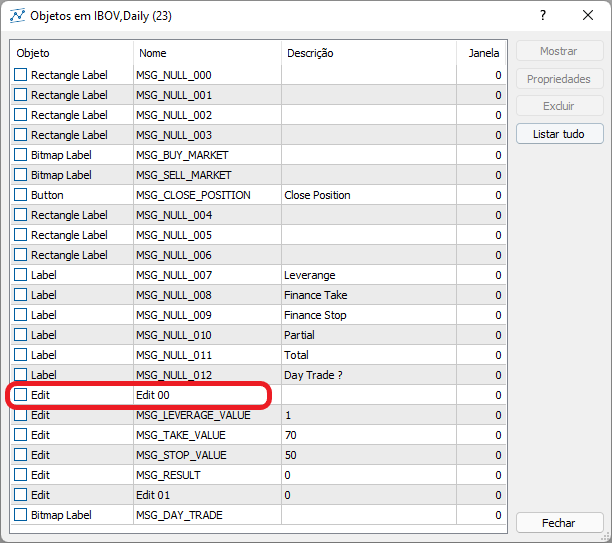
As you can see, there are minor changes to the design itself. Two new areas have been added: one will receive the name of the asset, and the other one will receive the accumulated value for the day. Well, these are the things that we can live without, and they will not affect our decisions. But they can be interesting anyway. I will show the simplest and correct way to add functionality to our IDE. So, open the list of objects in the new interface. It appears as follows:
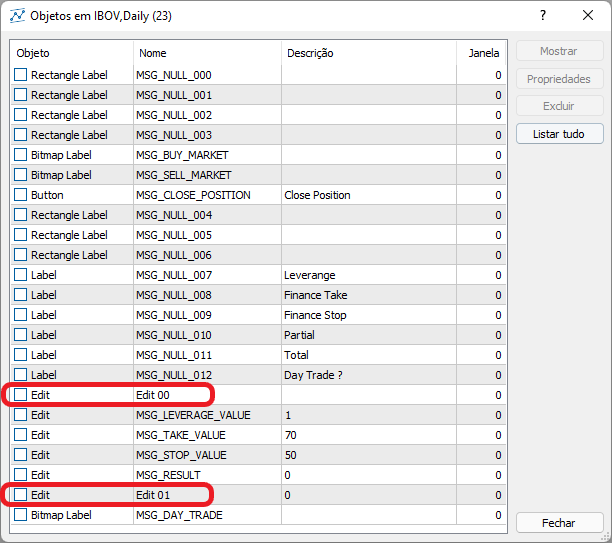
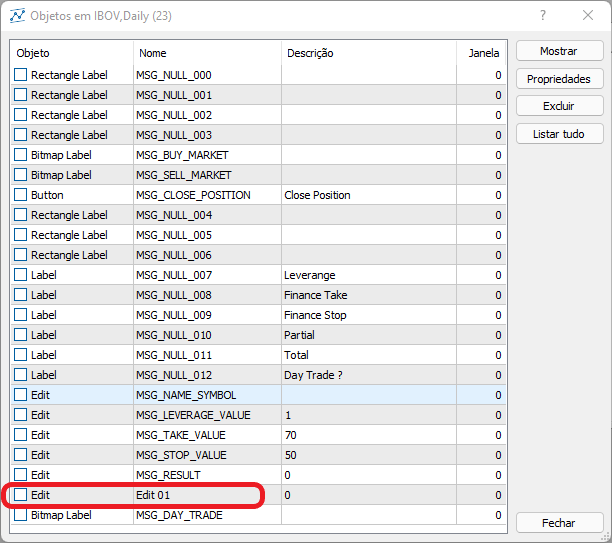
The two encircled objects don't have events associated with them, which means they don't function in the IDE. All other objects are already correctly associated with certain events, and MetaTrader 5 can force these events to execute correctly when they occur in the EA. That is, we can modify the IDE interface as we wish, but if the functionality is not yet implemented, MetaTrader 5 will do nothing but display the object on the chart. We need the EDIT 00 object to receive the name of the asset we are trading, and this name should appear in the center of the object. The EDIT 01 object will receive the accumulated value for a certain period. We will use the daily period to know whether we are in profit or in loss during the day. If the value is negative, it will be displayed in one color, and if it is positive, another color will be used.
Both values obviously cannot be changed by the user, so you can leave their properties as read-only, as shown in the figure below.
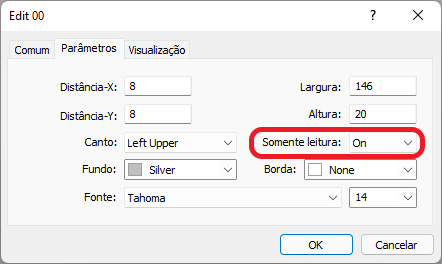
However, keep in mind that it is impossible to specify how the information will be presented, that is, we cannot align the text so that it appears in the center of the object. If desired, this can be done using code, as there is a property that aligns text setting it to the center. See "Object properties" for further details. Please note ENUM_ALIGN_MODE in the table — it contains the objects on which you can use justified text.
So, whatever modification we're going to implement , the first thing we need to do is to prepare a plan: define the new features, their presentation form and the ways the user will interact with them. This will allow the selection of the right object and the configuration of it as much as possible using the MetaTrader 5 own interface. As a result, we will have a ready-made IDE, and we will only need to adjust it through the MQL5 code, so that the IDE will end up 100% functional. So, let's proceed to the modifications.
Modifications
To prevent the code from becoming a real Frankenstein, we must organize ourselves as much as possible to check which features already exist and which actually need to be implemented. In many cases, it can be enough to make minor changes to existing code, get a new one and test it. This new code will be reused in the one we are about to implement, and the only thing left for us to test are the small control functions that we will add to create completely new functionality. Good programmers always do this: they try to reuse existing code in some way by adding control points to it.
Modification 1. Adding the asset name
To implement this part, we do not need substantial changes, but these changes should be implemented in the right places. First, let's add a new value to the enumeration, the source code is shown below:
enum eObjectsIDE {eRESULT, eBTN_BUY, eBTN_SELL, eCHECK_DAYTRADE, eBTN_CANCEL, eEDIT_LEVERAGE, eEDIT_TAKE, eEDIT_STOP};
Below is the new code; the highlighted part is what has been added. Please note that I don't add the new value to either the beginning or the end of the enumeration. This is done to avoid having to mess with other code parts which already exists and works.
enum eObjectsIDE {eRESULT, eLABEL_SYMBOL, eBTN_BUY, eBTN_SELL, eCHECK_DAYTRADE, eBTN_CANCEL, eEDIT_LEVERAGE, eEDIT_TAKE, eEDIT_STOP};
If you add the new value either at the beginning or at the end of the enumeration, you will have to find and change all the places where these limits were used. In many cases omissions can be made due to forgetfulness, which will lead to errors that will be difficult to find. You would think that the errors will appear to be due to new additions, when in fact they are due to forgetfulness. Therefore, we add changes somewhere between the extreme values.
Immediately after that, we need to add a message to the system, otherwise we can get a RunTime error. So, add the following line to our source code.
static const string C_Chart_IDE::szMsgIDE[] = {
                                                "MSG_RESULT",
                                                "MSG_NAME_SYMBOL",
                                                "MSG_BUY_MARKET",
                                                "MSG_SELL_MARKET",
                                                "MSG_DAY_TRADE",
                                                "MSG_CLOSE_POSITION",
                                                "MSG_LEVERAGE_VALUE",
                                                "MSG_TAKE_VALUE",
                                                "MSG_STOP_VALUE"
                                              };
As you can see, we have added it in the same place to keep the order. But at the moment the constant can be added at any point, it won't make any difference since it's only used to check which object will receive the message. For the structural purposes, we added it as the second message.
Now let's go back to MetaTrader 5 and make the changes as shown below:

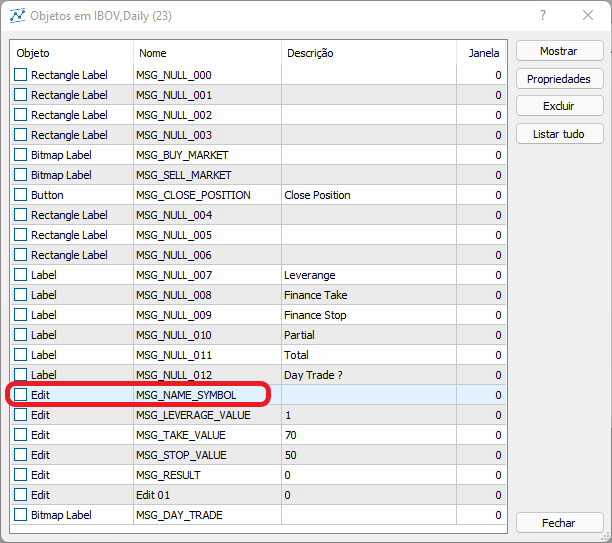
Now, MetaTrader 5 already recognizes the object in our IDE as an object to receive a message, and it only remains to create a procedure for sending the message. Text to the message should be added only once, and it can be sent as soon as MetaTrader 5 places our IDE on the chart. This could be done by simply adding the necessary code to the end of the Create function of our object class. But again, so that the code does not turn into Frankenstein full of fixes, we'll add the new code inside the DispatchMessage function. The original function looks like this:
void DispatchMessage(int iMsg, string szArg, double dValue = 0.0)
{
        if (m_CountObject < eEDIT_STOP) return;
        switch (iMsg)
        {
                case CHARTEVENT_CHART_CHANGE:
                        if (szArg == szMsgIDE[eRESULT])
                        {
                                ObjectSetInteger(Terminal.Get_ID(), m_ArrObject[eRESULT].szName, OBJPROP_BGCOLOR, (dValue < 0 ? clrLightCoral : clrLightGreen));
                                ObjectSetString(Terminal.Get_ID(), m_ArrObject[eRESULT].szName, OBJPROP_TEXT, DoubleToString(dValue, 2));
                        }
                        break;
                case CHARTEVENT_OBJECT_CLICK:

// ... The rest of the code...

        }
}
Below is the code after the relevant modifications:
void DispatchMessage(int iMsg, string szArg, double dValue = 0.0)
{
        if (m_CountObject < eEDIT_STOP) return;
        switch (iMsg)
        {
                case CHARTEVENT_CHART_CHANGE:
                        if (szArg == szMsgIDE[eRESULT])
                        {
                                ObjectSetInteger(Terminal.Get_ID(), m_ArrObject[eRESULT].szName, OBJPROP_BGCOLOR, (dValue < 0 ? clrLightCoral : clrLightGreen));
                                ObjectSetString(Terminal.Get_ID(), m_ArrObject[eRESULT].szName, OBJPROP_TEXT, DoubleToString(dValue, 2));
                        }else if (szArg == szMsgIDE[eLABEL_SYMBOL])
                        {
                                ObjectSetString(Terminal.Get_ID(), m_ArrObject[eLABEL_SYMBOL].szName, OBJPROP_TEXT, Terminal.GetSymbol());
                                ObjectSetInteger(Terminal.Get_ID(), m_ArrObject[eLABEL_SYMBOL].szName, OBJPROP_ALIGN, ALIGN_CENTER);
                        }
                        break;
                case CHARTEVENT_OBJECT_CLICK:

// ... The rest of the code

        }
}
After creating the send function, we can choose the point at which we will send this message. The best place is actually at the end of the Create function of our object class, so the final code will look like this:
bool Create(int nSub)
{
        m_CountObject = 0;
        if ((m_fp = FileOpen("Chart Trade\\IDE.tpl", FILE_BIN | FILE_READ)) == INVALID_HANDLE) return false;
        FileReadInteger(m_fp, SHORT_VALUE);

        for (m_CountObject = eRESULT; m_CountObject <= eEDIT_STOP; m_CountObject++) m_ArrObject[m_CountObject].szName = "";
        m_SubWindow = nSub;
        m_szLine = "";
        while (m_szLine != "</chart>")
        {
                if (!FileReadLine()) return false;
                if (m_szLine == "<object>")
                {
                        if (!FileReadLine()) return false;
                        if (m_szLine == "type")
                        {
                                if (m_szValue == "102") if (!LoopCreating(OBJ_LABEL)) return false;
                                if (m_szValue == "103") if (!LoopCreating(OBJ_BUTTON)) return false;
                                if (m_szValue == "106") if (!LoopCreating(OBJ_BITMAP_LABEL)) return false;
                                if (m_szValue == "107") if (!LoopCreating(OBJ_EDIT)) return false;
                                if (m_szValue == "110") if (!LoopCreating(OBJ_RECTANGLE_LABEL)) return false;
                        }
                }
        }
        FileClose(m_fp);
        DispatchMessage(CHARTEVENT_CHART_CHANGE, szMsgIDE[eLABEL_SYMBOL]);
        return true;
}
The added actually is highlighted in green. Note that without making almost any changes, we already have a 100% implemented message flow, and we can move on to the next message that needs to be implemented.
Modification 2. Adding the accumulated value for the day (Coverage point)
Again, we follow the same logic we did when adding the asset name and thus the new code will look like this:
enum eObjectsIDE {eRESULT, eLABEL_SYMBOL, eROOF_DIARY, eBTN_BUY, eBTN_SELL, eCHECK_DAYTRADE, eBTN_CANCEL, eEDIT_LEVERAGE, eEDIT_TAKE, eEDIT_STOP};

// ... Rest of the code

static const string C_Chart_IDE::szMsgIDE[] = {
                                                "MSG_RESULT",
                                                "MSG_NAME_SYMBOL",
                                                "MSG_ROOF_DIARY",
                                                "MSG_BUY_MARKET",
                                                "MSG_SELL_MARKET",
                                                "MSG_DAY_TRADE",
                                                "MSG_CLOSE_POSITION",
                                                "MSG_LEVERAGE_VALUE",
                                                "MSG_TAKE_VALUE",
                                                "MSG_STOP_VALUE"
                                              };
After that, let's change the IDE with a new message:

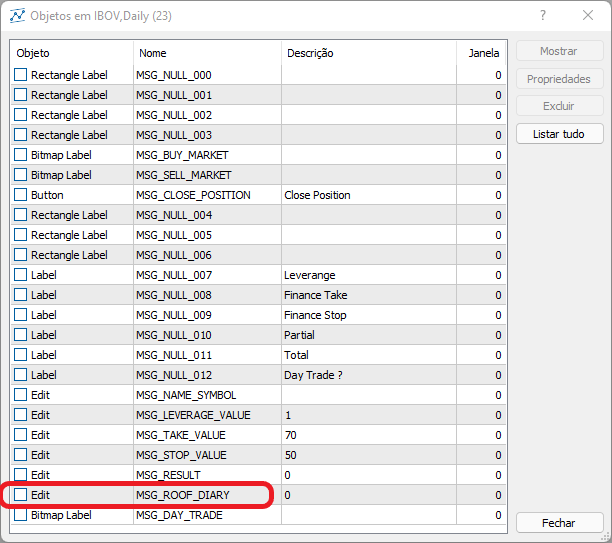
Our new IDE is ready. Now we will implement the code that will create a message containing the accumulated value for the day. We should decide first in which class this feature will be implemented. Many people would probably create this function here, in the C_Chart_IDE class, but for organizational reasons it would be better to put it together with the functions that work with orders. Therefore, the code is implemented in the C_OrderView class. Its code is shown below:
double UpdateRoof(void)
{
        ulong   ticket;
        int     max;
        string  szSymbol = Terminal.GetSymbol();
        double  Accumulated = 0;

        HistorySelect(macroGetDate(TimeLocal()), TimeLocal());
        max = HistoryDealsTotal();
        for (int c0 = 0; c0 < max; c0++) if ((ticket = HistoryDealGetTicket(c0)) > 0)
                if (HistoryDealGetString(ticket, DEAL_SYMBOL) == szSymbol)
                        Accumulated += HistoryDealGetDouble(ticket, DEAL_PROFIT);

        return Accumulated;
}
Now that the code has been implemented, we need to add the message to the system. To make the operator's life easier, I have already added the code to report already finalized results. Here is its code:
void DispatchMessage(int iMsg, string szArg, double dValue = 0.0)
{
        static double AccumulatedRoof = 0.0;
        bool    b0;
        double  d0;

        if (m_CountObject < eEDIT_STOP) return;
        switch (iMsg)
        {
                case CHARTEVENT_CHART_CHANGE:
                        if ((b0 = (szArg == szMsgIDE[eRESULT])) || (szArg == szMsgIDE[eROOF_DIARY]))
                        {
                                if (b0)
                                {
                                        ObjectSetInteger(Terminal.Get_ID(), m_ArrObject[eRESULT].szName, OBJPROP_BGCOLOR, (dValue < 0 ? clrLightCoral : clrLightGreen));
                                        ObjectSetString(Terminal.Get_ID(), m_ArrObject[eRESULT].szName, OBJPROP_TEXT, DoubleToString(dValue, 2));
                                }else
                                {
                                        AccumulatedRoof = dValue;
                                        dValue = 0;
                                }
                                d0 = AccumulatedRoof + dValue;
                                ObjectSetString(Terminal.Get_ID(), m_ArrObject[eROOF_DIARY].szName, OBJPROP_TEXT, DoubleToString(MathAbs(d0), 2));
                                ObjectSetInteger(Terminal.Get_ID(), m_ArrObject[eROOF_DIARY].szName, OBJPROP_BGCOLOR, (d0 >= 0 ? clrForestGreen : clrFireBrick));
                        }else   if (szArg == szMsgIDE[eLABEL_SYMBOL])
                        {
                                ObjectSetString(Terminal.Get_ID(), m_ArrObject[eLABEL_SYMBOL].szName, OBJPROP_TEXT, Terminal.GetSymbol());
                                ObjectSetInteger(Terminal.Get_ID(), m_ArrObject[eLABEL_SYMBOL].szName, OBJPROP_ALIGN, ALIGN_CENTER);
                        }
                        break;
                case CHARTEVENT_OBJECT_CLICK:

// .... The rest of the code....

        }
}
The highlighted parts support the system as described above. If the implementation were not implemented this way, we would have to send two messages to the system to correctly update the information. But using the way the code was implemented, we can track the result of both the open position and the result of the day with a single message.
Another modification in the EA concerns the OnTrade function. It looks like this:
void OnTrade()
{
        SubWin.DispatchMessage(CHARTEVENT_CHART_CHANGE, C_Chart_IDE::szMsgIDE[C_Chart_IDE::eROOF_DIARY], NanoEA.UpdateRoof());
        NanoEA.UpdatePosition();
}
Although this system works, you need to be careful with the OnTrade function execution time, which together with OnTick may degrade the performance of the EA. In the case of the code contained in OnTick, it is not very good, and optimization is critical. But it is easier with OnTrade, while the function is actually called when there is a change in the position. Knowing this, we have two alternatives. The first one is to modify the UpdateRoof position to limit its execution time. Another alternative is to modify the OnTrade function itself. For practical reasons we will modify the Update Roof function and thus we will at least slightly improve the execution time when we have an open position. The new function is as follows:
double UpdateRoof(void)
{
        ulong           ticket;
        string  szSymbol = Terminal.GetSymbol();
        int             max;
        static int      memMax = 0;
        static double   Accumulated = 0;

        HistorySelect(macroGetDate(TimeLocal()), TimeLocal());
        max = HistoryDealsTotal();
        if (memMax == max) return Accumulated; else memMax = max;
        for (int c0 = 0; c0 < max; c0++) if ((ticket = HistoryDealGetTicket(c0)) > 0)
                if (HistoryDealGetString(ticket, DEAL_SYMBOL) == szSymbol)
                        Accumulated += HistoryDealGetDouble(ticket, DEAL_PROFIT);

        return Accumulated;
}
The highlighted lines show the code added to the original function. Even though it may seem they do not make much difference, they do make a lot of difference. Let's see why. When the code is referenced for the first time, both the memMax static variable and Accumulated will be set to zero if there were no values in the order history for the specified period. The test will reflect this, and the routine will return, but if there is any data it will be tested, and both memMax and Accumulated will reflect the new condition. The fact that these variables are static means that their values are kept between calls. Therefore, when the value of a position changes as a result of the natural movement of an asset, MetaTrader 5 generates an event that will call the OnTrade function. At this point we have a new call of the UpdateRoof function, and if the position was not closed, the function will return to the control point, which will speed up the return process.
Conclusion
In this article, we have seen how to add new functionality to the RAD system thus enabling the creation of a library that makes the system ideal for creating an IDE interface with much more simplicity and fewer errors when building an interaction and control interface. From now on, the only real limitation will be your creativity, since here we only considered working with MQL5, but you can integrate the same idea into external libraries, thereby greatly expanding the possibilities of creating an IDE.