Multiple indicators on one chart (Part 05): Turning MetaTrader 5 into a RAD system (I)
Daniel Jose | 13 May, 2022
Introduction
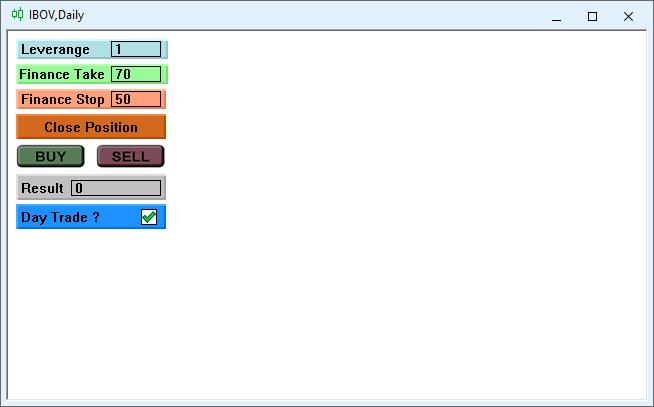
There are a lot of people who do not know how to program but they are quite creative and have great ideas. However, the lack of programming knowledge prevents them from implementing these ideas. Today we will create our own Chart Trade interface to send market orders or to set up parameters used in pending orders. We will do this without programming, just using the functions that will be inside the Expert Advisor. We are curious, so let's see how it will look on our monitors:
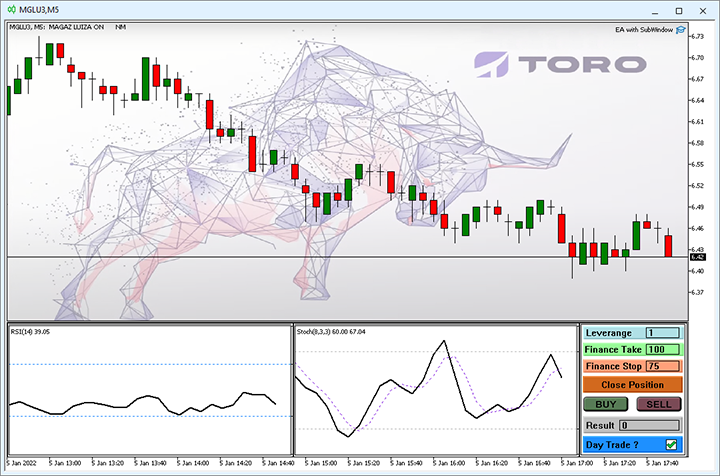
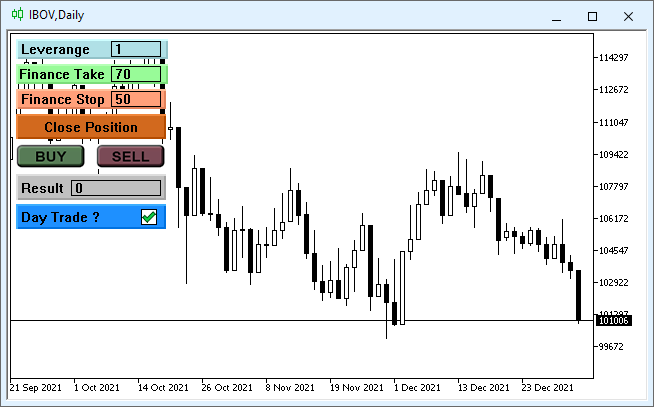
You might think, "But how do you do it? I don't know anything about programming, or what I know won't be enough for us to do it." Chart Trade which you see in the image above was created in the MetaTrader 5 platform itself and was designed as shown in the image below:
Now that we know what this article is about, we should be full of enthusiasm and ideas for creating our own chart. But we will need to complete a few steps to make it all work. Once the auxiliary code is set up, our creativity will be the only limitation for the design of our own Chart Trade IDE. This article is a continuation of the previous ones, so for a complete and comprehensive understanding, I recommend reading the previous articles in this series.
So, let's get to work.
Planning
To begin with, you should edit the propertied of the chart that you will be using as an IDE. This is done to reduce potential side effects. The point is that by leaving the chart clean, it will be easier to build and design the Chart Trade interface. So, open the chart properties and set the properties as shown in the figure below.
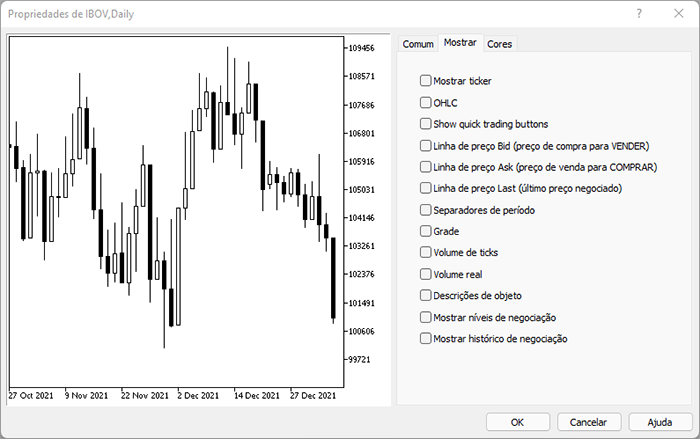
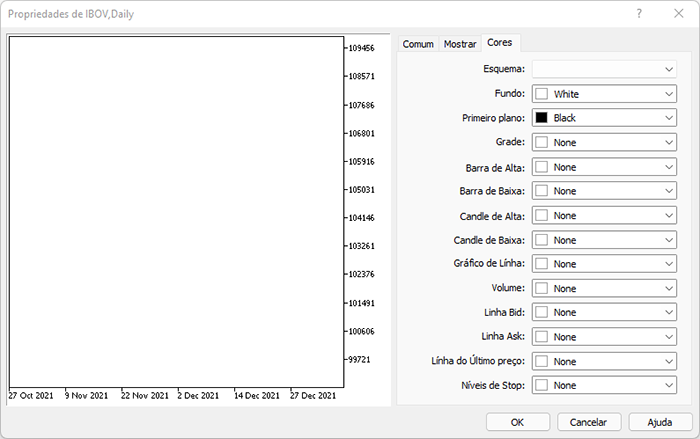
Thus, the screen will be absolutely clean and free of everything that may interfere with the development of our IDE. Now pay attention to the following explanation. Our IDE will be saved as a settings file, i.e. as a TEMPLATE, so we can use any of the objects provided by MetaTrader 5, but for practical reasons we will only use some of them. For all available objects please see Types of objects in MetaTrader 5.
| Object | Type of coordinates used for positioning | Interesting for IDE |
|---|---|---|
| Text | Date and price | NO |
| Label | X and Y location | YES |
| Button | X and Y location | YES |
| Graph | X and Y location | YES |
| Bitmap | Date and price | NO |
| Bitmap label | X and Y location | YES |
| Edit | X and Y location | YES |
| Event | Only the date is used | NO |
| Rectangle Label | X and Y location | YES |
We are going to use a system that can be located in any region of the screen, which is why it would not be practical to use an object that does not use the X and Y coordinate system for positioning, as such objects can make the IDE look completely different. Therefore, we will limit the system to six objects, which are more than enough to create an interface.
The idea is to arrange objects in a logical order, similar to how you draw something on the screen. We start with creating the background first, and then we lay the objects on top of each other, placing and adjusting the objects as we develop the interface. Here is how it goes:
It's all very simple, it just takes a little practice to master this way of designing and creating your own IDE. The idea here is very similar to the one used in RAD programs which are used to create programming interfaces in cases when the user interface development through code can be very complex. It's not that we can't create an interface directly through code. But the use of this method makes further modifications much faster and easier, which is ideal for those who want an interface with their own style.
Once we finish, we might end up with an interface like the one below, or even cooler. But here I tried to use as many objects as possible so that you can try them out. You can create your own preferred interface.
This is the first step in creating our IDE. Now we need to create code that actually supports this interface and makes it functional. Although the simple fact that you can create your own user interface should also be the source of motivation, and this motivation will be embodied in the code.
The next step is to save this interface as a settings file. Now we can save it and use the code from the previous version to display it as a pointer. This means that we will not need to make significant changes to the source code. However, if we wanted to test the possibility of receiving events or sending events to our IDE, we would see that this is not possible. But if the interface was created using objects from MetaTrader 5, why isn't it possible to send and receive events from these objects? The answer to this question is easier to show than to explain. We can check it by adding the following code to the original version of the EA.
void OnChartEvent(const int id, const long &lparam, const double &dparam, const string &sparam)
{
        switch (id)
        {
                case CHARTEVENT_OBJECT_CLICK:
                        Print(sparam);
                        break;
// .... The rest of the code...
        }
}
This code reports the name of the object that receives the click and generates the event. In this case, the event is CHARTEVENT_OBJECT_CLICK. However, the printed message will be the name of the object created by the EA, not the name of the objects in the IDE. This may seem to be a big problem that makes it impossible to use our IDE, but there is a very simple solution: read the settings file and then create the objects as specified in this file. This will create our IDE right on the chart. So, by analyzing the settings file (TPL), we can find the data that we need to use.
| KEY | Description |
|---|---|
| <chart> | Starts the settings file |
| </chart> | Ends the settings file |
| <window> | Starts the structure of elements present on the chart. |
| </window> | Ends the structure of elements present on the chart |
| <indicator> | Starts the structure that provides data related to some indicator |
| </indicator> | Ends the structure that provides data related to some indicator |
| <object> | Starts the structure that provides data about some object. |
| </object> | Ends the structure that provides object data. |
This structure looks as follows inside the TPL file.
<chart>

.... DATA

<window>

... DATA

<indicator>

... DATA

</indicator>

<object>

... DATA

</object>

</window>
</chart>
The part we are interested in is between <object> and </object>. There can be several such structures, each indicating a unique object. So, first we need to change the location of the file — we should add it to a place from which it can be read. This is the FILES directory. You can change the location, but in any case the file must be inside the FILE tree.
An important detail: although the system has received a modification that allows to clear the chart when using the IDE configuration file, ideally you should also have a clean file with the same name in the Profiles\Templates directory. This minimizes any leftovers which can be present in the default template, as we have seen in previous articles. The main changes are highlighted below:
#include <Auxiliar\Chart IDE\C_Chart_IDE.mqh>
//+------------------------------------------------------------------+
class C_TemplateChart : public C_Chart_IDE
{

 .... Other parts from code ....

//+------------------------------------------------------------------+
void AddTemplate(const eTypeChart type, const string szTemplate, int scale, int iSize)
{
        if (m_Counter >= def_MaxTemplates) return;
        if (type == SYMBOL) SymbolSelect(szTemplate, true);
        SetBase(szTemplate, (type == INDICATOR ? _Symbol : szTemplate), scale, iSize);
        if (!ChartApplyTemplate(m_handle, szTemplate + ".tpl")) if (type == SYMBOL) ChartApplyTemplate(m_handle, "Default.tpl");
        if (szTemplate == "IDE") C_Chart_IDE::Create(m_IdSubWin);
        ChartRedraw(m_handle);
}
//+------------------------------------------------------------------+
void Resize(void)
{
#define macro_SetInteger(A, B) ObjectSetInteger(Terminal.Get_ID(), m_Info[c0].szObjName, A, B)
        int x0 = 0, x1, y = (int)(ChartGetInteger(Terminal.Get_ID(), CHART_HEIGHT_IN_PIXELS, m_IdSubWin));
        x1 = (int)((ChartGetInteger(Terminal.Get_ID(), CHART_WIDTH_IN_PIXELS, m_IdSubWin) - m_Aggregate) / (m_Counter > 0 ? (m_CPre == m_Counter ? m_Counter : (m_Counter - m_CPre)) : 1));
        for (char c0 = 0; c0 < m_Counter; x0 += (m_Info[c0].width > 0 ? m_Info[c0].width : x1), c0++)
        {
                macro_SetInteger(OBJPROP_XDISTANCE, x0);
                macro_SetInteger(OBJPROP_XSIZE, (m_Info[c0].width > 0 ? m_Info[c0].width : x1));
                macro_SetInteger(OBJPROP_YSIZE, y);
                if (m_Info[c0].szTemplate == "IDE") C_Chart_IDE::Resize(x0);
        }
        ChartRedraw();
#undef macro_SetInteger
}
//+------------------------------------------------------------------+

... The rest of the code

}
Note that we are adding the IDE interface as a new class, and it is inherited by our original class. This means that the functionality of the original class will be extended, and it won't cause any side effects in the original code.
So far this has been the easy part. Now we need to do something more complicated that will support our IDE. First, let's create a message protocol that the system will use. This protocol will allow the system to work as shown below:
Note that we can change the system data, which is currently not possible, but by adding a messaging protocol, it will be possible to make our IDE functional. So, let's define a few things:
| Message | Purpose |
|---|---|
| MSG_BUY_MARKET | Sends a market BUY order |
| MSG_SELL_MARKET | Sends a market SELL order |
| MSG_LEVERAGE_VALUE | Leverage data |
| MSG_TAKE_VALUE | Trade take profit data |
| MSG_STOP_VALUE | Trade stop loss data |
| MSG_RESULT | Data on the current result of the open position |
| MSG_DAY_TRADE | Informs if the trade will be closed at the end of the day or not |
This protocol is a very important step. After defining it, make changes to the settings file. When you open the list of objects, you need to change it so that it looks like this:
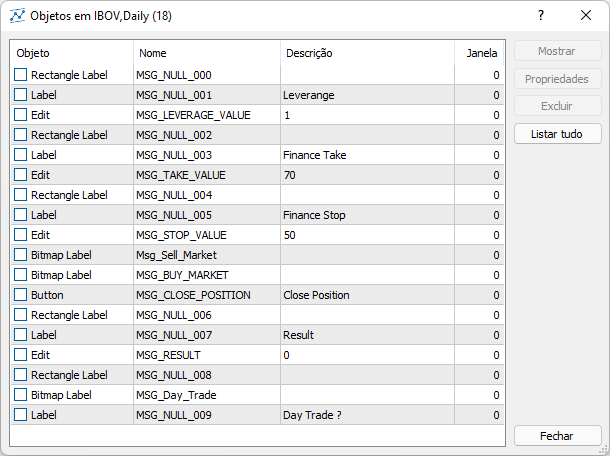
The interface I am showing will have a list of objects like in the image. Please pay attention to the following fact. The NAME of the objects corresponds to each of the messages that we are going to use. The names of other objects do not matter, as they will be used to help in the modeling of the IDE, but the objects with the names of the messages will receive and send messages. If you want to use more messages or a different type of messages, just make the necessary changes to the class code, and MetaTrader 5 itself will provide the means to exchange messages between the IDE and the EA code.
But we still need to study the TPL file to learn how to create our object class. Let's now find out how objects are declared inside the TPL file. It is true that we will have less access to the object properties in the TPL file than through programming, since the terminal interface itself gives less access to object properties. But even the access we have will be enough to make our IDE work.
So, inside the TPL file there is the structure that we need: from <object> to </object>. Based on the data inside the structure it may seem unclear how to find out what type of object it is. But if you take a closer look, you can see that the object type is determined by the type variable. It takes different values for each of the objects. The below table shows the objects that we want to use:
| The value of the TYPE variable | Referenced object |
|---|---|
| 102 | OBJ_LABEL |
| 103 | OBJ_BUTTON |
| 106 | OBJ_BITMAP_LABEL |
| 107 | OBJ_EDIT |
| 110 | OBJ_RECTANGLE_LABEL |
Our class is already starting to take shape. Here is the first function code:
bool Create(int nSub)
{
        m_CountObject = 0;
        if ((m_fp = FileOpen("Chart Trade\\IDE.tpl", FILE_BIN | FILE_READ)) == INVALID_HANDLE) return false;
        FileReadInteger(m_fp, SHORT_VALUE);

        for (m_CountObject = eRESULT; m_CountObject <= eEDIT_STOP; m_CountObject++) m_ArrObject[m_CountObject].szName = "";
        m_SubWindow = nSub;
        m_szLine = "";
        while (m_szLine != "</chart>")
        {
                if (!FileReadLine()) return false;
                if (m_szLine == "<object>")
                {
                        if (!FileReadLine()) return false;
                        if (m_szLine == "type")
                        {
                                if (m_szValue == "102") if (!LoopCreating(OBJ_LABEL)) return false;
                                if (m_szValue == "103") if (!LoopCreating(OBJ_BUTTON)) return false;
                                if (m_szValue == "106") if (!LoopCreating(OBJ_BITMAP_LABEL)) return false;
                                if (m_szValue == "107") if (!LoopCreating(OBJ_EDIT)) return false;
                                if (m_szValue == "110") if (!LoopCreating(OBJ_RECTANGLE_LABEL)) return false;
                        }
                }
        }
        FileClose(m_fp);
        return true;
}
Please note that the first thing to do is open the file in read mode and as a binary file. This is done so as not to miss anything. When using the HEXA editor, the TPL file looks as follows. Note that it starts with a very interesting value.
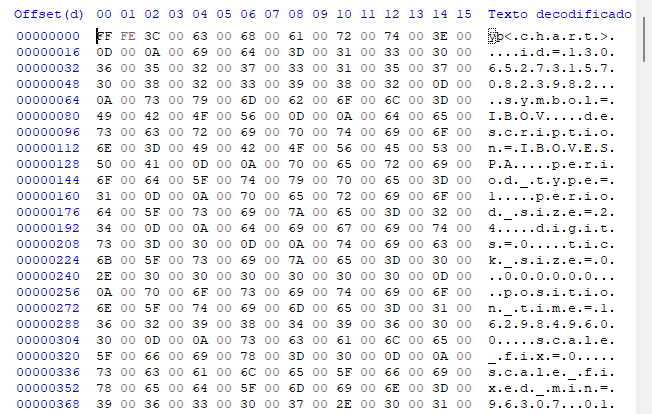
Sounds confusing? In fact, it is not. The file uses the UTF-16 encoding. We know that data is organized by line, so let's create a function to read the entire line at once. For this purpose, let's write the following code:
bool FileReadLine(void)
{
        int utf_16 = 0;
        bool b0 = false;
        m_szLine = m_szValue = "";
        for (int c0 = 0; c0 < 500; c0++)
        {
                utf_16 = FileReadInteger(m_fp, SHORT_VALUE);
                if (utf_16 == 0x000D) { FileReadInteger(m_fp, SHORT_VALUE); return true; } else
                if (utf_16 == 0x003D) b0 = true; else
                if (b0) m_szValue = StringFormat("%s%c", m_szValue, (char)utf_16); else m_szLine = StringFormat("%s%c", m_szLine, (char)utf_16);
                if (FileIsEnding(m_fp)) break;
        }
        return (utf_16 == 0x003E);
}
Reading tries to be as efficient as possible, so when we meet an equals sign ( = ), we separate already during the reading, so as not to do this later. The loop limits the string to a maximum of 500 characters, but this value is arbitrary and can be changed if necessary. With each new string found, the function will return providing the contents of the string so that we can proceed with the appropriate analysis.
We will need certain variables to support the message protocol. They are shown in the code below:
class C_Chart_IDE
{
        protected:
                enum eObjectsIDE {eRESULT, eBTN_BUY, eBTN_SELL, eCHECK_DAYTRADE, eBTN_CANCEL, eEDIT_LEVERAGE, eEDIT_TAKE, eEDIT_STOP};
//+------------------------------------------------------------------+
#define def_HeaderMSG "IDE_"
#define def_MaxObject eEDIT_STOP + 32
//+------------------------------------------------------------------+
        private :
                int             m_fp,
                                m_SubWindow,
                                m_CountObject;
                string          m_szLine,
                                m_szValue;
                bool            m_IsDayTrade;
                struct st0
                        {
                                string  szName;
                                int     iPosX;
                        }m_ArrObject[def_MaxObject];

// ... The rest of the class code....
The def_MaxObject definition indicates the maximum number of objects that we can keep. This number is obtained based on the number of messages plus an extra number of objects that we are going to use. In our case we have the maximum of 40 objects, but it can be changed if necessary. The first 8 objects will be used to send messages between the IDE and MetaTrader 5. The alias of these messages can be seen in the eObjectsIDE enumeration. It's important to keep this in mind in case you want to expand the system or adapt it for something else.
This is just the first part of the support system. There is another point to pay attention to: the constant which deals with the message system. In fact, the way MQL5 deals with constants can be a little confusing for those who program in C / C++. In C/C++, a constant is declared in the variable declaration itself. In MQL5 the way it is created can make the code a little more complicated. However, you can live with this, since constants are used quite rarely. Shown in bold below is how you can do this.
        public  :
                static const string szMsgIDE[];

// ... The rest of the class code....

};
//+------------------------------------------------------------------+
static const string C_Chart_IDE::szMsgIDE[] = {
                                                "MSG_RESULT",
                                                "MSG_BUY_MARKET",
                                                "MSG_SELL_MARKET",
                                                "MSG_DAY_TRADE",
                                                "MSG_CLOSE_POSITION",
                                                "MSG_LEVERAGE_VALUE",
                                                "MSG_TAKE_VALUE",
                                                "MSG_STOP_VALUE"
                                             };
//+------------------------------------------------------------------+
The defined constants are exactly the same values used in object names in the interface. The system was designed to be case insensitive. You can change this behavior if you want, but I don't recommend doing that.
After completing all these steps, it's time to move on to the next one. So, let's go back to the TPL file. Look at the file fragment below:
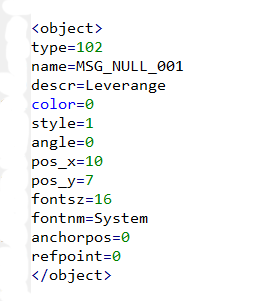
After defining the type of object to use, we have a series of data that indicates the properties of the object, such as name, position, color, font, and so on. These properties should be passed to internal objects. Since it is a repetitive thing, we can create a general function for this. It will be as follows:
bool LoopCreating(ENUM_OBJECT type)
{
#define macro_SetInteger(A, B) ObjectSetInteger(Terminal.Get_ID(), m_ArrObject[c0].szName, A, B)
#define macro_SetString(A, B) ObjectSetString(Terminal.Get_ID(), m_ArrObject[c0].szName, A, B)
        int c0;
        bool b0;
        string sz0 = m_szValue;
        while (m_szLine != "</object>") if (!FileReadLine()) return false; else
        {
                if (m_szLine == "name")
                {
                        b0 = false;
                        StringToUpper(m_szValue);
                        for(c0 = eRESULT; (c0 <= eEDIT_STOP) && (!(b0 = (m_szValue == szMsgIDE[c0]))); c0++);
                        c0 = (b0 ? c0 : m_CountObject);
                        m_ArrObject[c0].szName = StringFormat("%s%04s>%s", def_HeaderMSG, sz0, m_szValue);
                        ObjectDelete(Terminal.Get_ID(), m_ArrObject[c0].szName);
                        ObjectCreate(Terminal.Get_ID(), m_ArrObject[c0].szName, type, m_SubWindow, 0, 0);
                }
                if (m_szLine == "pos_x"                 ) m_ArrObject[c0].iPosX = (int) StringToInteger(m_szValue);
                if (m_szLine == "pos_y"                 ) macro_SetInteger(OBJPROP_YDISTANCE    , StringToInteger(m_szValue));
                if (m_szLine == "size_x"                ) macro_SetInteger(OBJPROP_XSIZE        , StringToInteger(m_szValue));
                if (m_szLine == "size_y"                ) macro_SetInteger(OBJPROP_YSIZE        , StringToInteger(m_szValue));
                if (m_szLine == "offset_x"              ) macro_SetInteger(OBJPROP_XOFFSET      , StringToInteger(m_szValue));
                if (m_szLine == "offset_y"              ) macro_SetInteger(OBJPROP_YOFFSET      , StringToInteger(m_szValue));
                if (m_szLine == "bgcolor"               ) macro_SetInteger(OBJPROP_BGCOLOR      , StringToInteger(m_szValue));
                if (m_szLine == "color"                 ) macro_SetInteger(OBJPROP_COLOR        , StringToInteger(m_szValue));
                if (m_szLine == "bmpfile_on"            ) ObjectSetString(Terminal.Get_ID()     , m_ArrObject[c0].szName, OBJPROP_BMPFILE, 0, m_szValue);
                if (m_szLine == "bmpfile_off"           ) ObjectSetString(Terminal.Get_ID()     , m_ArrObject[c0].szName, OBJPROP_BMPFILE, 1, m_szValue);
                if (m_szLine == "fontsz"                ) macro_SetInteger(OBJPROP_FONTSIZE     , StringToInteger(m_szValue));
                if (m_szLine == "fontnm"                ) macro_SetString(OBJPROP_FONT          , m_szValue);
                if (m_szLine == "descr"                 ) macro_SetString(OBJPROP_TEXT          , m_szValue);
                if (m_szLine == "readonly"              ) macro_SetInteger(OBJPROP_READONLY     , StringToInteger(m_szValue) == 1);
                if (m_szLine == "state"                 ) macro_SetInteger(OBJPROP_STATE        , StringToInteger(m_szValue) == 1);
                if (m_szLine == "border_type"           ) macro_SetInteger(OBJPROP_BORDER_TYPE  , StringToInteger(m_szValue));
        }
        m_CountObject += (b0 ? 0 : (m_CountObject < def_MaxObject ? 1 : 0));
        return true;

#undef macro_SetString
#undef macro_SetInteger
}
Each object will get a name and will be stored in the appropriate location, but the highlighted line shows something different. When we create an IDE, it must start at the top left corner of the chart, but this X position is not necessarily the top left corner of the subwindow. This position must correspond to the top left corner of the OBJ_CHART object, to which the IDE will be bound. This object is indicated when loading the IDE template, so it can be anywhere inside the subwindow. If this is not corrected, then the IDE will not appear in the correct location. Therefore, save the X value and use it later to display the object in the correct place. The function that renders the IDE correctly is shown below.
The basic information used in the objects is already defined, but if you need to add any other information, just add it to the set of commands and change the property with the appropriate value.
void Resize(int x)
{
        for (int c0 = 0; c0 < m_CountObject; c0++)
                ObjectSetInteger(Terminal.Get_ID(), m_ArrObject[c0].szName, OBJPROP_XDISTANCE, x + m_ArrObject[c0].iPosX);
};
Before looking at how messages are processed, let's analyze two other equally important functions. The system can receive values from the EA that are received during initialization. These values must be correctly represented and adjusted so that when using Chart Trade, orders could be configured directly in it to either send a market order or a pending order, without the need to call the EA. Both functions are shown below:
void UpdateInfos(bool bSwap = false)
{
        int nContract, FinanceTake, FinanceStop;

        nContract       = (int) StringToInteger(ObjectGetString(Terminal.Get_ID(), m_ArrObject[eEDIT_LEVERAGE].szName, OBJPROP_TEXT));
        FinanceTake = (int) StringToInteger(ObjectGetString(Terminal.Get_ID(), m_ArrObject[eEDIT_TAKE].szName, OBJPROP_TEXT));
        FinanceStop = (int) StringToInteger(ObjectGetString(Terminal.Get_ID(), m_ArrObject[eEDIT_STOP].szName, OBJPROP_TEXT));
        m_IsDayTrade = (bSwap ? (m_IsDayTrade ? false : true) : m_IsDayTrade);
        ObjectSetInteger(Terminal.Get_ID(), m_ArrObject[eCHECK_DAYTRADE].szName, OBJPROP_STATE, m_IsDayTrade);
        NanoEA.Initilize(nContract, FinanceTake, FinanceStop, clrNONE, clrNONE, clrNONE, m_IsDayTrade);
}
//+------------------------------------------------------------------+
void InitilizeChartTrade(int nContracts, int FinanceTake, int FinanceStop, color cp, color ct, color cs, bool b1)
{
        NanoEA.Initilize(nContracts, FinanceTake, FinanceStop, cp, ct, cs, b1);
        if (m_CountObject < eEDIT_STOP) return;
        ObjectSetString(Terminal.Get_ID(), m_ArrObject[eEDIT_LEVERAGE].szName, OBJPROP_TEXT, IntegerToString(nContracts));
        ObjectSetString(Terminal.Get_ID(), m_ArrObject[eEDIT_TAKE].szName, OBJPROP_TEXT, IntegerToString(FinanceTake));
        ObjectSetString(Terminal.Get_ID(), m_ArrObject[eEDIT_STOP].szName, OBJPROP_TEXT, IntegerToString(FinanceStop));
        ObjectSetInteger(Terminal.Get_ID(), m_ArrObject[eCHECK_DAYTRADE].szName, OBJPROP_STATE, m_IsDayTrade = b1);
}
Please note that the IDE is linked to the order system, so changes made to the system will be reflected in the order system. This way we will not have to change data in the EA like we did before. Now we can do this directly in the IDE or in our Chart Trade - this is done with these two functions mentioned above related to the messaging system.
void DispatchMessage(int iMsg, string szArg, double dValue = 0.0)
{
        if (m_CountObject < eEDIT_STOP) return;
        switch (iMsg)
        {
                case CHARTEVENT_CHART_CHANGE:
                        if (szArg == szMsgIDE[eRESULT])
                        {
                                ObjectSetInteger(Terminal.Get_ID(), m_ArrObject[eRESULT].szName, OBJPROP_BGCOLOR, (dValue < 0 ? clrLightCoral : clrLightGreen));
                                ObjectSetString(Terminal.Get_ID(), m_ArrObject[eRESULT].szName, OBJPROP_TEXT, DoubleToString(dValue, 2));
                        }
                        break;
                case CHARTEVENT_OBJECT_CLICK:
                        if (StringSubstr(szArg, 0, StringLen(def_HeaderMSG)) != def_HeaderMSG) return;
                        szArg = StringSubstr(szArg, 9, StringLen(szArg));
                        StringToUpper(szArg);
                        if ((szArg == szMsgIDE[eBTN_SELL]) || (szArg == szMsgIDE[eBTN_BUY])) NanoEA.OrderMarket(szArg == szMsgIDE[eBTN_BUY]);
                        if (szArg == szMsgIDE[eBTN_CANCEL])
                        {
                                NanoEA.ClosePosition();
                                ObjectSetInteger(Terminal.Get_ID(), m_ArrObject[eBTN_CANCEL].szName, OBJPROP_STATE, false);
                        }
                        if (szArg == szMsgIDE[eCHECK_DAYTRADE]) UpdateInfos(true);
                        break;
                case CHARTEVENT_OBJECT_ENDEDIT:
                        UpdateInfos();
                        break;
        }
}
And the question arises: Is that all? Yes, it is the message system that allows the MetaTrader 5 platform to interact with the IDE. It is very simple, I must admit, but without this function, the IDE wouldn't work, and it wouldn't be possible to build the system. It may seem a little complicated how to make this work in an EA, but actually thanks to OOP the EA code will remain super simple. What will be a little tricky is to get update the result that will appear in the IDE. Values are updated in the OnTick function, but for simplicity, I used the data provided in MetaTrader 5, so the function looks like this. This part is the most important — this function is the most requested of all, so it should also be the fastest one.
void OnTick()
{
        SubWin.DispatchMessage(CHARTEVENT_CHART_CHANGE, C_Chart_IDE::szMsgIDE[C_Chart_IDE::eRESULT], NanoEA.CheckPosition());
}
In other words, with each new quote, a message is sent to the class and the resulting value is updated in the operation. But please do not forget that this function must be well optimized, otherwise we can have serious problems.
Conclusion
Sometimes it seems impossible to do some things, but I like challenges. And this one, which shows how to make a RAD system inside a platform that was not originally developed for this, was quite interesting. I hope that this system that started with something simple can motivate you to try to explore something new, which few people dare to.
Soon I will add something new to this Expert Advisor, so stay tuned!